![見出し画像](https://assets.st-note.com/production/uploads/images/82211249/rectangle_large_type_2_91e51fd66302bebb58bfed256f3da28d.png?width=1200)
【ティラノビルダー】キャラ・イメージの重なりを「最背面へ」「最背面へ」みたいに指定できるようになるプラグインの導入方法
ティラノスクリプト用プラグインである『キャラ・イメージの重なりを「最背面へ」「最背面へ」みたいに指定できるようになるプラグイン』を、ティラノビルダーで使用する方法を解説します。
①ダウンロード
上記のページから、プラグインをダウンロードします。
さらに、ダウンロードしたプラグインを、すべて展開(お使いのソフトによっては解凍)します。
![画像1](https://assets.st-note.com/production/uploads/images/64774530/picture_pc_aaf07aba0c6d42ae56fc9f2b54d31f1b.png)
・depth_modフォルダ
・readme.txtファイル
が入っています。
②depth_modフォルダの配置
![画像2](https://assets.st-note.com/production/uploads/images/64776501/picture_pc_4ea774cbb9b0acef2172f03927ea1fe3.png?width=1200)
ティラノビルダーを起動し、プロジェクト一覧ページの左側にあるアイコンをクリックします。
![画像3](https://assets.st-note.com/production/uploads/images/64777045/picture_pc_b14e12957ee462a099493884c6e81b18.png?width=1200)
dataフォルダから、othersフォルダをクリックします。
![画像4](https://assets.st-note.com/production/uploads/images/64777124/picture_pc_64902d92bcfdce22c766d0d5ecfac8c7.png?width=1200)
pluginフォルダをクリックします。
![画像5](https://assets.st-note.com/production/uploads/images/64777205/picture_pc_8feb33e6544e6f05847ff10d2f81cdae.png?width=1200)
フォルダは空の状態です。
![画像6](https://assets.st-note.com/production/uploads/images/64777321/picture_pc_c4becc46d2ad313d7749af3e78ef57c9.png?width=1200)
先程ダウンロードしたdepth_modフォルダを入れます。
③plugin.ksファイルに、コードを追加する
![画像7](https://assets.st-note.com/production/uploads/images/64778083/picture_pc_6c569e2487e4f84f3633325d9fc28837.png?width=1200)
dataフォルダから、scenarioフォルダをクリックします。
![画像8](https://assets.st-note.com/production/uploads/images/64778219/picture_pc_2b4c9c733a50ae35e11e92237f969fe3.png?width=1200)
systemフォルダをクリックします。
![画像9](https://assets.st-note.com/production/uploads/images/64778363/picture_pc_c0763c665eb46e974881a30fd9e13193.png?width=1200)
plugin.ksにコードを記述します。
右クリックし、プログラムから開くをクリックし、メモ帳を選択します。
![画像10](https://assets.st-note.com/production/uploads/images/64778567/picture_pc_7b5a0ea4c0018dc39085d6202adc45f6.png?width=1200)
plugin.ksをメモ帳で開くと、[return]と書かれています。
![画像11](https://assets.st-note.com/production/uploads/images/64778739/picture_pc_080da72849fd50c9ddc50468f7faa3e8.png?width=1200)
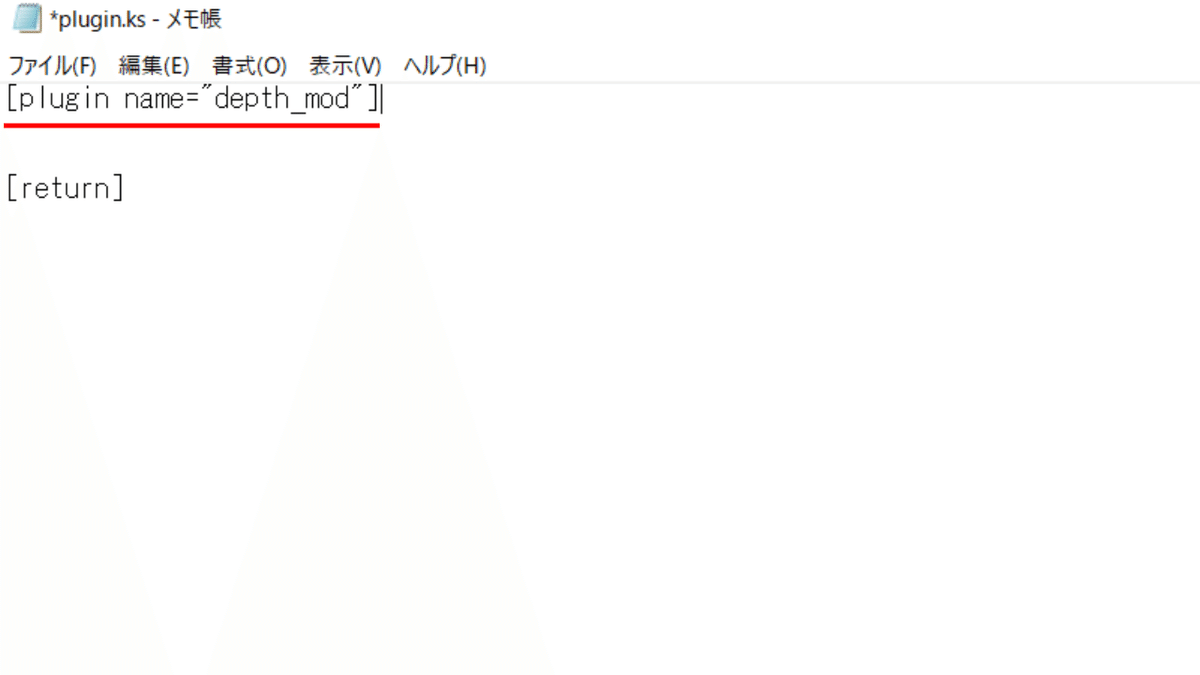
[plugin name="depth_mod"]
上記のコードを追加し、上書き保存します。
これで、プラグインの導入は完了です。
④プラグインの使用方法
■使用する画像をfgimageフォルダに入れます。
![画像12](https://assets.st-note.com/production/uploads/images/64781228/picture_pc_0aef971dfbbcf92f18e747c08231132b.png?width=1200)
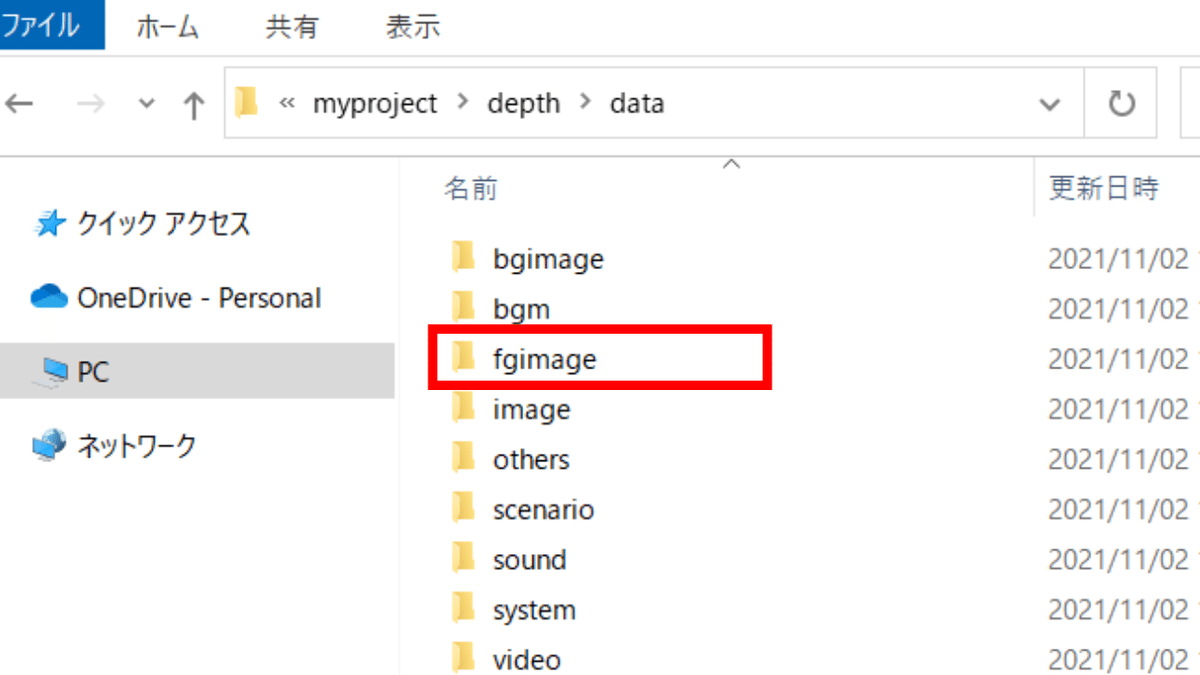
dataフォルダから、fgimageフォルダをクリックします。
![画像13](https://assets.st-note.com/production/uploads/images/64781319/picture_pc_b1df9d388d0792b62c3369a759b20538.png?width=1200)
fgimageフォルダに画像を追加します。
![画像14](https://assets.st-note.com/production/uploads/images/64781441/picture_pc_f169fba23566f83ac34b483108c1010d.png?width=1200)
myimag1.pngとmyimag2.pngを追加しました。
myimag1.png
![画像17](https://assets.st-note.com/production/uploads/images/64783157/picture_pc_f761068473d6de6688d889dfe55a8a06.png)
myimag2.png
![画像18](https://assets.st-note.com/production/uploads/images/64783181/picture_pc_6129f67dc52ab1a69dbe803158e6d953.png)
■次に、キャラクターの登録を行います。
![画像15](https://assets.st-note.com/production/uploads/images/64781646/picture_pc_077ecc05d366f1e2828ea9741eb16c80.png?width=1200)
キャラクター管理画面を開き、キャラクターを登録します。
今回はキャラクター名をakaneとしました。
■キャラクターと画像の表示
![画像16](https://assets.st-note.com/production/uploads/images/64783006/picture_pc_1b319203af87ee5d6b97cb4b9a9b3e87.png?width=1200)
[image layer=0 storage=myimg1.png name="myimg1" left="40" top="100"]
[image layer=0 storage=myimg2.png name="myimg2" left="740" top="100"]
[chara_show layer=0 name="akane" top="100"]
ティラノスクリプトコンポーネントに上記のコードを貼り付けます。
■ キャラクターを最前面に移動する場合
![画像19](https://assets.st-note.com/production/uploads/images/64783999/picture_pc_b8d4c431f866179f4e70ebc84b4c2c85.png?width=1200)
[depth_mod layer=0 name="akane" depth="front" ]
■ キャラクターを最背面に移動する場合
![画像20](https://assets.st-note.com/production/uploads/images/64784006/picture_pc_32097e4aa84f5eaa7337765724bd7b70.png?width=1200)
[depth_mod layer=0 name="akane" depth="back" ]
■画像を最前面に移動する場合
![画像21](https://assets.st-note.com/production/uploads/images/64784018/picture_pc_6e8f738c74aaf52b42cae14e2e2a1e68.png?width=1200)
[depth_mod layer=0 name="myimg2" depth="front" ]
以上で解説を終わります。
この記事が気に入ったらサポートをしてみませんか?