
【開催レポート】JAWS-UG千葉支部オンライン#10 AWS Protonハンズオン #jawsug #jawsugchiba

TL;DR
2021/6/9にGAされたばかりの、AWS Protonのハンズオンを世界最速(筆者調べ)で開催しました。
AWS Proton とは
AWS Proton は、コンテナおよびサーバーレスアプリケーションのための初の完全マネージド型アプリケーションデプロイサービスです。AWS Proton を使用すれば、プラットフォームエンジニアリングチームは、インフラストラクチャのプロビジョニング、コードデプロイ、モニタリング、更新の際に必要になるさまざまなツールをすべて接続し、協調させることできます。
数百、場合によっては数千のマイクロサービスを、絶えず変化するインフラストラクチャリソースと継続的インテグレーション/継続的デリバリー (CI/CD) 構成で維持することは、どんなに有能なプラットフォームチームにとってもほぼ不可能なタスクです。
AWS Proton を利用することで、この煩雑なタスクを管理して一貫した標準を適用するために必要となるツールをプラットフォームチームが手にすることとなり、デベロッパーはコンテナとサーバーレステクノロジーを利用してコードを簡単にデプロイできるようになるため、前述の問題を解決できます。
昨年のre:Inventで発表されたサービスで、なんと今週GA(一般公開)されたばかりです!!
というわけで、GA後世界初の、Protonハンズオンとなりました。
Proton サービス概要
AWSJ亀田さんによる、サービス概要の説明から始まりました。
まずはマイクロサービスの説明から

マイクロサービスとは…「少ないメンバーで小さく作る」

可観測性が重要
・ログを一箇所に集約し
・時系列に整理し
・ユーザーリクエストに応じて必要な情報を出し分ける

マイクロサービスによって、アプリケーションの流動性はどんどん大きくなる→運用は大変になる

これに対して、最近AWSから発表されたのが、App Runner
CI/CDやインフラとアプリをまるっとまとめて構成管理するイメージ

ProtonはApp Runnerとは違うアプローチ

・インフラ管理者が、インフラストラクチャーのテンプレートを定義して展開する
・開発部隊が、上記インフラの上に、アプリケーションインフラストラクチャー定義して公開する
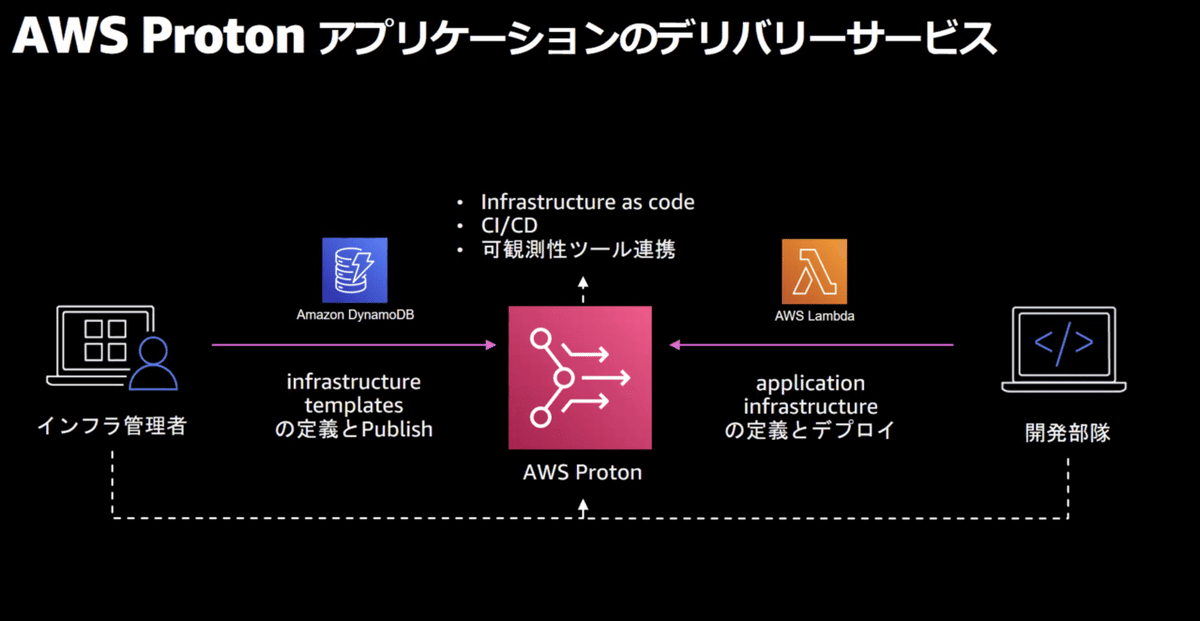
App Runnerは、アプリケーションの構成をシンプルにする
Protonは、それぞれの専門領域(インフラ・アプリ)を疎結合で管理する


Minor Updates = 下位互換性が必須
Major Updates = サービス停止※を伴うような変更
※Blue-Greenやカナリアデプロイを運用している場合はこの限りではない
ハンズオン
ハンズオンはこちらの手順を使用しました
※ 以下、簡略化した手順をここに記載しますが、キャプチャ含めた詳細なフルバージョンの手順を見たい方はこちら↓を活用下さい。
↓ 今回のハンズオンで構築する構成は以下となります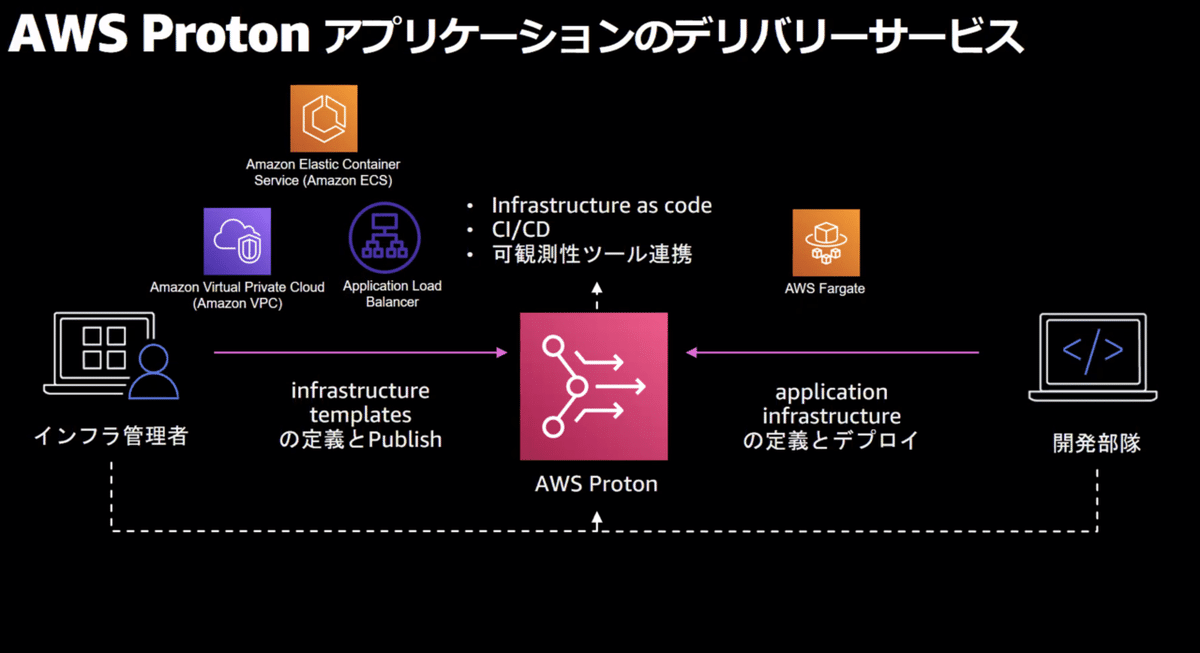
またハンズオン中に使用したサンプルアプリはAWSさんが提供されてます。
Protonを利用するための下準備
1. Cloud9を作成
2. Githubからサンプルアプリを自分のRepoへFork
3. Cloud9上でCLIアップデート、などなど
# AWS CLIのバージョン確認(事前)
$ aws --version
aws-cli/1.19.89 Python/2.7.18 Linux/4.14.232-176.381.amzn2.x86_64 botocore/1.20.89

# AWS CLIのバージョンアップ
$ pip3 install --upgrade --user awscli
Collecting awscli
... [中略] ...
Successfully installed PyYAML-5.4.1 awscli-1.19.92 botocore-1.20.92 colorama-0.4.3 pyasn1-0.4.8 rsa-4.7.2 s3transfer-0.4.2

# 変数確認
$ ls -a ~
.   .aws           .bash_logout   .bashrc  .cache   environment  .gitconfig  .local   node_modules  .npmrc  package-lock.json  .rvm  .zlogin
..  .bash_history  .bash_profile  .c9      .config  .gem         .gnupg      .mkshrc  .npm          .nvm    .profile           .ssh  .zshrc

# PATHを設定
$ export PATH=$HOME/.local/bin:$PATH
$ source ~/.bash_profile

# AWS CLIのバージョン確認(事後)
$ aws --version
aws-cli/1.19.92 Python/3.7.9 Linux/4.14.232-176.381.amzn2.x86_64 botocore/1.20.92

# jqインストール
$ sudo yum install -y jq

# Protonセットアップ用のソースコードをgit clone
$ git clone https://github.com/aws-samples/aws-proton-sample-templates.git
$ cd ~/environment/aws-proton-sample-templates/loadbalanced-fargate-svc

# アカウントIDを変数セット
$ account_id=`aws sts get-caller-identity|jq -r ".Account"`
$ echo $account_id
xxxx

# CLIからProtonのヘルプを表示できることを確認
$ aws proton help

# Templateを保管するS3バケット作成
$ aws s3api create-bucket \
>   --region us-west-2 \
>   --bucket "proton-cli-templates-${account_id}" \
>   --create-bucket-configuration LocationConstraint=us-west-2
{
   "Location": "http://proton-cli-templates-xxxx.s3.amazonaws.com/"
}
4. S3バケットを確認
5. Cloud9にIAMロールをアタッチ
6. IAMポリシー作成
# IAMポリシー作成
$ aws iam create-role \
> --role-name ProtonServiceRole \
> --assume-role-policy-document \
> file://./policies/proton-service-assume-policy.json
{
"Role": {
"Path": "/",
"RoleName": "ProtonServiceRole",
"RoleId": "hogehoge",
"Arn": "arn:aws:iam::xxxxx:role/ProtonServiceRole",
"CreateDate": "2021-06-11T11:09:40Z",
"AssumeRolePolicyDocument": {
"Version": "2012-10-17",
"Statement": [
{
"Effect": "Allow",
"Principal": {
"Service": "proton.amazonaws.com"
},
"Action": "sts:AssumeRole"
}
]
}
}
}
# IAMポリシーアタッチ
$ aws iam attach-role-policy \
> --role-name ProtonServiceRole \
> --policy-arn arn:aws:iam::aws:policy/AdministratorAccess
$7. CodePipelineからGitHubへ接続するためのCodeStar Connectionsを設定
※AWSコンソールとGitHubを初めて接続する時は、以下の画面で「AWS Connector for GitHub」の許可をします。

AWS Connectorでインストールする時はレポジトリを選んで下さいな

Protonに開発エンジニアが利用するための環境とサービスを登録する(インフラエンジニアの作業)
1. 環境テンプレートの登録
$ aws proton create-environment-template \
>   --region us-west-2 \
>   --name "public-vpc" \
>   --display-name "PublicVPC" \
>   --description "VPC with Public Access and ECS Cluster"
{
   "environmentTemplate": {
       "arn": "arn:aws:proton:us-west-2:xxxx:environment-template/public-vpc",
       "createdAt": 1623410464.775,
       "description": "VPC with Public Access and ECS Cluster",
       "displayName": "PublicVPC",
       "lastModifiedAt": 1623410464.775,
       "name": "public-vpc"
   }
}
2. 環境テンプレートをバージョニング
# 環境設定をS3バケットへアップロード
$ tar -zcvf env-template.tar.gz environment/
environment/
environment/infrastructure/
environment/infrastructure/cloudformation.yaml
environment/infrastructure/manifest.yaml
environment/schema/
environment/schema/schema.yaml
$ aws s3 cp env-template.tar.gz s3://proton-cli-templates-${account_id}/env-template.tar.gz \
> --region us-west-2
upload: ./env-template.tar.gz to s3://proton-cli-templates-xxxx/env-template.tar.gz
$ rm env-template.tar.gz

# 環境テンプレートの作成 ※メジャーバージョン(majorVersion)とマイナーバージョン(minorVersion)を確認
$ aws proton create-environment-template-version \
>   --region us-west-2 \
>   --template-name "public-vpc" \
>   --description "Version 1" \
>   --source s3="{bucket=proton-cli-templates-${account_id},key=env-template.tar.gz}"
{
   "environmentTemplateVersion": {
       "arn": "arn:aws:proton:us-west-2:xxxx:environment-template/public-vpc:1.0",
       "createdAt": 1623410761.674,
       "description": "Version 1",
       "lastModifiedAt": 1623410761.674,
       "majorVersion": "1",
       "minorVersion": "0",
       "status": "REGISTRATION_IN_PROGRESS",
       "templateName": "public-vpc"
   }
}

# 環境テンプレートの確認 ※ テンプレートのstatusがDRAFTなので、公開する必要がある
$ $ aws proton get-environment-template-version \
>   --region us-west-2 \
>   --template-name "public-vpc" \
>   --major-version "1" \
>   --minor-version "0"
{
   "environmentTemplateVersion": {
       "arn": "arn:aws:proton:us-west-2:xxxx:environment-template/public-vpc:1.0",
       "createdAt": 1623410761.674,
       "description": "Version 1",
       "lastModifiedAt": 1623410763.373,
       "majorVersion": "1",
       "minorVersion": "0",
       "schema": "schema:\n  format:\n    openapi: \"3.0.0\"\n  environment_input_type: \"PublicEnvironmentInput\"\n  types:\n    PublicEnvironmentInput:\n      type: object\n      description: \"Input properties for my environment\"\n      properties:\n        vpc_cidr:\n          type: string\n          description: \"This CIDR range for your VPC\"\n          default: 10.0.0.0/16\n          pattern: ([0-9]{1,3}\\.){3}[0-9]{1,3}($|/(16|24))\n        subnet_one_cidr:\n          type: string\n          description: \"The CIDR range for subnet one\"\n          default: 10.0.0.0/24\n          pattern: ([0-9]{1,3}\\.){3}[0-9]{1,3}($|/(16|24))\n        subnet_two_cidr:\n          type: string\n          description: \"The CIDR range for subnet one\"\n          default: 10.0.1.0/24\n          pattern: ([0-9]{1,3}\\.){3}[0-9]{1,3}($|/(16|24))\n",
       "status": "DRAFT",
       "statusMessage": "",
       "templateName": "public-vpc"
   }
}

# 環境テンプレートを公開する
$ aws proton update-environment-template-version \
>   --region us-west-2 \
>   --template-name "public-vpc" \
>   --major-version "1" \
>   --minor-version "0" \
>   --status "PUBLISHED"
{
   "environmentTemplateVersion": {
       "arn": "arn:aws:proton:us-west-2:xxxx:environment-template/public-vpc:1.0",
       "createdAt": 1623410761.674,
       "description": "Version 1",
       "lastModifiedAt": 1623411166.177,
       "majorVersion": "1",
       "minorVersion": "0",
       "recommendedMinorVersion": "0",
       "schema": "schema:\n  format:\n    openapi: \"3.0.0\"\n  environment_input_type: \"PublicEnvironmentInput\"\n  types:\n    PublicEnvironmentInput:\n      type: object\n      description: \"Input properties for my environment\"\n      properties:\n        vpc_cidr:\n          type: string\n          description: \"This CIDR range for your VPC\"\n          default: 10.0.0.0/16\n          pattern: ([0-9]{1,3}\\.){3}[0-9]{1,3}($|/(16|24))\n        subnet_one_cidr:\n          type: string\n          description: \"The CIDR range for subnet one\"\n          default: 10.0.0.0/24\n          pattern: ([0-9]{1,3}\\.){3}[0-9]{1,3}($|/(16|24))\n        subnet_two_cidr:\n          type: string\n          description: \"The CIDR range for subnet one\"\n          default: 10.0.1.0/24\n          pattern: ([0-9]{1,3}\\.){3}[0-9]{1,3}($|/(16|24))\n",
       "status": "PUBLISHED",
       "statusMessage": "",
       "templateName": "public-vpc"
   }
}

# サービステンプレートを作成
$ aws proton create-service-template \
>   --region us-west-2 \
>   --name "lb-fargate-service" \
>   --display-name "LoadbalancedFargateService" \
>   --description "Fargate Service with an Application Load Balancer"
{
   "serviceTemplate": {
       "arn": "arn:aws:proton:us-west-2:xxxx:service-template/lb-fargate-service",
       "createdAt": 1623411259.916,
       "description": "Fargate Service with an Application Load Balancer",
       "displayName": "LoadbalancedFargateService",
       "lastModifiedAt": 1623411259.916,
       "name": "lb-fargate-service"
   }
}

# サービスの環境設定をS3バケットへアップロード
$ tar -zcvf svc-template.tar.gz service/
service/
service/instance_infrastructure/
service/instance_infrastructure/cloudformation.yaml
service/instance_infrastructure/manifest.yaml
service/pipeline_infrastructure/
service/pipeline_infrastructure/cloudformation.yaml
service/pipeline_infrastructure/manifest.yaml
service/schema/
service/schema/schema.yaml
$ aws s3 cp svc-template.tar.gz s3://proton-cli-templates-${account_id}/svc-template.tar.gz --region us-west-2
upload: ./svc-template.tar.gz to s3://proton-cli-templates-xxxx/svc-template.tar.gz
$ rm svc-template.tar.gz

# サービステンプレートのバージョン作成
$ aws proton create-service-template-version \
>   --region us-west-2 \
>   --template-name "lb-fargate-service" \
>   --description "Version 1" \
>   --source s3="{bucket=proton-cli-templates-${account_id},key=svc-template.tar.gz}" \
>   --compatible-environment-templates '[{"templateName":"public-vpc","majorVersion":"1"}]'
{
   "serviceTemplateVersion": {
       "arn": "arn:aws:proton:us-west-2:xxxx:service-template/lb-fargate-service:2.0",
       "compatibleEnvironmentTemplates": [
           {
               "majorVersion": "1",
               "templateName": "public-vpc"
           }
       ],
       "createdAt": 1623411469.241,
       "description": "Version 1",
       "lastModifiedAt": 1623411469.241,
       "majorVersion": "2",
       "minorVersion": "0",
       "status": "REGISTRATION_IN_PROGRESS",
       "templateName": "lb-fargate-service"
   }
}

# 確認
$ aws proton get-service-template-version \
>   --region us-west-2 \
>   --template-name "lb-fargate-service" \
>   --major-version "1" \
>   --minor-version "0"
{
   "serviceTemplateVersion": {
       "arn": "arn:aws:proton:us-west-2:xxxx:service-template/lb-fargate-service:1.0",
       "compatibleEnvironmentTemplates": [
           {
               "majorVersion": "1",
               "templateName": "public-vpc"
           }
       ],
       "createdAt": 1623411337.273,
       "description": "Version 1",
       "lastModifiedAt": 1623411339.539,
       "majorVersion": "1",
       "minorVersion": "0",
       "schema": "schema:\n  format:\n    openapi: \"3.0.0\"\n  service_input_type: \"LoadBalancedServiceInput\"\n  pipeline_input_type: \"PipelineInputs\"\n\n  types:\n    LoadBalancedServiceInput:\n      type: object\n      description: \"Input properties for a loadbalanced Fargate service\"\n      properties:\n        port:\n          type: number\n          description: \"The port to route traffic to\"\n          default: 80\n          minimum: 0\n          maximum: 65535\n        desired_count:\n          type: number\n          description: \"The default number of Fargate tasks you want running\"\n          default: 1\n          minimum: 1\n        task_size:\n          type: string\n          description: \"The size of the task you want to run\"\n          enum: [\"x-small\", \"small\", \"medium\", \"large\", \"x-large\"]\n          default: \"x-small\"\n        image:\n          type: string\n          description: \"The name/url of the container image\"\n          default: \"public.ecr.aws/z9d2n7e1/nginx:1.19.5\"\n          minLength: 1\n          maxLength: 200\n\n    PipelineInputs:\n      type: object\n      description: \"Pipeline input properties\"\n      properties:\n        dockerfile:\n          type: string\n          description: \"The location of the Dockerfile to build\"\n          default: \"Dockerfile\"\n          minLength: 1\n          maxLength: 100\n        unit_test_command:\n          type: string\n          description: \"The command to run to unit test the application code\"\n          default: \"echo 'add your unit test command here'\"\n          minLength: 1\n          maxLength: 200\n",
       "status": "DRAFT",
       "statusMessage": "",
       "templateName": "lb-fargate-service"
   }
}

# サービステンプレートを公開
$ aws proton update-service-template-version \
>   --region us-west-2 \
>   --template-name "lb-fargate-service" \
>   --major-version "1" \
>   --minor-version "0" \
>   --status "PUBLISHED"
{
   "serviceTemplateVersion": {
       "arn": "arn:aws:proton:us-west-2:xxxx:service-template/lb-fargate-service:1.0",
       "compatibleEnvironmentTemplates": [
           {
               "majorVersion": "1",
               "templateName": "public-vpc"
           }
       ],
       "createdAt": 1623411337.273,
       "description": "Version 1",
       "lastModifiedAt": 1623411828.876,
       "majorVersion": "1",
       "minorVersion": "0",
       "recommendedMinorVersion": "0",
       "schema": "schema:\n  format:\n    openapi: \"3.0.0\"\n  service_input_type: \"LoadBalancedServiceInput\"\n  pipeline_input_type: \"PipelineInputs\"\n\n  types:\n    LoadBalancedServiceInput:\n      type: object\n      description: \"Input properties for a loadbalanced Fargate service\"\n      properties:\n        port:\n          type: number\n          description: \"The port to route traffic to\"\n          default: 80\n          minimum: 0\n          maximum: 65535\n        desired_count:\n          type: number\n          description: \"The default number of Fargate tasks you want running\"\n          default: 1\n          minimum: 1\n        task_size:\n          type: string\n          description: \"The size of the task you want to run\"\n          enum: [\"x-small\", \"small\", \"medium\", \"large\", \"x-large\"]\n          default: \"x-small\"\n        image:\n          type: string\n          description: \"The name/url of the container image\"\n          default: \"public.ecr.aws/z9d2n7e1/nginx:1.19.5\"\n          minLength: 1\n          maxLength: 200\n\n    PipelineInputs:\n      type: object\n      description: \"Pipeline input properties\"\n      properties:\n        dockerfile:\n          type: string\n          description: \"The location of the Dockerfile to build\"\n          default: \"Dockerfile\"\n          minLength: 1\n          maxLength: 100\n        unit_test_command:\n          type: string\n          description: \"The command to run to unit test the application code\"\n          default: \"echo 'add your unit test command here'\"\n          minLength: 1\n          maxLength: 200\n",
       "status": "PUBLISHED",
       "statusMessage": "",
       "templateName": "lb-fargate-service"
   }
}
これで、環境テンプレートとサービステンプレートの両方が公開されました


Protonからアプリケーション実行環境にアプリケーションをデプロイする(開発エンジニアの作業)
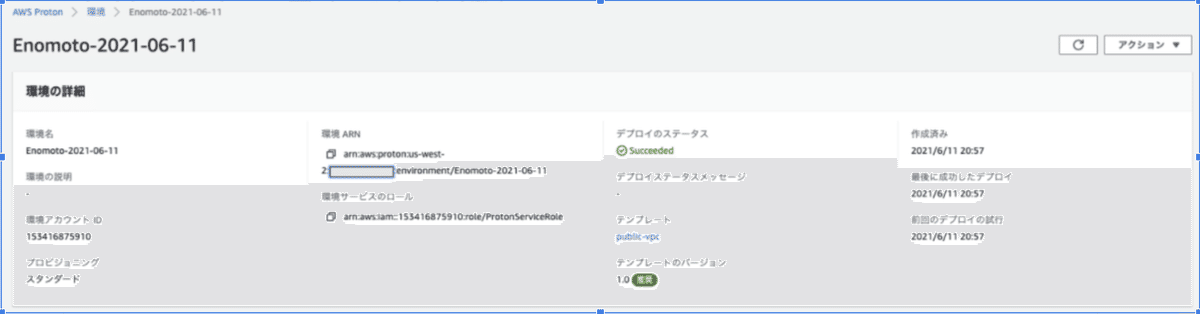
1. Protonのコンソール画面から、環境を作成
※ 作成を実行するとバックグラウンドでCFnが動きます
![]()
2. 次に、サービスを作成
※以下同文

3. Forkしたサンプルアプリは、そのまま実行するとパイプラインがエラーになる(本記事執筆時点)ので、ビルドプロジェクトとデプロイプロジェクトのbuildspecを更新し → CodePipelineから「変更をリリース」してパイプラインを再実行
4. 成功
※ URLは、手順2で作成したサービスインスタンスの、「ServiceEndpoint」の値になります。

5. サンプルアプリの「index.html」をGitから変更してCommit(→マージ)すると、自動的にパイプラインが実行されました

はい。ECSを見てみると、Fargateが実行中でした。

というわけで、ハンズオンの環境構築〜サンプルアプリをデプロイまで完了しました。
後片付け
遠足はお家に帰るまでが遠足、ハンズオンは後片付けまでがハンズオン。
来たときよりも美しく、のボーイスカウト精神(←ボーイスカウト経験者だけどこれは初めて知った…)で、構築した環境を削除したら、ハンズオンは完全終了です。
まとめ
あとで追記します
この記事が気に入ったらサポートをしてみませんか?