
【マイクロサービスの統合】コミュニケーション、Netflix Eureka、API Gateway - Springboot3 第5回
はじめに
こんにちは、今日はマイクロサービスの統合方法三つについてまとめてみます。マイクロサービスアーキテクチャはモジュール化されたコンポーネントで構築された分散システムを可能にしますが、これらのサービス間の円滑な通信と管理が重要な課題です。 このブログでは、EurekaサービスディスカバリーとAPIゲートウェイを通じてマイクロサービス間の効率的なコミュニケーションをどのように実現するかについて探求します。
マイクロサービスの動機的コミュニケーション
RestTemplate
<Employee>
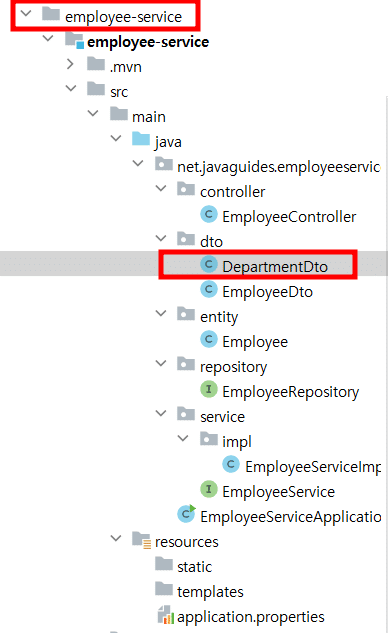
private String departmentCode; <DepartmentDto>
@Setter
@Getter
@AllArgsConstructor
@NoArgsConstructor
public class DepartmentDto {
    private Long id;
    private String departmentName;
    private String departmentDescription;
    private String departmentCode;
}
これらのフィールドは、DepartmentDto のサービスと同じです。
@Bean
	public RestTemplate restTemplate() {
		return new RestTemplate();
	}
RestTemplateの関数に「Bean」アノテーションをつきます、
RestTemplateはスプリングフレームワークで提供するHTTP通信を簡単に行えるクラスです。 主にRESTfulウェブサービスと相互作用するために使用されます。 HTTPリクエストの送信、リクエスト、および応答マッピングに利用されます。
<EmployeeServiceImpl>
 // for microservices communication
    private RestTemplate restTemplate;

    @Override
    public EmployeeDto saveEmployee(EmployeeDto employeeDto) {

        Employee employee = new Employee(
                employeeDto.getId(),
                employeeDto.getFirstName(),
                employeeDto.getLastName(),
                employeeDto.getEmail(),
                // for microservices communication
                employeeDto.getDepartmentCode()
        );
        Employee savedEmployee = employeeRepository.save(employee);

        EmployeeDto savedEmployeeDto = new EmployeeDto(
                savedEmployee.getId(),
                savedEmployee.getFirstName(),
                savedEmployee.getLastName(),
                savedEmployee.getEmail(),
                // for microservices communication
                savedEmployee.getDepartmentCode()
        );
        return savedEmployeeDto;
    }

    @Override
    public EmployeeDto getEmployeeById(Long employeeId) {

        Employee employee = employeeRepository.findById(employeeId).get();

        // for microservices communication
        ResponseEntity<DepartmentDto> responseEntity = restTemplate.getForEntity("http://localhost:8080/api/departments/" + employee.getDepartmentCode(),
                DepartmentDto.class);

        EmployeeDto employeeDto = new EmployeeDto(
                employee.getId(),
                employee.getFirstName(),
                employee.getLastName(),
                employee.getEmail(),
                // for microservices communication
                employee.getDepartmentCode()
        );
        return employeeDto;
    }
マイクロサービスの通信のため、「getDepartmentCode」と「restTemplate.getForEntity」を追加します。
<APIResponseDTO>
@Getter
@Setter
@AllArgsConstructor
@NoArgsConstructor
public class APIResponseDto {
    private EmployeeDto employee;
    private DepartmentDto department;
}
APIResponseDTOを生成して上記のコードを作成すます。
<EmployeeService>
APIResponseDto getEmployeeById(Long employeeId);<EmployeeServiceImpl>
 @Override
    public APIResponseDto getEmployeeById(Long employeeId) {

        Employee employee = employeeRepository.findById(employeeId).get();

        // for microservices communication
        ResponseEntity<DepartmentDto> responseEntity = restTemplate.getForEntity("http://localhost:8080/api/departments/" + employee.getDepartmentCode(),
                DepartmentDto.class);

        DepartmentDto departmentDto = responseEntity.getBody();

        EmployeeDto employeeDto = new EmployeeDto(
                employee.getId(),
                employee.getFirstName(),
                employee.getLastName(),
                employee.getEmail(),
                // for microservices communication
                employee.getDepartmentCode()
        );

        APIResponseDto apiResponseDto = new APIResponseDto();
        apiResponseDto.setEmployee(employeeDto);
        apiResponseDto.setDepartment(departmentDto);

        return apiResponseDto;
    }
<EmployeeController>
public ResponseEntity<APIResponseDto> getEmployee(@PathVariable("id") Long employeeId) {
        APIResponseDto apiResponseDto = employeeService.getEmployeeById(employeeId);
        return new ResponseEntity<>(apiResponseDto, HttpStatus.OK);
    }
全体的にタイプを「EmployeeDto」から「APIResponseDto」で修正します。


社員とともに、部署のデータも応答に表示されていることがわかります。社員サービスから部署サービスへのREST API Call が成功したということです。
WebClient
		<dependency>
			<groupId>org.springframework.boot</groupId>
			<artifactId>spring-boot-starter-webflux</artifactId>
		</dependency>
「webflux」の依存性を追加します。
@SpringBootApplication
public class EmployeeServiceApplication {

//	@Bean
//	public RestTemplate restTemplate() {
//		return new RestTemplate();
//	}

	@Bean
	public WebClient webClient() {
		return WebClient.builder().build();
	}

	public static void main(String[] args) {
		SpringApplication.run(EmployeeServiceApplication.class, args);
	}

}
restTemplateの代わりにWebClientをbeanで設定します。
<EmployeeServiceImpl>
   @Override
    public APIResponseDto getEmployeeById(Long employeeId) {

        Employee employee = employeeRepository.findById(employeeId).get();

//        // for microservices communication
//        ResponseEntity<DepartmentDto> responseEntity = restTemplate.getForEntity("http://localhost:8080/api/departments/" + employee.getDepartmentCode(),
//                DepartmentDto.class);
//
//        DepartmentDto departmentDto = responseEntity.getBody();

        DepartmentDto departmentDto = webClient.get()
                .uri("http://localhost:8080/api/departments/" + employee.getDepartmentCode())
                .retrieve()
                .bodyToMono(DepartmentDto.class)
                .block();

        EmployeeDto employeeDto = new EmployeeDto(
                employee.getId(),
                employee.getFirstName(),
                employee.getLastName(),
                employee.getEmail(),
                // for microservices communication
                employee.getDepartmentCode()
        );

        APIResponseDto apiResponseDto = new APIResponseDto();
        apiResponseDto.setEmployee(employeeDto);
        apiResponseDto.setDepartment(departmentDto);

        return apiResponseDto;
    }
restTemplateをコメント処理し、WebClientを利用してdepartmentDtoを再定義します。

では、なぜWebClientが推薦されますかという疑問点ができるかもしれないですね。
非同期およびリアクティブサポート、関数型プログラミングスタイル、リアクティブストリームサポートなどの理由でWebClientを使用することを推奨しています。
Spring Cloud Open Feign
Spring Cloud OpenFeignは、スプリングベースのマイクロサービスアーキテクチャにおいて、異なるマイクロサービス間のHTTP通信を簡単に行うためのライブラリです。 HTTP要求を送信するクライアント コードをインターフェイスとして定義する方法を使用して、より高いレベルの抽象化を提供します。 また、Netflix Eurekaのようなサービスディスカバリークライアントと一緒に使用できます。また、サーキットブレーカーをサポートしてサービス間の通信に障害が発生した場合、サーキットブレーカーを使用して障害を処理し、サービスの可用性を維持することができます。
	<properties>
		<java.version>17</java.version>
		<spring-cloud.version>2022.0.4</spring-cloud.version>
	</properties>
...

 <dependency>
      <groupId>org.springframework.cloud</groupId>
      <artifactId>spring-cloud-starter-openfeign</artifactId>
    </dependency>
	</dependencies>

	<dependencyManagement>
		<dependencies>
			<dependency>
				<groupId>org.springframework.cloud</groupId>
				<artifactId>spring-cloud-dependencies</artifactId>
				<version>${spring-cloud.version}</version>
				<type>pom</type>
				<scope>import</scope>
			</dependency>
		</dependencies>
	</dependencyManagement>
Spring InitializrでSpring Cloud OpenFeignの依存性を探して、pom.xmlに追加します。<properties>, <dependency>, <dependencyManagement> で分けて追加します。
@SpringBootApplication
@EnableFeignClients
public class EmployeeServiceApplication {

//	@Bean
//	public RestTemplate restTemplate() {
//		return new RestTemplate();
//	}

//	@Bean
//	public WebClient webClient() {
//		return WebClient.builder().build();
//	}

	public static void main(String[] args) {
		SpringApplication.run(EmployeeServiceApplication.class, args);
	}

}
webClientはコメント処理して、EmployeeServiceApplicationのクラスに@EnableFeignClientsアノテーションを付きます。
<APIClient>
@FeignClient(url = "http://localhost:8080", value= "DEPARTMENT-SERVICE")
public interface APIClient {

    @GetMapping("api/departments/{department-code}")
   DepartmentDto getDepartment(@PathVariable("department-code") String DepartmentCode);
}
serviceパッケージの中にAPIClientクラスを作ります。@FeignClientアノテーションを付き、DepartmentControllerのgetDepartmentを追加し、urlを修正して、ビジネスロジックをなくします。
@Service
@AllArgsConstructor
public class EmployeeServiceImpl implements EmployeeService {

    private EmployeeRepository employeeRepository;

    // for microservices communication
    //private RestTemplate restTemplate;

    //private WebClient webClient;
    private APIClient apiClient;

    ...

    @Override
    public APIResponseDto getEmployeeById(Long employeeId) {

        Employee employee = employeeRepository.findById(employeeId).get();

//        // for microservices communication
//        ResponseEntity<DepartmentDto> responseEntity = restTemplate.getForEntity("http://localhost:8080/api/departments/" + employee.getDepartmentCode(),
//                DepartmentDto.class);
//
//        DepartmentDto departmentDto = responseEntity.getBody();

//        DepartmentDto departmentDto = webClient.get()
//                .uri("http://localhost:8080/api/departments/" + employee.getDepartmentCode())
//                .retrieve()
//                .bodyToMono(DepartmentDto.class)
//                .block();

       DepartmentDto departmentDto = apiClient.getDepartment(employee.getDepartmentCode());

        EmployeeDto employeeDto = new EmployeeDto(
                employee.getId(),
                employee.getFirstName(),
                employee.getLastName(),
                employee.getEmail(),
                // for microservices communication
                employee.getDepartmentCode()
        );

        APIResponseDto apiResponseDto = new APIResponseDto();
        apiResponseDto.setEmployee(employeeDto);
        apiResponseDto.setDepartment(departmentDto);

        return apiResponseDto;
    }
}
webClientで定義したdepartmentDtoをapiClientを通じて再定義します。より簡単でしょう。
EmployeeServiceApplicationを再起動して、Postmanでテストしましょう。

Netflix Eureka - Service Registry and Discovery

EurekaプロジェクトをModuleで読み込む


圧縮されたデータを元に戻す


読み込まれた。
Eurekaサーバー実装
@SpringBootApplication
@EnableEurekaServer
public class ServiceRegistryApplication {

   public static void main(String[] args) {
      SpringApplication.run(ServiceRegistryApplication.class, args);
   }

}
@EnableEurekaServerアノテーションを追加します。
<application.properties>
spring.application.name=SERVICE-REGISTRY
server.port=8761
eureka.client.register-with-eureka=false
eureka.client.fetch-registry=false

Eureka Clientをdepartment-serviceの Microserviceに登録
department-serviceの<pom.xml>
	<properties>
		<java.version>17</java.version>
		<spring-cloud.version>2022.0.4</spring-cloud.version>
	</properties>

...
	    <dependency>
			<groupId>org.springframework.cloud</groupId>
			<artifactId>spring-cloud-starter-netflix-eureka-client</artifactId>
		</dependency>
	</dependencies>

<dependencyManagement>
		<dependencies>
			<dependency>
				<groupId>org.springframework.cloud</groupId>
				<artifactId>spring-cloud-dependencies</artifactId>
				<version>${spring-cloud.version}</version>
				<type>pom</type>
				<scope>import</scope>
			</dependency>
		</dependencies>
	</dependencyManagement>
依存性を追加。
department-serviceの<application.properties>
spring.application.name=DEPARTMENT-SERVICE
eureka.instance.client.serverUrl.defaultZone=http://localhost:8761/eureka
アプリケーションの名称を入力
service-registryのポート番号を含めたURLを入力

Eureka Serverにアプリケーションが表示された。
Eureka Clientをemployee-serviceの Microserviceに登録
employee-serviceの<pom.xml>
		<dependency>
			<groupId>org.springframework.cloud</groupId>
			<artifactId>spring-cloud-starter-netflix-eureka-client</artifactId>
		</dependency>
Eureka Clienのemployee-serviceのpom.xmlに依存性を追加します。

department-serviceの複数インスタンスの実行
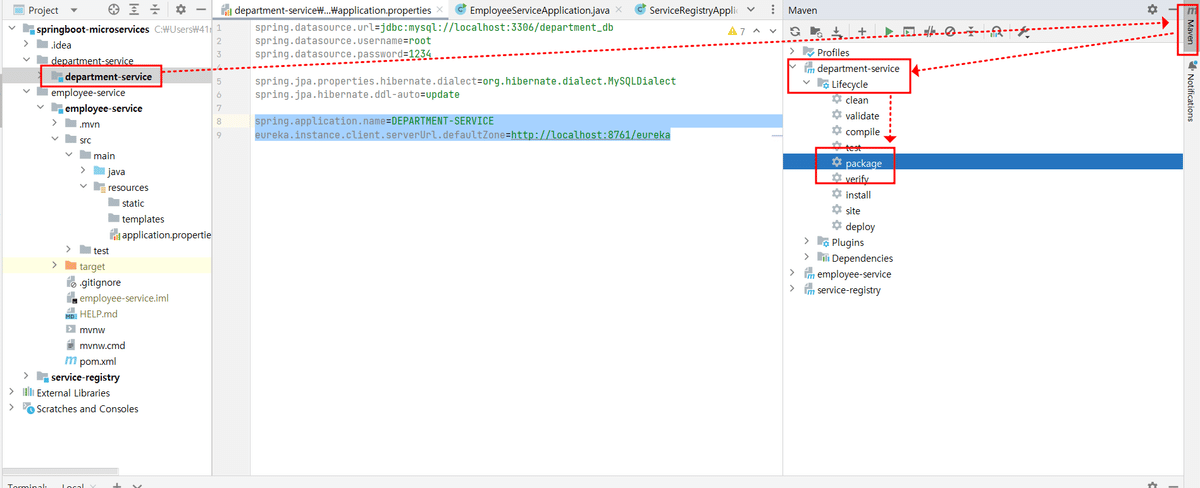


-Dserver.port=8082ができなったので、
--server.port=8082で起動しました。


ロードバランシング
//@FeignClient(url = "http://localhost:8080;http://localhost:8082", value= "DEPARTMENT-SERVICE")
@FeignClient(name= "DEPARTMENT-SERVICE")
public interface APIClient {

    @GetMapping("api/departments/{department-code}")
   DepartmentDto getDepartment(@PathVariable("department-code") String DepartmentCode);
}

}
employee-serviceのAPIClientに「http://localhost:8082」をアノテーションに追加しても、できますが、nameにアプリケーションの名称を記入したら、より簡単になります。


もし、department-serviceの中で一つが止まっちゃったら?


Spring Cloud Gateway
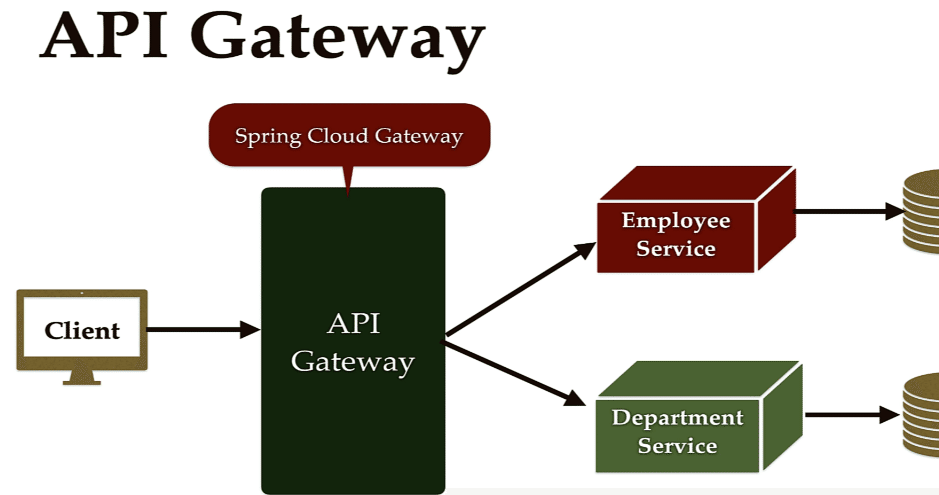
クライアントは、それぞれが消費したいすべてのマイクロサービスのホスト名とポートを記憶する必要はありません。
API Gatewayはマイクロサービスのための統合されたインターフェースを提供します。 おかげで、クライアントはマイクロサービスの内部的な詳細について詳しく知る必要がありません。
また、セキュリティ、モニタリング、トラフィックに制限をかけるレート制限 などを集中化します。Spring Cloud Gatewayがその役割を果たします。
API Gateway プロジェクトの生成


api-gatewayをEureka ClientとしてEurekaサーバに登録
api-gatewayの<application.properties>
spring.application.name=API-GATEWAY
server.port=9191
eureka.instance.client.serverUrl.defaultZone=http://localhost:8761/eureka
API-Gatewayのルートの設定とPostmanテスト
api-gatewayの<application.properties>
spring.application.name=API-GATEWAY
server.port=9191
eureka.instance.client.serverUrl.defaultZone=http://localhost:8761/eureka
management.endpoints.web.exposure.include=*

## Routes for Employee Service
spring.cloud.gateway.routes[0].id=EMPLOYEE-SERVICE
spring.cloud.gateway.routes[0].uri=lb://EMPLOYEE-SERVICE
spring.cloud.gateway.routes[0].predicates[0]=Path=/api/employees/**

## Routes for Department Service
spring.cloud.gateway.routes[1].id=DEPARTMENT-SERVICE
spring.cloud.gateway.routes[1].uri=lb://DEPARTMENT-SERVICE
spring.cloud.gateway.routes[1].predicates[0]=Path=/api/departments/**
「lb」はロード バランサの略で、その後にサービス レジストリ サービス ID が続きます。
「predicates[0]=Path=」の後はControllerの「@RequestMapping」のエンドポイントです。「**」は全てのエンドポイントを意味すます。


Spring Cloud Gatewayを使用したルートの自動作成

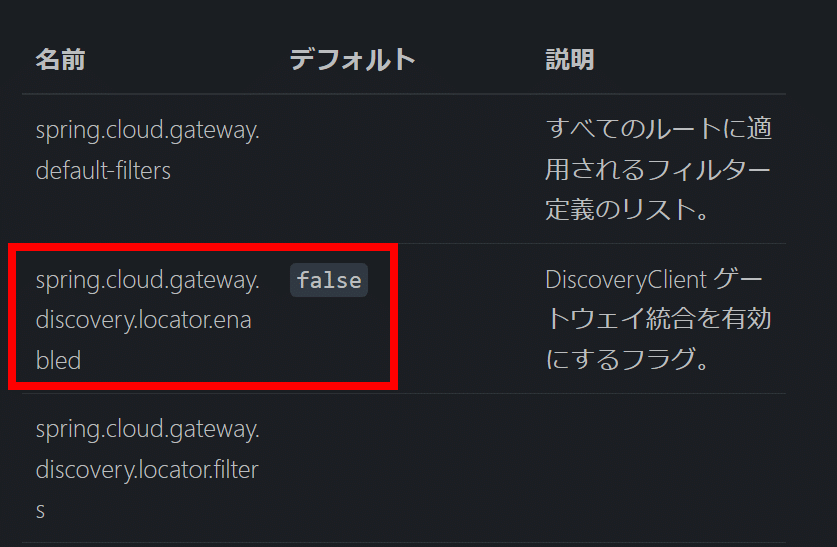
spring.application.name=API-GATEWAY
server.port=9191
eureka.instance.client.serverUrl.defaultZone=http://localhost:8761/eureka
management.endpoints.web.exposure.include=*
spring.cloud.gateway.discovery.locator.enabled=true
logging.level.org.springframework.cloud.gateway.handler.RoutePredicateHandlerMapping=DEBUG

### Routes for Employee Service
#spring.cloud.gateway.routes[0].id=EMPLOYEE-SERVICE
#spring.cloud.gateway.routes[0].uri=lb://EMPLOYEE-SERVICE
#spring.cloud.gateway.routes[0].predicates[0]=Path=/api/employees/**
#
### Routes for Department Service
#spring.cloud.gateway.routes[1].id=DEPARTMENT-SERVICE
#spring.cloud.gateway.routes[1].uri=lb://DEPARTMENT-SERVICE
#spring.cloud.gateway.routes[1].predicates[0]=Path=/api/departments/**
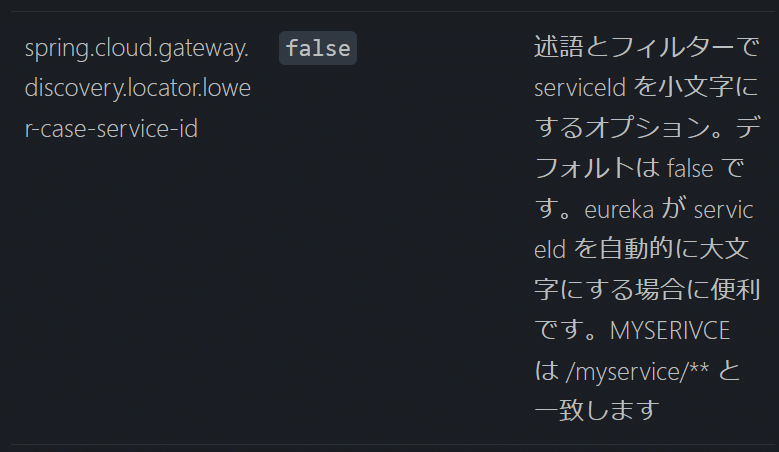
「spring.cloud.gateway.discovery.locator.enabled」と「 spring.cloud.gateway.discovery.locator.lower-case-service-id」を「true」で設定します。先ほど設定したコードはコメント処理します。
ログレベルの設定も「logging.level.org.springframework.cloud.gateway.handler.RoutePredicateHandlerMapping=DEBUG」でします。

「localhost:9191/employee-service/api/employees/{id}」
真ん中にアプリケーションの名称がはいっている。

このようにSprint Cloud APIは、特定のリクエストのルートを自動的に作成します。


通常、ルートは手動で設定するため、要件に基づいて手動で設定します。新しいメンバーがチームに入ってくるたびに、 新しいメンバーは簡単にルートを理解できます。
そのためコメント処理したものを解除し、自動設定をコメント処理します。
spring.application.name=API-GATEWAY
server.port=9191
eureka.instance.client.serverUrl.defaultZone=http://localhost:8761/eureka
management.endpoints.web.exposure.include=*

#spring.cloud.gateway.discovery.locator.enabled=true
#spring.cloud.gateway.discovery.locator.lower-case-service-id=true
#logging.level.org.springframework.cloud.gateway.handler.RoutePredicateHandlerMapping=DEBUG


## Routes for Employee Service
spring.cloud.gateway.routes[0].id=EMPLOYEE-SERVICE
spring.cloud.gateway.routes[0].uri=lb://EMPLOYEE-SERVICE
spring.cloud.gateway.routes[0].predicates[0]=Path=/api/employees/**

## Routes for Department Service
spring.cloud.gateway.routes[1].id=DEPARTMENT-SERVICE
spring.cloud.gateway.routes[1].uri=lb://DEPARTMENT-SERVICE
spring.cloud.gateway.routes[1].predicates[0]=Path=/api/departments/**
私のGithubのレポジトリです~。https://github.com/Commonerd/springboot-microservices
最後に
マイクロサービスアーキテクチャの成功的な実装は、サービス間の通信と管理を効果的に扱うことに依存します。 EurekaとAPI Gatewayによるサービスディスカバリーと通信は、このようなアーキテクチャをサポートし、改善する重要なツールの一つです。 これらのツールを適切に活用すると、マイクロサービスベースのアプリケーションをより安定的かつ拡張可能に構築し、ユーザーエクスペリエンスとシステムパフォーマンスを向上させることができます。
エンジニアファーストの会社 株式会社CRE-CO
ソンさん
【参考】
[Udemy] Building Microservices with Spring Boot & Spring Cloud
この記事が気に入ったらサポートをしてみませんか?
