
【マイクロサービスの監視と故障許容】 Zipkin, Resilience4j - Springboot3 第8回目

1.はじめに
こんにちは、今日はマイクロサービスの監視と故障許容として、「Zipkin」と「Resilience4j」について勉強します!
2.分散トレーシング(Distributed Tracing)
分散トレーシング(Distributed Tracing)は、アプリケーション内で発生するリクエストやトランザクションが、複数のサービスやコンポーネントを横断してどのように動作しているかを追跡するためのテクニックです。マイクロサービスアーキテクチャや分散システム内で複数のサービスが連携して動作する場合に特に有用です。

マイクロサービスに時間がかかりすぎている原因を突き止めたい。「トレースID」は基本的にリクエスト全体で共通です。「スパンID」は各マイクロサービスのコンポーネントに共通です。
3.実装過程
3.1「micreometer」と「zipkin」依存性追加
<dependency>
    <groupId>io.micrometer</groupId>
    <artifactId>micrometer-observation</artifactId>
</dependency>
<dependency>
    <groupId>io.micrometer</groupId>
    <artifactId>micrometer-tracing-bridge-brave</artifactId>
</dependency>
<dependency>
    <groupId>io.zipkin.reporter2</groupId>
    <artifactId>zipkin-reporter-brave</artifactId>
</dependency>
<dependency>
    <groupId>io.github.openfeign</groupId>
    <artifactId>feign-micrometer</artifactId>
</dependency>
「micrometer-observation」は、アプリケーションのメトリクスを収集して Zipkin にレポートできるようになります。
「micrometer-tracing-bridge-brave」 は、spring bootアプリケーションをトレースできるようになります。
「zipkin-reporter-brave」 は、収集したトレースを Zipkin に送信できるようになります。
「feign-micrometer」は、マイクロサービスで 「feign」を使って他のAPIを呼び出すために追加します。この依存関係によって、micrometerがfeignで動作するように設定されます。

3.2「ジプキン」:トレース情報をUIで可視化
https://zipkin.io/pages/quickstart.html

Zipkinをダウンロードして、プロジェクトに入れます。

コマンドプロンプトでZipkinサーバーを実行します。

このような画面が表示される。
3.3 リクエストが表示されない場合?
私の場合、<dependencyManager>の中に依存性を入れて間違っちゃったです。それと、プロジェクトクリーンをしなかったので、依存性がうまく追加されなかったです。自分の依存性がちゃんと入力されたのかチェックしてください。

3.4 設定追加
「department-service.properties」と「employee-service.properties」
下記の通り設定追加
management.tracing.sampling.probability=1.0
logging.pattern.level=%5p [${spring.application.name:},%X{traceId:-},%X{spanId:-}]
logging.level.org.springframework.web=DEBUG
3.5 リクエストをUIで確認


4. 故障許容
マイクロサービスが他のマイクロサービスを連鎖的に呼び出す時、呼び出されたサービスが動作しない場合はどうなるでしょうか? 他のマイクロサービスに依存関係にあるサービスが全て動作しなくなります。
そんな問題に対応するために、三つ目の方法があります。
(1) フォールバックメソッド(fallback method)
マイクロサービス2がダウンした場合、マイクロサービス1はデフォルトのレスポンスを返します。こうすることでカスケード障害を回避できます。
(2) サーキットブレーカー(circuit breaker)
マイクロサービスがダウンした場合、マイクロサービス3はマイクロサービス4へのリクエストを継続的にヒットすることができなくなります。つまり、サーキットブレーカーパターンを実装すれば、リソースを大幅に節約でき、マイクロサービス3からマイクロサービス4への連続コールを回避できる。
(3) リトライ機構(retry mechanism)
リトライ機構を実装する場合、マイクロサービス4が一時的にダウンしたとします。マイクロサービス3がマイクロサービス4を複数回呼び出すように、マイクロサービス3にリトライ機構を実装します。
(4) レートリミッター(rate limiter)
マイクロサービスからマイクロサービスへの呼び出し回数を制限するパターンです。
サーキットブレーカーパターン(Circuit Breaker Pattern)
サーキットブレーカーパターン(Circuit Breaker Pattern)は、ソフトウェアアプリケーションでのエラー 処理と可用性を向上させるデザインパターンです。このパターンは、アプリケーションが一時的な障害や負荷の増加に対処するのを支援します。サーキットブレーカーパターンには三つの主要な状態があります。
閉じられた状態(Closed): 初期状態で、リクエストが実行され、サービスの応答がモニタリングされます。一定のエラー率が超えた場合、サーキットは「オープン」状態に遷移し、リクエストは即座に拒否されます。
オープン状態(Open): 一定のエラー率が超えた場合やサービスが一時的に利用できない場合、サーキットはオープン状態に移行します。この状態では、新しいリクエストは直ちに拒否され、サービスへの負荷が軽減されます。
ハーフオープン状態(Half-Open): 一定の時間が経過すると、サーキットは一時的にハーフオープン状態に遷移します。この状態では、一部のリクエストがサービスに送信され、その応答を監視します。エラー率が低い場合、サーキットは再び「閉じられた」状態に戻り、リクエストが正常に処理されます。
5. サーキットブレーカーパターンの実装過程
5.1 依存性追加

employee-service/pom.xml
		<dependency>
			<groupId>org.springframework.cloud</groupId>
			<artifactId>spring-cloud-starter-circuitbreaker-resilience4j</artifactId>
		</dependency>
		<dependency>
			<groupId>org.springframework.boot</groupId>
			<artifactId>spring-boot-starter-aop</artifactId>
		</dependency>
もし依存性の追加ができない場合はプロジェクトクリーンを行ってください。
5.2 @CircuitBreakerアノテーション
RestTemplateを使う代わりに、WebClientを使いましょう。
EmployeeServiceImpl.java
    private WebClient webClient;
...

    @CircuitBreaker(name = "${spring.application.name}", fallbackMethod = "getDefaultDepartment")
    @Override
    public APIResponseDto getEmployeeById(Long employeeId) {

        Employee employee = employeeRepository.findById(employeeId).get();

//        // for microservices communication
//        ResponseEntity<DepartmentDto> responseEntity = restTemplate.getForEntity("http://localhost:8080/api/departments/" + employee.getDepartmentCode(),
//                DepartmentDto.class);
//
//        DepartmentDto departmentDto = responseEntity.getBody();

        DepartmentDto departmentDto = webClient.get()
                .uri("http://localhost:8080/api/departments/" + employee.getDepartmentCode())
                .retrieve()
                .bodyToMono(DepartmentDto.class)
                .block();

//        DepartmentDto departmentDto = apiClient.getDepartment(employee.getDepartmentCode());

        EmployeeDto employeeDto = new EmployeeDto(
                employee.getId(),
                employee.getFirstName(),
                employee.getLastName(),
                employee.getEmail(),
                // for microservices communication
                employee.getDepartmentCode()
        );

        APIResponseDto apiResponseDto = new APIResponseDto();
        apiResponseDto.setEmployee(employeeDto);
        apiResponseDto.setDepartment(departmentDto);

        return apiResponseDto;
    }
webClientに関してコメントアウトされたコードを解除します。
@CircuitBreakerアノテーションを付けます。
name = "${spring.application.name}", fallbackMethod = "getDefaultDepartment"
二つのプロパティを指定します。
EmployeeeServiceApplication
@SpringBootApplication
@EnableFeignClients
public class EmployeeServiceApplication {

//	@Bean
//	@LoadBalanced
//	public RestTemplate restTemplate() {
//		return new RestTemplate();
//	}

	@Bean
	public WebClient webClient() {
		return WebClient.builder().build();
	}

	public static void main(String[] args) {
		SpringApplication.run(EmployeeServiceApplication.class, args);
	}

}
restTemplate関連はコメントアウトし、webClient関連コードは生かせます。
何らかの理由で「department-service」がダウンしているとしよう。ここでIntelliJを実行し、「department-service」を強制的に停止してみよう。


デフォルトレスポンスを送ることはできないのだろうか? もちろんあります。
@CircuitBreaker(name = "${spring.application.name}", fallbackMethod = "getDefaultDepartment")
@Override
public APIResponseDto getEmployeeById(Long employeeId) {
    Employee employee = employeeRepository.findById(employeeId).get();
EmployeeServiceImplでgetEmployeeByIdメソッドの上に@CircuitBreakerアノテーションを付けます。
name = "${spring.application.name}", fallbackMethod = "getDefaultDepartment"
二つのプロパティを指定します。
5.3 Fallbackメソッド
前のfallbackMethodはgetDefaultDepartment"です。その具体的なコードは下記のように作成します。
   public APIResponseDto getDefaultDepartment(Long employeeId) {
        Employee employee = employeeRepository.findById(employeeId).get();

        DepartmentDto departmentDto = new DepartmentDto();
        departmentDto.setDepartmentName("R&D Deparetment");
        departmentDto.setDepartmentCode("RD001");
        departmentDto.setDepartmentDescription("Research and Development Department");


        EmployeeDto employeeDto = new EmployeeDto(
                employee.getId(),
                employee.getFirstName(),
                employee.getLastName(),
                employee.getEmail(),
                // for microservices communication
                employee.getDepartmentCode()
        );

        APIResponseDto apiResponseDto = new APIResponseDto();
        apiResponseDto.setEmployee(employeeDto);
        apiResponseDto.setDepartment(departmentDto);

        return apiResponseDto;

    }
5.4 サーキットブレーカー設定追加
employee-serviceのapplication.propertiesに追加します。
# Actuator endpoints for Circuit Breaker
management.health.circuitbreaker.enabled=true
management.endpoints.web.exposure.include=health
management.endpoint.health.show-details=always

# Circuit Breaker configuration
resilience4j.circuitbreaker.instance.EMPLOYEE-SERVICE.registerHealthIndicator=true
resilience4j.circuitbreaker.instance.EMPLOYEE-SERVICE.failureRateThreshold=50
resilience4j.circuitbreaker.instance.EMPLOYEE-SERVICE.minimumNumberOfCalls=5
resilience4j.circuitbreaker.instance.EMPLOYEE-SERVICE.automaticTransitionFromOpenToHalfOpenEnabled=true
resilience4j.circuitbreaker.instance.EMPLOYEE-SERVICE.waitDurationInOpenState=5s
resilience4j.circuitbreaker.instance.EMPLOYEE-SERVICE.permittedNumberOfCallsInHalfOpenState=3
resilience4j.circuitbreaker.instance.EMPLOYEE-SERVICE.slidingWindowSize=10
resilience4j.circuitbreaker.instance.EMPLOYEE-SERVICE.slidingWindowType=COUNT-BASED
management.health.circuitbreaker.enabled=true
Circuit Breaker関連のアクチュエータエンドポイントを有効にする設定です。 この設定をtrueに設定すると、Circuit Breaker関連の情報をエンドポイントで確認することができます。
management.endpoints.web.exposure.include=health
Circuit Breakerに関連するアクチュエーターエンドポイントのうち、'health'エンドポイントだけを公開するように設定します。これにより、/actuator/healthエンドポイントを通じてCircuit Breakerの状態情報を確認することができます。
management.endpoint.health.show-details=always
'health'エンドポイントを通じてCircuit Breakerの詳細情報を常に表示するように設定します。これにより、Circuit Breakerの状態や構成に関する詳細情報を確認することができます。
resilience4j.circuitbreaker.instance.EMPLOYEE-SERVICE.registerHealthIndicator=true
Circuit Breakerのヘルスインジケータ(Health Indicator)を登録するように設定します。これにより、Circuit Breakerの状態がアプリケーションのヘルスチェックに含まれます。
resilience4j.circuitbreaker.instance.EMPLOYEE-SERVICE.failureRateThreshold=50
Circuit Breakerの失敗率の閾値を設定します。この閾値を超えると、Circuit Breakerはオープン状態に切り替わります。
resilience4j.circuitbreaker.instance.EMPLOYEE-SERVICE.minimumNumberOfCalls=5
Circuit Breakerが動作するために必要な最小呼び出し数を設定します。この呼び出し数に達するまで、Circuit Breakerは動作しません。
resilience4j.circuitbreaker.instance.EMPLOYEE-SERVICE.automaticTransitionFromOpenToHalfOpenEnabled=true
Circuit Breakerがオープン状態からハーフオープン状態に自動移行できるように設定します。これにより、障害復旧の試みを自動で行うことができます。
resilience4j.circuitbreaker.instance.EMPLOYEE-SERVICE.waitDurationInOpenState=5s
Circuit Breakerがオープン状態に切り替わった後、ハーフオープン状態に切り替えるまでの待機時間を設定します。ここでは5秒に設定されているので、5秒間Circuit Breakerがオープン状態を維持した後、ハーフオープン状態に切り替えます。
resilience4j.circuitbreaker.instance.EMPLOYEE-SERVICE.permittedNumberOfCallsInHalfOpenState=3
Circuit Breakerがハーフオープン状態で許可される呼び出し数を設定します。ハーフオープン状態では、一定数の呼び出しのみが許可されます。
resilience4j.circuitbreaker.instance.EMPLOYEE-SERVICE.slidingWindowSize=10
Circuit Breakerのスライディングウィンドウのサイズを設定します。スライディングウィンドウは、一定時間の呼び出しを追跡し、失敗率を計算するために使用されます。
resilience4j.circuitbreaker.instance.EMPLOYEE-SERVICE.slidingWindowType=COUNT-BASED
Circuit Breakerのスライディングウィンドウのタイプを設定します。 'COUNT-BASED'に設定すると、呼び出し数に基づいてスライディングウィンドウが動作します。他のオプションとして'TIME-BASED'を使うこともできます。
詳しくは以下のドキュメントを参照。
5.5 employee-service再起動


public APIResponseDto getDefaultDepartment(Long employeeId, Exception exception) {
        Employee employee = employeeRepository.findById(employeeId).get();
Exception exceptionを追加します。


再起動して再度確認しましょう。

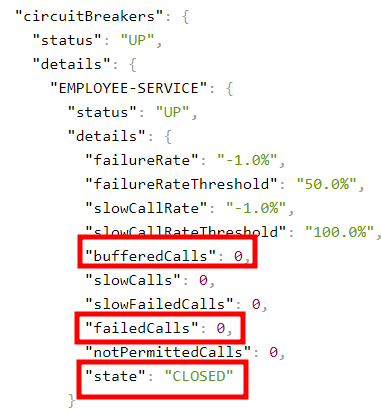
サーキットブレーカーがどのようにして 「HALF_OPEN」状態だけでなく「 OPEN」状態にも移行するのかを理解しよう。


5回目のリクエストを繰り返します。

もう1回リクエストを送ります。
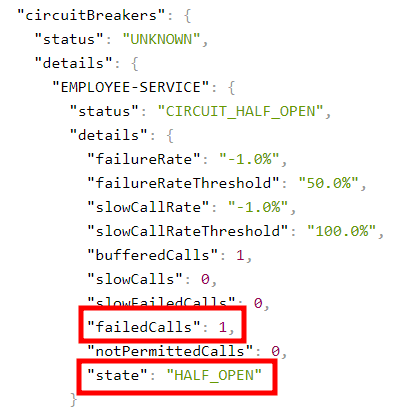


リクエストをさらに2回繰り返す。
6.「Resilience4j」で Retryパターンの実装

6.1 @Retryアノテーション
//@CircuitBreaker(name = "${spring.application.name}", fallbackMethod = "getDefaultDepartment")
@Retry(name = "${spring.application.name}", fallbackMethod = "getDefaultDepartment")
    @Override
    public APIResponseDto getEmployeeById(Long employeeId) {

        Employee employee = employeeRepository.findById(employeeId).get();
6.2 Fallbackメソッド
下記のコードは既に実装されているので、次に進みます。
public APIResponseDto getDefaultDepartment(Long employeeId, Exception exception) {
6.3 Retry設定を追加
# Retry Configuration
resilience4j.retry.instances.EMPLOYEE-SERVICE.registerHealthIndicator=true
resilience4j.retry.instances.EMPLOYEE-SERVICE.maxRetryAttempts=5
resilience4j.retry.instances.EMPLOYEE-SERVICE.waitDuration=1s
EmployeeServiceImplでLOGGERインスタンスを作成し、getEmployeeByIdメソッドのコードブロック内にLOGGER.info("inside getEmployeeById() method");のコードを挿入します。fallbackメソッドであるgetDefaultDepartmentにも同じように入力します。
private static final Logger LOGGER = LoggerFactory.getLogger(EmployeeServiceImpl.class);
..
..
 @Retry(name = "${spring.application.name}", fallbackMethod = "getDefaultDepartment")
    @Override
    public APIResponseDto getEmployeeById(Long employeeId) {

        LOGGER.info("inside getEmployeeById() method");
        Employee employee = employeeRepository.findById(employeeId).get();
...
public APIResponseDto getDefaultDepartment(Long employeeId, Exception exception) {
LOGGER.info("inside getDefaultDepartment() method");
Employee employee = employeeRepository.findById(employeeId).get();
...6.4 employee-serviceの再起動
retryパターンをテストするためdepartment-serviceをダウンさせます。


https://github.com/Commonerd/springboot-microservices
7. 最後に
マイクロサービスの監視と故障許容に関する内容を説明しました。具体的には、分散トレーシング(Distributed Tracing)とサーキットブレーカーパターン(Circuit Breaker Pattern)について説明して実装もしてみました。
分散トレーシングは、マイクロサービスアーキテクチャや分散システム内でリクエストやトランザクションの動作を追跡するためのテクニックであり、トレースIDとスパンIDを使用してリクエストの経路を可視化します。
サーキットブレーカーパターンは、エラー処理と可用性向上のためのデザインパターンであり、「CLOSED」状態、「OPEN」状態、「HALF OPEN」状態の3つの状態でリクエストの制御を行います。また、リトライパターンも実装し、リトライ回数や待機時間を設定しています。
そんマイクロサービスの監視と故障許容方法は、大規模のシステムを開発する際には、必須知識になりそうですね!
エンジニアファーストの会社 株式会社CRE-CO
ソンさん
【参考】
[Udemy] Building Microservices with Spring Boot & Spring Cloud
この記事が気に入ったらサポートをしてみませんか?