
簡単アニメキャラ抜き出しアプリ

画像中のアニメのキャラクタだけを抜き出したいことってありますよね。Illustratorなどの画像処理系アプリを使えばそれなりに出来ますし、WebUIなど、StableDiffusionで生成する時に背景削除も出来るようになっています。そのような中でキャラクタを取り出して画像の中央に配置し、ついでにアップスケールで自在に大きさを変えたり、キャンパスサイズを変更してキャラクタの一部、例えば顔やポートレート、上半身等の画像を手軽に欲しくなることはありませんか? このアプリはAnime−Face-DetectionとAnimeSegmentation(背景削除)、Real-SERGAN(UP-Scale:超解像度)nの3種類のAIを組み合わせて上記のような画像の切り出しを簡単に行うことができます。
背景
3年前、まだStableDiffusionが発表される前に筆者は当時最先端であったStyelGANを独自にモデルの学習から行い、高精度なアニメ顔やポートレート画像を生成するアプリを開発していました。その中で多量の学習データを正しいアライメントに配置するためにnagadomi氏のAnime−Face-Detectionを利用していましたが、AIではなかったために精度が悪く、収集画像の半分は捨てていました。更に背景もそのまま付いて来るため学習素材としては最適とは言えず、人手で学習データのスクリーニングを行っていました。この作業が大変だったため、SSDを用いて顔検出精度を向上させるとともにSSDで学習する画像の厳選を行うことで品質の高い画像のみを検出させる試みを実施し、独自のAnime−Face-DetectionーAIを完成させました。その後、背景削除も取りれて学習素材として非常に質の高い画像が得られる環境が整いました。すでにアプリはRev1として公開しており、さらなる画質の向上を目指して新たな学習データの作成をする段階にありましたが、Stable-DIffusionの登場により頓挫してしまいます。その後、キャラクタを動かすことに集中し、Talking-Head-Anime-3を用いてキャラクタを動かす過程でキャラの顔を大きくしたいという要求から超解像度の導入を進め、Anime顔専用モデルがあって高速にアップスケールが可能なReal-ESRGANを取り入れた超解像度機能付きのTalking-Head-Anime-3による動画作成アプリを開発しましたがあまりにも複雑なため実用化に至らずお蔵入りしてしましました。ただしこれらの技術はAITuberの開発に引き継がれて現在に至っています。もちろん過去記事にあるようにリアルタイム性を追求するための様々な工夫も取り入れました。
Talking-Head-Anime-3のテンプレートは面倒
Talking-Head-Anime-3のテンプレートは以下のような縛りがあります。
これを画像処理ソフトで作成するのか結構な手間がかかるので、Talking-Head-Anime-3の特徴である1枚絵があればどんなキャラクタでも簡単に動かせる機能を十分に使いこなせませんでした。そこで、StelGANの学習データのアライメントを自動で作成する機能を用いてテンプレート自動作成機能を統合しました。これが以下のアプリです。(この画像はアップスケールも行ったときのアウトプットです。)

このアプリはマルチプロセッシングを駆使して動かしているため、使い方が面倒で、Windowsへのインストールに手間取るようです。内部の動きは別途詳細を説明する記事は書きたいのですが、長くなるので時間ができたらとします。バグや修正点も多くあるので-V2になってからになるかと思います。
派生アプリとしてのアニメキャラ切り出し
ここまででご理解いただけたと思いますが、Talking-Head-Anime-3のテンプレート自動抜き出し機能は、単体で利用すれば様々な絵柄からキャラクタだけを抜きだして中央にアライメントしてくれる便利な機能だと気が付きました。そして少し工夫をして顔検出時の大きさと、指定した顔エリアの大ききさを比較することで任意の倍率にキャラクタを切り出せる機能や、抜き出したキャラクタを貼り付けるキャンパスの大きさの指定、顔検出のコンフィデンスレベルの設定機能などで、検出困難な画像も切り抜ける機能を追加して実現したアプリが「Auto AnimeFace Cropping」となります。リアルタイム性を要求しないアプリなのでGPU無しで動かすことが可能です。
コードの説明
4つの主要コード+GUIから成り立っています。
1)GUI(anime_face_seg.py)
2)クロップ計算(anime_image_2_chracter_class.py)
3)Anime−Face-Detection(face_d_api_class.py)
4)Anime-Segmentation(del_bkg_api_class .py)
5)Real-ESRGAN(upscal_class.py)
1)GUI(anime_face_seg.py)
ここはとてもシンプルなコードです。gradioから得た変数をanime_image_2_chracter_class.pyへ渡して結果をgradioで表示しているだけです。以下コードです。
I2f = Image2form()
で初期化を行いすべてのAIのウエイトを読み込んでいます。
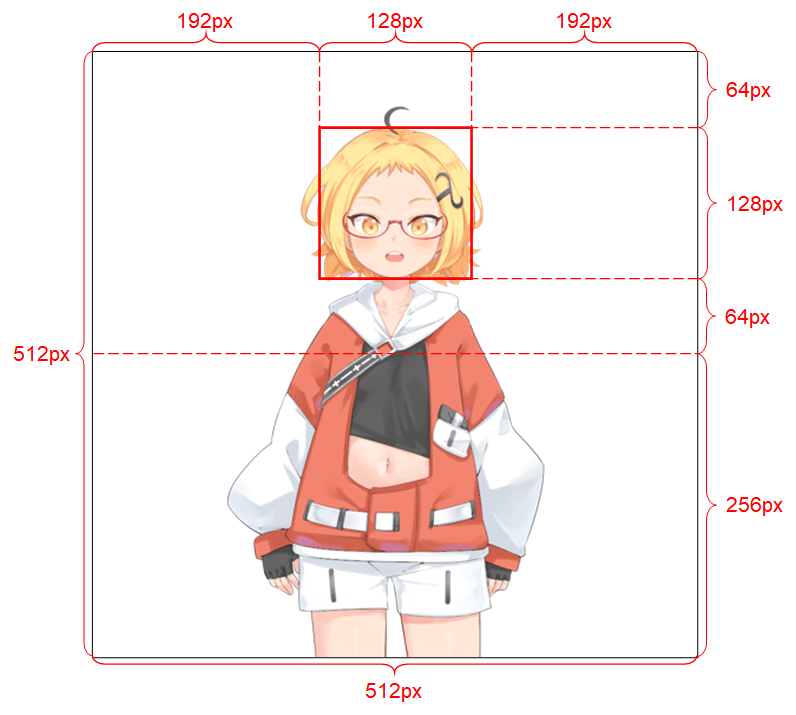
result, pil_w_img = I2f.image_data_formで実際に切り抜きの実行とキャンパスへの貼り付けを行っています。各変数についてはanime_image_2_chracter_class.py中で以下のように定義しています。説明を追記しておきます。
input_image, # 入力イメージ pillow、OpenCVでα-chもok
out_form="pil", # 入出力形式指定 Pillow="pil"、OpenCV="CV2"
h=512, # キャンパスの高さ
w=512, # キャンパスの幅さ
top_space=64, # 貼り付け時の上部のスペース指定
head=128, # 検出顔の大きさ=切り抜き後の顔の大きさ
cnfidence_level=0.5, # 顔検出時のConfidencelebel
mask=False, # 背景削除時にマスク生成指定
del_flag=True # 背景削除をするかしないかを指定
iface = gr.Interface以下がgradio-UIのコードです。
import gradio as gr
from anime_image_2_chracter_class import Image2form

I2f = Image2form()

def process_image(image, img_type, h, w, top_space, head, confidence_level, mask):

    result, pil_w_img = I2f.image_data_form(image, img_type, h=int(h), w=int(w), top_space=int(top_space), head=int(head),confidence_level=float(confidence_level), mask=mask, del_flag=True)
    return pil_w_img

iface = gr.Interface(
    fn=process_image,
    inputs=[
        gr.components.Image(type="pil", label="Input Image"),
        gr.components.Dropdown(choices=["pil", "other"], value="pil",label="Image Type"),
        gr.components.Slider(minimum=1, maximum=2048, value=1024, label="Height"),
        gr.components.Slider(minimum=1, maximum=2048, value=756, label="Width"),
        gr.components.Slider(minimum=0, maximum=100, value=20, label="Top Space"),
        gr.components.Slider(minimum=1, maximum=512, value=256, label="Head size"),
        gr.components.Slider(minimum=0.1, maximum=1.0, value=0.5, label="Face detection confidence level"),
        gr.components.Checkbox(value=False, label="Mask"),
    ],
    outputs=gr.components.Image(type="pil", label="Processed Image"),
    title="Anime Character Cropping from Image",
    description="Cropping an anime character form input-image and upscale/resize."
)

iface.launch(share=True)
クロップのための顔検出とエリア計算
anime_image_2_chracter_class.pyがコード本体です。
class Image2form():
    def __init__(self):
        self.UP=Up_Scale()
        self.AF=AnimeFaceDetect()
        self.BG=DeleteBackground()

    # *************** TKH用にinput_imageをフォーミングする。out_formで出力をpilかcvに指定、mask:True= マスク生成,del_flegで背景削除の有無を指定する。
    #    例)Talking-Head用アライメント画像作成
    #        input_image =image_data_form(input_image ,"pil",False)
クラス定義と、使用する3種類のAIの初期化、すなわちウエイトのロードを行っています。
1)変数定義部です。
def image_data_form(self,
                input_image,
                out_form="pil",
                h=512,
                w=512,
                top_space=64,
                head=128,
                confidence_level=0.5,
                mask=False,
                del_flag=True
                ): #入出力の画像形式はout_formで指定
2)画像形式に基づき、αチャンネルの有無を確認。
del_flagの設定に応じて背景削除を行います。
そしてAnime−Face-Detectionの仕様にあるようαチャンネルを削除し、
imge, dnum, predict_bbox, pre_dict_label_index, scores =self.AF.face_det_head(cv_w_img,1.68,0.5, confidence_level)#face-head検出
でAnime−Face-Detectionを実行しています。得られる結果は以下の通り。
Imge, バウンディングbox付きの画像イメージ
dnum, 検出数
predict_bbox, 検出された顔の位置データ [x-y, x+W-y+h]が検出数並ぶ
pre_dict_label_index, 検出された顔の属性(girl,boy)
scores 検出角度(Confidencerevele)
        result =True
        if out_form=="cv":#input is cv
            height, width, channels = input_image.shape
            if channels != 4: #αチャンネルがなければ背景を削除してチャンネル追加
                input_image,_=self.BG.del_bkg_out(input_image , "cv")
        else:
            if input_image.mode != "RGBA": #αチャンネルがな背景を削除してチャンネル追加
                input_image ,_=self.BG.del_bkg_out(input_image , "pil")
            np_w_img = np.array(input_image, dtype=np.uint8)
            input_image = cv2.cvtColor(np_w_img, cv2.COLOR_RGBA2BGRA) #input_image = 背景を削除 OpeCV
        cv_w_img = cv2.cvtColor(input_image, cv2.COLOR_BGRA2BGR)#Face detectのためにαチャンネルを削除
        imge, dnum, predict_bbox, pre_dict_label_index, scores =self.AF.face_det_head(cv_w_img,1.68,0.5, confidence_level)#face-head検出   ratio=1.68, shift=0.5, confidence_level=0.5
        print("bbox=",predict_bbox,"label=",pre_dict_label_index,"score=",scores)
3)拡大縮小率を求める
検出された顔の大きさと、与えられた比較サイズ(head)から拡大縮小率を求めています。
resize_facter=head/int(box[0]-box[2])
        box=predict_bbox[0]
        print("box= ",box)
        #face-head検出のバウンディングbox付きの大きさを元に画像の拡大率を計算(THKのフォフォームに合わせるため:Head=128標準 )
        box_disp=(box[0],box[1]),(box[2],box[3])
        print(box_disp)
        print("BOX SIZE=",int(box[0]-box[2]),int(box[1]-box[3]))
        resize_facter=head/int(box[0]-box[2])
        print("resize_facter=",resize_facter) #HeadからResizeのファクタを計算
4)拡大縮小率に応じてアップスケールと縮小を行います。
コメントにあるとおり、
resize_facter > 4 4倍以上の拡大は推奨できないのでエラー
resize_facter > 2 4倍未満、2倍以上は4倍し指定サイズに縮小
resize_facter > 1 2倍未満、1倍以上は2倍し指定サイズに縮小
resize_facter < 1 1倍以下は指定のサイズに縮小する
        if resize_facter > 4:   #4倍以上の拡大は推奨できないのでエラー
            print("image is too small")
            result="image is too small"
        elif resize_facter > 2: #4倍して所定のサイズに縮小する

            input_image = self.UP.upscale(input_image, 4)  #upscale
            image_resaize=resize_facter/4
        elif resize_facter > 1: #2倍して所定のサイズに縮小する
            input_image = self.UP.upscale(input_image, 2)  #upscale             image_resaize=resize_facter/2
        else: # 1> reasize >0 なのでそのまま縮小率として使う
            image_resaize=resize_facter
最終的なサイズに整合させて画像の高さと幅を得ます。
        height, width, channels = input_image.shape
        cv_resize_img = cv2.resize(input_image, dsize=(round(width*image_resaize),round(height*(image_resaize))),interpolation = cv2.INTER_AREA)
        height, width, channels = cv_resize_img.shape#縮小した画像のH,W取得
        print("resize_image h= ",height,"w= ",width,"Channels= ",channels)
5)顔の位置を計算
拡大縮小を終えた顔の位置をresize_facterと検出時のバウンディングbox位置から計算
        #バウンディングboxは検出字のresize_facterを使う
        top=int(box[3]*resize_facter)
        left=int(box[2]*resize_facter)
        bottom=int(box[1]*resize_facter)
        right=int(box[0]*resize_facter)
        print("top=",top,"left=",left,"bottom=",bottom,"right=",right)
6)αチャンネルpillowイメージ画像に変換
        #αチャンネル付き入力画像をPILイメージに変換
        nd_input_image = cv2.cvtColor(cv_resize_img, cv2.COLOR_BGRA2RGBA)
        pil_input_image = Image.fromarray(nd_input_image)
7)指定された大きさのキャンバズを作成
        # W,Hピクセルで、全てのピクセルが透明な画像を作成
        pil_out_image = Image.new("RGBA", (w, h), (0, 0, 0, 0))
8)貼り付け位置を計算
        # ペーストする位置を指定
        p_top = top_space-top #バウンディングboxの位置が64pixよりも大きければ差がペースト位置、小さければ差がマイナスになっているがpilではOK
        p_left = int(w/2)-int(head/2)-left
8)キャラクタ画像を貼り付ける
        # 画像の大きさを調整した入力画像をアルファチャンネルを考慮して前景画像を背景画像にペースト
        pil_out_image.paste(pil_input_image, (p_left, p_top), pil_input_image)
9)指定された出力形式に変換して返す
        if out_form=="pil":
            return result, pil_out_image
        elif out_form=="cv":
            np_w_img = np.array(pil_out_image, dtype=np.uint8)
            cv_out_image = cv2.cvtColor(np_w_img, cv2.COLOR_RGBA2BGRA) #input_image = 背景を削除 OpeCV
            return result, cv_out_image
Anime−Face-Detectionクラス
1)クラスの定義と初期化
検出するラベルを定義
self.voc_classes = ['girl', 'girl_low', 'man', 'man_low']
SSDのパラメータを定義し初期化
以下でウエイトをロード
self.net = SSD(phase="inference", cfg=self.ssd_cfg)
net_weights = torch.load(weight_path, map_location={'cuda:0': 'cpu'})
self.net.load_state_dict(net_weights)
class AnimeFaceDetect:
    def __init__(self, weight_path='./weights/ssd_best8.pth'):
        # 初期設定: クラス分類とネットワーク設定
        self.voc_classes = ['girl', 'girl_low', 'man', 'man_low']
        self.ssd_cfg = {
            'num_classes': 5,  # 背景クラスを含めたクラス数
            'input_size': 300,  # 入力画像サイズ
            'bbox_aspect_num': [4, 6, 6, 6, 4, 4],  # DBoxのアスペクト比
            'feature_maps': [38, 19, 10, 5, 3, 1],  # 特徴マップのサイズ
            'steps': [8, 16, 32, 64, 100, 300],  # DBoxのサイズを決定
            'min_sizes': [21, 45, 99, 153, 207, 261],  # 最小サイズ
            'max_sizes': [45, 99, 153, 207, 261, 315],  # 最大サイズ
            'aspect_ratios': [[2], [2, 3], [2, 3], [2, 3], [2], [2]]
        }
        self.net = SSD(phase="inference", cfg=self.ssd_cfg)
        net_weights = torch.load(weight_path, map_location={'cuda:0': 'cpu'})
        self.net.load_state_dict(net_weights)
        print('ネットワーク設定完了:学習済みの重みをロードしました')
2)基本的な顔検出を行うメソッド(Anime−Face-Detection)
    def face_det(self, img_data, confidence_level):
        # 基本的な顔検出を行うメソッド
        ssd = SSDPredictShow(eval_categories=self.voc_classes, net=self.net)
        rgb_img, predict_bbox, pre_dict_label_index, scores = ssd.ssd_predict(img_data, confidence_level)
        dnum = len(pre_dict_label_index)
        return dnum, rgb_img, predict_bbox, pre_dict_label_index, scores
3)正方形の顔検出を行うメソッド
SSD実行後に正方形のバウンディングエリアを計算して返す
        ssd = SSDPredictShow(eval_categories=self.voc_classes, net=self.net)
        print("検出開始")
        rgb_img, predict_bbox, pre_dict_label_index, scores = ssd.ssd_predict(img_data, confidence_level)
        dnum = len(pre_dict_label_index)
        for i in range(dnum):
            box = predict_bbox[i]
            if (box[2] - box[0]) > (box[3] - box[1]):
                box_hlf = (box[3] - box[1]) / 2
                horizontal_center = (box[2] + box[0]) / 2
                box[0] = horizontal_center - box_hlf
                box[2] = horizontal_center + box_hlf
            else:
                box_hlf = (box[2] - box[0]) / 2
                vertical_center = (box[3] + box[1]) / 2
                box[1] = vertical_center - box_hlf
                box[3] = vertical_center + box_hlf
        return dnum, rgb_img, predict_bbox, pre_dict_label_index, scores
4)正方形の頭全体の検出を行うメソッド
SSD実行後に頭全体が入るように調整しれバウンディングエリアを返す
    def face_det_head(self, img_data, ratio, shift, confidence_level):
        print("confidence_level=",confidence_level)
        voc_classes = ['girl', 'girl_low', 'man', 'man_low']
        try:
            ssd = SSDPredictShow(eval_categories=self.voc_classes, net=self.net)
            print("step1")
            print("step2")
            # ボックスなどを取得
            rgb_img, predict_bbox, pre_dict_label_index, scores = ssd.ssd_predict(img_data,confidence_level)
            dnum=len(pre_dict_label_index)
            for i in range(dnum):
                box=predict_bbox[i]
                print(box)
                if (box[2] - box[0]) > (box[3] - box[1]):
                    box_hlf=(box[3] - box[1])/2
                    horizontal_center = (box[2] + box[0])/2
                    print("horizontal_center=",horizontal_center, "box_hlf=",box_hlf)
                    box[0]=horizontal_center + box_hlf
                    box[2]=horizontal_center - box_hlf
                else:
                    box_hlf=(box[2] - box[0])/2
                    vurtical_center=(box[3] + box[1])/2
                    print("vurtical_center=",vurtical_center, "box_hlf=",box_hlf)
                    box[1]=vurtical_center - box_hlf
                    box[3]=vurtical_center + box_hlf
                #head expantion
                new_horizontal_center = (box[2] + box[0])/2
                new_vurtical_center   = (box[3] + box[1])/2
                new_box_hlf=(box[2] - box[0])/2
                new_box_half=new_box_hlf*ratio
                new_horizontal_center = (box[2] + box[0])/2
                new_vurtical_center=(box[3] + box[1])/2
                box[0]=new_horizontal_center - new_box_half
                box[2]=new_horizontal_center + new_box_half
                box[1]=new_vurtical_center - new_box_half + new_box_half*shift
                box[3]=new_vurtical_center + new_box_half + new_box_half*shift
            return dnum,rgb_img, predict_bbox, pre_dict_label_index, scores
        except:
            print("SSD error")
            return False
背景削除(Anime-Segmentation)
Anime-Segmentationを用いてアニメに特化した高精度の背景削除を実行します。
1)クラスの定義と初期化
cpuを指定してウエイトをロード
self.model = AnimeSegmentation.try_load('isnet_is', 'weights/isnetis.ckpt', 'cpu')
self.model.eval()
self.model.to(device)
class DeleteBackground():
       def __init__(self):
              # イニシャライズ
              self.img_size=1024
              device = torch.device('cpu')
              self.model = AnimeSegmentation.try_load('isnet_is', 'weights/isnetis.ckpt', 'cpu')
              self.model.eval()
              self.model.to(device)
2)通常の背景削除 (del_bkg)
通常はこちらをつかいます。ここからdel_bkg_outが呼ばれて指定形式で戻します。get_maskで得られたマスクを用いて元画像から背景を削除
       def del_bkg(self,image, mode):
              print("mode=",mode)
              img = image
              out_img , mask = self.del_bkg_out(img ,mode)
              return out_img , mask

       def del_bkg_out(self,img , img_mode): #del_bkg_out  背景削除     # Input :  img=image , img_mode="pil" or "cv"
               if  img_mode=="pil":
                   img= np.array( img, dtype=np.uint8)
               else:
                   img = cv2.cvtColor(img, cv2.COLOR_BGR2RGB)#カラーチャンネル変換
               mask = self.get_mask(self.model, img , 1024) # mask
               img = np.concatenate((mask * img + 1 - mask, mask * 255), axis=2).astype(np.uint8) # イメージにマスクを追加mask
               pil_img= Image.fromarray(img)
               if  img_mode=="pil":
                   return pil_img , mask  #imgはpillow、maskはcv2
               else:
                   new_image = np.array(pil_img, dtype=np.uint8)
                   img = cv2.cvtColor(new_image , cv2.COLOR_RGBA2BGRA)#opencv形式
                   return img , mask  #imgとmaskはcv2
3)推論部分
マスク形状を推論します。
       #+++++++++++++++++++ infference  ++++++++++++++++++++
       def get_mask(self,model, input_img,  s=640):
           h0, w0 = h, w = input_img.shape[0], input_img.shape[1]
           if h > w:
               h, w = s, int(s * w / h)
           else:
               h, w = int(s * h / w), s
           ph, pw = s - h, s - w
           tmpImg = np.zeros([s, s, 3], dtype=np.float32)
           tmpImg[ph // 2:ph // 2 + h, pw // 2:pw // 2 + w] = cv2.resize(input_img, (w, h)) / 255
           tmpImg = tmpImg.transpose((2, 0, 1))
           tmpImg = torch.from_numpy(tmpImg).unsqueeze(0).type(torch.FloatTensor).to(model.device)
           with torch.no_grad():
               pred = model(tmpImg)
               pred = pred[0, :, ph // 2:ph // 2 + h, pw // 2:pw // 2 + w]
               pred = cv2.resize(pred.cpu().numpy().transpose((1, 2, 0)), (w0, h0))[:, :, np.newaxis]
               return pred
アップスケール(超解像度、Real-ESRGAN)
Real-ESRGANとアニメ専用のウエイトを用いて高精度で画像をアップスケールします。拡大率はx2、x4、x8です。
1)クラス定義と初期化
class  Up_Scale():
    #+++++++++++++++++++  init  +++++++++++++++++++
    def __init__(self):
        model_name = 'realesr-animevideov3'
        model = SRVGGNetCompact(num_in_ch=3, num_out_ch=3, num_feat=64, num_conv=16, upscale=4, act_type='prelu')
        netscale = 4
        model_path = "./weights/" + model_name +".pth"
        print(model_path )
        dni_weight = None

        self.upsampler = RealESRGANer(
                scale=netscale,
                model_path=model_path,
                dni_weight=dni_weight,
                model=model,
                tile=0,
                tile_pad=10,
                pre_pad=0,
                half=True,
                gpu_id=0)
2)アップスケールの実行
output, _ = self.upsampler.enhance(img , outscale=scale)
で拡大画像を得ています。outscale=scaleで拡大率が指定できまます。画像の種類は選びません。
    # ++++++++++++++  up scale ++++++++++++++++ img=OpenCV ndarrey BGR or BGRA
    def  upscale(self,img , scale):
        try:
                output, _ = self.upsampler.enhance(img , outscale=scale)
        except RuntimeError as error:
                print('Error', error)
                print('If you encounter CUDA out of memory, try to set --tile with a smaller number.')
        return output
まとめ
2〜3年前のAIですが便利なツールとして活用するのであれば最新AIに頼る必要も無いので、公開しました。