
Michinoku Costal Trail Route Guide 1/50 Kabushima Island(Hachinohe City) - Tanesashi Coast - Hashikami Station(Hashikami Town)

Hello. I live in Miyako City, Iwate Prefecture, Japan.
I work as a guide for the Michinoku Coastal Trail and Sanriku Geopark, also the manager of Guest House 3710 in Miyako City.
This article is detailed route guide of the Michinoku Coastal Trail. One of the 50 sections that divide the entire route.
Very detailed and specific introduction of entire route.
Based on experience of actually walking the entire route two times, both southbound(SOBO) / northbound(NOBO).
The article is written as the southbound (SOBO) route. But, there may also be photos and explanations of the northbound (NOBO) route.
If you want to know basic information about the Michinoku Coastal Trail in general, please read the article below first (It's a free article).
Also, before actually walking, be sure to read the Michinoku Trail Club's "Alerts" before starting.
For example, the latest information on detours due to construction is posted.
(This article is based on information as of June 2024. The information provided is for reference only. Please do your own research, make a plan, and act at your own risk. Please note that I cannot be held responsible for any trouble or accidents that may occur as a result of using this information.)
0. Overview of this area
This is the northern end of the Michinoku Coastal Trail, from Kabushima island in Hachinohe City to Hashikami Station in Hashikami Town.
This route is mostly paved, with few ups and downs.
It is a scenic route with many parts of it overlooking the ocean.
There are several shops along the route, making it a perfect course for beginners.
However, you will be walking on a sandy beach for a long time on the way, so be careful not to get too hot or get your feet tired.
Distance: Approximately 20km
Maximum elevation: Approximately 20m
Estimated time required: 5 hours
Route difficulty: Very easy
Access to public transportation: easy
Accommodations: Many (Around Hon-Hachinohe Station)
Campsite: Available (Tanesashi Campground)
Restaurants: Several
Stores: Several
1. Kabushima Island to Osuka Beach
The northern Head/End point of the Michinoku Coastal Trail is Kabushima Island in Hachinohe City.

In reality, you will most likely use the JR Hachinohe Line and use Same Station as your starting and finishing point.
Also, the accommodations are not located at Same Station, but around Honhachinohe Station, which is 4 stations away.
There are not many accommodations around Hachinohe Station, where the Tohoku Shinkansen stops.

"Same" means "Shark" in English. It is a unique station name even from a Japanese people.
There is a one-coin bus that connects Same Station (or Kabushima Island) to Tanesashi Coast, which is convenient for section hikers, but the bus stop is not inside the Same Station rotary.
It is located on the road that starts walking towards Kabushima Island.
Information of one-coin bus "Umineko" (Only Japanese)

Kabushima Island is just a short walk from Same Station.
Kabushima Island used to be a real island, but now the sandbar has been landfilled and it is connected to the land. Kabushima Shrine is located at the top of Kabushima Island.
Kabushima Island is a nesting site of seacats, a type of seagull. Seacats have many nesting sites along the Sanriku coast. However, they are often on cliffs or reefs, so places like Kabushima Island where you can see close to seacats are valuable.
Seacats get there name from their voice, which resembles that of a cat.
The photo below was taken in June.
This was the breeding season, so there are a lot of seacats. The yellow flowers are canola flowers. What looks like white dots are seacats.

Seacats droppings are falling everywhere on Kabushima Island.
They can also fall from overhead, so be careful.
Umbrellas are also available for rent.
However, in Japan, getting bird droppings on your body is sometimes called good fortune.
This is because the Japanese word "Un" which means "bird droppings" is pronounced the same as the Japanese word "Un" which means "fortune".
And, although it is often overlooked, past tsunami height is displayed on the stairs to the shrine. The Michinoku Coastal Trail is also a way to learn about the Great East Japan Earthquake.

The head/end point of the Michinoku Coastal Trail is in front of the sandy beach near Kabushima Island. There are only two locations in the world: here and Matsukawaura Environmental Park in Soma City, Fukushima Prefecture.
This is the start of a journey of over 1000km (Hiking Map Book N-S 0.00).

Immediately after starting along the sandy beach, you will find the Fisheries Science Museum Marient.

The inside of the museum is worth seeing, and the view towards Kabushima Island from the observation deck is also wonderful.

Just after passing through Marient, you will see the first trail sign.
Here the route leaves the paved road and heads along the fence towards the embankment (Hiking Map Book N-S 0.72).

There is a "whale stone" at a shrine along the way.
There is an old story that a whale god named "Taro Hachinohe" became this stone.

After passing through the shrine, you will come to the entrance of Ebisuhama fishing port.
Nearby there is "S-net", a tsunami detection system for the Japan Trench, which is part of the earthquake detection system "MOWLAS".
Based on the experience of the Great East Japan Earthquake, "S-net" is a plan to install 5,000 km of submarine cables throughout the coast of the Japan Trench in order to quickly detect tsunami.
This has enabled emergency stoppages of Shinkansen trains and improved accuracy of earthquake early warnings.
This is one of the places where the submarine cable comes out on land.
There is a "No Trespassing" sign on the fence leading to the embankment.
However, there is a sign right next to it that says "Hikers can pass,'' so you can proceed to the embankment from the side of the fence (Hiking Map Book N-S 0.90).
Like that, you'll see many signs along the route indicating only hikers are allowed to walk.

As you proceed along the embankment, you will see the trail traffic survey counter for the first time.
Please press the counter only once when passing by.
Also, the trail for a while from here walks along the rocky shore, so it is impassable during high waves. In that case, detour to a paved road.
There are pillow lava rocks around here. It has a rounded and squashed shape. These rocks were formed by hardening lava from past submarine volcanic activity.
When the lava cooled, the outside part cooled first and expanded into a round shape, and the subsequent lava that flowed out also solidified into a round shape.

The route follows the coast for a while.
There is a route sign unique to fishing ports, with an arrow drawn on a floating ball (Hiking Map Book N-S 1.51).

At this point, leave the coast, turn right, and climb up the rocky area.

Climb up the rocky area and you'll find a floating ball and a pillar.
This area is called "Samekado".
It is generally said that this is the northern tip of the "Sanriku Coast."
It can also be called the northern tip of the Kitakami mountains.
Samekado Lighthouse and a racehorse farm called Taihei Farm are also nearby.
This pillar is called a milepost and is a landmark placed to measure a ship's speed performance.
There is another one left near Samekado Lighthouse (Hiking Map Book N-S 2.13).

From here, the route follows the prefectural road for a while.
There is a pillar-like rock in the sea that can be clearly seen from the road, and it is called "Itakomaimai Iwa Rock."
It means "the rock on which the shrine maiden danced."
This rock was formed when lava cools and hardens due to submarine volcanic activity.
The rock was eroded by waves and formed into this shape.
There is a legend that a shrine maiden once performed a dance on the top of this rock, which is where the name comes from.

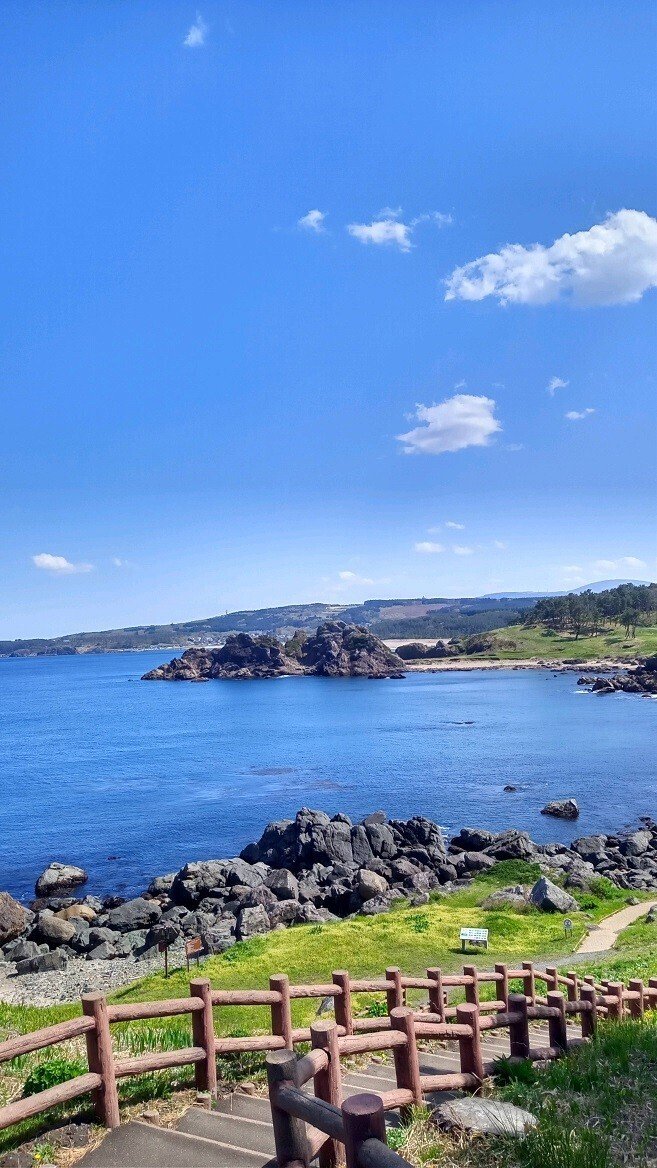
Proceeding along the prefectural road, you will reach the Ashigezaki Observation Deck.
A panoramic view of the Pacific Ocean.
There is also a gelato shop, Horonbairu, in front of the deck (Hiking Map Book N-S 2.55).


From the Ashigezaki Observation Deck, proceed to the Nakasuka Beach.
You can walk around this area as if you were on a picnic.
It's a peaceful road compared to the areas around Tanohata Village and Miyako City, which are known as the "Alps of the Sea."
At Nakasuka Beach, the sea and flowers along the sidewalk are beautiful.
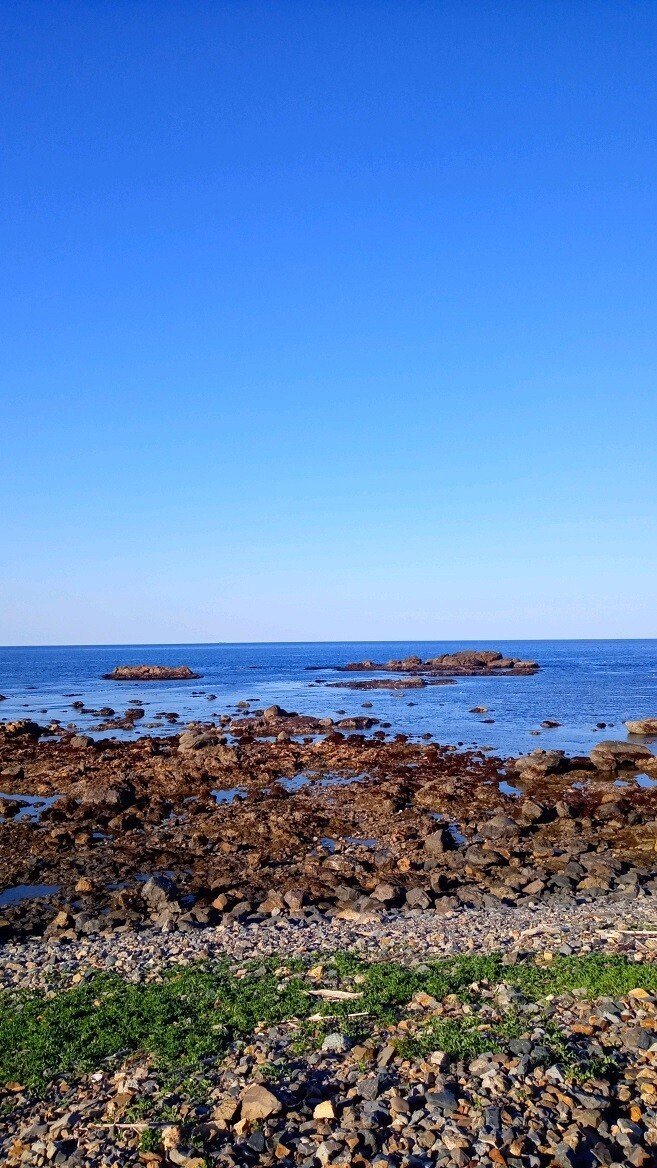
After finishing Nakasuka Beach, you will now walk on the sandy beach of Osuka Beach (Hiking Map Book N-S 3.61).

A photo below is looks like "This is exactly Michinoku Coastal Trail".
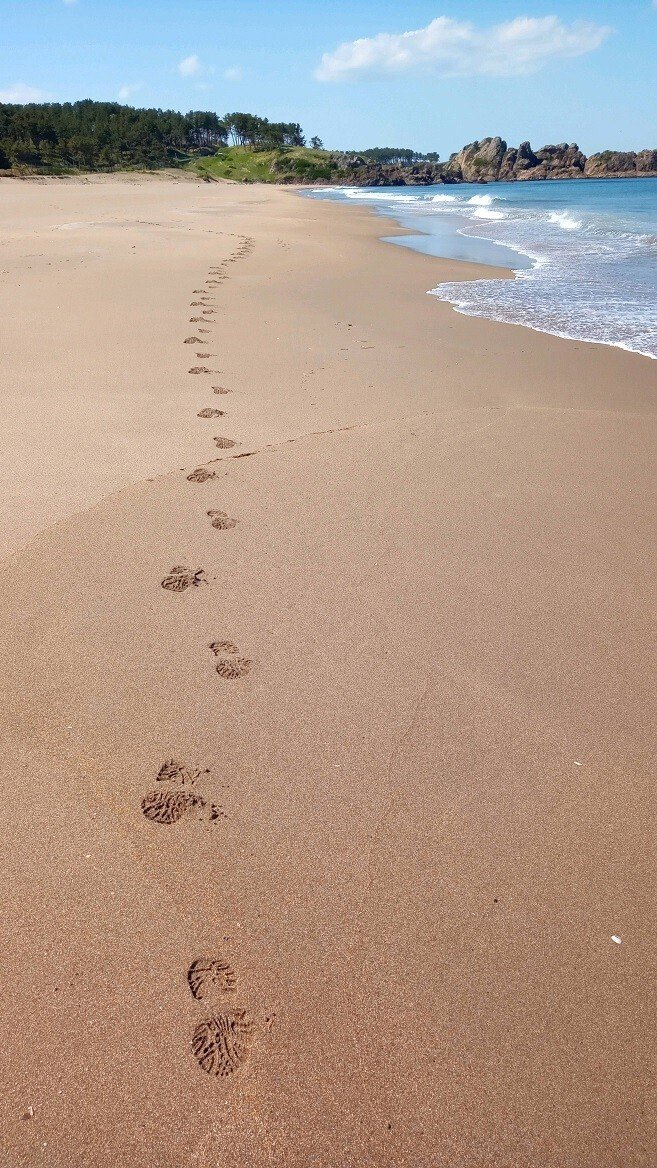
Walking on the sandy beach is fun, but the walking distance is nearly 2km, which can be surprisingly tiring for your feet.
The distance of walking along this sandy beach is probably the longest along the entire route.
By the way, if you listen carefully, you may hear a squeaking sound when stepping on sand.
This is the sound that comes from the rubbing of the mineral components contained in the sand here, and is called "singing sand".

Several streams flows into Osuka Beach.
It may be difficult to cross when the water is rising.
Also, if you find it difficult to walk on the sand, take a detour to paved road.
2. Osuka Beach to Tanesashi Coast Information Center
After walking along Osuka Beach, you will enter the fishing port.

There are no trespassing signs, but hikers are allowed.
Signs like this, which are only open to hikers, will be seen often in other parts of the south.
Pass through the fence and continue along the fishing port (Hiking Map Book N-S 5.67).

After leaving the sidewalk, you will see the same pattern of signs again (Hiking Map Book N-S 6.23).

Here, for some unknown reason, you will be directed to walk on the mountain side of the building. It's strange because you can walk on the sea side as well.

The path will change to a sidewalk again and enter "Yodo no Matsubara", forest of black pine.
From around the entrance, you can see big white rock in the sea.
The reason this rock looks white is not the color of the rock itself, but the color of the bird droppings.

Walk along the "Yodo no Matsubara" sidewalk.

Along the way, there are signs pointing to the "Bat Hole" and "Hermit Cave".
They are located a little way up off the sidewalk.
There is a legend that a hermit lived in "Hermit Cave" because of the wonderful view of the sea from here.
Additionally, the vertical cracks are known as "bat hole", and it is said that many bats lived here in the past.

There are many huge rocks in the sea near "Hermit Cave".
It is not visible from sidewalk, there is a sea cave with the strange name "Hell Hole'' behind the huge rocks in this seaside.
Legend has it that this "hell hole" is connected to the "Hachinohe hole" in Jodogahama beach, Miyako.
It is also said that there was once a hole called "Hei hole" in the direction of the current Hachinohe mine.
"Hei" is an old name for the Miyako region. As the name "Hei" suggested, it may or may not be connected to Miyako.
I don't know if the legend is true, but it is certain that there has been interaction between Hachinohe and Miyako for a long time.
It's a little romantic.

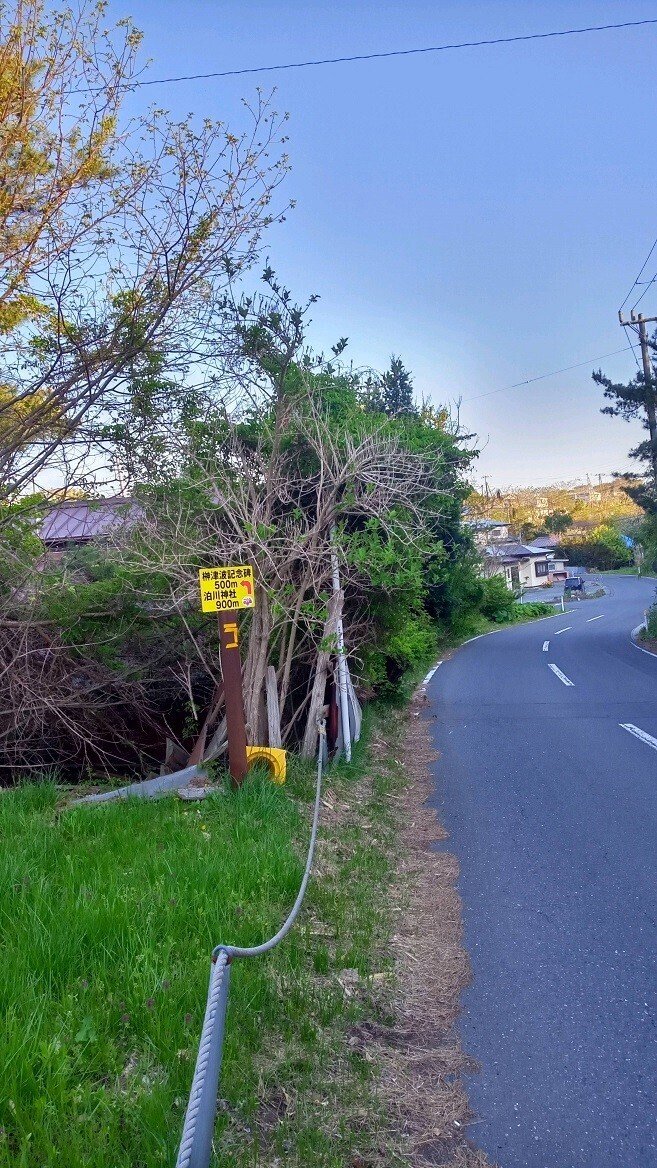
After passing through "Yodo no Matsubara", you will pass through the Tanesashi Campground and reach the natural lawn field of the Tanesashi Coast.
It's a wonderful landscape (Hiking Map Book N-S 7.74).

The Tanesashi Coast Information Center is located here.
It is one of the base facilities of the Michinoku Coastal Trail (Hiking Map Book N-S 7.92).
To use the Tanesashi Campsite, please make a reservation at the Tanesashi Coast Information Center.Opening: late April to around November.
Tanesashi Campsite(Japanese only).

Near the information center, there are restaurants and a Yanagisawa store that sells camping supplies.
There is also Tanesashi Kaigan Station and a bus stop. Hachinohe City's one-coin bus runs from here to Kabushima, so dividing sections here is a good choice as an introductory route(Hiking Map Book N-S 8.07).

Also, if you go up to the mountain side from the information center, you will find the remains of the residence of an artist famous for drawing bird's eye view of this region(Yanagisawa store has a lot of information about this artist. Also, I'm sure you'll see a map of him somewhere while walking along the Sanriku coast).

3. Tanesashi Coast Information Center to Hashikami Station
On the route from Tanesashi Coast, enter the lawn again from the information center.
Go down next to the restroom under the tourist parking lot and proceed along the sandy beach again.
This is a narrow sandy beach, so high waves can be dangerous.
And, if the stream that flows into the beach is swollen, it may be difficult to cross.
In such cases, it is better to take a detour by walking along the paved road from the information center.

Reach the fishing port again (Hiking Map Book N-S 8.98).

From here, you will enter a small path through the bushes.

There is already a second counter.

Continuing through the bushes, the road branches into a T-junction.
The trail route is better to go on the prefectural road, but there is also a route that goes up to the observation point.
If you proceed that way, you will come to the "Takaiwa" observation point.
The view is quite nice.
Returning to the route from the observatory, you will reach the prefectural road.
As soon as you return to the prefectural road, you will branch off to the sea side and come across a rope that is closed to traffic (Hiking Map Book N-S 9.86).
Continue past this road closure.
But this area may be a little difficult to follow.
So, you may walk along the prefectural road from the information center instead of following the route according to the map.

Climb through the forest from the side of the fishing port.

The photo below was taken finished climb the ascent and turned around.

The photo below was also taken looking back from the south, too.
On the left side is a private house, and the route passes by it.

Return to the prefectural road next to this school.
In the case of NorthBound, if you miss this branch, you may end up walking on the prefectural road all the way to the information center.

Okuki Station on the JR Hachinohe Line is right near the school.
It is an unmanned station located in a residential area, and there are no shops nearby, so it is not recommended to use it to separate sections.
Rather than Okuki Station, it is better to break off at Tanesashi Kaigan or continue to Oja Station or Hashikami Station (Hiking Map Book N-S 10.42).
The rute takes a sharp detour from the prefectural road toward the sea, passing by a beach hut that is a cultural heritage site.
The beach hut itself seems to be valuable, but it doesn't seem like it's particularly open to tours.

The route returns to the prefectural road.
If you are coming from the south, you may miss the turn at this intersection and continue on the prefectural road.
The landmarks are the traffic lights and the fire brigade building.
The photo below was taken from the south facing north.
The sea side is on the right.

After that, walk on the prefectural road for a while.
There is Kanehama Station on a side street before entering Hashikami Town, but it is a little off the route, so you probably won't use it (Hiking Map Book N-S 13.51).
And, enter Hashikami Town from Hachinohe City (Hiking Map Book N-S 14.20).

There is a farm-direct facility called "Hashikami Hama no Eki Aldiva". Good for taking a break or using the restroom.
There is also a hiking passport stamp (Hiking Map Book N-S 14.66).
On the map, there is a strange route that goes around the sea side of the building.

Walk along the prefectural road along the coast for a while.
Eventually, you will emerge along the rocky shore of Oja.
The coastline is impressive, with a very rocky feel.
Hiking passport book stamps are also available at the Sakashita store on the Oja coast.
If you go uphill a little north of the store, you will also find Oja Station on the Hachinohe Line (Hiking Map Book N-S 15.42).

Go a little further from Oja, you will enter a district called Sakaki.
There is a fishery facility and a nursery school, and once you pass there you will see a sign pointing to the tsunami monument.
Follow that sign and turn towards the sea.
The route follows the "Uminari line". It means "the sound of the sea."

On top of the hill, there is a monument to the Showa era Sanriku tsunami.

This is an easy-to-see location, but in other areas, there are tsunami monuments hidden on roadsides that are hard to notice.
As you go south along the route, the number of tsunami monuments will increase, so it may be a good idea to keep looking for where they are as you walk.

Proceed further, you will find Tomarikawa Shrine.
The back of the shrine is open to the sea, making it the spot for the first sunrise of the year.

It's certainly a sunrise spot with no obstructions.

Pass the shrine, Hashikami Station is nearby.
Return to the fork in a V-shaped direction and go up the hill.
In the photo below, you are coming from the Hachinohe area on the right and climbing to the left.
If you come from Hashikami Station, go the other way, from left to right in the photo (Hiking Map Book N-S 17.32).

After climbing the hill, cross the Hachinohe Line railroad crossing. There is a trail sign post on the side of the road.

A railroad crossing is made of many railroad ties.
It's a bit interesting.

Immediately after crossing the railroad crossing, turn into the first street.
In the photo below, come from the back and go to the right.
On the other hand, if you are coming from Hashikami Station, don't overlook this alley and railroad crossing.

Pass through the retro-looking shopping street in front of the station, you will arrive at Hashikami Station.
An old arm railway traffic light is on display in front of Hashikami Station.

Arrive at Hashikami Station on the Hachinohe Line (Hiking Map Book N-S 18.12).
There is space for several cars, but only a few.
If you are using a car, it would be safer to park at Tanesashi Coast, Kabushima, or towards Mt. Hashikami.

This southern section is the Mt. Hashikami route, which takes a long time.
If you are doing a section hike, you may want to postpone climbing Mt. Hashakami until later.
It is also possible to go south from Hashikami Station and head towards Taneichi Station first.
You'll have to think about where to divide the area and where to spend the night.
This south section is covered in the following article (paid article) .
Index of contents for all route guide articles is below.
Two articles are available for free as trial versions.
-The first Hachinohe section from the north.
-The last Soma section from the north.(The first section from the south.)
Other articles are paid articles.
Only the beginning of paid articles is free, so if you want to read the rest, you have to pay 300 yen per article.
Purchase Michinoku Coastal Trail Guide (English version)
So, this article is free, but if you would like to support the author, you can pay 300 yen below (No new sentence below, There's just a payment button).
ここから先は
¥ 300
この記事が気に入ったらサポートをしてみませんか?