
Photo by
eiitiaoki
tradingviewのバックテストで決済注文出すときの注意点

pine scriptがわかる方向けの記事です。
「エントリー注文と決済注文が同時にtrueになった場合両方の注文が通るので注意が必要ですよ」という内容です。知ってる人にとっては当たり前のことなのでスルーしていただければと思います。
下記のようなストラテジーを例に出します。
sma期間10とsma期間20のゴールデンクロスで買い
sma期間10とsma期間20のデッドクロスで買い
sma期間8とsma期間16のゴールデンクロスで売り決済
sma期間8とsma期間16のデッドクロスで買い決済
//@version=3
strategy("hoge")

//エントリー
ma1_entry = sma(close,10)
ma2_entry = sma(close,20)
buy = crossover(ma1_entry,ma2_entry)
sell = crossunder(ma1_entry,ma2_entry)

//決済
ma1_exit = sma(close,8)
ma2_exit = sma(close,18)
exit_buy = crossunder(ma1_exit,ma2_exit)
exit_sell = crossover(ma1_exit,ma2_exit)

//エントリー注文
strategy.entry("BUY",  strategy.long , when=buy)
strategy.entry("SELL", strategy.short, when=sell)

//決済注文
strategy.close("BUY",when=exit_buy)
strategy.close("SELL",when=exit_sell)

//ポジション量をチャートに表示
plot(strategy.position_size,color=black)
今回注目したいのはポジションサイズです。最終行のplotでポジションサイズを表示するようにしました。表示されたポジションサイズは下記です。
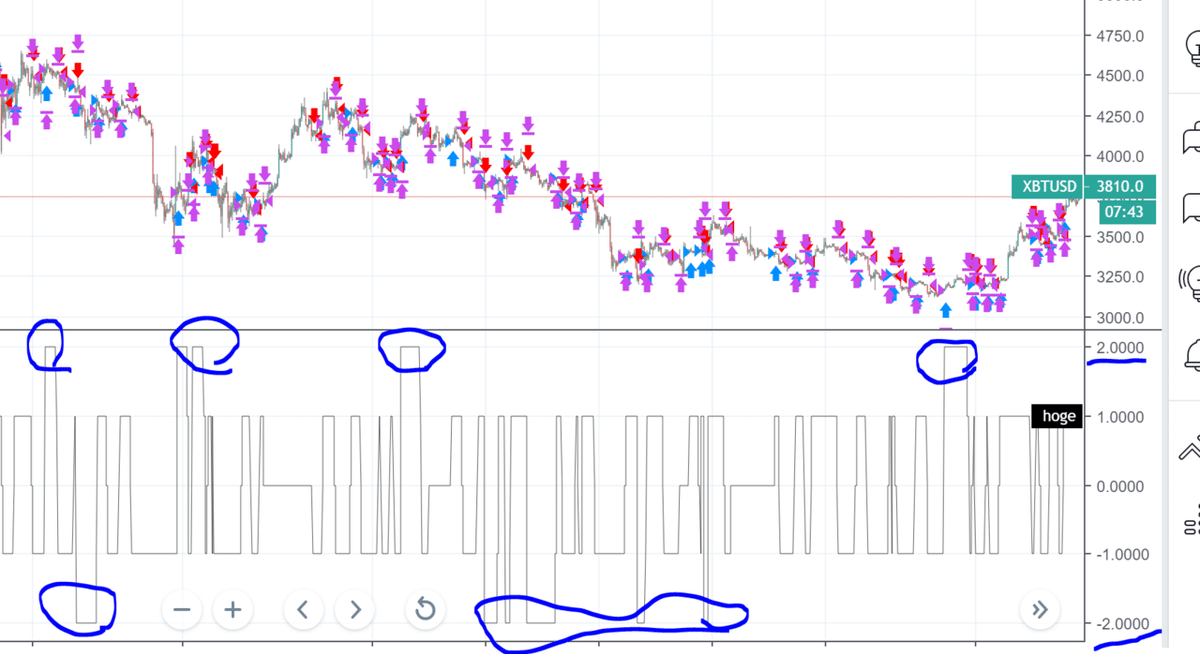
ところどころ+2、-2のポジションを持っています。
これはなぜでしょうか?
答えはドテン注文と決済注文が両方通っているからです。
ポジションー1の状態から買い注文を出せばポジションが+1になる
⇒+2の買い注文
ポジションー1の状態から決済注文を出せばポジションが0になる
⇒+1の買い注文
これが同時に起こるのでポジションー1からポジション+2になる
これを意図していればいいのですが、そうでない場合は下記のようなコードにする必要があります。
//@version=3
strategy("hoge")

//エントリー
ma1_entry = sma(close,10)
ma2_entry = sma(close,20)
buy = crossover(ma1_entry,ma2_entry)
sell = crossunder(ma1_entry,ma2_entry)

//決済
ma1_exit = sma(close,8)
ma2_exit = sma(close,18)
exit_buy = crossunder(ma1_exit,ma2_exit) and (not sell)//★修正点
exit_sell = crossover(ma1_exit,ma2_exit) and (not buy)//★修正点

//エントリー注文
strategy.entry("BUY",  strategy.long , when=buy)
strategy.entry("SELL", strategy.short, when=sell)

//決済注文
strategy.close("BUY",when=exit_buy)
strategy.close("SELL",when=exit_sell)

//ポジション量をチャートに表示
plot(strategy.position_size,color=black)
エントリーがfalseの時にしか決済がtrueにならないようにする必要があります。こちらのコードでのポジションサイズは下記です。

こうすると+2、-2のポジションを持つことがなくなります。そしてバックテスト結果が変わります。
以上です!
この記事が気に入ったらサポートをしてみませんか?