
Aimant-03キャンディスリーブAラインブラウス

①準備
各パーツを裁断しておきます。
芯地を貼るパーツは粗裁ちをし、芯地を貼ってから裁断をして下さい。
②リボンを用意します
脇リボン、衿でリボン、カフスリボン。


③身頃を作る
※前端に部分芯を貼る。

*タック前たて、左前端をアイロンで折り目をつけておく。


(前立ての場合、右前立ては最後にはさむので前立てに折り目をつけておく。)*後ろ身頃にギャザーをよせ、後ろヨーク2枚を中表にし、後ろ身頃上端を挟んで縫い合わせる。


*前身頃も同じく挟んで縫い合わせる。


*前脇に脇リボンを仮止めする。
(ポケットをつけたい場合は先に前身頃にポケットをつけておく。)

*脇を中表にして縫い合わせる。

④裾見返しを縫い合わせる
※裾始末を三つ折りに0.5cmにする場合は前立を作ってから裾始末をしてください。
*前後の裾見返しを脇で中表に会わせて縫う。縫い代は割る。
*裾見返しの上端を1cmでアイロンで折る。

*身頃の裾と中表に合わせて、縫い合わせる。見返しの前端側は、縫い返した時に前立ての三つ折り部分の内側に裾見返しがくるように合わせる。


※前立ての場合、右前端は裾始末のあとに前立てに挟み込む。*裾見返しを裏側に返してアイロンで整える。
*裾見返しの上端をピンで止める。前端は前立ての下側に来ていることを確認する。

*見返しの上端をミシンで縫う。


⑤前立てを作る
*右前タック前立ての、下側の三つ折部分をミシンで縫う。
(前立ての場合は、前立の裾に側を中縫いし表に返す。右前端を前立で挟み込み0.5cm巾stをする)


*左前端を三つ折りにしてミシンで縫う。

*タック前立て(右前立て)側に釦ホールをあける。
*釦ホール位置にタックがくるようにタックを整え、タック押さえstをする。

⑥衿を作る
*表に台衿にリボンを挟み込む。


*衿を作る。
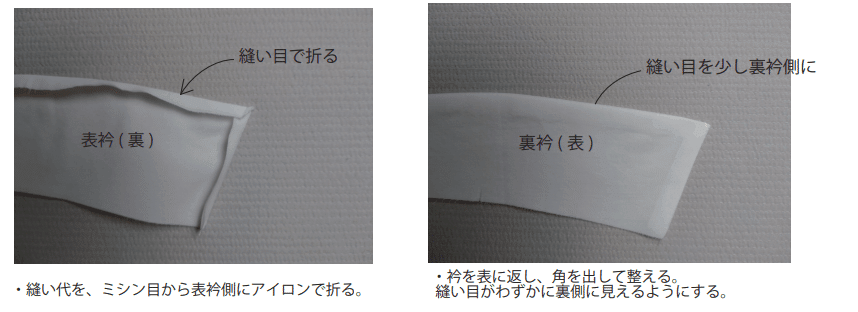


*台衿に衿を挟み中縫いし、表に返す。


⑦身頃に衿をつける
*衿ぐりに衿をつけ、最後に一周コバSTする。


⑧袖を作る
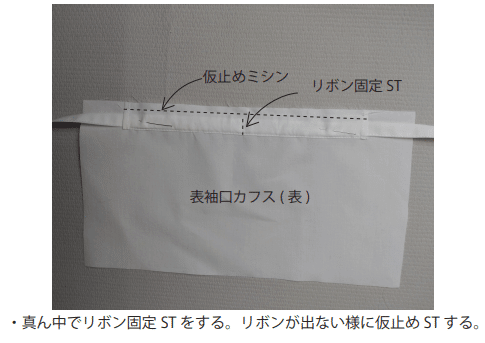
*カフスの表側にリボン通し布を縫い付け、リボンを通し、リボン固定stで止める。


*カフスを中表に合わせ周りを縫い、表に返す。


*袖口にイッテコイあきを作る。


※前側にあきがあるので倒し方向注意してください。
☆今回のイッテコイ布の巾は、よく見るものより1.2㎝と広くしています。
巾を広くすることで、カフスを閉じた時に重なりが深くなり、
イッテコイあきをもっと長くアレンジする時も、釦をつけたりも出来ます。
*袖の内側にゴム通し当て布を縫い付けて、平ゴムを通す。


*袖下を中縫いし、ロック始末する。

*袖山と袖口ギャザーよせる。

*袖口にカフスをつける。


*身頃に袖を中縫いし、ロック始末する。

⑨仕上げ
*釦をつける。
最後に。。。
このブログは、私の縫い方になりますので、参考程度にして下さい。
デザインからパターン、仕様、写真、コメントも私の手作りになっています、写真の見ずらいところがたくさんあると思いますが、
あたたかい目で見て頂けるとうれしいです。
手作り時間を楽しんで下さい。
山口


この記事が気に入ったらサポートをしてみませんか?