
Pixel Game Maker MV: Intro To Physics, Part 1

INTRO
Welcome to the beginner’s explanation of using physics in Pixel Game Maker MV!
In this part 1, we will cover the basics:
What is game physics?
What physics concepts does Pixel Game Maker MV implement from physics?
How is this reflected in the settings provided by Pixel Game Maker MV?
A part 2 will cover basic implementation of these objects.
The knowledge in this part 1 should be generic enough that with creative thinking it can be applied to any game engine that supports 2D physics.
WHAT IS GAME PHYSICS?
Real-life physics is the method, usually mathematical, of how we describe the interactions between different objects/types of matter. Thus, game physics is merely a simplified version of those rules. Pixel Game Maker MV (PGMMV), like most 2D game engines, is not attempting to be a true-to-life representation of physical properties. Instead, we focus on the basic concepts behind what is typically called Newtonian physics. This can be summed up most succinctly as “describing the motion of objects through some volume.”
Game physics is used to provide more of the randomization and organic feel to a game without the need for the developer to think of every possible situation. Sometimes this randomization/organic feel can lead to less-than-desirable results, but it is generally quicker to implement than bespoke custom solutions when you want something like a bouncing ball.
WHAT SETTINGS DOES PIXEL GAME MAKER MV PROVIDE?
There are 5 fundamental variables used by Pixel Game Maker MV in its physics Object calculations. 2 are regular Object variables and 3 are physics-only variables.
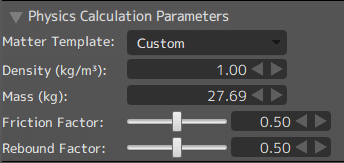
Object Weight (Physics Calculations Only)
Object Weight is described by 2 variables, Mass and Density
Mass is the total weight of that object. Kilograms are used as the unit.
Density is the ratio of mass to volume. Big but light objects have a low density (a balloon), while small but very heavy objects have a high density (a lead weight).
By default, all objects in PGMMV are assigned a Density of 1 and the mass is calculated automatically based on the X/Y size of the object.
After the Object is created, you are free to change the values as you see fit. Adjusting the Density will automatically update the Mass value.
Only Objects have these Weight settings.
Friction (Physics Calculation Only)
Friction is assigned via the Friction Factor slider. The default value is 0.50
Friction is used to calculate how 2 Objects slow each other down when they are touching. This is the same principle used for most bicycle brakes!
Objects and Tiles have a Friction Factor slider.
Rebound Factor (Physics Calculation Only)
Rebound is, essentially, how bouncy an Object is.
The slider is set to 0.50 by default.
This is a minor variable only used to modify the results of a physics collision.
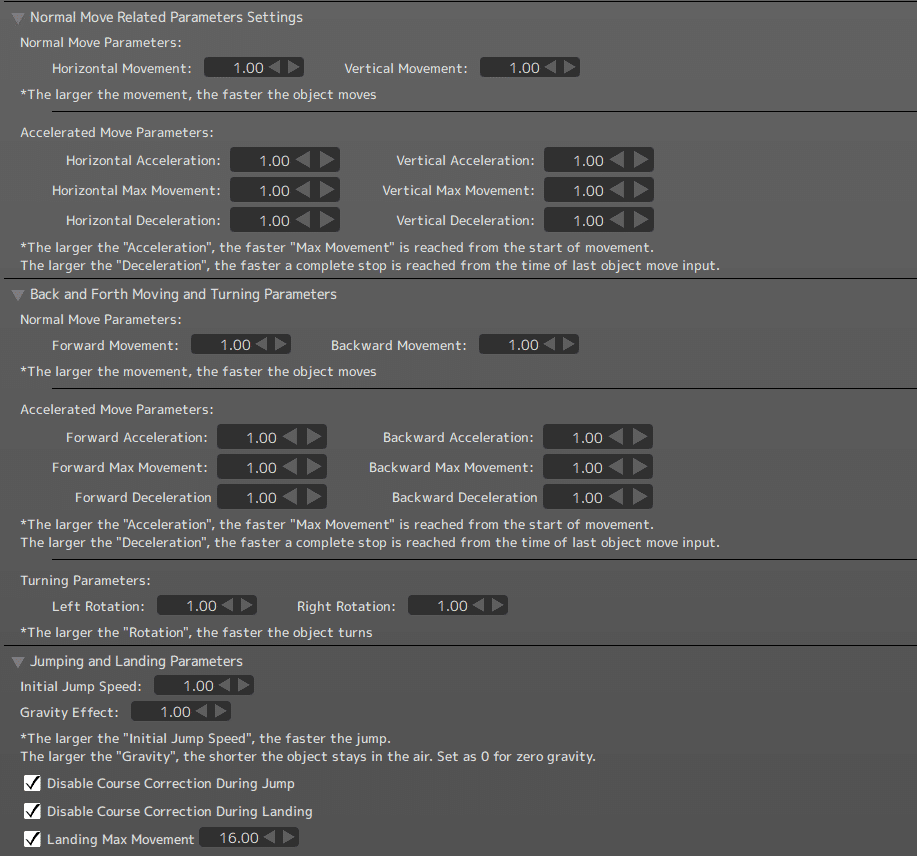
Movement Speed (Object Variables)
Movement speed is the representation of how fast the Object is moving.
Object movement speed is normally calculated directly from the Normal Move and Accelerated Move Parameters, but the actual movement speed is also directly updated by the Physics system when physics is enabled for the Object.
Only Objects have Movement Speed settings.
Particle calculations are separate from the physics system in PGMMV.
Gravity (Object Variable)
Gravity determines how quickly Objects fall down when they are not on the ground.
The default value for all Objects is 1.00.
Gravity can be changed on a per-Object basis, as needed, even if making a physics-based project.
Only Objects have Gravity settings.
There are also a variety of prefab-ed Physics Widgets (called Parts in the PGMMV UI) that have additional physics parameters:
Bonds
Bonds tie a non-physics Object to either a Circle or a Square Physics Part
Bonds have no special variables but are fundamental to implementing the physics system in PGMMV.
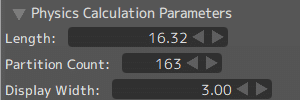
Ropes
Ropes connect 2 physics Objects together via a rope.
The stiffness of the rope is controlled by the Partition Count variable.
A low count rope is very stiff and doesn't bend well.
A high count rope is very flexible and will have a lot of bounciness to it. But this increases processing load.
Springs
Acts as a spring, typically between 2 points.
The strength of spring (how fast or slowly it contracts/expands) is controlled by the Spring Constant, Attenuation Factor, and Natural Length variables.
The Spring Constant, also known as k in Hooke’s Law, determines how much the spring can stretch or compress when weight is applied.
The Attenuation Factor controls the maximum amount of stretching or compression the spring will accept (springs cannot break in PGMMV) and how quickly it will return to normal when the load is removed.
Natural Length is the initial length of the spring. By default it is set as the X/Y length of the spring when placed into the scene, but it can be changed to a value different from the visual representation.
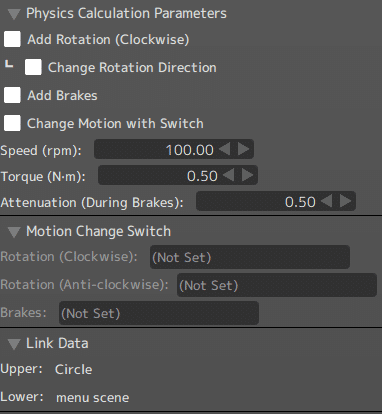
Axis
Provides a motor-power axis capable of spinning a physics Object
The direction of rotation can be configured.
Braking force can be configured.
Off by default.
Brake strength is represented by the “Attenuation (During Brakes) variable.
Target RPM is controlled by the Speed (RPM) variable
This determines the maximum number of rotations per minute the axis will spin at when there is no weight on the axis.
A Torque value is also provided.
Torque determines how much weight the Axis is capable of spinning before it slows down or stops.
Torque is a measure of force, not weight, and is configured using values of Newton-Meters.
Explosions
Provides an explosive force.
Objects caught in the explosion will be their movement speed affected by the Strength, Speed (Time Until Max), Effective Distance, and Direction of the explosion.
Effective distance does not fall off, as it is not a real explosion simulation. Only limiting factor is time spent within the explosion's area of effect.
Gravity/Repulsion field
This widget generates either an additional gravitational field effect, or a repulsive force.
By default, it follows a falloff within the field, but the field can be configured to apply a constant force.
Primary variables are Strength (of the Field), Effective Distance, and the Direction of the field.
WHAT IS IT ALL USED FOR?
With these variables, a variety of properties can be easily (via mathematical formulae) derived. But it all comes down to Object movement! The gravity, friction, torque, and all these other variables are simply used to calculate how a Physics Object should now be moving!
On each physics calculation interval, each Physics Object and Widget provides useful information via all the variables described above. These variables are tallied and run through basic physics formulae to determine, at the end of the interval, the current movement speed & direction (that is properly called a vector) of each Physics Object.
As a developer, you don’t even need to fully understand the mathematics behind how each variable is applied. Just remember that each variable is just a representation of a movement parameter.
Next time I’ll go over how to create physics Objects in Pixel Game Maker MV and begin to cover how the different variables all interact! A lot of the general information has been provided here, which means some of you might be able to experiment and figure out the rest on your own. However, there’s a lot of finesse that goes into getting good results, which I will try to provide in part 2!