Cloud RunとContainer Registryに入門する

本記事のゴール
Docker環境で作ったNuxt.jsのプロジェクトを簡単にデプロイしたい!
Cloud Runとは?
サーバーレスアーキテクチャで、コンテナを使って簡単に本番環境へデプロイできる、Google Cloud Platformのサービスです。
Googleアカウントを使用するので、簡単に始められるのも利点です!
Docker Imageを用意
以前作成したNuxt.jsのimageを使っていきたいと思います。
プロジェクトの作成
GCPを触るのが初めてだったので新しくプロジェクトを作成します。
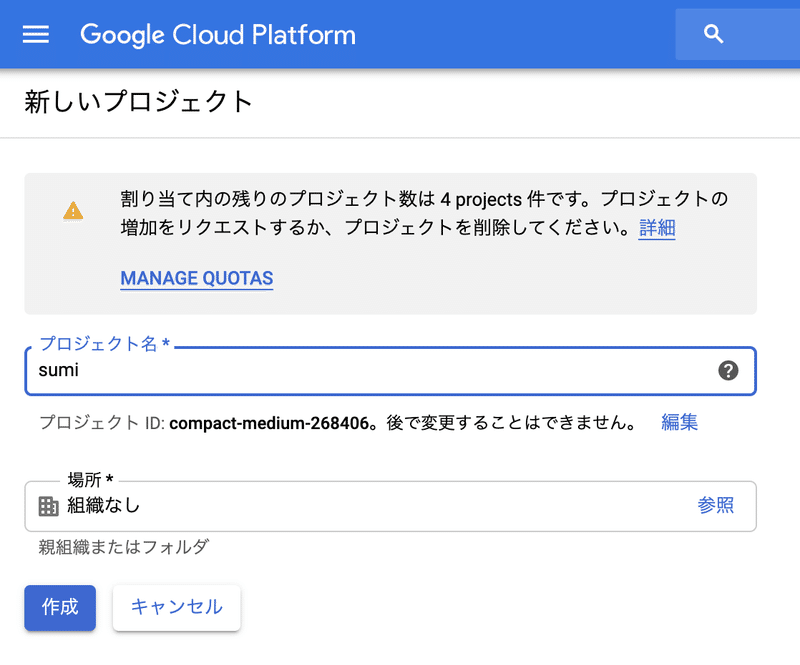
sumiプロジェクトの中でContainer RegistryとCloud Runを使っていきます。
Google Cloud SDKを使う
gcloudコマンドを使えるように下記コマンドを実行します。
curl https://sdk.cloud.google.com | bashシェルを再起動
exec $SHELL -lgclound環境を初期化
gcloud init
Google Cloud SDK インストーラの使用 | Cloud SDK のドキュメント
Pick configuration to use:
[1] Re-initialize this configuration [default] with new settings
[2] Create a new configuration
Please enter your numeric choice: 2

Choose the account you would like to use to perform operations for
this configuration:
 [1] [自分のメールアドレス]@gmail.com
 [2] Log in with a new account
Please enter your numeric choice:  1

Pick cloud project to use:
[1] [プロジェクト名]
Please enter numeric choice or text value (must exactly match list
item):  1 (GCPで先程作成したプロジェクトidを指定)
.
.
.
Your Google Cloud SDK is configured and ready to use!
gcloud initすると色々聞かれます。GCPで先程作成したプロジェクトidを指定してready to use!となればOKです!
もしリージョンを聞かれたらasia-northeast1-a(東京)とします。
gcloud を Docker 認証ヘルパーとして使用
このコマンドを実行することで、docker pushやdocker pullなどdockerコマンドを使う際にgcloudで認証してくれるようになります。
gcloud auth configure-docker
認証方法 | Container Registry のドキュメント | Google Cloud
Docker imageを選択する
自分のimageを確認します

上記のkawa1228/docker-nuxtを使っていきます。

わたしのプロジェクトIDはsumi-268406です。
下記のように docker tag [docker imageの名前] gcr.io/[プロジェクトid] / [名前] としてコマンドを実行し、タグをつけます。
docker tag kawa1228/docker-nuxt gcr.io/sumi-268406/docker-nuxt次に下記コマンドでpushします
docker push gcr.io/sumi-268406/docker-nuxtこれでContainer Registryを確認します。
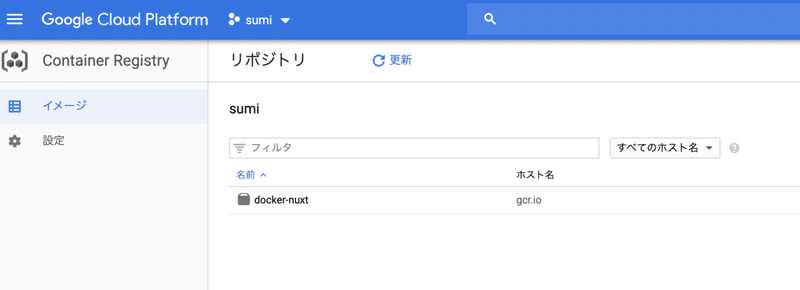
今pushしたdocker-nuxtが反映されていました🎉
Cloud Runのサービスを作成
Cloud Runでは先程pushしたdocker imageを使って簡単にデプロイすることができます。
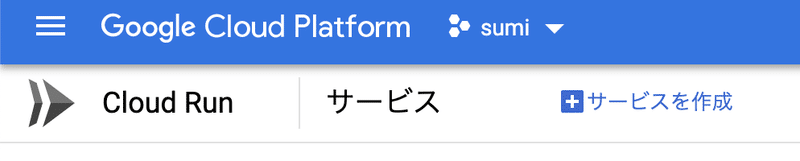
右のボタンからサービスを作成します。
Google Container Registry イメージの選択
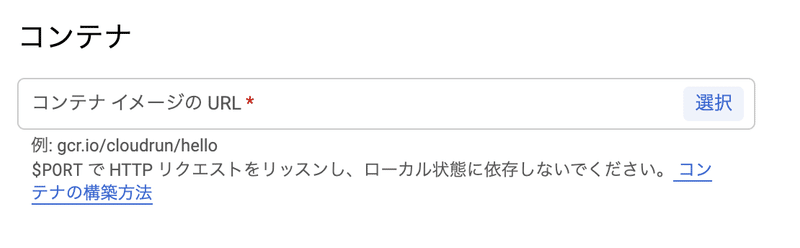
選択ボタンを押すと先程作成したイメージを選択できるようになります。
デプロイメント プラットフォーム
→リージョンに東京を選択
認証
→未認証の呼び出しを許可
認証が必要と設定するとBearer tokenが発行されます。今回は未認証許可とします。
リビジョン設定
→コンテナポートを指定します。
すべての設定が完了したら作成ボタンを押します。

作成が完了すると、上記のようにURLが作成されます。
アクセスすると・・・できた🎉
これでDocker上で作ったプロジェクトを簡単にデプロイすることができました😊
余談
Cloud Run にデプロイしたサービスは、Firebaseで使うことができるらしいです!下記のようにservice idとregionを指定するだけ。
特定のページだけCloud Run でデプロイしたサービスへリダイレクトさせたい...とかもできるらしい。
"hosting": {
 // ...
 // Add the "rewrites" attribute within "hosting"
 "rewrites": [ {
   "source": "**",
   "run": {
     "serviceId": "helloworld",  // "service name" (from when you deployed the container image)
     "region": "us-central1"     // optional (if omitted, default is us-central1)
   }
 } ]
}
Cloud Run を使用した動的コンテンツの配信とマイクロサービスのホスティング | Firebase
おわりに
今回は自分の使い慣れているNuxt.jsのプロジェクトをデプロイしましたが、今後は今勉強中のLaravelのプロジェクトをデプロイするときなどに使ってみたい!
スキ頂けると嬉しいです〜