
AWS SAM でTypeScriptを使う

あけましておめでとうございます!新年1発目のnoteは、AWS SAM CLIで作成したプロジェクトをTypeScript化したメモです。
はじめに
現在LambdaはNode.jsはsupportしていますが、TypeScriptをsupportしていないため、webpackを使って環境を構築していきます。この記事では下記pluginを利用させていただきました。
SAMプロジェクトの作成は下記↓のnoteをご参照ください。
ファイル構成
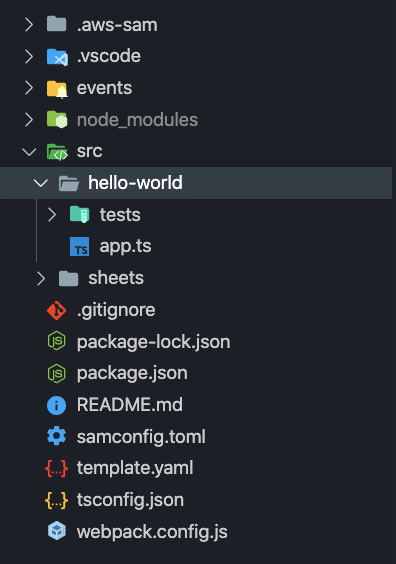
最終的なファイル構成はこのようになります。
.aws-sam・・・buildして生成されるファイル群
src・・・Lambda関数
インストール
まずapp.jsをapp.tsに修正。エラーになりますね。
npm init してpackage.jsonを生成した後、必要なpackageをinstallします
npm install webpack webpack-cli typescript ts-loader aws-sam-webpack-plugin @types/aws-lambda --save-devwebpack.config.jsの作成
example を参考にwebpacj.config.jsを作成します
module.exports = {
   // Loads the entry object from the AWS::Serverless::Function resources in your
   // template.yaml or template.yml
   entry: awsSamPlugin.entry(),
   // Write the output to the .aws-sam/build folder
   output: {
     filename: "[name]/app.js",
     libraryTarget: "commonjs2",
     path: __dirname + "/.aws-sam/build/"
   },
   // Create source maps
   devtool: "source-map",
   // Resolve .ts and .js extensions
   resolve: {
     extensions: [".ts", ".js"]
   },
   // Target node
   target: "node",
   // Includes the aws-sdk only for development. The node10.x docker image
   // used by SAM CLI Local doens't include it but it's included in the actual
   // Lambda runtime.
   externals: process.env.NODE_ENV === "development" ? [] : ["aws-sdk"],
   // Set the webpack mode
   mode: process.env.NODE_ENV || "production",
   // Add the TypeScript loader
   module: {
     rules: [
       {
         test: /\.tsx?$/,
         loader: "ts-loader"
       }
     ]
   },
   // Add the AWS SAM Webpack plugin
   plugins: [
     awsSamPlugin
   ]
}
tsconfig.jsonを追加
tsconfigを追加しないとエラーになるので追加します。設定はお好みでどうぞ。
{
 "compilerOptions": {
   /* Basic Options */
   "target": "es5",                          /* Specify ECMAScript target version: 'ES3' (default), 'ES5', 'ES2015', 'ES2016', 'ES2017','ES2018' or 'ESNEXT'. */
   "module": "commonjs",                     /* Specify module code generation: 'none', 'commonjs', 'amd', 'system', 'umd', 'es2015', or 'ESNext'. */
   "lib": ["ES2015", "DOM"],                             /* Specify library files to be included in the compilation. */
   "outDir": "./dist",                        /* Redirect output structure to the directory. */
   "rootDir": "./",                       /* Specify the root directory of input files. Use to control the output directory structure with --outDir. */
   /* Strict Type-Checking Options */
   "strict": true,                           /* Enable all strict type-checking options. */
   "noImplicitAny": false,                 /* Raise error on expressions and declarations with an implied 'any' type. */
   /* Module Resolution Options */
   "esModuleInterop": true,                   /* Enables emit interoperability between CommonJS and ES Modules via creation of namespace objects for all imports. Implies 'allowSyntheticDefaultImports'. */
   /* Experimental Options */
   "experimentalDecorators": true,        /* Enables experimental support for ES7 decorators. */
   "emitDecoratorMetadata": true         /* Enables experimental support for emitting type metadata for decorators. */
 },
 "exclude": [
   "src/node_modules",
   "**/*.spec.ts"
 ]
}
package.jsonを修正
scriptsを編集していきます。
  "scripts": {
   "dev": "npm run build && sam local start-api",
   "build": "NODE_ENV=dev webpack --mode=development",
   "deploy": "NODE_ENV=prod webpack --mode=production && sam deploy"
 },
npm run dev ・・・ローカルホストの起動
npm run build・・・.aws-sam配下にビルドファイルを生成
npm run deploy・・・デプロイ実行、エンドポイントが生成される
ためしてみる
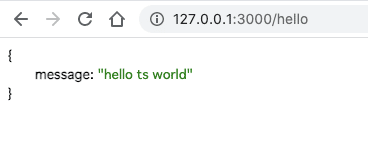
src/hello-world/app.ts を下記のように修正します。
exports.lambdaHandler = async (event, context) => {
   const message: string = 'hello ts world'
   try {
       response = {
           'statusCode': 200,
           'body': JSON.stringify({
               message: message,
           })
       }
   } catch (err) {
       console.log(err);
       return err;
   }
   return response
};
いけました!
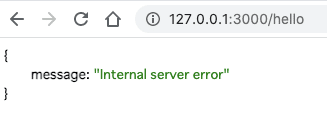
stringにしたmessageに数字を入れてみました。
const message: string = 111111111111111 vscode上ですでにエラー表示してくれてます。

buildも無事失敗してますね👍

変更時に更新する
このままだと、コード変更時に毎回 npm run buildしないといけないので、変更を検知してbuildされるようにpackage.jsonを修正します。
  "scripts": {
   "build": "NODE_ENV=dev webpack --watch --mode=development",
 },
ターミナルを2つ開き、1つめは「sam local start-api」2つめは「npm run build」すると、変更時に更新することができます 👍
おわりに
supportしていないのでTypeScript化はちょっと面倒くさいですね。。調べていて最初に巡り合ったプラグイン(aws-sam-webpack-plugin)を使ったのですが、皆さんはどう構築してるんでしょう・・?もっと良い方法があるのかな👀
とりあえずやりたいことは出来たので満足です。
スキ頂けると嬉しいです〜