
Panel UIを活用したXDプラグインの作り方

この記事は、Adobe XD プラグイン制作 Advent Calendar 2019 の16日目の記事です。
現在こんな感じのXDプラグインを開発中です。
XD PluginのPanel UIの学習も兼ねて、フロー図とかに使う線を引いてくれるプラグインを作り始めた。HTML+CSS+JSの知識だけで普段使いの道具を作れるのが楽しい。XDのレスポンシブ設定により矢印の矢のサイズを保ったまま変形してくれる。 #XDPlugin #AdobeXD pic.twitter.com/KYCDag6DXW
— 鈴木慎吾 / TSUMIKI INC. (@shingo2000) December 12, 2019
Powerpoint や Keynote でフロー図をつくる際によく使う、矢印のついたコネクタのオブジェクトを作成するプラグインです。このプラグインにPanel UIというプラグイン用のUIを利用してみたのですが、想像以上に便利で面白いものでした。この記事ではPanel UIを活用したXDプラグインの作り方を解説します。
Panel UIの登場
公式ドキュメントの変更履歴によると、Panel UIはXDのVer. 21(2019年7月公開)から追加されたようです。Panel UIを利用するとサイドバーにプラグイン毎に独自のUIを持つことができます。この機能の面白いところは、ユーザーが一覧からプラグインを選択した際に呼ばれる show() と、プラグイン一覧に戻った際に呼ばれる hide() のほかに、 update() という関数が用意されていることです。update()関数は以下のタイミングで呼ばれます。
・ユーザーがオブジェクトを選択した時
・ユーザーが選択中のオブジェクトに変更を加えた時
・パネルを閉じた後に再び開かれた時
https://adobexdplatform.com/plugin-docs/reference/ui/panels/update.html
このupdate()関数内でパネル内のUIに変更を加えると通常時と特定オブジェクトの選択時で異なるUIの表示が可能になります。
XDプラグインのPanel UI面白い。以前までのモーダルと違い、アートボード上のオブジェクトの選択状態に応じてUIの切り替えができるので、ツールバーとプロパティインスペクタ両方の役割をもたせることができる。 #XDPlugin #AdobeXD pic.twitter.com/L33XCUxqGl
— 鈴木慎吾 / TSUMIKI INC. (@shingo2000) December 15, 2019
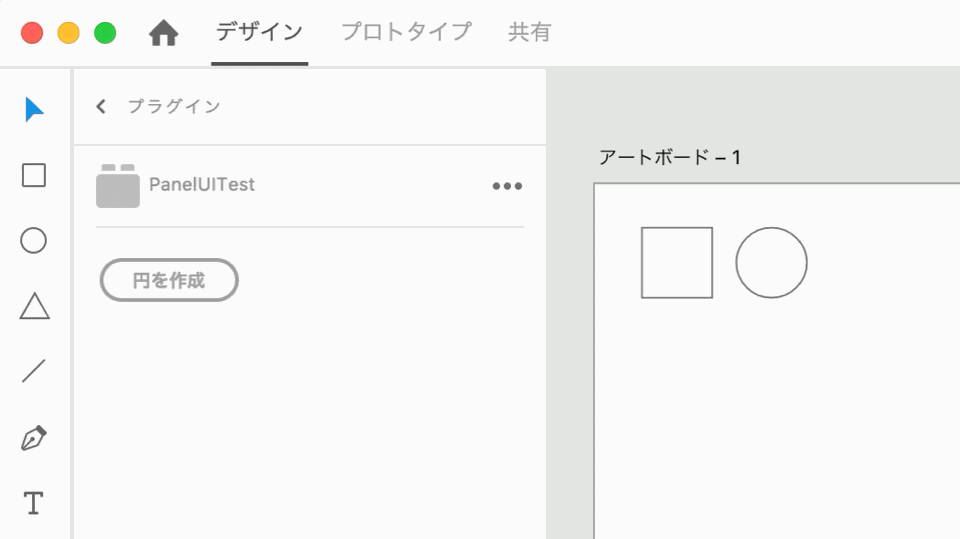
通常時はパネル内に「直線」「折れ線」「カギ線」というボタンが並びます。これらのボタンを押すとアートボードに直線・折れ線・カギ線状のコネクタが作成されます。
作成済みのコネクタを選択すると、パネル内のUIが切り替わり編集モードになります。選択したコネクタの線の太さや左右のポイントの大きさや形状、色の変更が可能です。
ツールパネルとプロパティパネルの実装
この通常時と選択時のUIの切り替えを実装してみます。Panel UIを利用したXDプラグインの作成方法については、公式ドキュメントのQuickStart(英語)と、Adobe竹岡さんによる記事での解説がわかりやすいです。
これらの記事にもあるように、manifest.jsonのuiEntryPointsに "type" : "panel" と "panelId" : "任意の文字列" を指定し、
"uiEntryPoints" : [ {
   "label" : "Panel UI Test",
   "type" : "panel",
   "panelId" : "panelUITest"
} ],
main.jsにはcreate()、show()、update()の関数を記述します。
const {Ellipse, Color} = require("scenegraph”);

let panel;

function create() {}

function show(event) {}

function update(selection) {}

module.exports = {
 panels: {
   panelUITest: {
     show,
     update
   }
 }
};
create() にはUIとなるhtmlを追加する処理を加えます。
function create() {
 const html = `
   <style>
   .show {display: block;} // [1]
   .hide {display: none;}
   </style>
   <div id="tool" class="show”> // [2]
     <button>円を作成</button>
   </div>
   <div id="property" class="hide”> // [3]
     <label>
       <p>線の太さ: <span>1</span>
       <input type="range" min="0.5" max="5" step="0.5" value="1">
     <label>
   </div>
 `;

 function createCircle(e){} // [4]
 function onChangeSlider(e){}

 panel = document.createElement("div");
 panel.innerHTML = html;

 panel.querySelector("button").addEventListener("click", createCircle); // [5]
 panel.querySelector("input").addEventListener("change", onChangeSlider);

 return panel;

}
[1] ツールパネルとプロパティパネルの表示を切り替える .showと.hideのスタイル定義
[2] ツールパネルとなるdiv
[3] プロパティパネルとなるdiv
[4] ボタンを押下時、スライダー変更時に呼ばれる関数(後で実装)
[5] ボタンとスライダーにイベント追加
show()からはpanelの初期作成の処理としてcreate()を呼び出し、生成されたDOMをパネルに追加します。
function show(event) {
 if (!panel) event.node.appendChild(create());
}
update() 内には特定オブジェクトを選択した際にのみ、UIを切り替えるような処理を付け加えます。ここでは仮実装として楕円オブジェクトを選択した際のみプロパティパネルを表示するようにしてみます。
function update(selection) {
const toolPanel = document.getElementById("tool");
const propertyPanel = document.getElementById("property");
if(selection && selection.items[0] instanceof Ellipse){
toolPanel.className = "hide";
propertyPanel.className = "show";
}else{
toolPanel.className = "show";
propertyPanel.className = "hide";
}
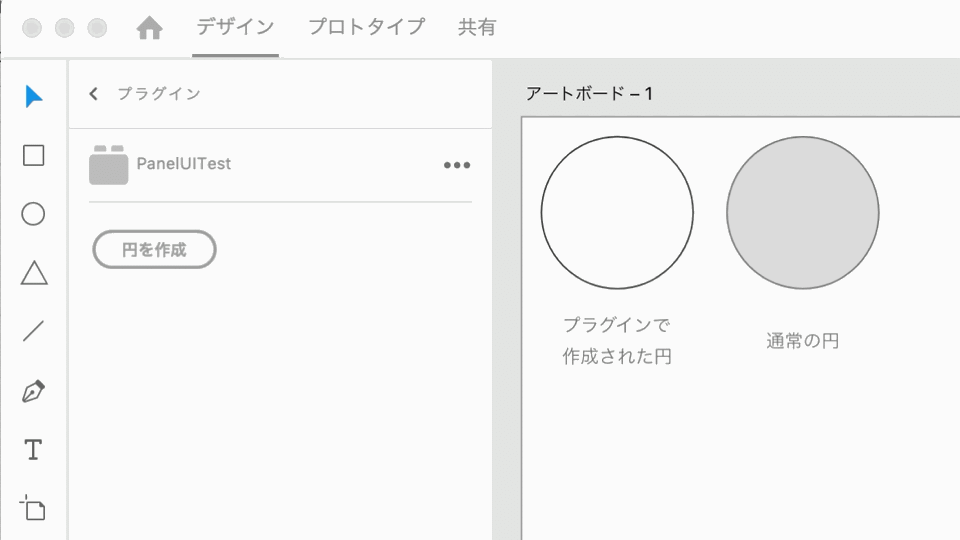
}以下のように楕円オブジェクトを選択した際にのみプロパティパネルに表示が切り替わります。
次にcreate()関数内のcreateCircle()に円を作成する処理を追加します。この関数は「円を作成」ボタンを押した際に呼ばれるようにイベント登録されています。
  function createCircle(e){
   const { editDocument } = require("application");
   editDocument({ editLabel: "create circle" }, function(selection) { // [1]
     const circle = new Ellipse();
     circle.radiusX = 50;
     circle.radiusY = 50;
     circle.stroke = new Color("#333333”);
     circle.pluginData = “XDPluginCircle"; // [2]
     selection.insertionParent.addChild(circle);
   });
 }
[1] editDocument() に引数として渡す関数内に楕円オブジェクトを追加する処理を加える
[2] プラグインで作成したオブジェクトであることがわかるように pluginData に名称を設定
ボタンを押すと円オブジェクトが追加されるようになりました。

次に先ほど実装したupdate()関数に変更を加え、プラグインで作成した円を選択した時にのみ、プロパティパネルを表示するようにします。
function update(selection) {
 const toolPanel = document.getElementById("tool");
 const propertyPanel = document.getElementById("property");


 if(selection
       && selection.items[0]
       && selection.items[0].pluginData == "XDPluginCircle"){ // [1]
   toolPanel.className = "hide";
   propertyPanel.className = "show";
 }else{
   toolPanel.className = "show";
   propertyPanel.className = "hide";
 }
}
[1] pluginDataを確認して、プラグインで作成されたオブジェクトの場合のみプロパティパネルを表示
プラグインで作成された円を選択するとプロパティパネルが表示され、通常の円ではプロパティパネルが表示されません。
次に選択中の円から線の太さを取得して、プロパティパネルのUIに反映します。
function update(selection) {

 /* 省略 */

 if(selection
   && selection.items[0]
   && selection.items[0].pluginData == "XDPluginCircle"){

   const strokeWidth = selection.items[0].strokeWidth; // [ 1 ]
   const valueLabel = propertyPanel.querySelector("span"); // [ 2 ]
   const slider = propertyPanel.querySelector("input");
   valueLabel.innerHTML = String(strokeWidth);
   slider.value = strokeWidth;

   toolPanel.className = "hide";
   propertyPanel.className = "show";
 }else{
     /* 省略 */
 }
}
[1] 選択中の円の線の太さを取得
[2] プロパティパネルのラベルとスライダーに反映
そして、プロパティパネルのスライダーの変更に応じて、選択中の円の線の太さを変更します。create() 関数内に予め用意しておいた onChangeSlider() に以下の処理を加えます。
  function onChangeSlider(e){
   const sliderValue = e.currentTarget.value; // [1]
   const propertyPanel = document.getElementById("property");
   const valueLabel = propertyPanel.querySelector("span");
   valueLabel.innerHTML = String(sliderValue); // [2]


   const { editDocument } = require("application");
   editDocument({ editLabel: "edit strokeWdith" }, function(selection) { // [3]
     const circle = selection.items[0];
     circle.strokeWidth = sliderValue;
   });
 }
[1] スライダーの値を取得
[2] プロパティパネル内のラベルに値を反映
[3] editDocument() に引数として渡す関数内で、選択中のオブジェクトの線幅を変更
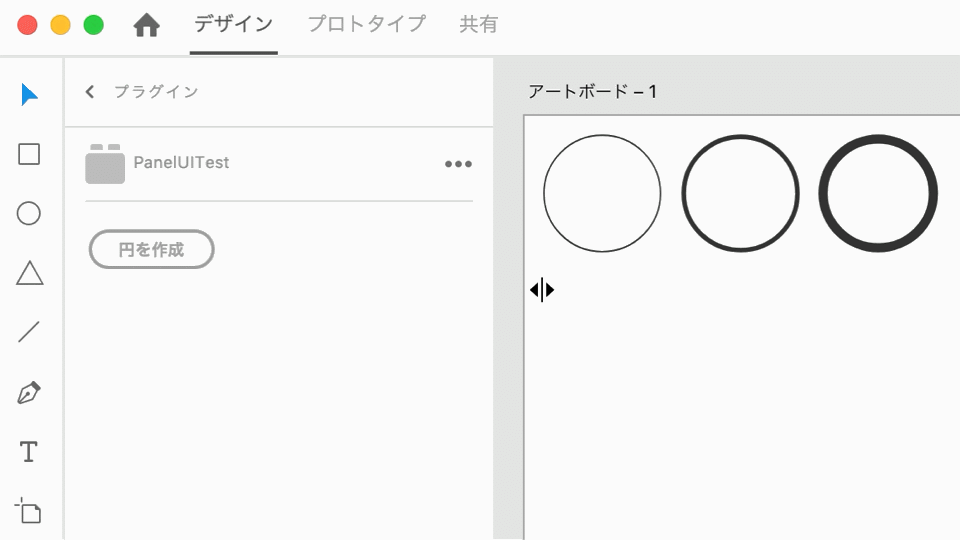
スライダーの変更に応じて、線幅が変更されるようになりました。
最後に「円を作成」ボタンを押して円を作成した直後に、作成した円が自動的に選択されるようにcreateCircle()関数内に1行付け加えます。
  function createCircle(e){
   const { editDocument } = require("application");
   editDocument({ editLabel: "create circle" }, function(selection) {
     /* 省略 */
     selection.insertionParent.addChild(circle);

     selection.items = [circle]; // 作成した円を自動的に選択
   });
 }
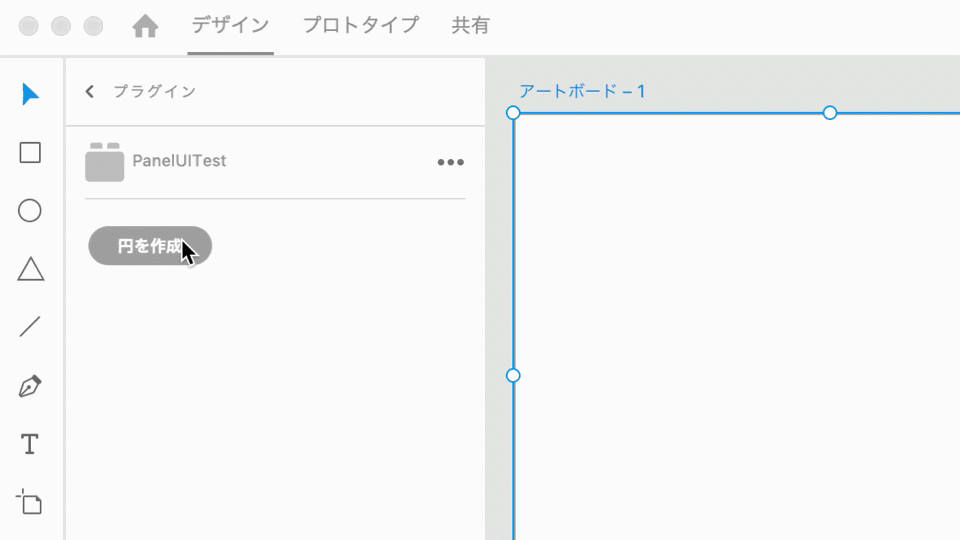
こうすることで、作成直後の円が選択状態になり、ツールパネルからプロパティパネルに表示が切り替わります。ユーザーが「円の作成」→「線幅の変更」という操作をスムーズに行うことができます。
以上が、ツールパネルとプロパティパネルを活用したプラグインの作成方法です。ユーザーの選択状態によってUIを切り替えることによって、よりアプリケーションらしく振る舞うプラグインの開発ができそうです。
今回のサンプルコードはこちらからダウンロードできます。
https://github.com/shingo2000/xd-plugin-panelUITest
フロー図作成を手助けするプラグインは年内公開予定です。
しばらくお待ち下さい。
その他にもこんなXDプラグインを公開しています。
1年ぶりにXDプラグインを更新。画像レイヤーの解像度とJPGの場合は画質を変更してPDFエクスポートした際のファイルサイズを低減するプラグイン。グループ内の画像レイヤーにも適用されるようになりました。
— 鈴木慎吾 / TSUMIKI INC. (@shingo2000) December 9, 2019
#XDPluginhttps://t.co/OsDAlarM9v pic.twitter.com/ct5ZB1DhSB
作成したXD Pluginが審査通過して公開されました。XDからPDFファイルにエクスポートすることを前提に、96dpi換算の各用紙のアートボードを作成できます。XDのメニュー「プラグイン > プラグインを見つける > Artboard for PDF」からインストールできます。 #xdplugin pic.twitter.com/igQPcxZHzO
— 鈴木慎吾 / TSUMIKI INC. (@shingo2000) November 12, 2018
XD プラグイン制作 Advent Calendarですが、まだまだ空きがあります。興味がある方は是非参加してください!
ご質問や感想などTwitterでお気軽にどうぞ。
Twitter (@shingo2000)
この記事が気に入ったらサポートをしてみませんか?