

VSCode上でNode.js(ES6で実装)のdebugをするための設定をしてみた

はじめに
こんにちは、SHIFT の開発部門に所属しているKatayamaです。
Node.js で ES Modules を使わずに実装(require/module.export の構文で実装)している場合、VS Code での debug 設定は特に追加の設定は不要で以下のようになると思います(設定後はDebuggingにある通りに debug を実行するのみ)。
// ./.vscode/launch.json
{
  "version": "0.2.0",
  "configurations": [
    {
      "type": "node",
      "request": "launch",
      "name": "Launch Program",
      "skipFiles": ["<node_internals>/**"],
      "program": "${workspaceFolder}/src/index.js",
      "envFile": "${workspaceFolder}/.env"
    }
  ]
}
今回は、ES Modules を使って実装するために webpack × Babel でトランスパイル(コードの変換)をしているような場合に、VS Code 上で debug できるようにする設定をやってみたのでそれについてまとめてみたいと思います。debug できるようにする事で、コード内の変数の状態やどこでエラーになっているか?などを素早く把握できるようになるため開発する上では重要です。
やってみてわかったのですが、少なくとも 2 通りのやり方があることが分かったため、今回はその 2 通りのやり方についてそれぞれ見ていきたいと思います。
①babel-nodeを使う
②sourceMap を使う
※Node.js で import・export(ES6 の構文)を使えるように webpack × Babel の設定をやってみたにあるような設定が実施済みの前提で以下は書いています。
・参考:debugging in Visual Studio Code with babel-node
degug のための準備をする
ここは上記の ①・② のどちらの方法を採用する場合でも必要になる事前準備としてやる必要のある事(VS Code で launch.json を作成する)を取り上げる。
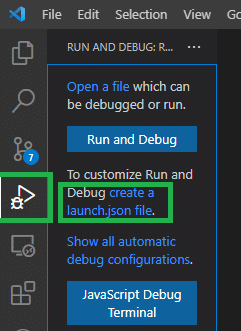
launch.json は VS Code の左側の debug のアイコンから作成できるので、下図の通りのアイコンをクリックして、"create a launch.json file"をクリックする。
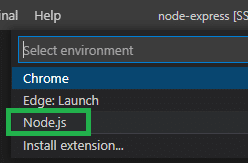
すると、下図のようにどの環境の Project であるか?が聞かれるので、Node.js を選択する。
選択すると初期状態の "launch.json" が "./.vscode/" 以下に作成される。
{
  // Use IntelliSense to learn about possible attributes.
  // Hover to view descriptions of existing attributes.
  // For more information, visit: https://go.microsoft.com/fwlink/?linkid=830387
  "version": "0.2.0",
  "configurations": [
    {
      "type": "pwa-node",
      "request": "launch",
      "name": "Launch Program",
      "skipFiles": ["<node_internals>/**"],
      "program": "${file}"
    }
  ]
}
上記のファイルの type の部分と、program(debug 実行したいファイル)の設定を以下のように変更しただけで debug を実行すると、以下の通りエラーになる。そこでさらに設定を行っていくが、それについては以下の各章を参照。
{
  "version": "0.2.0",
  "configurations": [
    {
      "type": "node",
      "request": "launch",
      "name": "Launch Program",
      "skipFiles": ["<node_internals>/**"],
      "program": "${workspaceFolder}/src/index.js"
    }
  ]
}
/root/.nodebrew/current/bin/node ./src/index.js
Process exited with code 1
(node:4415) Warning: To load an ES module, set "type": "module" in the package.json or use the .mjs extension.
(Use `node --trace-warnings ...` to show where the warning was created)
Uncaught /root/workspace/node-express/src/index.js:1
import 'source-map-support/register';
^^^^^^
SyntaxError: Cannot use import statement outside a moduledebug のための設定をする ① ~ babel-node を使う~
結論:どうすればいいか?
// ./.vscode/launch.json
{
  "version": "0.2.0",
  "configurations": [
    {
      "type": "node",
      "request": "launch",
      "name": "Launch Program",
      "skipFiles": ["<node_internals>/**"],
      "program": "${workspaceFolder}/src/index.js",
      "runtimeExecutable": "${workspaceFolder}/node_modules/.bin/babel-node",
      "envFile": "${workspaceFolder}/.env"
    }
  ]
}
yarn add --dev @babel/core @babel/nodebabe-node をインストールして debug する
babel-nodeを使うため、以下のようにプロジェクトの依存関係に追加する。
yarn add --dev @babel/core @babel/nodeあとは簡単で、"launch.json"の方に、"runtimeExecutable"の項を以下のように設定するだけ。
{
	...
	"configurations": [
		{
			...
			"runtimeExecutable": "${workspaceFolder}/node_modules/.bin/babel-node"
		}
	]
}
これで以下の動画のように debug が実行できるようになる。
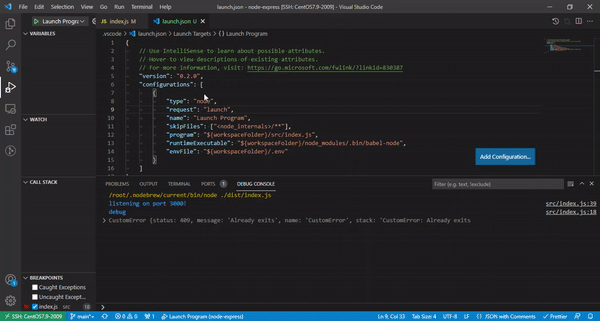
debug を実際にしてみるとわかるが、単にコードを実行せずに静的に追っていく場合に比べ、変数の状態や実際のコードの実行の流れなどが可視化されるので、Bug等があった際にはその原因の究明が格段にしやすくなる。また、自身の実装したソースだけでなく、依存しているライブラリのソースコードの方までStep by Stepで確認していくこともできるので、ライブラリの中での動きを確認したりもできるようになる。
※注意点として、公式にも書いてあるが、babel-node では「ES6 形式のモジュールローディングが期待通りに機能しないことがある」ようなので、その場合には以下に記載した ②sourceMap を使う の方法を取る事になるだろう。
ES6-style module-loading may not function as expected
Due to technical limitations ES6-style module-loading is not fully supported in a babel-node REPL.
debug のための設定をする ② ~ sourceMap を使う~
結論:どうすればいいか?
// ./.vscode/launch.json
{
  "version": "0.2.0",
  "configurations": [
    {
      "type": "node",
      "request": "launch",
      "name": "Launch Program",
      "skipFiles": ["<node_internals>/**"],
      "program": "${workspaceFolder}/dist/index.js",
      "preLaunchTask": "build for debug",
      "outFiles": ["${workspaceFolder}/dist/**/*.js"],
      "envFile": "${workspaceFolder}/.env"
    }
  ]
}
// ./.vscode/task.json
{
  "version": "2.0.0",
  "tasks": [
    {
      "label": "build for debug",
      "type": "npm",
      "script": "build:debug"
    }
  ]
}// ./package.json
{
...
"scripts": {
...
"build:debug": "webpack --node-env=development",
}
}sourceMap を使い debug する
トランスパイル時に sourceMap を有効化しておく事で、元のファイルとの関連付けを作り debug を行う。
ただ、今回は debug 前に必ず最新のコードをトランスパイルしてから debug を起動する設定にしたいので、launch.json の preLaunchTask オプションを使って task.json の設定内容に基づいてトランスパイルを実行するように設定する(今回は webpack を使っているプロジェクトなので、Tool Configuration Webpackに書かれている設定が参考になる)。
※今回、webpack.config.js と babel.config.js が設定済みになっている必要があるが、参考までにその設定内容を「おまけ」に載せているのでそちらも良ければ参照ください(「おまけ」に載せたものの設定内容についてはNode.js で import・export(ES6 の構文)を使えるように webpack × Babel の設定をやってみたの記事を参照)。
まず、webpack コマンドで debug したいソースコードをトランスパイル(コードの変換)するために、package.json の scripts に以下のようにコマンドを定義する。
"build:debug": "webpack --node-env=development"続いて VS Code が実行できる Task を定義するために、task.json を作成し、以下のように設定をする。
{
"version": "2.0.0",
"tasks": [
{
"label": "build for debug",
"type": "npm",
"script": "build:debug"
}
]
}label に設定している内容が VS Code がどの Task を実行すればいいのか?を識別するための名前であり、実際に実行する内容としては、package.json に設定している script の"build:debug"を設定している。これで debug 実行前にこの Task を呼び出すように設定すれば、debug 実行毎にトランスパイルを実行できるようになる。
debug 実行前にトランスパイルを実行するために、最後に launch.json の方を以下のように設定する。
{
	...
	"configurations": [
		{
			...
			"program": "${workspaceFolder}/dist/index.js",
			"preLaunchTask": "build for debug",
			"outFiles": ["${workspaceFolder}/dist/**/*.js"],
			...
		}
	]
}
・outFiles
Source Map Discoveryに書かれている通り、ワークスペース全体がをソースマップのための検索対象になっているので、それを outFiles を指定する事で狭めて効率を上げるようにしている(以下、公式からの引用)。
By default, VS Code will search your entire workspace, excluding node_modules, for sourcemaps. In large workspaces, this search might be slow. You can configure the locations where VS Code will search for source maps by setting the outFiles attribute in your launch.json.(デフォルトでは、VS Codeはnode_moduleを除くワークスペース全体をソースマップのために検索します。大規模なワークスペースでは、この検索に時間がかかることがあります。launch.json で outFiles 属性を設定することで、VS Code がソースマップを検索する場所を設定することができます。)
・preLaunchTask
Launch.json attributesに書かれているオプション。デバッグセッションの開始前にタスクを起動できるので、今回は task.json の label"build for debug"を設定する事で、task.json に設定済みの scrips "build:debug"を実行させている。
・program
トランスパイル前のファイル(./src/index.js)ではなく、sourceMap が有効になったトランスパイル後のファイルを指定する必要があるので注意。
※sourceMaps オプションについてはデフォルトで true なため設定不要(以下、公式からの引用)。
The source map feature is controlled by the sourceMaps attribute that defaults to true.(ソースマップ機能は、デフォルトがtrueのsourceMaps属性で制御されます。)
これで以下の動画のように debug が実行できるようになる。

・参考:Node.js debugging in VS Code
・参考:Source maps
・参考:Integrate with External Tools via Tasks
まとめとして
今回は ES6 の構文で実装した Node.js で debug を行う方法についてみていく事で、ES6 で実装する事で少し追加の設定が必要になる事を見てきた。debug は開発時には必須になると思うので、debug が必要になった際には今回設定したような方法で debug をしていきたいと思った。
おまけ
webpack.config.js と babel.config.js の例
// webpack.config.js
const path = require("path");
// ... 省略
module.exports = {
  devtool: "source-map",
  target: "node",
  // ... 省略
  mode: process.env.NODE_ENV === "production" ? "production" : "development",
  name: "node-express",
  entry: {
    index: "./src/index.js",
  },
  output: {
    path: path.resolve(__dirname, "dist"),
    filename: "[name].js",
    clean: true,
  },
  module: {
    rules: [
      {
        test: /\.m?js$/,
        exclude: /node_modules/,
        use: {
          loader: "babel-loader",
        },
      },
    ],
  },
  // ... 省略
};
// babel.config.js
module.exports = {
  presets: [
    [
      "@babel/preset-env",
      {
        useBuiltIns: "usage",
        corejs: 3,
        targets: { node: "current" },
      },
    ],
  ],
};
__________________________________
執筆者プロフィール:Katayama Yuta
SaaS ERPパッケージベンダーにて開発を2年経験。 SHIFTでは、GUIテストの自動化やUnitテストの実装などテスト関係の案件に従事したり、DevOpsの一環でCICD導入支援をする案件にも従事。 最近開発部門へ異動し、再び開発エンジニアに。座学で読み物を読むより、色々手を動かして試したり学んだりするのが好きなタイプ。


お問合せはお気軽に
https://service.shiftinc.jp/contact/
SHIFTについて(コーポレートサイト)
https://www.shiftinc.jp/
SHIFTのサービスについて(サービスサイト)
https://service.shiftinc.jp/
SHIFTの導入事例
https://service.shiftinc.jp/case/
お役立ち資料はこちら
https://service.shiftinc.jp/resources/
SHIFTの採用情報はこちら
https://recruit.shiftinc.jp/career/