
GitHub GraphQL APIでPull Requestの作成

こんにちは。 Showcase Gigハブチーム所属のリョです。 最近日常開発を楽にするためいろいろ改善を試してみました。今日は主にGitHubのgraphqlを使ってpr作成のことを簡単に紹介させてください
やること
このPull Requestは単なるsemverに沿ってnpm package versionをあげるのです。リリースするたびにversion上げのPull Requestは忘れがちなので自動化したいのは理由です。
step
先にPull Requestの作成について簡単におさらいします。
branch Aを元にbranch Bを作成する。
branch Bのファイルを修正する。
branch Bをremoteにpushする。
branch Bを使ってbranch C向きのPull Requestを作成する。 手動なら上の4つのstepですが、自動化はすべてAPIでGitHubのresourceを修正するのでlocalの操作はないです。
remoteのbranch Aを元にremote branch Bを作成する。
remote branch Bのファイルを取って修正する。
修正をcommitとしてremote branch Bにpushする。
remote branch Bを使ってremote branch C向きのPull Requestを作成する。
step-1: remoteのbranch Aを元にremote branch Bを作成
step-1-A: branch Aの情報を先に取得
graphqlはこうです。(使いやすいため関数まで)
const getHeadCommitQuery = ({
  repository,
  owner,
  branchName,
}: {
  repository: string;
  owner: string;
  branchName: string;
}): string => `{
  repository(name: "${repository}", owner: "${owner}") {
    id
    name
    ref(qualifiedName: "refs/heads/${branchName}") {
      id
      name
      target {
        ... on Commit {
          id
          history(first: 1) {
            edges {
              node {
                oid
              }
            }
          }
        }
      }
    }
  }
}`;
1つずつ説明します。
repositoryのidはbranch作成の時は使われます。
branchのprefixはrefs/heads/です。最初は自分も戸惑ってまして調べたら仕様だとわかりました。branchはprefix=heads付きのrefです。localのGitのdirectoryを見たらたしかにrefs/heads/下は全部branchです。

1個目のcommitのoid(object id)を取得する。後のどbranch作成に使われます。step-1-B: branch Aの情報を元にbranch Bを作成
graphqlはこうです。
export const getCreateBranchQuery = ({
  repositoryId,
  branchName,
  commitHash,
}: {
  repositoryId: string;
  branchName: string;
  commitHash: string;
}): string => `mutation create_ref{
  createRef(input: {repositoryId: "${repositoryId}", name: "refs/heads/${branchName}", oid: "${commitHash}"}
  ) {
    clientMutationId
    ref {
      id
      name
      prefix
    }
  }
}`;
説明:
repositoryIdはstep-1-Aで取得したrepositoryのid。
commitHashもstep-1-Aで取得したoidです。
branchNameはbranch Bのnameです。 これでbranch Bは作成できます。
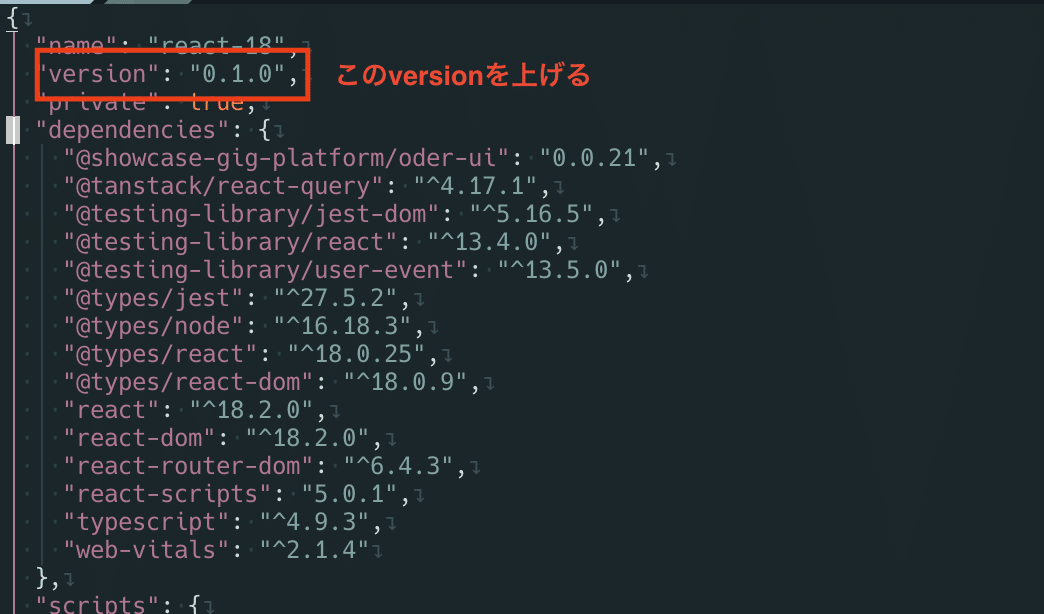
step-2: remote branch Bのファイルを取って修正
graphqlはこれです。
export const getPackageVersionQuery = ({
  repositoryName,
  ownerName,
  branchName,
}: {
  repositoryName: string,
  ownerName: string,
  branchName: string,
}): string => `{
  repository(name: "${repositoryName}", owner: "${ownerName}") {
    object(expression: "${branchName}:package.json") {
      id
      __typename
      ... on Blob {
        id
        text
      }
    }
  }
}`;
説明:
branchName、repositoryNameとownerNameは言うまでもないです。
packageのversionを直したいので、file名はroot下のpackage.jsonです。 これでファイルの中身も取れましてファイルの修正もできます。
step-3: 修正をcommitとしてremote branch Bにpush
graphqlはこれです。
const getCreateCommitOnBranchQuery = ({
  branchName,
  repositoryNameWithOwner,
  message,
  headCommitHash,
  additions,
}: {
  branchName: string;
  repositoryNameWithOwner: string;
  message: string;
  headCommitHash: string;
  additions: Array<{ path: string, contents: string }>;
}): string => {
  let additionQuery = `[`;
  for (let i = 0; i < additions.length; i++) {
    const { path, contents } = additions[i];
    const encodedContents = Buffer.from(contents).toString("base64");
    additionQuery += `{path: "${path}", contents: "${encodedContents}"}`;
    if (i !== 0) {
      additionQuery += ",";
    }
  }
  additionQuery = additionQuery + "]";
  return `mutation create_commit_on_branch{
    createCommitOnBranch(input: {branch: {branchName: "${branchName}", repositoryNameWithOwner: "${repositoryNameWithOwner}"}, message: {headline: "${message}"}, expectedHeadOid: "${headCommitHash}", fileChanges: {additions: ${additionQuery}}}
    ) {
      clientMutationId
    }
  }`;
};
説明:
branchNameはbranch Bのnameです。
repositoryNameWithOwnerはowner/repositoryNameの形です。
messageはcommitのmessageです。
headCommitHashはstep-1-Aで取ったoidです。どのcommitの後ろにcommitを追加するか。
additions: 修正対象のファイルです。複数修正可能なので配列です。送信する前にbase64としてencodeする必要があります。
mutationなのでqueryの中にはmutationを書かないといけません。
step-4: remote branch Bを使ってremote branch C向きのPull Requestを作成
graphqlはこれです。
const getCreatePullRequestQuery = ({
  repositoryId,
  toBranchName,
  fromBranchName,
  title,
}: {
  repositoryId: string;
  toBranchName: string;
  fromBranchName: string;
  title: string;
}) => `mutation create_pull_request{
  createPullRequest(
    input: {repositoryId: "${repositoryId}", baseRefName: "${toBranchName}", headRefName: "${fromBranchName}", title: "${title}"}
  ) {
    clientMutationId
  }
}`
説明:
repositoryIdはstep-1-Aで取ってきたrepositoryのidです。
toBranchNameはbranch Cのnameです。
fromBranchNameはbranch Bのnameです。
titleはprのtitleです。
step-alpha: GitHub ocotokitの準備
GitHub octokitを使っているので初期の準備が必要です。
import { graphql } from "@octokit/graphql";
// TODO: 環境変数設定必要
const token = process.env.GITHUB_TOKEN;
const graphqlWithAuth = graphql.defaults({
  headers: {
    authorization: `token ${token}`,
  },
});
const query = getHeadCommitQuery = ({
  repository: "foo",
  owner: "bar",
  branchName: "baz",
});
graphqlWithAuth(query);
まとめ
特に複雑なものではないですが、勉強になったものをまとめると
branchはprefix=ref/heads付きのrefです。localの.gitフォルダで確認できます。
GitHubはfileをbase64にencodeしています。(webだから ?)
tree-sitterも触りました。tree-sitterはIDE界隈(nvimなど)でよく使われますがたまにはfileのast分析して中身を入れ替えてfile修正できます。tree-sitterはただ解析ツールなのでほかのastツールとは違ってcode -> astまではできますがast修正してからcode出力はできないです。