【Nuxt.js(SSR) × Firebase Authentication】@nuxtjs/firebaseモジュールを使ったログインセッション管理

認証基盤にFirebase Authenticationを使ったNuxt.js(SSR)アプリで、@nuxtjs/firebaseモジュールを使ってログインセッションを管理する方法について紹介します。
この記事ではTwitterログインを扱いますが、Firebase Authenticationの他のログインプロバイダについても対応可能です。
モチベーション
Nuxt.js(SSR)アプリの認証基盤にFirebase Authenticationを使いたい
but
ログインユーザーの情報はブラウザ側に保存されているので、サーバー側(SSR)でログインユーザー情報を使用できない
↓
Service Workerを使ってサーバーへのリクエストのヘッダーにFirebase AuthのIDトークンを追加し、サーバー側で検証を行うことでユーザー情報を取得する
@nuxtjs/firebaseモジュールを使うと、上記のService Workerによるセッション管理部分を簡単に実装できる ← 本記事で紹介
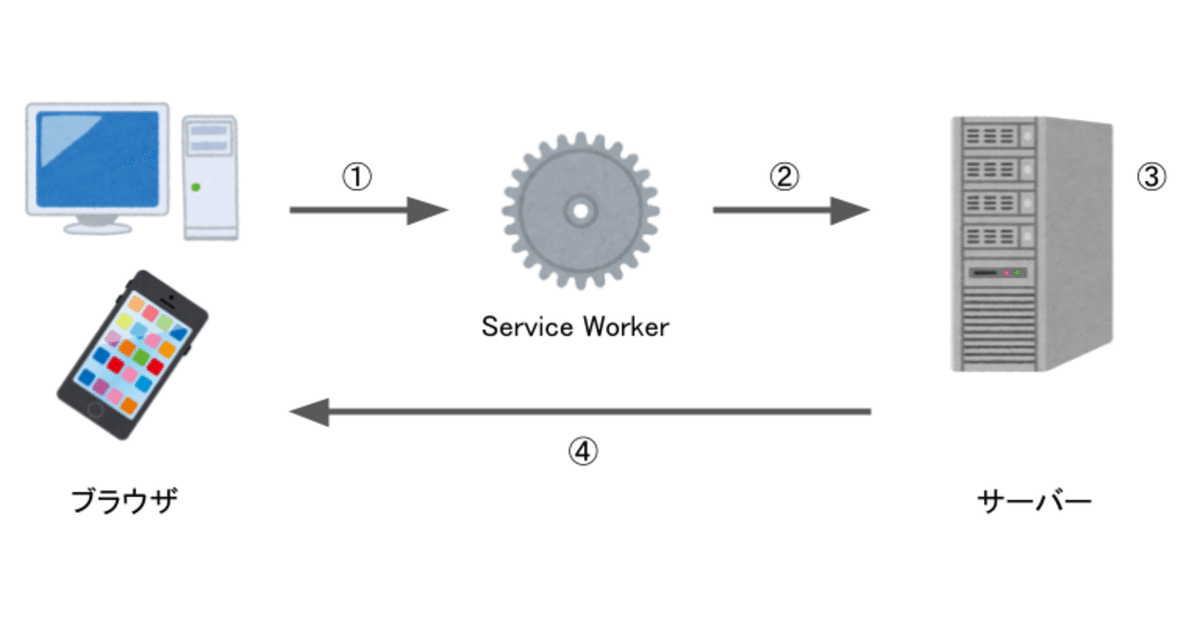
処理の流れ
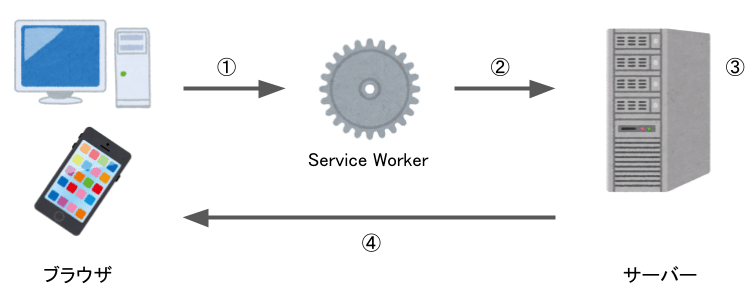
①ブラウザからサーバーへリクエストが送信される
②Service WorkerがリクエストヘッダーにIDトークンを追加する
③サーバー側でIDトークンの検証を行い、ログインユーザー情報を取得する
④ログインユーザー情報を基に、レスポンスを返す
@nuxtjs/firebase
https://firebase.nuxtjs.org/
最小限のセットアップでFirebaseのサービスをNuxt.jsアプリに統合できるモジュールです。上図の「③リクエストヘッダーへのIDトークンの追加&④サーバー側での検証」をこのモジュールのauthサービスに実行してもらいます。
事前準備
Firebase Authenticationを利用できる状態にしておきます。詳細な説明はここでは省きますが、簡単な流れは以下の通りです。
1. Firebaseプロジェクトを作成し、アプリを追加する
2. Authenticationページで、使用するログインプロバイダを有効にする
3. プロジェクトの設定ページから、Firebaseを使用するためのパラメータ(firebaseConfig)を確認する
モジュールのインストール
yarn add firebase firebase-admin @nuxtjs/pwa @nuxtjs/firebaseIDトークンの検証のためにfirebase-adminを、Service Workerを使用するために@nuxtjs/pwaをインストールします。
モジュールの設定
nuxt.config.js
  modules: [
   // ...
   '@nuxtjs/pwa',
   [
     '@nuxtjs/firebase',
     {
       config: {
         apiKey: '<apiKey>',
         authDomain: '<authDomain>',
         projectId: '<projectId>',
         storageBucket: '<storageBucket>',
         messagingSenderId: '<messagingSenderId>',
         appId: '<appId>',
         measurementId: '<measurementId>'
       },
       services: {
         auth: {
           persistence: 'local',
           initialize: {
             onAuthStateChangedAction: 'onAuthStateChangedAction',
           },
           ssr: true
         }
       }
     }
   ]
 ],

pwa: {
 meta: false,
 icon: false,

 workbox: {
   importScripts: [
     '/firebase-auth-sw.js'
   ],
   // by default the workbox module will not install the service worker in dev environment to avoid conflicts with HMR
   // only set this true for testing and remember to always clear your browser cache in development
   dev: true
 }
},
@nuxtjs/firebase
・config
事前準備の3.で確認したfirebaseConfigの内容を記入します
・services.auth
・persistence
認証状態の永続性を指定します(参考)
・initialize.onAuthStateChangedActionnAuthStateChangedAction
onAuthStateChangedオブザーバーが呼ばれたときに実行するactionを指定します。
・ssr
trueにすると「③リクエストヘッダーへのIDトークンの追加&④サーバー側での検証」が実行されるようになります。
pwa
firebase-auth-sw.jsをインポートします。
Vuex
store/index.js
export const state = () => ({
 authUser: null
})

export const getters = {
 isLoggedIn: state => !!state.authUser
}

export const actions = {
 async onAuthStateChangedAction({ commit, dispatch }, { authUser, claims }) {
   if (!authUser) {
     commit('RESET_USER')

     return
   }

   const { uid, email, emailVerified, displayName } = authUser

   commit('SET_USER', {
     uid,
     email,
     emailVerified,
     displayName,
     photoURL: claims.picture,
     isAdmin: claims.custom_claim
   })
 },
 async nuxtServerInit({ dispatch }, { res,req }) {
   if (res && res.locals && res.locals.user) {
     const { allClaims: claims, idToken: token, ...authUser } = res.locals.user

     await dispatch('onAuthStateChangedAction', {
       authUser,
       claims,
       token
     })
   }
 }
}

export const mutations = {
 SET_USER(state, payload) {
   state.authUser = payload;
 },
 RESET_USER(state) {
   state.authUser = null
 }
}
ログインユーザーの情報をstateとして保持します。
サーバー側で取得したログインユーザー情報はres.locals.userに格納されるので、nuxtServerInitでこの情報をstateにセットします。これにより、サーバー側でログインユーザーの情報を使用することができます。
以上で設定は完了です。
次にログイン/ログアウトメソッドを実装します。
ログインとログアウト
ログイン
<script>
export default {
  methods: {
    login() {
      const provider = new this.$fireModule.auth.TwitterAuthProvider()
      this.$fire.auth.signInWithPopup(provider)
      .then((result) => {
        // ログイン成功時の処理
        window.alert('ログインしました')
      }).catch((error) => {
        // ログイン失敗時の処理
        window.alert('ログインに失敗しました')
        console.log(error)
      })
    }
  }
}
</script>
ログアウト
<script>
export default {
  methods: {
    logout() {
      this.$fire.auth.signOut()
      .then(() => {
        // ログアウト成功時の処理
        window.alert('ログアウトしました')
       })
       .catch((error) => {
         window.alert('ログアウトに失敗しました')
         console.log(error)
       })
    }
  }
}
</script>公式サイトを参考に、ログインプロバイダに対応するメソッドを呼び出すだけです。 $fireと$fireModuleは@nuxtjs/firebaseモジュールで定義された変数です。(参考)
ログイン必須ページ
ページの描画前にmiddlewareでログインしているかどうかをチェックすることで、ログイン必須ページを作成することができます。
middleware/auth.js
export default function ({ store, redirect }) {
 if (!store.getters['isLoggedIn']) {
   return redirect('/login')
 }
}
ログイン必須ページには以下のようにmiddleware: 'auth'を指定することで、ログインしていない場合は /login にリダイレクトさせることができます。
<script>
export default {
 // ...
 middleware: 'auth'
}
</script>
まとめ
Nuxt.js(SSR) × Firebase Authenticationのログインセッション管理は、@nuxtjs/firebaseモジュールを使うと簡単