ec2にspringbootをデプロイ

今回の目的
AWSのEC2上でspringbootで作成した.jarファイルを実行し,ブラウザ上にhelloworldを表示させる.
Spring Initializerでの操作

https://start.spring.io/ にアクセスし,
projectでMavenの選択.依存関係にSpring Webの追加を行う.
また,今回はプロジェクト名をtest_awsとします.
SpringBootでの操作

プロジェクトをインポート→既存Mavenプロジェクト→先ほどダウンロードしたファイルを参照→/pom.xmlにチェック
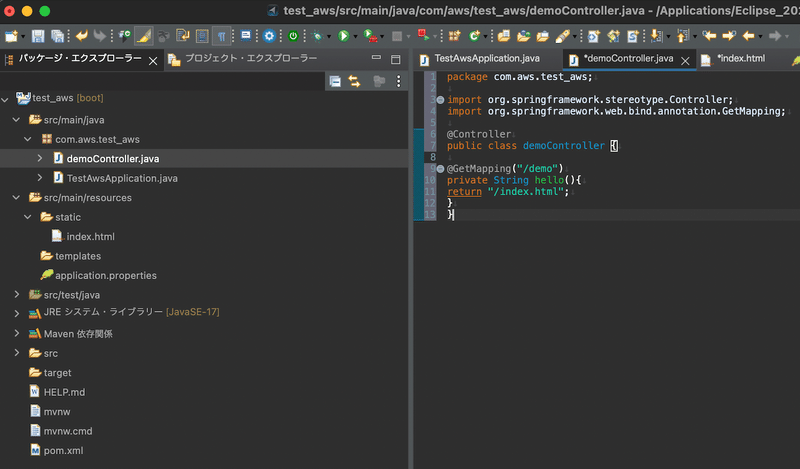
package com.aws.test_aws;

import org.springframework.stereotype.Controller;
import org.springframework.web.bind.annotation.GetMapping;

@Controller
public class demoController {

@GetMapping("/demo")
private String hello(){
return "/index.html";
}
}
demoController.javaという名前でファイルを作成./demoでアクセスを受けたとき,index.htmlファイルが呼び出される.

<!DOCTYPE html>
<html>
<head>
	<meta charset="utf-8">
	<title>デモ</title>
</head>
<body>
	<h1>Hello World!</h1>
</body>
</html>
次に,呼び出される,index.htmlを作成する.

次に環境を揃えるために,ec2のjavaのバージョンを確認し,pom.xmlのjavaのバージョンを揃える.

その後,Macen clean,Maven installを実行

ダウンロードしたフォルダー内のtarget内に.jarファイルが作成される.
scp -i "Key.pem" test_aws-0.0.1-SNAPSHOT.jar ec2-user@10.0.0.0:~その後,ターミナルにてjarファイルを転送
java -jar test_aws-0.0.1-SNAPSHOT.jar jarファイルを実行して,http://10.0.0.0:8080/demoアクセスすると helloworldが確認することができる.
この記事が気に入ったらサポートをしてみませんか?