
[Drogon]DBからORMを実装する

今回はDrogonフレームワークを使用してRESTfulAPIを作成する手順について解説します。
Drogonフレームワークには接続したデータベースの構造を基にして、C++で作成されたモデルクラスを生成してくれる機能があります。
この機能のことをORM(Object Relation Mapping)と言います。
通常ORMで生成したクラスを使用するには、コントローラのソースコードで生成されたモデルクラスのヘッダをインクルードする必要がありましたが、Drogonではさらに一歩進んで、ORMを利用したRESTfulAPIをコントローラとして作成してくれる機能があります。
データベースの操作をするだけなら自動でRESTfulAPIクラスを生成してしまった方がSQLを書かなくて良い分扱い自体は簡単です。
ORMはデータベースの構造やパフォーマンスに合わせたSQLのチューニングは難しいので、SQLを習得してコントローラからデータベースをいじった方が効率的ではありますが、C++も、SQLも、とあれこれ同時に学習していては心が折れる方も多く見かけますから、今はC++だけ使うと割り切って使用してみましょう。
データベースを作成する
今回はPostgreSQLを使用して実装していきます。
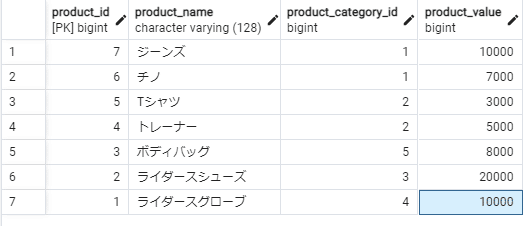
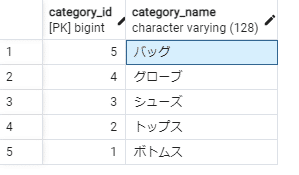
データベースに配置するテーブルはこんな感じ。

製品のテーブルとカテゴリのテーブルがあり、製品のテーブルはカテゴリテーブルのIDを参照するリレーションが設定されています。
比較的よくある1:nのシンプルなリレーションです。
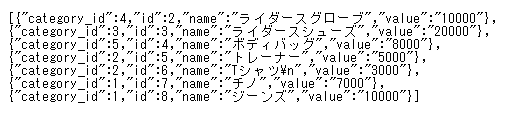
テーブルのデータはこんな感じ。
プロジェクトを作成する
次にDrogonのプロジェクトを作成します。
今回の名前は model_sample として以下のコマンドを使用して作成します。
$ dg_ctl create project model_sampleプロジェクトディレクトリが出来たらその中に入ります。
$ cd model_sampledrogonではデータベースへの接続に、config.json に記載された情報を用いることができるので、まずはエディタでconfig.jsonに情報を記載します。
今回私がサンプル用に作ったデータベースの接続情報は、
host : localhost(127.0.0.1)
port : 5432
database : sample_database
schema : public
table : products, categories
といった形でしたので、まずはこの情報を記入します。
config.jsonより一部抜粋
    "db_clients": [
        {
            //name: Name of the client,'default' by default
            //"name":"",
            //rdbms: Server type, postgresql,mysql or sqlite3, "postgresql" by default
            "rdbms": "postgresql",
            //filename: Sqlite3 db file name
            //"filename":"",
            //host: Server address,localhost by default
            "host": "127.0.0.1",
            //port: Server port, 5432 by default
            "port": 50052,
            //dbname: Database name
            "dbname": "sample_database",
            //user: 'postgres' by default
            "user": "drogon_user",
            //passwd: '' by default
            "passwd": "drogon",
            //is_fast: false by default, if it is true, the client is faster but user can't call
            //any synchronous interface of it.
            "is_fast": false,
            //client_encoding: The character set used by the client. it is empty string by default which
            //means use the default character set.
            //"client_encoding": "",
            //number_of_connections: 1 by default, if the 'is_fast' is true, the number is the number of
            //connections per IO thread, otherwise it is the total number of all connections.
            "number_of_connections": 1,
            //timeout: -1.0 by default, in seconds, the timeout for executing a SQL query.
            //zero or negative value means no timeout.
            "timeout": -1.0,
            //"auto_batch": this feature is only available for the PostgreSQL driver(version >= 14.0), see
            // the wiki for more details.
            "auto_batch": false
        }
    ],
実行する際にエラーを吐いたりするので、以下のキーはコメントアウトしておきます。
そもそもHTTPSimpleControllerは使用しないですからね…
        //simple_controllers_map: Used to configure mapping from path to simple controller
        /*"simple_controllers_map": [
            {
                "path": "/path/name",
                "controller": "controllerClassName",
                "http_methods": [
                    "get",
                    "post"
                ],
                "filters": [
                    "FilterClassName"
                ]
            }
        ],*/
次に、main.cc の configfile を読み込む個所を有効にしましょう。
#include <drogon/drogon.h>
int main() {
    //Set HTTP listener address and port
    drogon::app().addListener("0.0.0.0",8848);
    //Load config file
    drogon::app().loadConfigFile("../config.json"); // ←この行のコメントアウトを外す
    //Run HTTP framework,the method will block in the internal event loop
    drogon::app().run();
    return 0;
}
これでプロジェクトからデータベースに接続する準備は完了です。
モデルを作成する
モデルの作成については他の記事で細かく説明します。
まずはプロジェクトディレクトリで以下のコマンドを打ちましょう。
$ dg_ctl create model modelsすると、models ディレクトリの下に model.json というモデル情報のファイルが作成されると思います。
Drogonは、この model.json によってデータベースから情報を取得してモデルを作成するので、まずはmodel.jsonに対してデータベースへの接続情報を書いて埋めていきます。
このとき、先ほど加工した config.json と model.json の設定は一致している必要があるので、注意が必要です。
変更箇所は大きく二つ、model.json上部のこの部分と、
    //rdbms: server type, postgresql,mysql or sqlite3
    "rdbms": "postgresql",
    //filename: sqlite3 db file name
    //"filename":"",
    //host: server address,localhost by default;
    "host": "127.0.0.1",
    //port: server port, 5432 by default;
    "port": 50052,
    //dbname: Database name;
    "dbname": "sample_database",
    //schema: valid for postgreSQL, "public" by default;
    "schema": "public",
    //user: User name
    "user": "drogon_user",
    //password or passwd: Password
    "password": "drogon",
    //client_encoding: The character set used by drogon_ctl. it is empty string by default which
    //means use the default character set.
    "client_encoding": "UTF-8",
    //table: An array of tables to be modelized. if the array is empty, all revealed tables are modelized.
    "tables": [],
    //convert: the value can be changed by a function call before it is stored into database or
    //after it is read from database
コントローラを自動生成するためのこの部分の値を変更します。
    "restful_api_controllers": {
        "enabled": true,
ファイル全体はこんな感じです。
model.json
{
    //rdbms: server type, postgresql,mysql or sqlite3
    "rdbms": "postgresql",
    //filename: sqlite3 db file name
    //"filename":"",
    //host: server address,localhost by default;
    "host": "127.0.0.1",
    //port: server port, 5432 by default;
    "port": 5432,
    //dbname: Database name;
    "dbname": "sample_database",
    //schema: valid for postgreSQL, "public" by default;
    "schema": "public",
    //user: User name
    "user": "drogon_user",
    //password or passwd: Password
    "password": "drogon",
    //client_encoding: The character set used by drogon_ctl. it is empty string by default which
    //means use the default character set.
    "client_encoding": "UTF-8",
    //table: An array of tables to be modelized. if the array is empty, all revealed tables are modelized.
    "tables": [],
    //convert: the value can be changed by a function call before it is stored into database or
    //after it is read from database
    "convert": {
      "enabled": false,
      "items":[{
          "table": "user",
          "column": "password",
          "method": {
            //after_db_read: name of the method which is called after reading from database, signature: void([const] std::shared_ptr [&])
            "after_db_read": "decrypt_password",
            //before_db_write: name of the method which is called before writing to database, signature: void([const] std::shared_ptr [&])
            "before_db_write": "encrypt_password"
          },
          "includes": [
            "\"file_local_search_path.h\"","<file_in_global_search_path.h>"
          ]
      }]
    },
    "relationships": {
        "enabled": true,
        "items": [
            {
                "type": "has many",
                "original_table_name": "products",
                "original_table_alias": "product",
                "original_key": "category_id",
                "target_table_name": "categories",
                "target_table_alias": "category",
                "target_key": "id",
                "enable_reverse": false
            }
        ]
    },
    "restful_api_controllers": {
        "enabled": true,
        // resource_uri: The URI to access the resource, the default value
        // is '/*' in which the asterisk represents the table name.
        // If this option is set to a empty string, the URI is composed of the namespaces and the class name.
        "resource_uri": "/*",
        // class_name: "Restful*Ctrl" by default, the asterisk represents the table name.
        // This option can contain namespaces.
        "class_name": "Restful*Ctrl",
        // filters: an array of filter names.
        "filters": [],
        // db_client: the database client used by the controller. this option must be consistent with
        // the configuration of the application.
        "db_client": {
            //name: Name of the client,'default' by default
            "name": "default",
            //is_fast:
            "is_fast": false
        },
        // directory: The directory where the controller source files are stored.
        "directory": "controllers",
        // generate_base_only: false by default. Set to true to avoid overwriting custom subclasses.
        "generate_base_only": false
    }
}
モデルとコントローラのソースコードを生成する
一連の設定を書き終えたら、モデルとコントローラのソースコードを生成します。それには、プロジェクトのルートディレクトリで以下のコマンドを実行します。
$ dg_ctl create model models「あれ?」と思った方もいらっしゃるかもしれません。
model.json を作成したコマンドと全く一緒のコマンドなのです。
ですが、model.json の有無によりこのコマンドの実行結果は変わります。
今回はmodelsディレクトリの下にテーブル名のソースファイルが、
controllersディレクトリの下にRestfulというプリフィックスから始まるテーブル名のソースファイルが、それぞれ生成されたと思います。
modelsの下にあるのは、dg_ctlコマンドによってデータベースの構造を基に生成された、データベースのデータを保持するためのオブジェクトです。
そしてcontrollersの下に生成されたのは、実際にmodelsの下のオブジェクトを扱うベースクラスと、httpリクエストをルーティングするCtrlクラスです。
Baseのソースコードは長大ですが、Ctrlクラスの方はシンプルです。
それらのソースコードを確認してみると、CRUD(データの作成(Create)、読み出し(Read)、更新(Update)、削除(Delete))に対応したインターフェースと、
それぞれのパスが定義されているのが判ると思います。
このCRUDをURLのルーティングによるインターフェースの呼び分けで実現するWebAPIのことを、RESTfulAPIと呼びます。
RESTfulAPIとしてデータのやり取りの口を用意しておくと、ネットワークさえあればデスクトップアプリからでも他のWebアプリケーションからでも、HTTPを介した統一的なデータ操作が可能なので、拡張性を確保しつつシステムを構築するのに非常に便利です。
アプリケーションをビルドする
最後に、おなじみのアプリケーションのビルドを実行してみます。
buildディレクトリに移動し、
$ cd build以下のコマンドを実行し、
$ cmake ..
$ make
出来上がったバイナリファイルを実行します。
$ ./model_sample試しにブラウザから、
localhost:80/products
にアクセスしてみましょう。
先ほどデータベースに登録したデータがJson形式で参照出来れば成功です。
さいごに
今回はDrogonフレームワークを利用して、ORMによるモデルの構築を行いました。
ORMそのものはデメリットも多くあり、世の中的に賛否両論な仕組みではありますが、例えば小規模短納期で社内に公開するようなアプリ開発をする場合や、DBのテーブル構造がそれほど複雑でない場合などには、開発期間を短縮したりちょっとした動作検証を行うのに便利な仕組みでもあります。
覚えておいて損はないでしょう。