
UE5から始める C++ & BP 14 【C++版】Flow Control(Loop)

ついに次が基本文法最後のタスクになります。

平日の朝にしか書けなくなってしまったので、進捗が一気に落ちてしまいました。
いよいよ朝活と休日にしか書けない。
朝活のいいところは時間制限があることです。
少ない時間しかないからかなり集中して書けます。
どうせ、今まで何もしてこなかったから0だったのが、1でも増えているからかなりの進捗をたたき出している。
そう考えると焦ることもないか
日々勉強!
コンスタントに勉強していればいいことあるさ。
Blueprintの内容をC++で再現します。
【C++】Flow Control(Loop)
C++でBlueprintを再現すること
Blueprintの3種類のLoopノードをC++で再現します。
For Loop
For Each Loop
While Loop
[For Loop]と[For Earch Loop]にはBreak付きのノードが用意されています。

3つのLoopで同じ結果になる処理を紹介します。
For Loop
For Each Loop
While Loop


編集するActorクラスを作成する
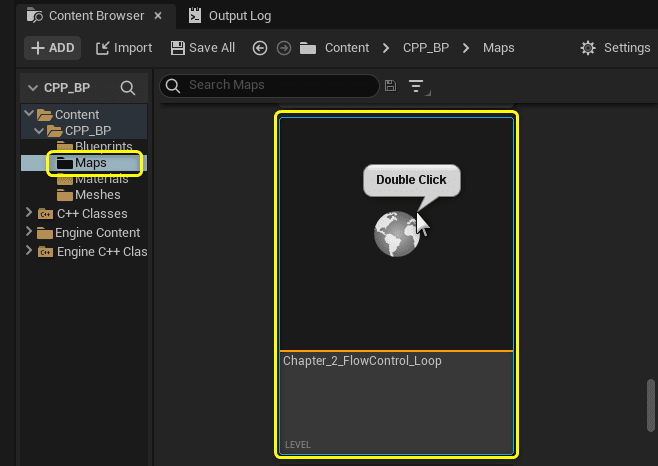
プロジェクトを閉じていたら、プロジェクトを開き、「Chapter_2_FlowControl_Loop」を開きます。
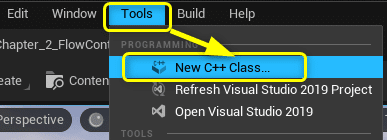
[Tools]メニューから[New C++ Class]を開きます。
親クラスに[Actor]を選択します。

ClassTypeとClass名を設定します。


Solution Explorerから今回編集する2つのファイルを開きます。
CPPFlowControlLoop.h
CPPFlowControlLoop.cpp

開いたファイルを学習する初期状態に修正します。
CPPFlowControlLoop.h
// Fill out your copyright notice in the Description page of Project Settings.

#pragma once

#include "CoreMinimal.h"
#include "GameFramework/Actor.h"
#include "CPPCalcType.h"
#include "CPPFlowControlLoop.generated.h"

UCLASS()
class CPP_BP_API ACPPFlowControlLoop : public AActor
{
	GENERATED_BODY()

public:
	ACPPFlowControlLoop();

	// Event Dispatcher[OnPrintHello]
	DECLARE_DYNAMIC_MULTICAST_DELEGATE(FPrintHelloDelegate);

	UPROPERTY(BlueprintAssignable, Category = "CPP_BP")
	FPrintHelloDelegate OnPrintHello;

	// Custom Event[PrintHello]
	UFUNCTION()
	void PrintHello();

	int32 Sum(int32 A, int32 B);

	// Action Mappingsに設定したActionを処理する関数
	void PressedActionPrintCalcResult();

protected:
	// Called when the game starts or when spawned
	virtual void BeginPlay() override;

private:
	TArray<FString> Messages = { TEXT("C++ Hello World!"), TEXT("你好 世界!"), TEXT("Bonjour le monde!"), TEXT("Hallo Welt!"), TEXT("こんにちは世界!") };
	//TArray<FString> Messages = { "C++ Hello World!", "你好 世界!", "Bonjour le monde!", "Hallo Welt!", "こんにちは世界!" };

	// 計算結果を出力する関数
	void PrintCalcResult(const ECPPCalcType Type, const int32 A, const int32 B, const float PrintDuration);

	// PrintString関数のDurationに設定する変数
	const float Duration = 10.0f;

	// PrintString関数のTextColorに設定する変数
	const FLinearColor TextColor = FColor(255, 255, 255);

	// 計算用の変数
	int32 CalcVarA = 7;
	int32 CalcVarB = 3;

	// Flow Control用の変数
	bool IsPrintHello = false;
	int32 TypeIndex = 0;
	TArray<ECPPCalcType> CalcTypes = { ECPPCalcType::Add, ECPPCalcType::Subtract, ECPPCalcType::Multiply, ECPPCalcType::Divide };

	// Input設定
	void SetupInput();

	// Input Eventを処理する関数
	void PressedH();

};
CPPFlowControlLoop.cpp
// Fill out your copyright notice in the Description page of Project Settings.


#include "CPPFlowControlLoop.h"
#include "Kismet/KismetSystemLibrary.h"
#include "Kismet/GameplayStatics.h"

ACPPFlowControlLoop::ACPPFlowControlLoop()
{
	// Event Dispathcer[OnPrintHello]にCustom Event[PrintHello]をバインドする
	OnPrintHello.AddDynamic(this, &ACPPFlowControlLoop::PrintHello);
}

int32 ACPPFlowControlLoop::Sum(int32 A, int32 B)
{
	return A + B;
}

// Called when the game starts or when spawned
void ACPPFlowControlLoop::BeginPlay()
{
	Super::BeginPlay();

	SetupInput();

	if (IsPrintHello)
	{
		// Hello World!を出力する処理
		PrintHello();
	}
	else
	{
		// 計算結果を出力する処理
		PressedActionPrintCalcResult();
	}
}

void ACPPFlowControlLoop::PrintCalcResult(const ECPPCalcType Type, const int32 A, const int32 B, const float PrintDuration)
{
	switch (Type)
	{
		case ECPPCalcType::Add:
		{
			// Add(足し算)の処理
			// 値渡し
			int32 ResultAdd = Sum(A, B);
			FString StrResultAdd = FString::Printf(TEXT("%d"), ResultAdd);
			UKismetSystemLibrary::PrintString(this, StrResultAdd, true, true, FColor::Red, PrintDuration);
			break;
		}
		case ECPPCalcType::Subtract:
		{
			// Subtract(引き算)の処理
			int32 ResultSubtract = A - B;
			FString StrResultSubtract = FString::Printf(TEXT("%d"), ResultSubtract);
			UKismetSystemLibrary::PrintString(this, StrResultSubtract, true, true, FColor::Yellow, PrintDuration);
			break;
		}
		case ECPPCalcType::Multiply:
		{
			// Multiply(掛け算)の処理
			int32 ResultMultiply = A * B;
			FString StrResultMultiply = FString::Printf(TEXT("%d"), ResultMultiply);
			UKismetSystemLibrary::PrintString(this, StrResultMultiply, true, true, FColor::Green, PrintDuration);
			break;
		}
		case ECPPCalcType::Divide:
		{
			// Divide(割り算)の処理(int > float)
			float ResultDivide = (float)A / (float)B;
			FString StrResultDivide = FString::Printf(TEXT("%f"), ResultDivide);
			UKismetSystemLibrary::PrintString(this, StrResultDivide, true, true, FColor::Blue, PrintDuration);
		}
	}
}

void ACPPFlowControlLoop::SetupInput()
{
	// 入力を有効にする
	EnableInput(UGameplayStatics::GetPlayerController(GetWorld(), 0));

	// HキーのPressedとReleasedをバインドする
	InputComponent->BindKey(EKeys::H, IE_Pressed, this, &ACPPFlowControlLoop::PressedH);

	// ActionMappingsに設定したActionをバインドする
	InputComponent->BindAction("ActionPrintCalcResult", IE_Pressed, this, &ACPPFlowControlLoop::PressedActionPrintCalcResult);
}

void ACPPFlowControlLoop::PressedH()
{
	// Event Dispathcer[OnPrintHello]をコールする
	OnPrintHello.Broadcast();
}

void ACPPFlowControlLoop::PressedActionPrintCalcResult()
{
	// 計算結果を出力する処理
	PrintCalcResult(CalcTypes[TypeIndex], CalcVarA, CalcVarB, Duration);

	TypeIndex++;
	TypeIndex = TypeIndex % CalcTypes.Num();
}

void ACPPFlowControlLoop::PrintHello()
{
	int32 randomIndex = FMath::RandRange(0, Messages.Num() - 1);

	// 1行で書くなら
	// Messages[FMath::RandRange(0, Messages.Num() - 1)]

	// Hello World!を出力する処理
	UKismetSystemLibrary::PrintString(this, Messages[randomIndex], true, true, TextColor, Duration);
}
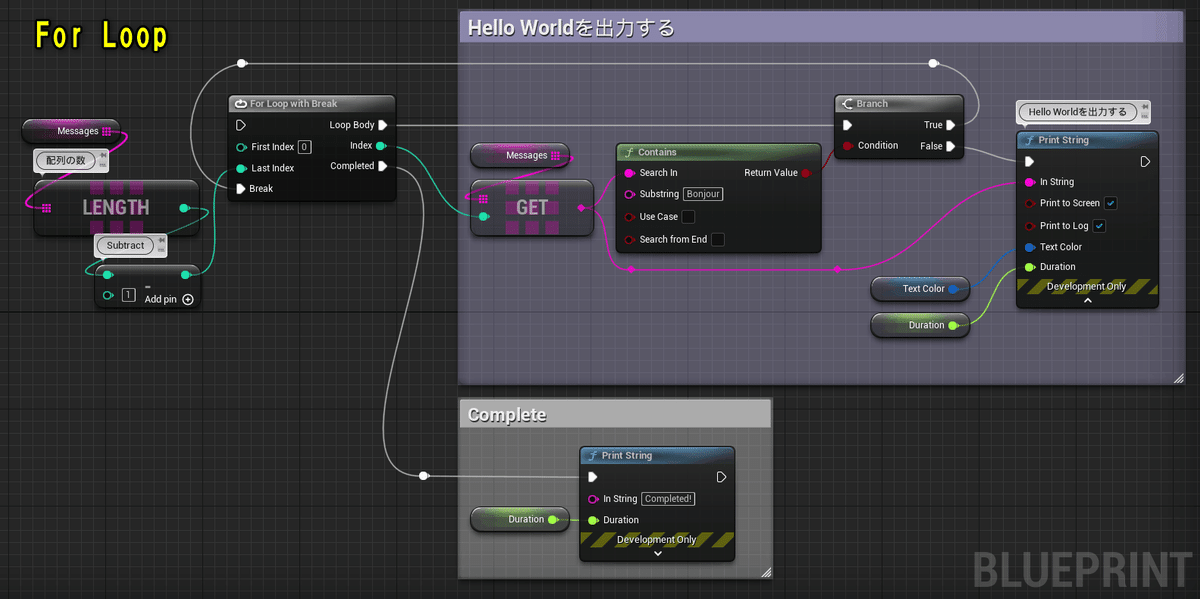
For LoopノードでPrintStringを繰り返し呼び出す
For LoopノードでPrintStringを繰り返し呼び出した処理をC++で再現します。

C++でFor Loopノードを再現すると以下のようになります。
indexでは文字が長いので、i,j,kといった1文字を使用します。
for (int i = 0; i <= 4; i++)
{
    // 繰り返し処理
}
// 完了後の処理
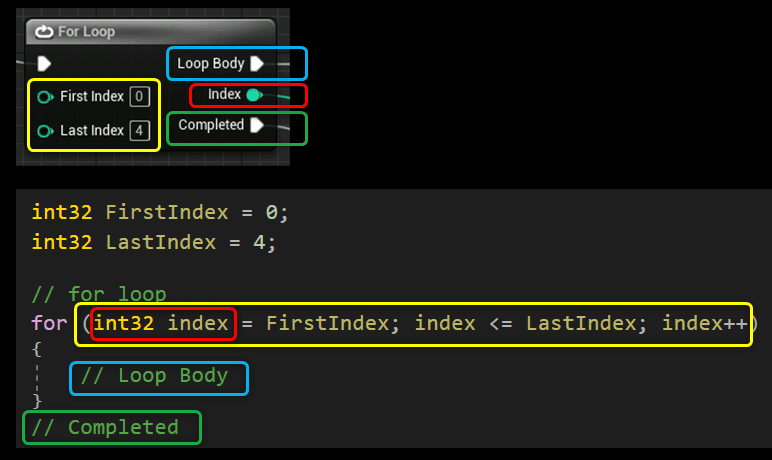
今回はBlueprintのノードを再現するので、分かりやすいようにBlueprintのノードの名称を使用します。
int32 FirstIndex = 0;
int32 LastIndex = 4;

// for loop
for (int32 index = FirstIndex; index <= LastIndex; index++)
{
    // Loop Body
}
// Completed
Blueprintの名称と同じにすることで、C++の書き方との対応が分かりやすくなったのではないでしょうか。
「CPPFlowControlLoop.cpp」の[PrintHello]を[For Loop]ノードを再現する記述に編集します。
CPPFlowControlLoop.cpp PrintHello()
void ACPPFlowControlLoop::PrintHello()
{
	int32 FirstIndex = 0;
	int32 LastIndex = 4;

	// for loop
	for (int32 index = FirstIndex; index <= LastIndex; index++)
	{
		// indexの値を出力する
		UKismetSystemLibrary::PrintString(this, FString::Printf(TEXT("%d"), index), true, true, TextColor, Duration);
	}
	// CompletedをPrintStringで出力する
	UKismetSystemLibrary::PrintString(this, TEXT("Completed"), true, true, FColor::Cyan, Duration);
}
Ctrl + Sでファイルを保存し、Compileを行います。

「CPPFlowControlLoop」をViewportにDrag&Dropします。
PrintStringの出力結果が分かりづらくなるので、「BP_FlowControl_Loop」を削除します。

Level Editorの[Play]ボタンをクリックします。

Blueprintと同様に配列のIndexNoがすべて出力された後に、Completedの文字が出力されました。

For Loopノードで配列をすべて出力する
[For Loop]ノードの[Last Index]ピンに配列[Messages]のLastIndexを接続して、配列をすべて出力する処理をC++で再現します。

C++ではfor文の条件を柔軟に書き換えられます。
配列のLastIndexか配列数でfor文を続けるか条件を書きます。
// 配列のLastIndexで比較する場合
int32 LastIndex = Messages.Num() - 1;
// 配列のLastIndex以下なら(BlueprintのFor Loopノードと同じ書き方)
for (int32 index = FirstIndex; index <= LastIndex; index++)

// 配列数で比較する場合
int32 LastIndex = Messages.Num();
// 配列数より小さかったらLoopを続ける
for (int32 index = FirstIndex; index < LastIndex; index++)
// 配列数に一致していなかったらLoopを続ける
for (int32 index = FirstIndex; index != LastIndex; index++)
今回はBluprintノードを再現するので、「配列のLastIndex以下か」の条件で再現します。
ACPPFlowControlLoop.cpp PrintHello()
void ACPPFlowControlLoop::PrintHello()
{
	int32 FirstIndex = 0;
	int32 LastIndex = Messages.Num() - 1;

	// for loop
	for (int32 index = FirstIndex; index <= LastIndex; index++)
	{
		// Messagesの値を出力する
		UKismetSystemLibrary::PrintString(this, Messages[index], true, true, TextColor, Duration);
	}
	// CompletedをPrintStringで出力する
	UKismetSystemLibrary::PrintString(this, TEXT("Completed"), true, true, FColor::Cyan, Duration);
}
Ctrl + Sでファイルを保存し、Compileを行います。

Level Editorの[Play]ボタンをクリックします。

Blueprintと同様に配列を最初から最後まで出力できました。

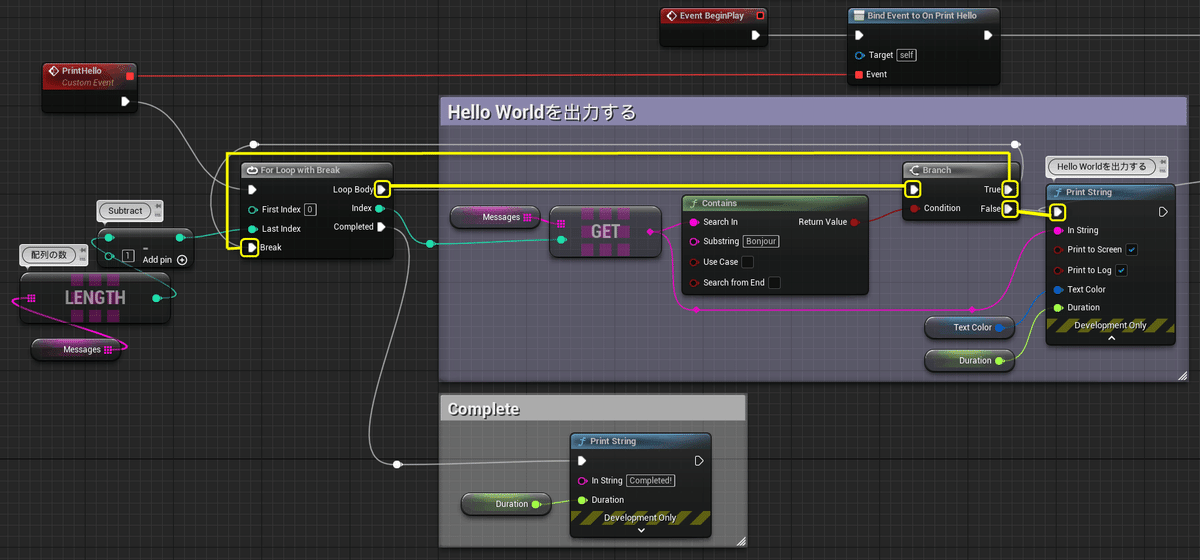
For Loop with BreakノードでLoopを途中で抜ける
配列[Messages]の文字列に「Boujour」が含まれていた時に[Break]実行ピンでLoopを途中で抜けた処理をC++で再現します。
C++ではfor文内の「break」が呼び出されるとfor文を途中で抜けます。
for (int i = 0; i <= 4; i++)
{
	// 繰り返し処理
	if(条件)
	{
		//条件がTrue
		break;
	}
}
// 完了後の処理
文字列が含まれているか判定する「Contains」ノードはC++で以下のように書きます。
FString str = TEXT("文字列が含まれているか");
str.Contains(TEXT("文字列"); // 含まれている(true)、含まれていない(false)
Blueprintの処理を再現すると以下のような記述になります。
int32 FirstIndex = 0;
int32 LastIndex = 4;

// for loop
for (int32 index = FirstIndex; index <= LastIndex; index++)
{
	// Loop Body
	if(Messages[index].Contains(TEXT("文字列")))
	{
		// 文字列が含まれる場合
		break;
	}
}
// Completed
[PrintHello]に再現した処理を反映します。
CPPFlowControlLoop.cpp PrintHello()
void ACPPFlowControlLoop::PrintHello()
{
	int32 FirstIndex = 0;
	int32 LastIndex = Messages.Num() - 1;

	// for loop
	for (int32 index = FirstIndex; index <= LastIndex; index++)
	{
		// 文字列に"Bonjour"が含まれているか
		if (Messages[index].Contains(TEXT("Bonjour")))
		{
			// TrueならLoopを抜ける
			break;
		}

		// Messagesの値を出力する
		UKismetSystemLibrary::PrintString(this, Messages[index], true, true, TextColor, Duration);
	}
	// CompletedをPrintStringで出力する
	UKismetSystemLibrary::PrintString(this, TEXT("Completed"), true, true, FColor::Cyan, Duration);
}
Ctrl + Sでファイルを保存し、Compileを行います。

Level Editorの[Play]ボタンをクリックします。

[Bonjour]が含まれていない、[Break]が実行される前の文字列のみ表示されました。

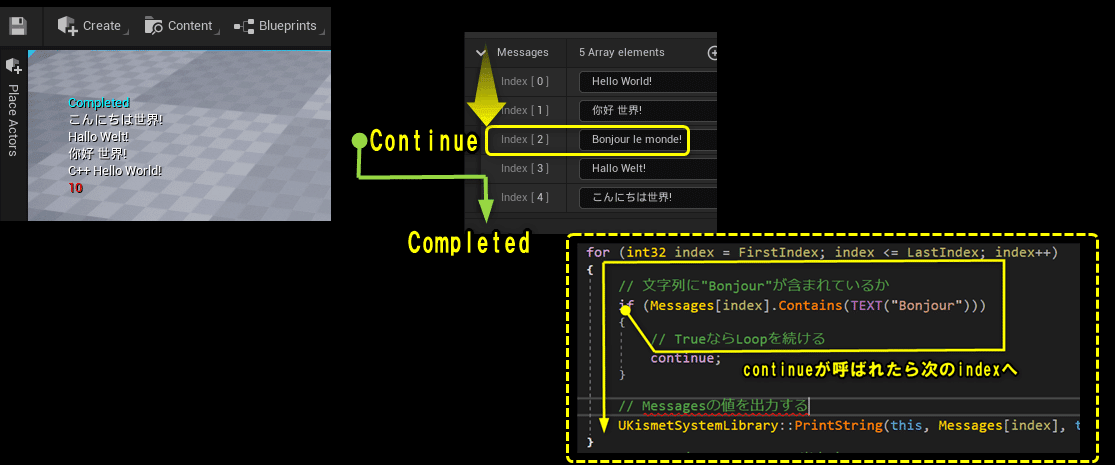
continue文(C++のみ)
C++では「break」の他に「continue」を使用できます。
「continue」が呼ばれると、処理の途中で次のindexのLoopが始まります。
for (int i = 0; i <= 4; i++)
{
	// 繰り返し処理
	if(条件)
	{
		//条件がTrue
		continue;
	}
}
// 完了後の処理
「break」を「continue」に変更します。
CPPFlowControlLoop.cpp PrintHello()
void ACPPFlowControlLoop::PrintHello()
{
	int32 FirstIndex = 0;
	int32 LastIndex = Messages.Num() - 1;

	// for loop
	for (int32 index = FirstIndex; index <= LastIndex; index++)
	{
		// 文字列に"Bonjour"が含まれているか
		if (Messages[index].Contains(TEXT("Bonjour")))
		{
			// TrueならLoopを続ける
			continue;
		}

		// Messagesの値を出力する
		UKismetSystemLibrary::PrintString(this, Messages[index], true, true, TextColor, Duration);
	}
	// CompletedをPrintStringで出力する
	UKismetSystemLibrary::PrintString(this, TEXT("Completed"), true, true, FColor::Cyan, Duration);
}
Ctrl + Sでファイルを保存し、Compileを行います。

Level Editorの[Play]ボタンをクリックします。

[Bonjour]が含まれていた文字以外は出力されました。
Foreach Loop with Breakノードで配列をすべて出力する
[For Loop with Break]ノードから[For Each Loop with Break]ノードに変更した処理をC++で再現します。

C++で[For Each Loop]ノードを再現した書き方は以下になります。
TArray<FString> Strs;

for (FString Str : Strs)
{
	// Index[0]~Index[LastIndex]までLoopする
}
// 完了後の処理
[For Each Loop]ノードを再現した処理と、「break」を追加して、[For Each Loop with Break]ノードを再現します。
CPPFlowControlLoop.cpp PrintHello()
void ACPPFlowControlLoop::PrintHello()
{
	// C++版のFor Each Loop with Break
	for (FString Message : Messages)
	{
		// 文字列に"Bonjour"が含まれているか
		if (Message.Contains(TEXT("Bonjour")))
		{
			// TrueならLoopを続ける
			break;
		}
		// Messagesの値を出力する
		UKismetSystemLibrary::PrintString(this, Message, true, true, TextColor, Duration);
	}
	// CompletedをPrintStringで出力する
	UKismetSystemLibrary::PrintString(this, TEXT("Completed"), true, true, FColor::Cyan, Duration);
}
Ctrl + Sでファイルを保存し、Compileを行います。

Level Editorの[Play]ボタンをクリックします。
[For Each Loop with Break]ノードの処理と同様の結果となりました。
配列を0~LastIndexまで処理するのであれば、「For Each Loop」の書き方が最適です。

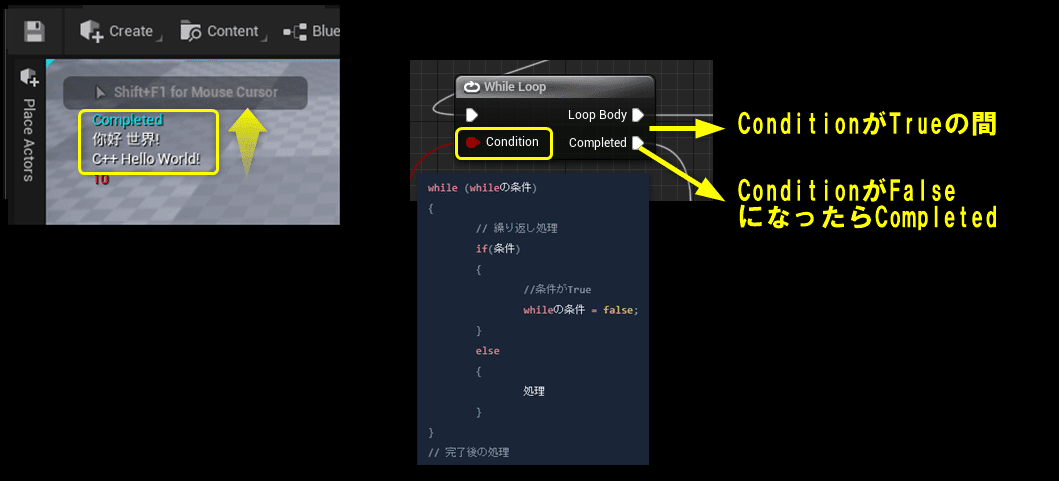
While loopノード
最後に[While Loop]ノードの処理を再現します。

[While Loop]ノードはC++では以下のように書きます。
whileの条件が[false]になった時にLoopを抜けます。
[While Loop]は無限ループになりやすいので、ループを抜ける処理を必ず用意します。
while (whileの条件)
{
	// 繰り返し処理
	if(条件)
	{
		//条件がTrue
		whileの条件 = false;
	}
	else
	{
		処理
	}
}
// 完了後の処理
[While Loop]ノードの処理を再現するように編集します。
PPFlowControlLoop.cpp PrintHello()
void ACPPFlowControlLoop::PrintHello()
{
	bool NotBonjour = true;
	int32 HelloIndex = 0;

	while (NotBonjour)
	{
		// 文字列に"Bonjour"が含まれているか
		if (Messages[HelloIndex].Contains(TEXT("Bonjour")))
		{
			// While Loopの条件をfalseに設定する
			NotBonjour = false;
		}
		else
		{
			// Messagesの値を出力する
			UKismetSystemLibrary::PrintString(this, Messages[HelloIndex], true, true, TextColor, Duration);
		}
		// HelloIndexをインクリメント
		HelloIndex++;
	}

	// CompletedをPrintStringで出力する
	UKismetSystemLibrary::PrintString(this, TEXT("Completed"), true, true, FColor::Cyan, Duration);
}
Ctrl + Sでファイルを保存し、Compileを行います。

Level Editorの[Play]ボタンをクリックします。

[While Loop]ノードと同様の処理になりました。
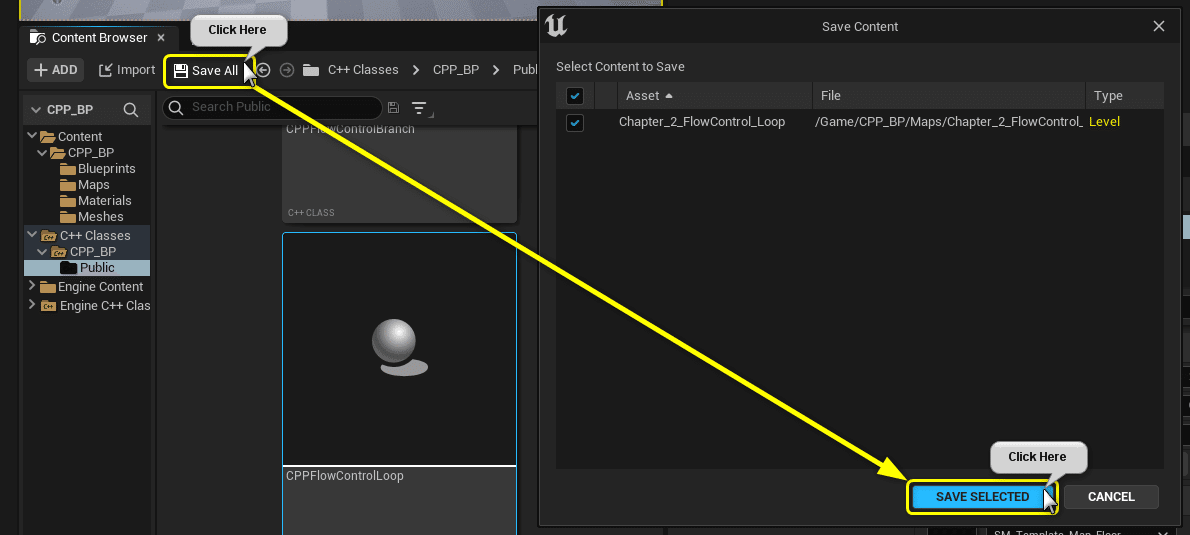
すべて保存
C++側の説明は以上になります。
プロジェクトをすべて保存しましょう。
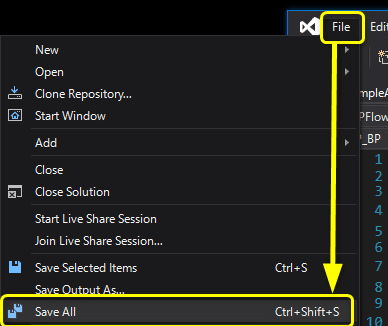
Visual StudioのSolutionもすべて保存しましょう。
まとめ
この文法執筆はサグラダ・ファミリア作るくらいまだまだ時間がかかる活動です。
少しずつでも積みあがって立派な建物になるように頑張ります!
引き続き応援よろしくお願いします。
参照URL
UE5から始めるC++&Blueprint 進捗とロードマップ
Zennで進捗報告を行い、GitHubでロードマップを公開中です。
よかったら覗いてみてください。
この記事が気に入ったらサポートをしてみませんか?