
UE5 EA プラグイン作成~プラグイン作成と公開する準備まで~

遂にプラグイン開発について書くところまでたどり着きました。
ブループリントの数学関数ライブラリを作成するプラグインを作成して、公開する準備まで(パッケージ化)までをまとめました。
プラグイン一覧に自分で作成したサムネイルが表示された時はモチベーションがグッと上がりました。
皆さんのお役に立つようなプラグインが提供できることを目指して、昨日より1歩でも先に進めていきます。
UE5 EA プラグイン作成~プラグイン作成と公開する準備まで~
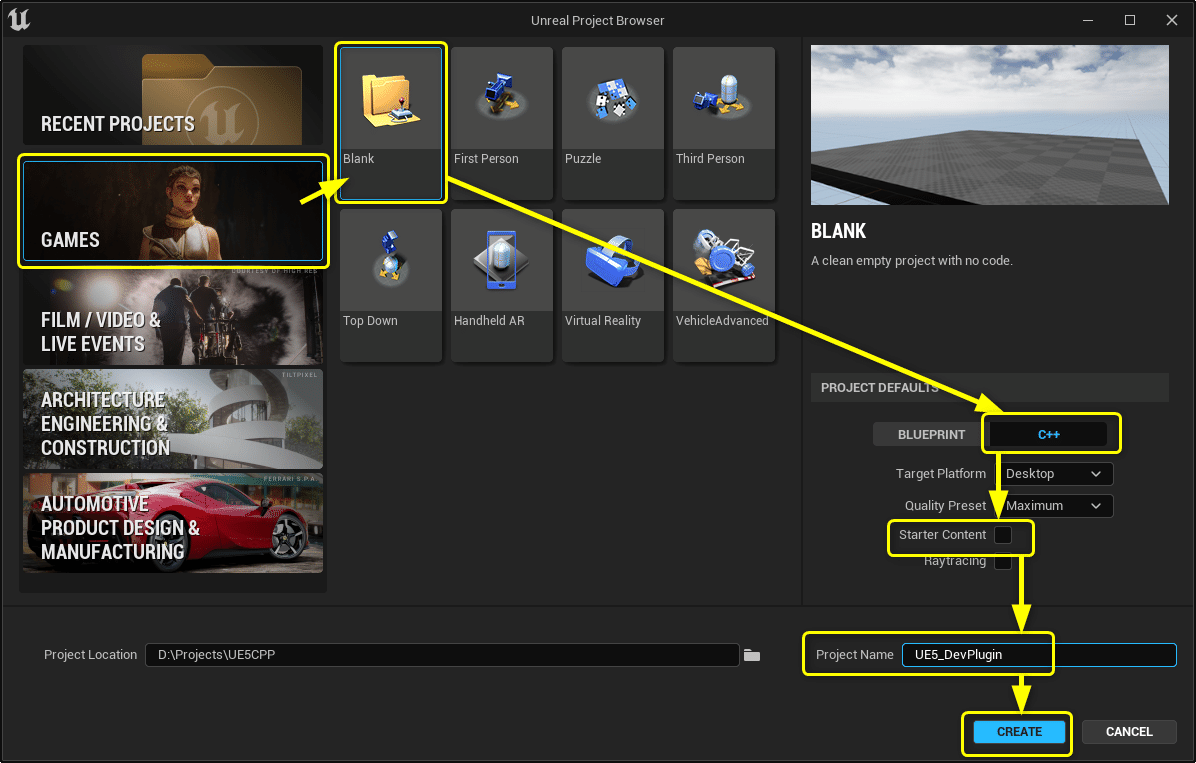
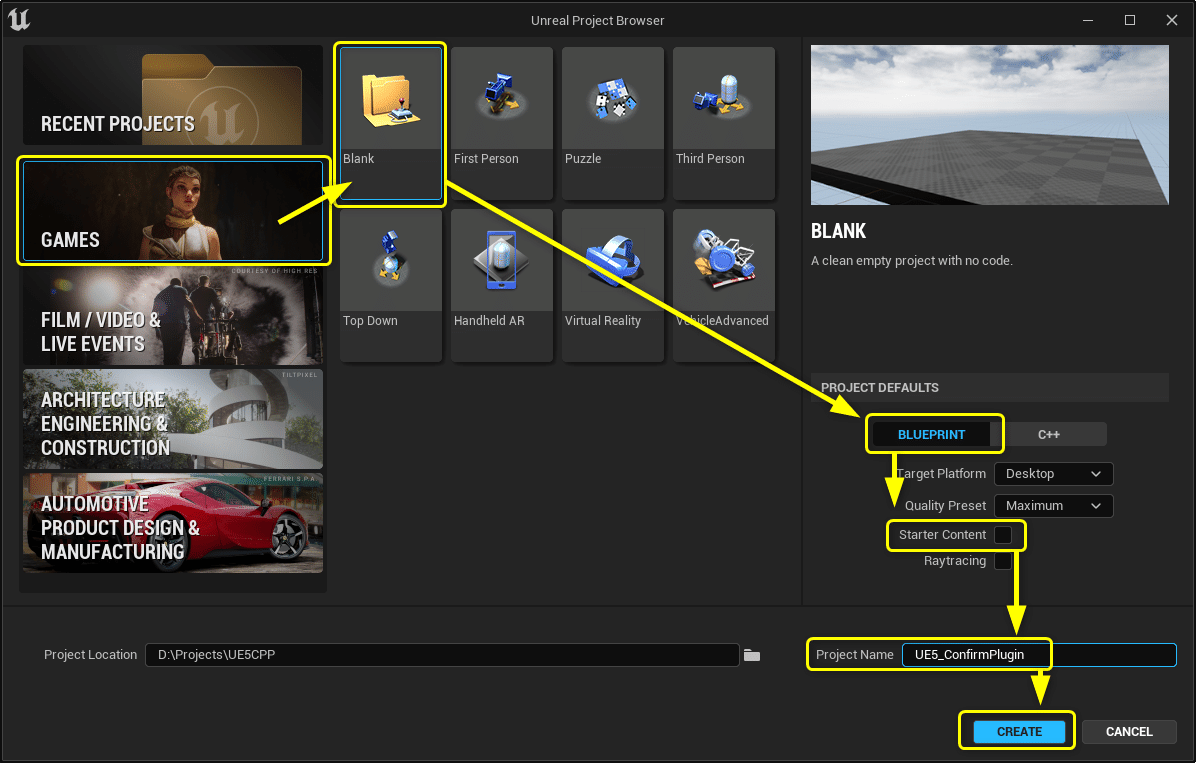
プラグインを作成するプロジェクトを作成する
UE5 EAでブループリントの数学関数ライブラリを作成するプラグインを作成していきます。
BlankのC++プロジェクトを作成します。
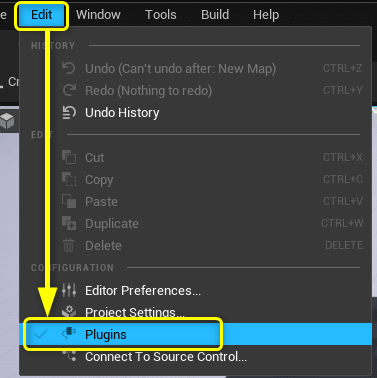
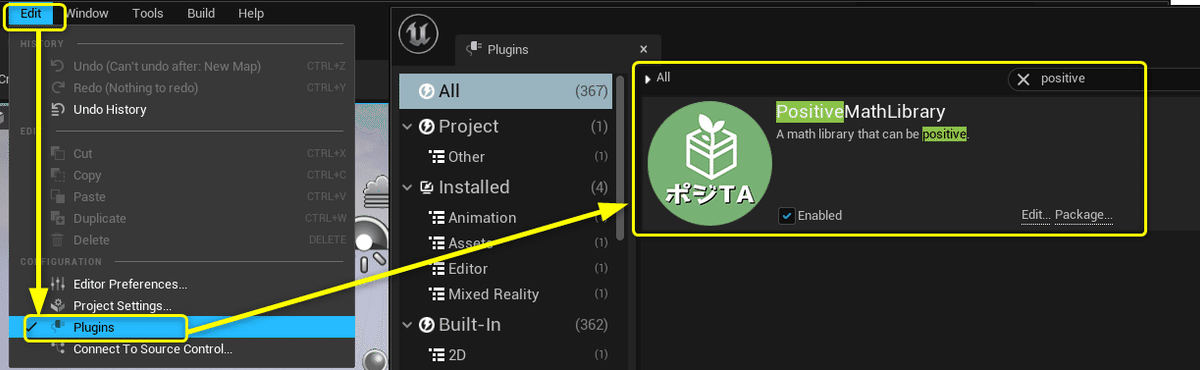
[Plugins]ウィンドウを開きます。
右下の[New Plugin]をクリックすると新しいプラグインを作成することが出来ます。

テンプレートを選んでプラグイン名とプラグインの説明や作成者情報(Descriptor Data)を設定します。
・Author:プラグインの作成者
・Descrption:プラグインの説明文
・Author URL:開発者の紹介用URL
・Is Beta Version:ベータ版かどうか(True:ベータ版)
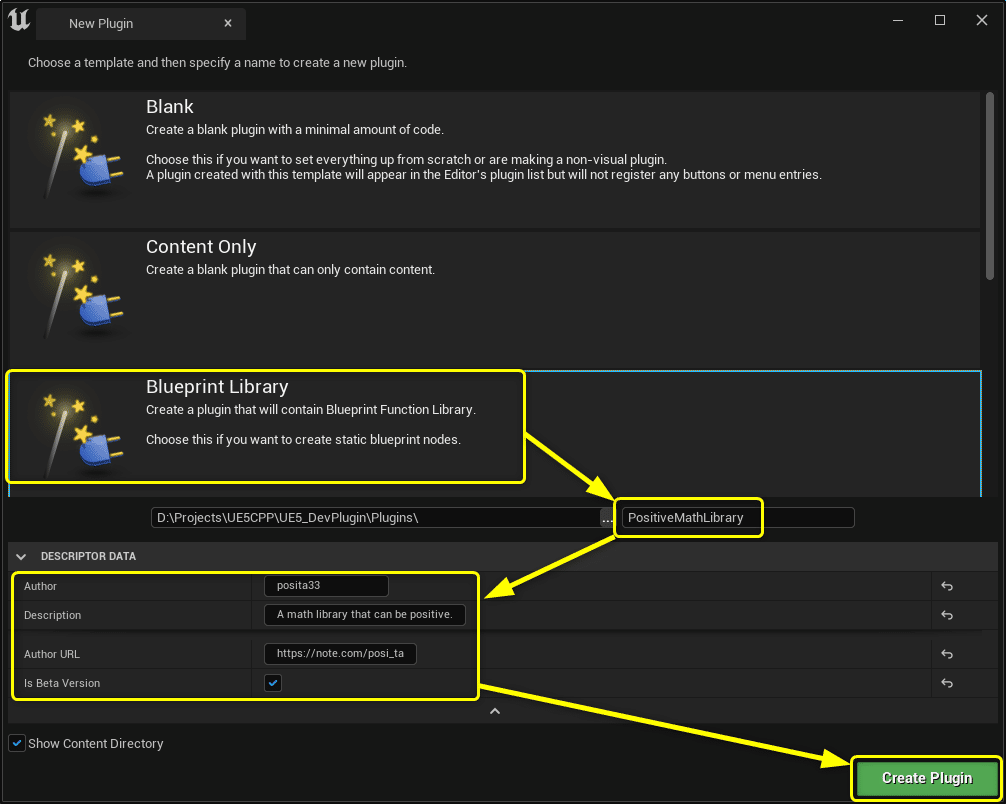
[Create Plugin]をクリックするとプラグインが追加されます。
Descriptor Dataに設定した情報は下の画像のように表示されます。

Descriptor Data情報が何処に表示されるか
Visual StudioのSolusion ExplorerにもPluginsフォルダが作成され、テンプレートのソースコードやリソースが配置されます。

テンプレートには呼び出し確認用のソースコードが入っています。
ソースコードを確認してみましょう。
PositiveMathLibraryBPLibrary.h
// Copyright Epic Games, Inc. All Rights Reserved.

#pragma once

#include "Kismet/BlueprintFunctionLibrary.h"
#include "PositiveMathLibraryBPLibrary.generated.h"

UCLASS()
class UPositiveMathLibraryBPLibrary : public UBlueprintFunctionLibrary
{
	GENERATED_UCLASS_BODY()

	UFUNCTION(BlueprintCallable, meta = (DisplayName = "Execute Sample function", Keywords = "PositiveMathLibrary sample test testing"), Category = "PositiveMathLibraryTesting")
	static float PositiveMathLibrarySampleFunction(float Param);

};
PositiveMathLibraryBPLibrary.cpp
// Copyright Epic Games, Inc. All Rights Reserved.

#include "PositiveMathLibraryBPLibrary.h"
#include "PositiveMathLibrary.h"

UPositiveMathLibraryBPLibrary::UPositiveMathLibraryBPLibrary(const FObjectInitializer& ObjectInitializer)
: Super(ObjectInitializer)
{

}

float UPositiveMathLibraryBPLibrary::PositiveMathLibrarySampleFunction(float Param)
{
	return -1;
}
ヘッダーファイルには簡単なUEのC++の関数について説明が書かれています。
/*
*	Function library class.
*	Each function in it is expected to be static and represents blueprint node that can be called in any blueprint.
*
*	When declaring function you can define metadata for the node. Key function specifiers will be BlueprintPure and BlueprintCallable.
*	BlueprintPure - means the function does not affect the owning object in any way and thus creates a node without Exec pins.
*	BlueprintCallable - makes a function which can be executed in Blueprints - Thus it has Exec pins.
*	DisplayName - full name of the node, shown when you mouse over the node and in the blueprint drop down menu.
*				Its lets you name the node using characters not allowed in C++ function names.
*	CompactNodeTitle - the word(s) that appear on the node.
*	Keywords -	the list of keywords that helps you to find node when you search for it using Blueprint drop-down menu.
*				Good example is "Print String" node which you can find also by using keyword "log".
*	Category -	the category your node will be under in the Blueprint drop-down menu.
*
*	For more info on custom blueprint nodes visit documentation:
*	https://wiki.unrealengine.com/Custom_Blueprint_Node_Creation
*/
書かれているURLにはコミュニティーWiki、分からなくなった時に調べるための解説ページのURLが紹介されています。
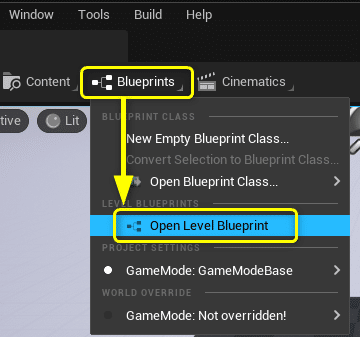
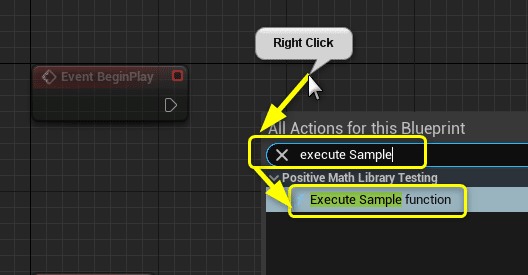
PositiveMathLibrarySampleFunction関数が[Execute Sample function]という名前で呼び出せるように用意されているので、レベルブループリントで呼べるか確認します。
UFUNCTION(BlueprintCallable, meta = (DisplayName = "Execute Sample function", Keywords = "PositiveMathLibrary sample test testing"), Category = "PositiveMathLibraryTesting")
static float PositiveMathLibrarySampleFunction(float Param);
UE5のプロジェクトに戻って、レベルブループリントにサンプルの関数を呼び出す処理を書いていきましょう。
[Execute Sample Function]が関数一覧に表示されます。
Execute Sample function(PositiveMathLibrarySampleFunction関数)はReturnValueに[-1.0]を返すので、PrintStringで結果が正しく出力されるか確認します。
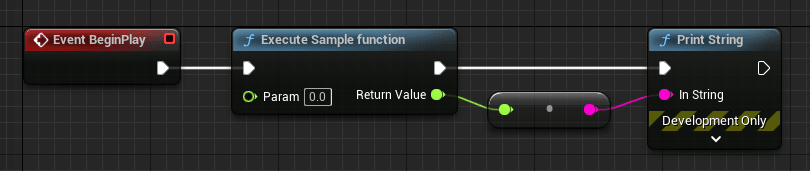
Return ValueをPrintStringで出力する
[Play]ボタンをクリックすると、Execute Sample functionのReturn Value[-1.0]が出力されました。
作成したPluginの関数を呼ぶことが出来ました。

プラグインに関数を追加する
足し算する関数:PositiveMathAddを追加して、独自に開発した関数を呼び出せるか確認します。
ヘッダーファイルとC++ファイルを修正します。
PositiveMathLibraryBPLibrary.h
// Copyright Epic Games, Inc. All Rights Reserved.

#pragma once

#include "Kismet/BlueprintFunctionLibrary.h"
#include "PositiveMathLibraryBPLibrary.generated.h"

UCLASS()
class UPositiveMathLibraryBPLibrary : public UBlueprintFunctionLibrary
{
	GENERATED_UCLASS_BODY()

	UFUNCTION(BlueprintCallable, meta = (DisplayName = "Execute Sample function", Keywords = "PositiveMathLibrary sample test testing"), Category = "PositiveMathLibraryTesting")
	static float PositiveMathLibrarySampleFunction(float Param);

	// 関数:PositiveMathAddを追加する
	UFUNCTION(BlueprintCallable, Category = "PositiveMathLibraryTesting")
	static int PositiveMathAdd(int A, int B);
};
PositiveMathLibraryBPLibrary.cpp
// Copyright Epic Games, Inc. All Rights Reserved.

#include "PositiveMathLibraryBPLibrary.h"
#include "PositiveMathLibrary.h"

UPositiveMathLibraryBPLibrary::UPositiveMathLibraryBPLibrary(const FObjectInitializer& ObjectInitializer)
: Super(ObjectInitializer)
{

}

float UPositiveMathLibraryBPLibrary::PositiveMathLibrarySampleFunction(float Param)
{
	return -1;
}

// 関数:PositiveMathAddの処理を実装する
int UPositiveMathLibraryBPLibrary::PositiveMathAdd(int A, int B)
{
	return A + B;
}
ソースコードを編集しただけでは作成した関数が追加されません。作成した関数を呼び出すにはPluginをコンパイルする必要があります。
Modulesタブを表示します。
ModulesタブはPlugin一覧と有効化しているかを表示するウィンドウです。
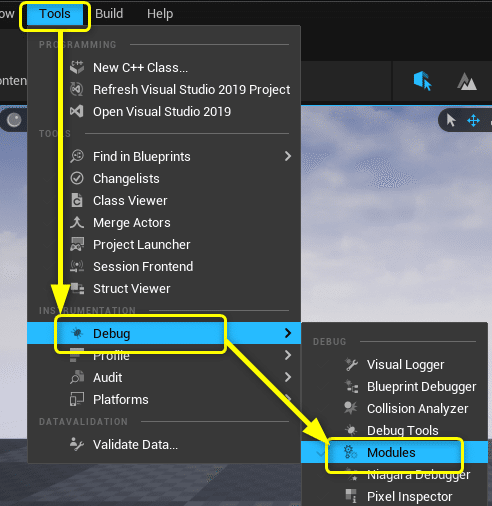
ModulesタブではPluginのRecompileを行うことが出来ます。
目的のPlugin Nameで検索して、Recompileボタンをクリックします。

画面の右下に[Compile Complete!]が表示されれば関数の追加が成功しています。
[Compile Failed!]が表示されたら、ソースコードにエラーがあるのでエラー箇所を修正してください。

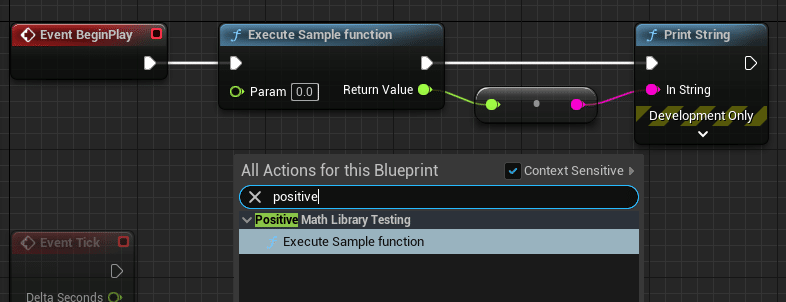
再びレベルブループリントで関数名を検索します。
追加した関数が選択できるようになりました。

レベルブループリントを修正します。
追加した関数[PositiveMathAdd]のReturnValueをPrintStringで出力します。

追加した関数[PositiveMathAdd]のReturnValueをPrintStringで出力する
AとBの値が足した値がReturnValueに設定されていれば関数が呼び出せたことを確認できます。
int UPositiveMathLibraryBPLibrary::PositiveMathAdd(int A, int B)
{
	return A + B;
}
独自の関数を作って呼び出せたら、後は中身をどう作るかを考えるだけになれます。まずはここまでやってみると良さそうですね。
サムネイル画像を変更する
次にプラグインのサムネイルを設定します。
サムネイルのサムネイルは透過pngが使えます。
正方形の透過png(幅:18px、高さ:128px )です。
作成したサムネイルを上書きします。
(プロジェクトフォルダ)/Plugins/(プラグイン名)/Resources
Icon 128.png
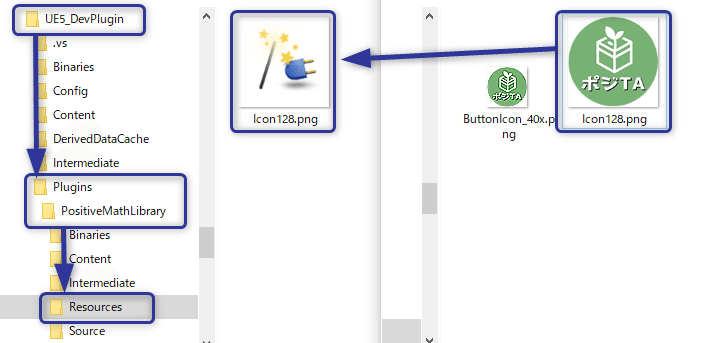
サムネイル画像はModulesウィンドウでRecompileを実行しなくても反映されます。

今回はBluerpintLibraryだったのでメニューに追加することがなかったのですが、ウィンドウ等を表示するためのメニューアイコンも変更することが出来ます。
メニューアイコンも正方形の透過png(幅:40px、高さ:40px )なので、こちらも用意しておく方がいいでしょう。

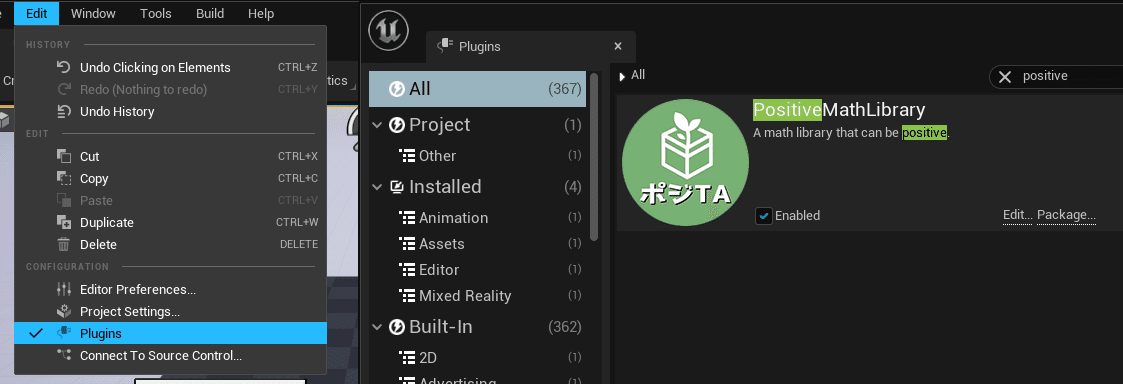
いつもお世話になっているPluginsの一覧に自分のアイコンが表示されるとモチベーションが上がります。
遂にポジTAアイコンをPluginsの一覧に出すことができました!
— ポジTA (@posita33) December 21, 2021
やったー! pic.twitter.com/LETux86rsA
別のプロジェクトでプラグインが使えるか確認する
ブループリントのプロジェクトでも作成したプラグインが使用できるか確認してみます。
BlankのBlueprintプロジェクトを作成します。
プロジェクトを作成したら、一度プロジェクトを閉じます。
Pluginsフォルダを新しく作成した確認用プロジェクトフォルダの直下にコピー&ペーストします。

プロジェクトを開き、Pluginsで作成したプラグイン名で検索すると一覧に表示されます。
レベルブループリントでプラグインの関数が呼び出せるか確認します。

プラグインの関数が呼び出せることを確認し、先ほどと同様の処理を実装します。

Playボタンをクリックし、結果が同じになることを確認します。

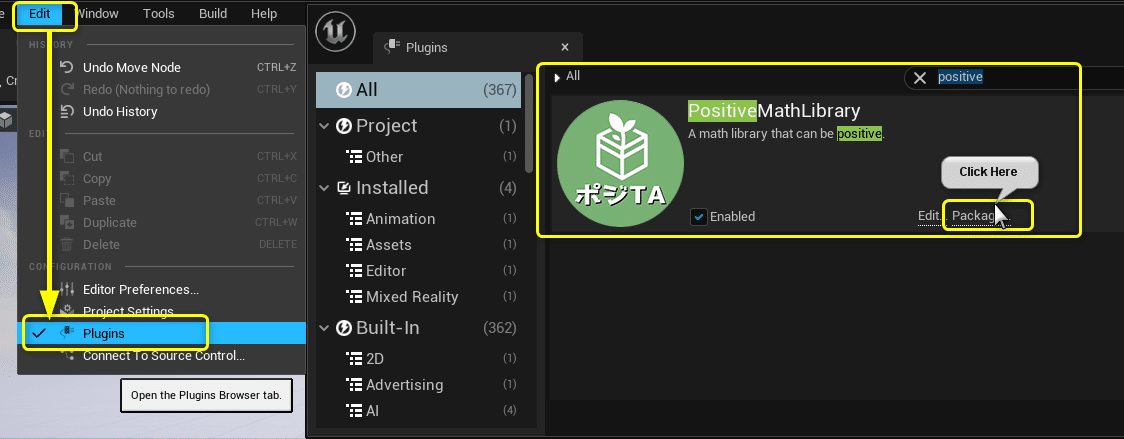
公開用にパッケージ化を行う
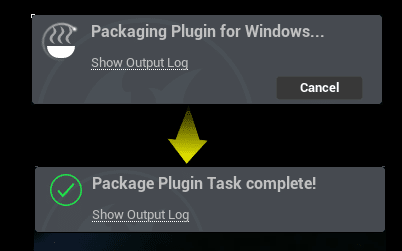
公開用にプラグインのパッケージ化を行います。
作成したプラグインの[Package]をクリックします。
パッケージ化するフォルダを作成して選択します。

プラグインのパッケージ化が開始されます。
成功すると右下に「Package Plugin Task complate!」が表示されます。
パッケージ化したフォルダに移動すると[HostProject]直下にプロジェクトが作成されています。
プロジェクトを開きます。
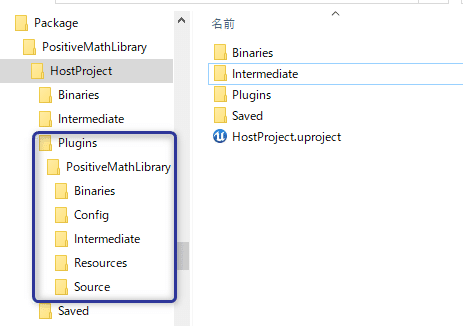
開いたプロジェクトには最初からプラグインが使用出来るようになっています。
(公開するのであれば、Saved,Intermediateフォルダは削除してもいいのかも?)
まとめ
プラグイン一覧に自分で作成したサムネイルが表示された時はモチベーションがグッと上がりました。
皆さんのお役に立つようなプラグインが提供できることを目指して、昨日より1歩でも先に進めていきます。
処理について書けるようになったら楽しそうですね。
まずは、1つ1つ基本的なことを出来るようになっていきます。
この記事が気に入ったらサポートをしてみませんか?