
UE5 独自UIプラグインを作成する 04~プロパティを更新するUIを作成する~

【今回のポジティブワード】
やれば分かる‼
やらなければ一生わからん‼
~吼えろペン 炎尾燃~
昨日は折り畳みのUIを作ろうとエンジンのソースコードを読んでいたのですが、ついにVerticalBoxのスロットの追加の底に行きついてしまいました。
VerticalBoxは底に行きついたけど、まだ下にはUIがある。
なんでだろう?
どうやらデータクラスを作成して、データクラスの変数からUIを作成することが出来るようです。
Detailパネルの仕組みが少し分かりました。
プラグインを作り始めなければ一生分からず使ってました。
やれば分かる!!
前回は「入力した2次元座標でViewportのFloorを動かす」方法について調査しました。
今回は「プロパティを更新するUIを作成する」方法について調査していきます。
プロパティを更新するUIを作成する
目標とする動作
FloorのプロパティをUIで変更できるようにします。
Rotation、StaticMesh、Materialを変更してみます。
今回学習できること
詳細ウィンドウを少し再現
回転を変更できる
マテリアルとスタティックメッシュを置き換える
新しくプラグインを作成する
ソースコードが多くなってきたので、別のプラグインとして作成します。
Editor Standalone Windowテンプレートを選択して、「CustomDetailsExample」に設定します。

プロパティ表示をするためのデータクラスを作成する
publicフォルダにCustomDetailsSettings.hを作成します。
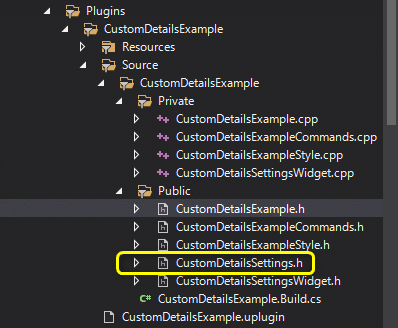
CustomDetailsSettings.h
StaticMeshActorのプロパティはもっと多いですが、今回プロパティを更新するためのプロパティのみ定義します。
関数は持たないのでヘッダーファイルだけに処理を書きます。
// Fill out your copyright notice in the Description page of Project Settings.

#pragma once

#include "CoreMinimal.h"
#include "CustomDetailsSettings.generated.h"
/*
*
*/
UCLASS(BlueprintType, config = EditorPerProjectUserSettings)
class UCustomDetailsSettings : public UObject
{
	GENERATED_BODY()
public:
	UPROPERTY(EditAnywhere, category = "Transform")
	FRotator Rotation;

	UPROPERTY(EditAnywhere, category = "Static Mesh")
	UStaticMesh* StaticMesh;

	UPROPERTY(EditAnywhere, category = "Materials")
	UMaterial* Element0;
};
プロパティ表示をするためのWidgetクラスを作成します
プロパティ表示するためのWidgetクラスを作成します。
Publicフォルダ:CustomDetailsSettingsWidget.h
Privateフォルダ:CustomDetailsSettingsWidget.cpp
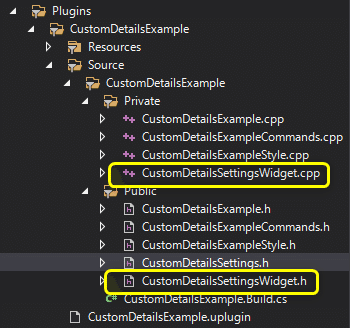
CustomDetailsSettingsWidget.h
#pragma once

#include "CoreMinimal.h"
#include "Widgets/SCompoundWidget.h"
#include "CustomDetailsSettings.h"

class SCustomDetailsSettingsWidget : public SCompoundWidget
{
public:
	SLATE_BEGIN_ARGS(SCustomDetailsSettingsWidget) {}
	SLATE_END_ARGS()

	/** コンストラクタ */
	void Construct(const FArguments& Args);

	// プロパティ
	UCustomDetailsSettings* CustomSettings;
private:

	TSharedPtr<class IDetailsView> PropertyWidget;
};
CustomDetailsSettingsWidget.cpp
データクラスの変数を元にUIを作成する処理を実装します。
#include "CustomDetailsSettingsWidget.h"


void SCustomDetailsSettingsWidget::Construct(const FArguments& Args)
{
	//Create our Details Panel object
	CustomSettings = NewObject<UCustomDetailsSettings>();

	//Load our Property Module
	FPropertyEditorModule& PropertyModule = FModuleManager::LoadModuleChecked<FPropertyEditorModule>("PropertyEditor");

	//FDetailsViewArgs is a struct of settings to customize our Details View Widget
	FDetailsViewArgs ViewArgs;
	ViewArgs.bHideSelectionTip = true;

	//Create the widget and store it in the PropertyWidget pointer
	PropertyWidget = PropertyModule.CreateDetailView(ViewArgs);

	//Important! We set our details view to use our Custom Settings object
	PropertyWidget->SetObject(CustomSettings);
	// Create a property Detail View
	ChildSlot
	[
		SNew(SBorder)
		.BorderImage(FCoreStyle::Get().GetBrush("ToolPanel.GroupBorder"))
		[
			SNew(SOverlay)

			// Overlay slot for the main HLOD window area
			+ SOverlay::Slot()
			[
				PropertyWidget.ToSharedRef()
			]
		]
	];
}
UIを表示する処理を実装する
CustomDetailsExampleクラスにUIを表示する処理を実装します。
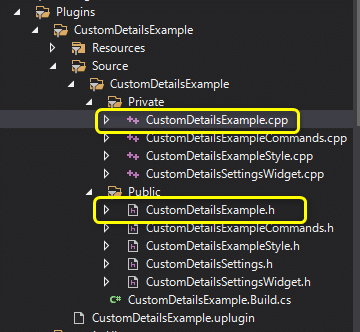
CustomDetailsExample.h
SCustomDetailsSettingsWidgetを参照する変数を追加します。
private:
	// Add Varable
	TSharedPtr<SCustomDetailsSettingsWidget> CustomDetailsSettingsWidget;
CustomDetailsExample.cpp OnSpawnPluginTab関数
UIを表示する処理を実装します。
TSharedRef<SDockTab> FCustomDetailsExampleModule::OnSpawnPluginTab(const FSpawnTabArgs& SpawnTabArgs)
{
	return SNew(SDockTab)
		.TabRole(ETabRole::NomadTab)
		[
			// Put your tab content here!
			SNew(SBox)
			[
				SNew(SVerticalBox)
				+ SVerticalBox::Slot()
				.AutoHeight()
				[
					SNew(SHorizontalBox)
					+ SHorizontalBox::Slot()
					.Padding(10.0f, 3.0f, 10.0f, 3.0f)
					.AutoWidth()
					[
						SNew(SButton)
						.Text(LOCTEXT("PropertyUpdate", "PropertyUpdate"))
					]
				]
				+ SVerticalBox::Slot()
				.Padding(0.0f, 12.0f, 0.0f, 3.0f)
				.FillHeight(1.0f)
				[
					SAssignNew(CustomDetailsSettingsWidget, SCustomDetailsSettingsWidget)
				]
			]
		];
}
CustomDetailsSettingsデータクラスを表示することが出来ました。

ボタンをクリックしたときにFloorのプロパティを更新する処理を実装する
CustomDetailsExampleクラスにボタンをクリックした時の処理を実装します。
CustomDetailsExample.h
ボタンをクリックした時の関数を追加します。
public:
	// PropertyUpdateButtonをクリックした時の処理
	FReply PropertyUpdateButtonClicked();
CustomDetailsExample.cpp PropertyUpdateButtonClicked関数
ボタンをクリックした時の処理を実装します。
FloorはStaticMeshComponentを変更するということを意識すると変更できます。
// includeを追加します
#include "EngineUtils.h"
#include "Runtime/Engine/Classes/Engine/StaticMeshActor.h"

FReply FCustomDetailsExampleModule::PropertyUpdateButtonClicked()
{
	UWorld* world = GEditor->GetEditorWorldContext().World();
	for (TActorIterator<AStaticMeshActor> actorItr(world); actorItr; ++actorItr)
	{
		FString staticMeshName = actorItr->GetActorLabel();
		if (staticMeshName.Equals(TEXT("Floor")))
		{
			// Rotationを更新する
			actorItr->SetActorRotation(CustomDetailsSettingsWidget->CustomSettings->Rotation);

			// StaticMeshComponentのStaticMeshを更新する
			actorItr->GetStaticMeshComponent()->SetStaticMesh(CustomDetailsSettingsWidget->CustomSettings->StaticMesh);

			// StaticMeshComponentのMaterialを更新する
			actorItr->GetStaticMeshComponent()->SetMaterial(0, CustomDetailsSettingsWidget->CustomSettings->Element0);
		}
	}
	return FReply::Handled();
}
CustomDetailsExample.cpp OnSpawnPluginTab関数
ボタンにクリック関数を設定します。
SNew(SButton)
.Text(LOCTEXT("PropertyUpdate", "PropertyUpdate"))
.OnClicked_Raw(this, &FCustomDetailsExampleModule::PropertyUpdateButtonClicked)
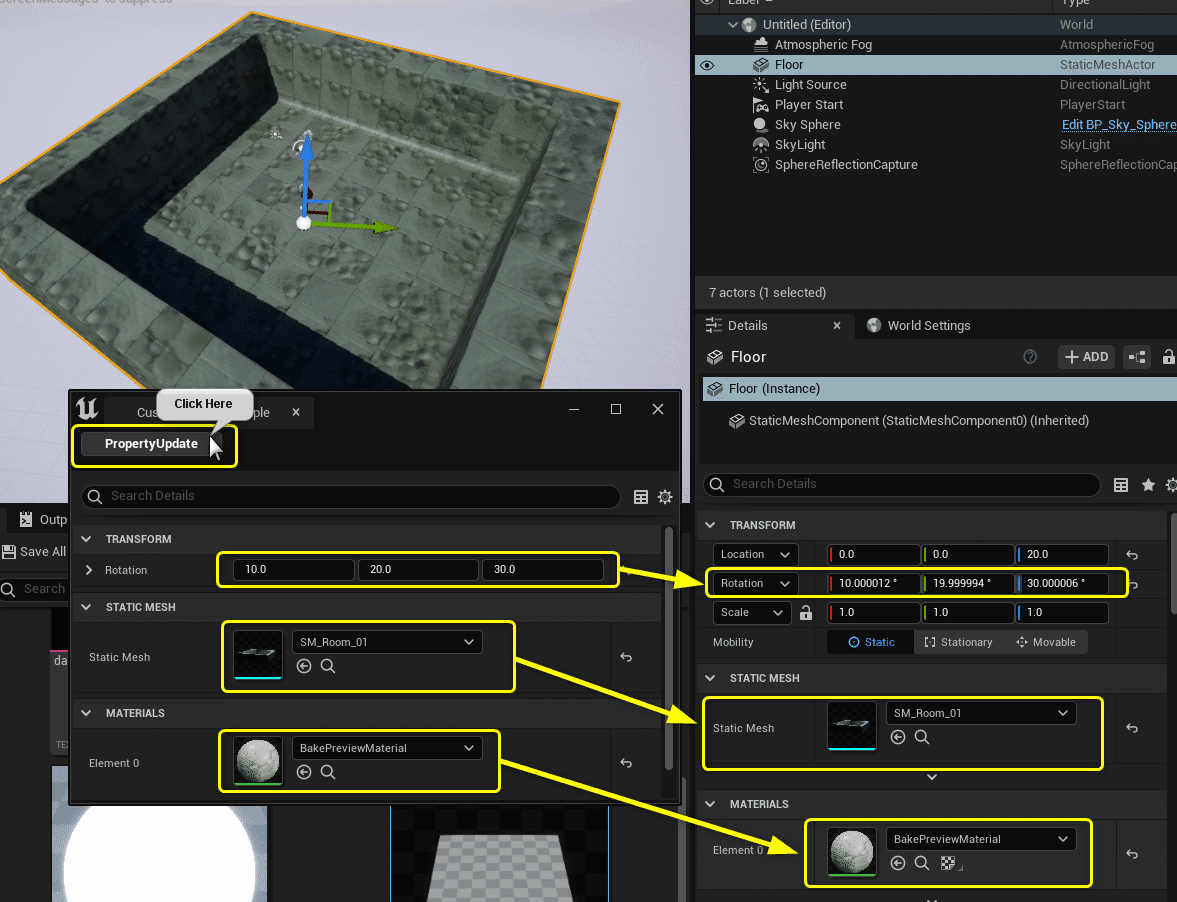
プラグインをコンパイルしてPropertyUpdateボタンをクリックします。
FloorのRotation,StaticMesh,Materialが更新されます。
UIを1つ1つ部品を追加するより、データクラスを作って読み込ませた方が簡単にUIを作成することが出来ました。
まとめ
普段何気なく使用している詳細パネルですが、「こうやって作っていたのか」ということが知れたので面白かったです。
OnSpawnPluginTab関数でUIを作成するサンプルがメジャーではないので貴重な情報が公開されていて助かりました。ありがとうございます。
作りたいプラグインのアイディアが少しずつ出てきたので、目標設定して役に立つプラグインを提供できるように頑張ります!
【ソースコード】
note記事ではコードを全部貼ることも出来ないので、GitHubにリポジトリを用意しました。
【参照URL】
この記事が気に入ったらサポートをしてみませんか?