UE5から始める C++ & BP 12 【C++版】Event Dispatcher

C++だとEvent Dispatcherではなく、Delegateなので説明が難しいですね。
別々の用語をつなげるより動いている画像を並べると一目瞭然
説明するより図で見せよう!
それでは、Blueprintの内容をC++で再現します。
【C++】Event Dispatcher
C++でBlueprintを再現すること
Event Dispatcherを作成します。
作成したEvent DispatcherにCustom EventをBindします。
「H」キーをPressした時に、Event Dispatherを呼び出し、Custom Eventを実行します。
編集するActorクラスを作成する
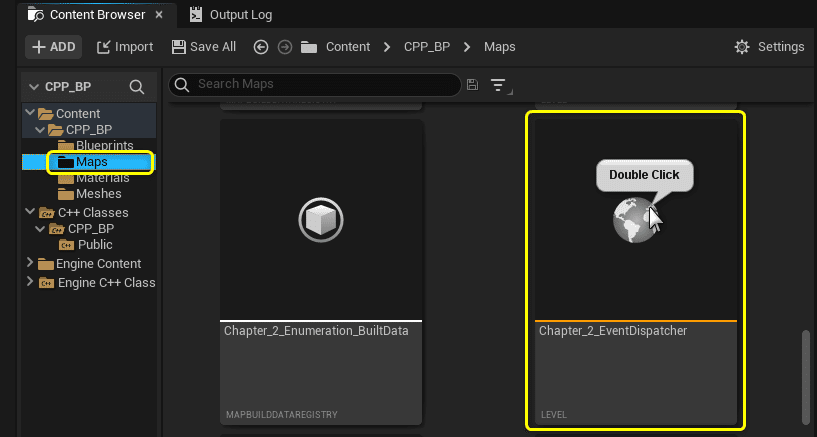
プロジェクトを閉じていたら、プロジェクトを開き、「Chapter_2_EventDispatcher」を開きます。
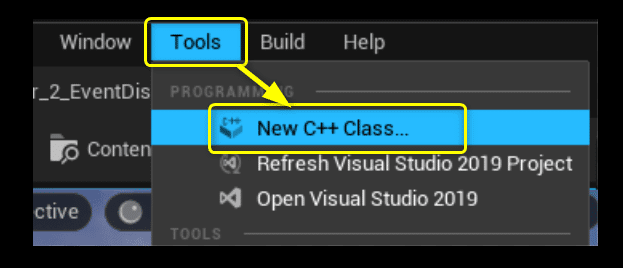
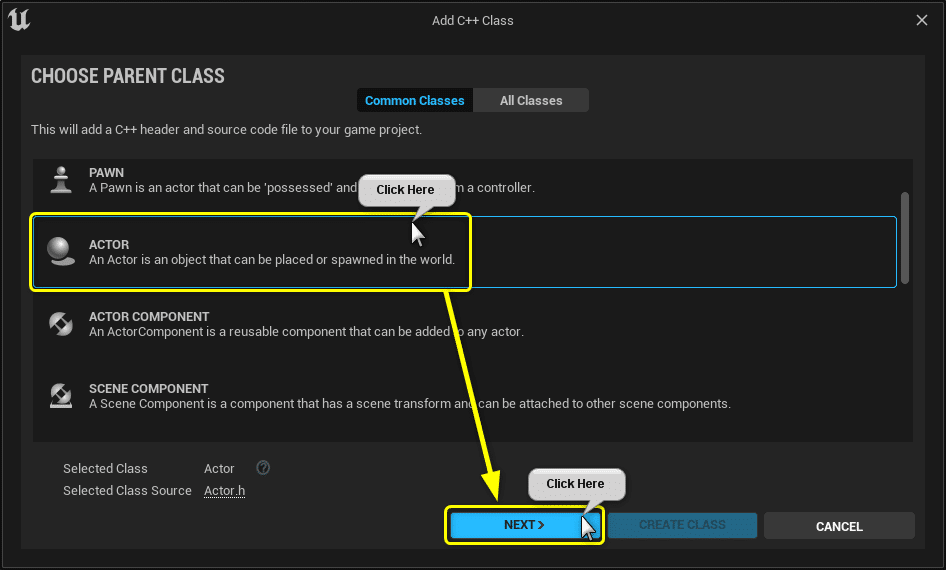
[Tools]メニューから[New C++ Class]を開きます。
親クラスに[Actor]を選択します。
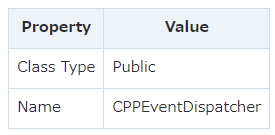
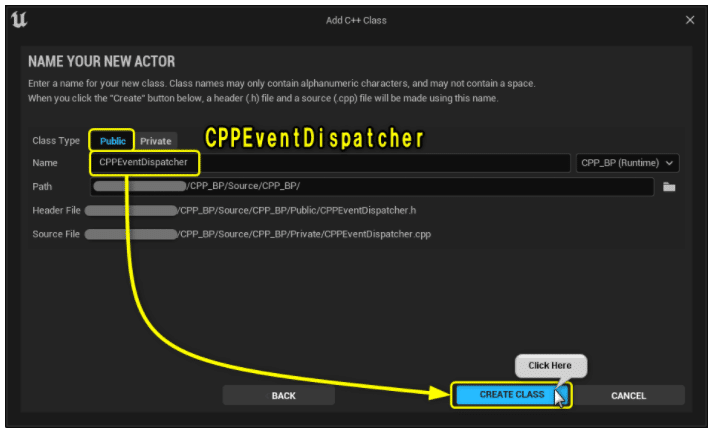
ClassTypeとClass名を設定します。
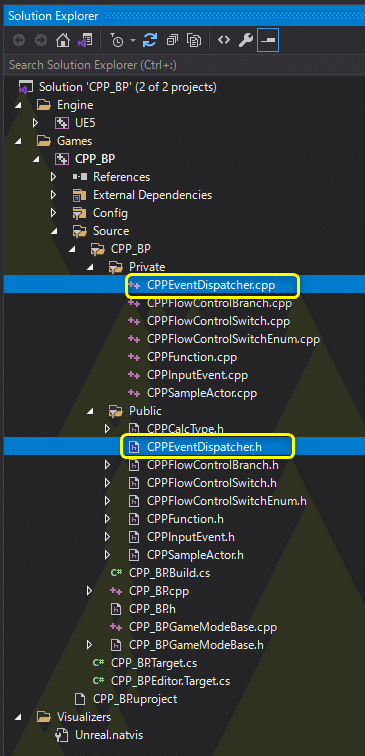
Solution Explorerから今回編集する2つのファイルを開きます。
CPPEventDispatcher.h
CPPEventDispatcher.cpp
開いたファイルを学習する初期状態に修正します。
CPPEventDispatcher.h
// Fill out your copyright notice in the Description page of Project Settings.

#pragma once

#include "CoreMinimal.h"
#include "GameFramework/Actor.h"
#include "CPPCalcType.h"
#include "CPPEventDispatcher.generated.h"

UCLASS()
class CPP_BP_API ACPPEventDispatcher : public AActor
{
	GENERATED_BODY()

public:
	int32 Sum(int32 A, int32 B);

	// Action Mappingsに設定したActionを処理する関数
	void PressedActionPrintCalcResult();

protected:
	// Called when the game starts or when spawned
	virtual void BeginPlay() override;

private:
	FString Message = "C++ Hello World!";

	// 計算結果を出力する関数
	void PrintCalcResult(const ECPPCalcType Type, const int32 A, const int32 B, const float PrintDuration);

	// PrintString関数のDurationに設定する変数
	const float Duration = 10.0f;

	// PrintString関数のTextColorに設定する変数
	const FLinearColor TextColor = FColor(255, 255, 255);

	// 計算用の変数
	int32 CalcVarA = 7;
	int32 CalcVarB = 3;

	// Flow Control用の変数
	bool IsPrintHello = false;
	ECPPCalcType CalcType = ECPPCalcType::Add;

	// Input設定
	void SetupInput();

	// Input Eventを処理する関数
	void PressedH();

};
CPPEventDispatcher.cpp
// Fill out your copyright notice in the Description page of Project Settings.


#include "CPPEventDispatcher.h"
#include "Kismet/KismetSystemLibrary.h"
#include "Kismet/GameplayStatics.h"

int32 ACPPEventDispatcher::Sum(int32 A, int32 B)
{
	return A + B;
}

// Called when the game starts or when spawned
void ACPPEventDispatcher::BeginPlay()
{
	Super::BeginPlay();

	SetupInput();

	if (IsPrintHello)
	{
		// PrintStringノードと同じ処理
		// UKismetSystemLibraryクラスのPrintString関数を呼び出す
		UKismetSystemLibrary::PrintString(this, Message, true, true, TextColor, Duration);
	}
	else
	{
		// 計算結果を出力する処理
		PrintCalcResult(CalcType, CalcVarA, CalcVarB, Duration);
	}
}

void ACPPEventDispatcher::PrintCalcResult(const ECPPCalcType Type, const int32 A, const int32 B, const float PrintDuration)
{
	switch (Type)
	{
		case ECPPCalcType::Add:
		{
			// Add(足し算)の処理
			// 値渡し
			int32 ResultAdd = Sum(A, B);
			FString StrResultAdd = FString::Printf(TEXT("%d"), ResultAdd);
			UKismetSystemLibrary::PrintString(this, StrResultAdd, true, true, FColor::Red, PrintDuration);
			break;
		}
		case ECPPCalcType::Subtract:
		{
			// Subtract(引き算)の処理
			int32 ResultSubtract = A - B;
			FString StrResultSubtract = FString::Printf(TEXT("%d"), ResultSubtract);
			UKismetSystemLibrary::PrintString(this, StrResultSubtract, true, true, FColor::Yellow, PrintDuration);
			break;
		}
		case ECPPCalcType::Multiply:
		{
			// Multiply(掛け算)の処理
			int32 ResultMultiply = A * B;
			FString StrResultMultiply = FString::Printf(TEXT("%d"), ResultMultiply);
			UKismetSystemLibrary::PrintString(this, StrResultMultiply, true, true, FColor::Green, PrintDuration);
			break;
		}
		case ECPPCalcType::Divide:
		{
			// Divide(割り算)の処理(int > float)
			float ResultDivide = (float)A / (float)B;
			FString StrResultDivide = FString::Printf(TEXT("%f"), ResultDivide);
			UKismetSystemLibrary::PrintString(this, StrResultDivide, true, true, FColor::Blue, PrintDuration);
		}
	}
}

void ACPPEventDispatcher::SetupInput()
{
	// 入力を有効にする
	EnableInput(UGameplayStatics::GetPlayerController(GetWorld(), 0));

	// HキーのPressedとReleasedをバインドする
	InputComponent->BindKey(EKeys::H, IE_Pressed, this, &ACPPEventDispatcher::PressedH);

	// ActionMappingsに設定したActionをバインドする
	InputComponent->BindAction("ActionPrintCalcResult", IE_Pressed, this, &ACPPEventDispatcher::PressedActionPrintCalcResult);
}

void ACPPEventDispatcher::PressedH()
{
	// Hello World!を出力する処理
	UKismetSystemLibrary::PrintString(this, Message, true, true, TextColor, Duration);
}

void ACPPEventDispatcher::PressedActionPrintCalcResult()
{
	// 計算結果を出力する処理
	PrintCalcResult(CalcType, CalcVarA, CalcVarB, Duration);
}
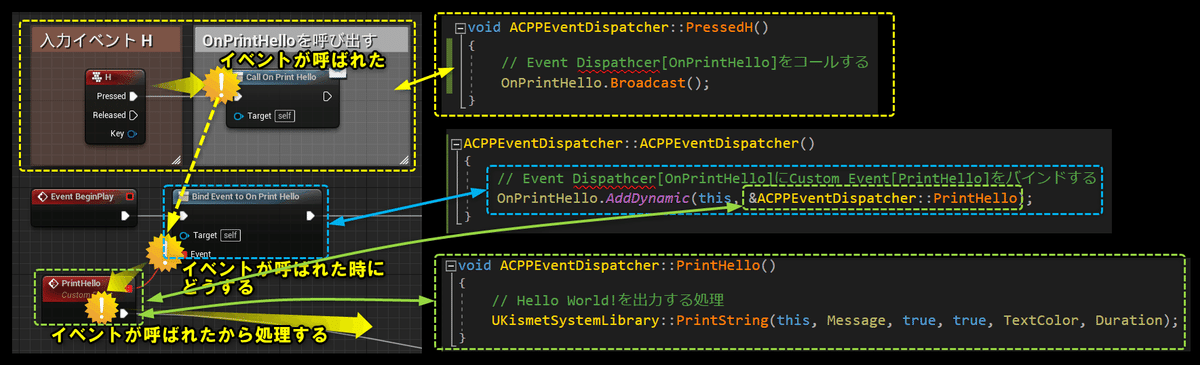
Event Dispatcher[OnPrintHello]を追加する
Blueprintで[My Blueprint]パネルの[Event Dispatchers]カテゴリーにEvent Dispatcher[OnPrintHello]を追加しました。
C++でEvent Dispatcherを再現します。
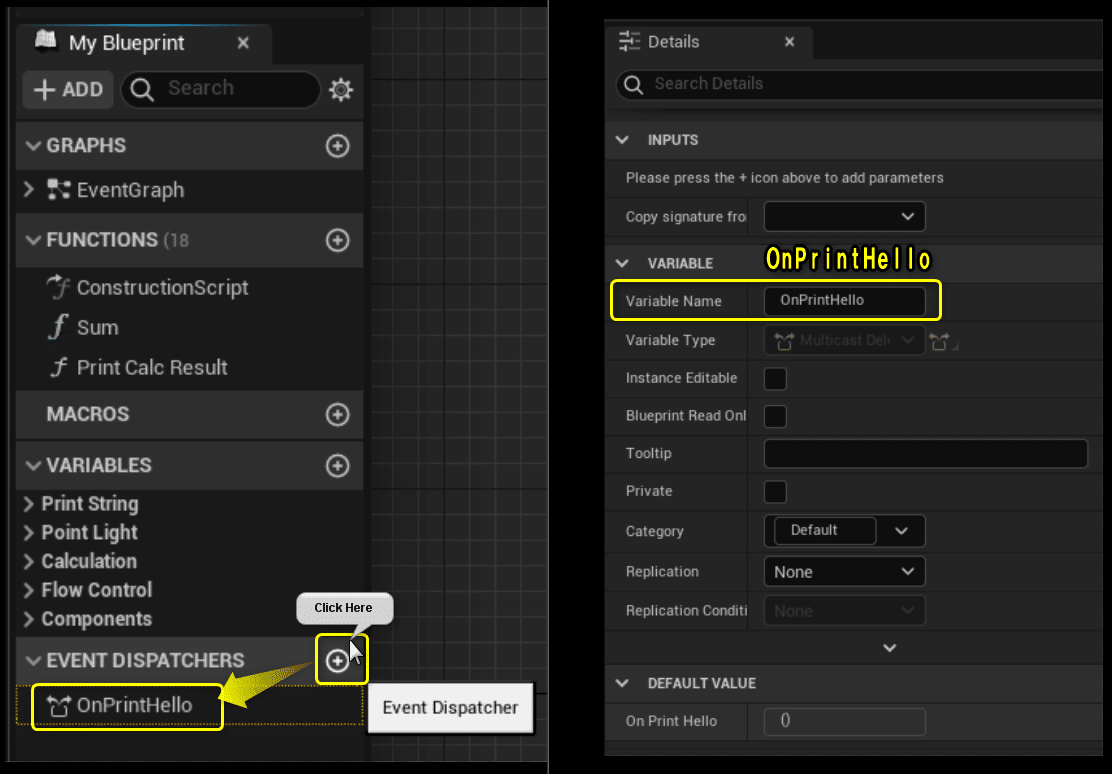
C++では以下のようなソースコードになります。
ACPPEventDispatcher.h
public:
	// Event Dispatcher[OnPrintHello]
	DECLARE_DYNAMIC_MULTICAST_DELEGATE(FPrintHelloDelegate);

	UPROPERTY(BlueprintAssignable, Category = "CPP_BP")
	FPrintHelloDelegate OnPrintHello;
Event Dispatcher[OnPrintHello]をCustom Event[PrintHello]にバインドする
Event Dispatcher[OnPrintHello]をCustom Event[PrintHello]にバインドする処理をC++で再現します。

「ACPPEventDispatcher.h」にコンストラクタとカスタムイベントにあたる関数[PrintHello]のプロトタイプを宣言します。
ACPPEventDispatcher.h
public:
	ACPPEventDispatcher();

	// Custom Event[PrintHello]
	UFUNCTION()
	void PrintHello();
コンストラクタにEvent Dispatcher[OnPrintHello]をCustom Event[PrintHello]にバインドする処理を書きます。
Custom Event[PrintHello]に”Hello World!”を出力するPrintStringを書きます。
ACPPEventDispatcher.cpp
ACPPEventDispatcher::ACPPEventDispatcher()
{
	// Event Dispathcer[OnPrintHello]にCustom Event[PrintHello]をバインドする
	OnPrintHello.AddDynamic(this, &ACPPEventDispatcher::PrintHello);
}

void ACPPEventDispatcher::PrintHello()
{
	// Hello World!を出力する処理
	UKismetSystemLibrary::PrintString(this, Message, true, true, TextColor, Duration);
}
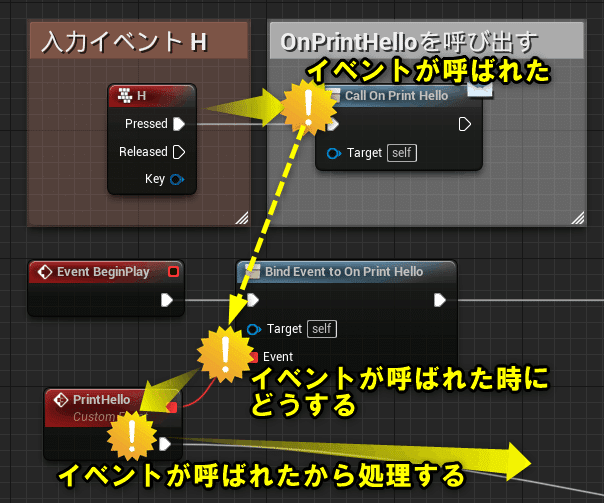
「H」キーのPressedからEventDispatcher「OnPrintHello」を呼び出す
「H」キーのPressedからEvent Dispatcher[OnPrintHello]のCallノードを呼び出す処理をC++で再現します。
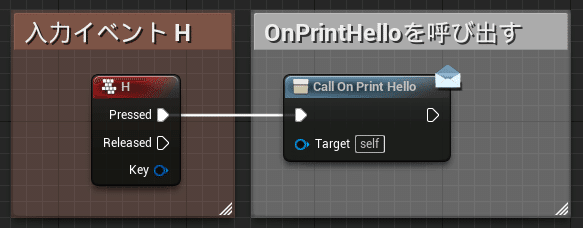
Broadcast()がCallノードにあたります。
ACPPEventDispatcher.cpp
void ACPPEventDispatcher::PressedH()
{
	// Event Dispathcer[OnPrintHello]をコールする
	OnPrintHello.Broadcast();
}
Ctrl + Sでファイルを保存し、Compileを行います。

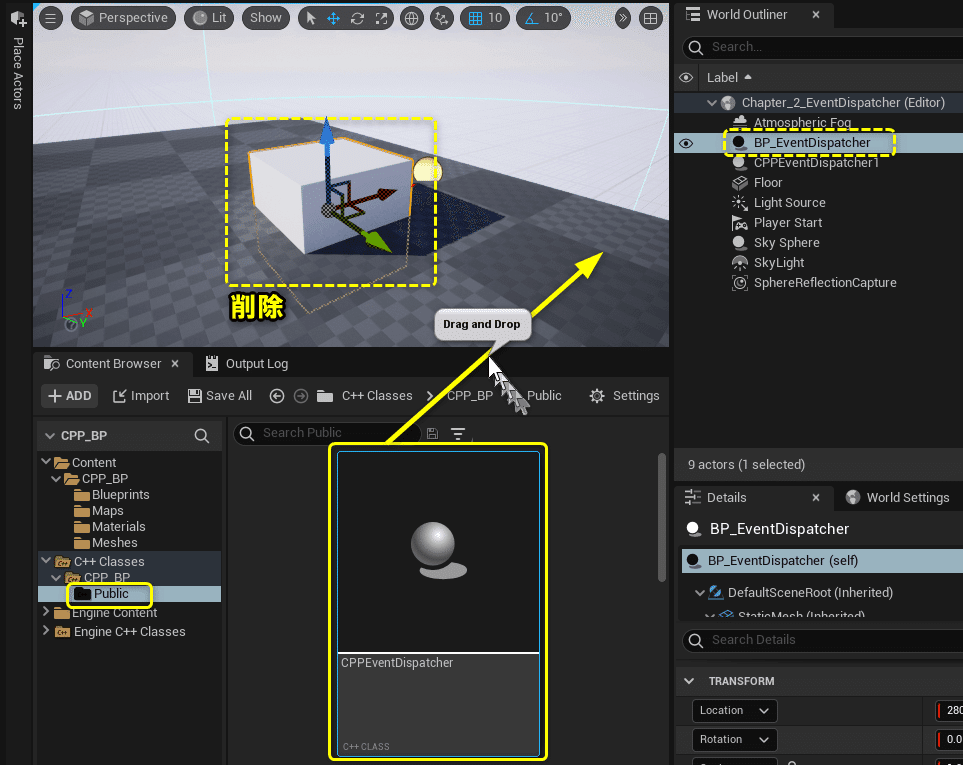
「ACPPEventDispatcher」をViewportにDrag&Dropします。
PrintStringの出力結果が分かりづらくなるので、「BP_EventDispatcher」を削除します。
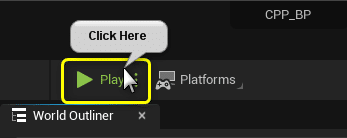
Level Editorの[Play]ボタンをクリックします。
「H」キーをPressすると、「OnPrintHello.Broadcast()」が呼ばれ、バインドしていたCustom Event[PrintHello]が呼ばれます。

BlueprintとC++との処理を対応させた図です。
すべて保存
C++側の説明は以上になります。
プロジェクトをすべて保存しましょう。
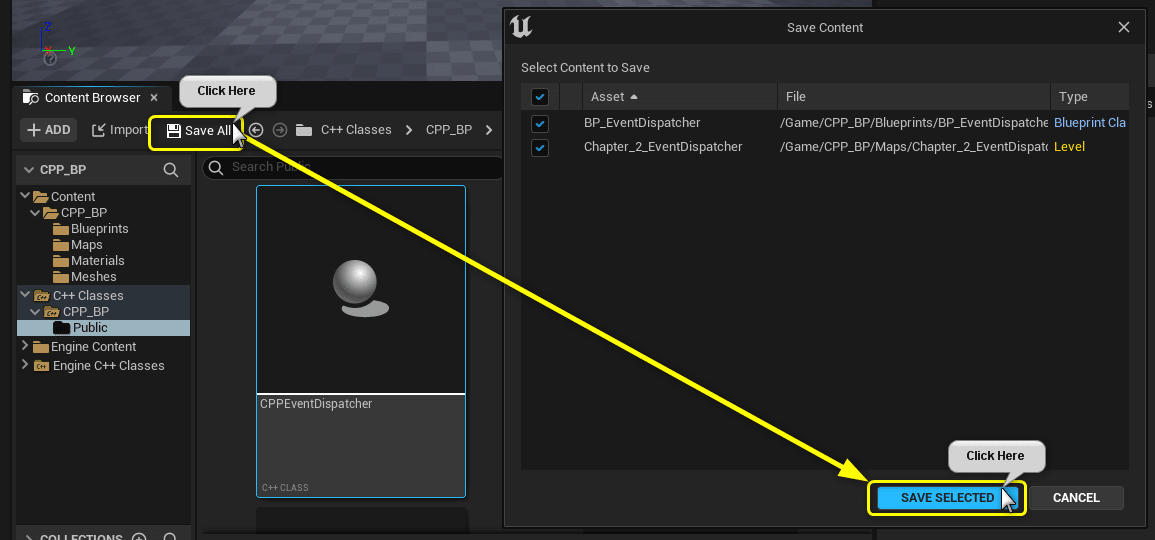
Visual StudioのSolutionもすべて保存しましょう。

まとめ
だんだんコードを間違えるとプロジェクトが立ち上がらなくなります。
C++はしっかりとした知識とエラーコードが無いと不安ですね。
説明が間違ってそうなので、正しく修正していきます。
参照URL
この記事が気に入ったらサポートをしてみませんか?