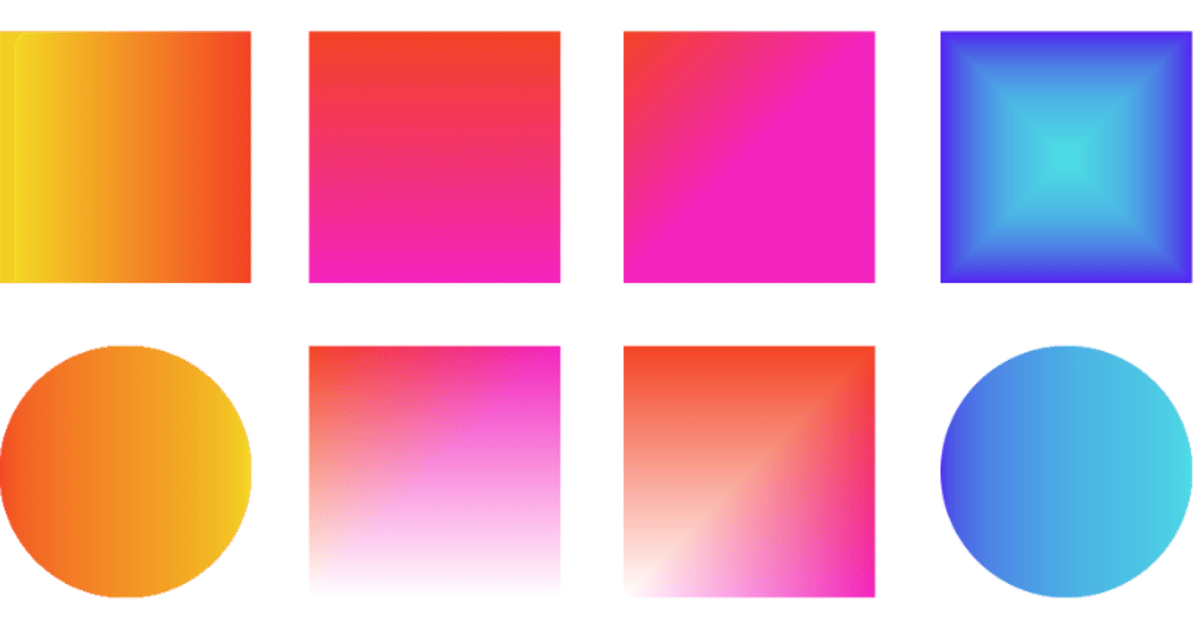
Processingでグラデーションを表現する

こんにちは。
今回はグラデーションを使って質感を加えよう!ということで、
自分用のまとめも兼ねてグラデーションを作る方法をシェアしたいと思います。
ざっくりと3種類の方法を紹介します。
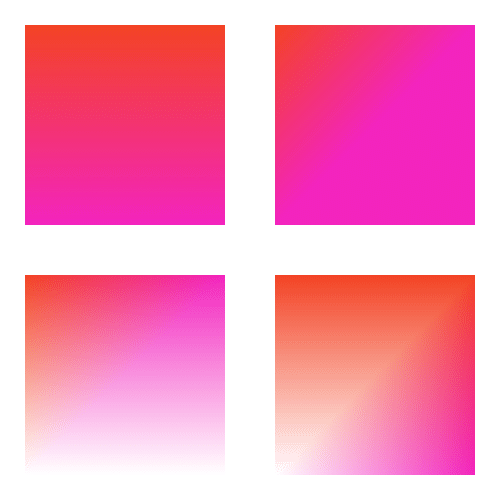
P2Dを使う
color col1, col2, col3;

void setup(){
 size(500, 500, P2D);
 colorMode(HSB, 360, 100, 100, 100);
 col1 = color(9, 85, 95);
 col2 = color(315, 85, 95);
 col3 = color(360);

 background(360);
 noStroke();
 grdRect1(width*0.25, height*0.25, 200, 200);
 grdRect2(width*0.75, height*0.25, 200, 200);
 grdRect3(width*0.25, height*0.75, 200, 200);
 grdRect4(width*0.75, height*0.75, 200, 200);

 saveFrame("gradation.png");
}

void grdRect1(float x, float y, float w, float h){
 float hw = w/2;
 float hh = h/2;

 fill(col1);
 beginShape();
 vertex(x-hw, y-hh);
 vertex(x+hw, y-hh);
 fill(col2);
 vertex(x+hw, y+hh);
 vertex(x-hw, y+hh);
 endShape();
}

void grdRect2(float x, float y, float w, float h){
 float hw = w/2;
 float hh = h/2;

 fill(col1);
 beginShape();
 vertex(x-hw, y-hh);
 fill(col2);
 vertex(x+hw, y-hh);
 vertex(x+hw, y+hh);
 vertex(x-hw, y+hh);
 endShape();
}

void grdRect3(float x, float y, float w, float h){
 float hw = w/2;
 float hh = h/2;

 fill(col1);
 beginShape();
 vertex(x-hw, y-hh);
 fill(col2);
 vertex(x+hw, y-hh);
 fill(col3);
 vertex(x+hw, y+hh);
 vertex(x-hw, y+hh);
 endShape();
}

void grdRect4(float x, float y, float w, float h){
 float hw = w/2;
 float hh = h/2;

 fill(col1);
 beginShape();
 vertex(x-hw, y-hh);
 vertex(x+hw, y-hh);
 fill(col2);
 vertex(x+hw, y+hh);
 fill(col3);
 vertex(x-hw, y+hh);
 endShape();
}
P2Dを使うと、beginShape()とendShape()の途中に入っているfill()やstroke()が適応されグラデーションを作ることができます。
fill()の位置でグラデーションをある程度調整することができます。
例えば中心から外側に向かってグラデーションにするなどの細かい調整はできませんが残りに2つの方法に比べて動作が軽くなります。
それと2色以上を使えるのもいいですね。
P3Dでも同じことができますよ。
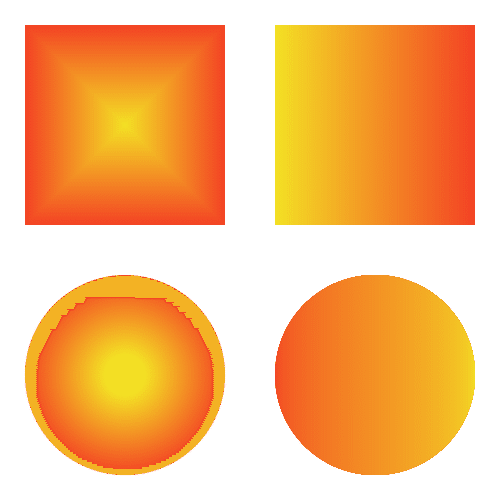
lerpColor()関数を使う
color col1, col2;

void setup() {
 size(500, 500);
 rectMode(CENTER);
 colorMode(HSB, 360, 100, 100, 100);
 col1 = color(9, 85, 95);
 col2 = color(55, 85, 95);

 background(360);
 noStroke();
 grdRect1(width*0.25, height*0.25, 200, 200);
 grdRect2(width*0.75, height*0.25, 200, 200);
 grdCircle1(width*0.25, height*0.75, 200);
 grdCircle2(width*0.75, height*0.75, 200);

 saveFrame("gradation.png");
}

void grdRect1(float x, float y, float w, float h) {
 float c = 100;
 for (int i=0; i<c; i++) {
   color col = lerpColor(col1, col2, i/c);
   float ww = lerp(w, 0, i/c);
   float hh = lerp(h, 0, i/c);

   fill(col);
   rect(x, y, ww, hh);
 }
}

void grdRect2(float x, float y, float w, float h) {
 float c = 100;
 for (int i=0; i<c; i++) {
   color col = lerpColor(col1, col2, i/c);
   float ww = lerp(w, 0, i/c);
   float xx = lerp(x, x-(w/2), i/c);

   fill(col);
   rect(xx, y, ww, h);
 }
}

void grdCircle1(float x, float y, float d) {
 float c = 100;
 for (int i=0; i<c; i++) {
   color col = lerpColor(col1, col2, i/c);
   float dd = lerp(d, d*0.2, i/c);

   fill(col);
   ellipse(x, y, dd, dd);
 }
}


void grdCircle2(float x, float y, float d) {
 float c = 100;
 for (int i=0; i<c; i++) {
   color col = lerpColor(col1, col2, i/c);
   float a = lerp(PI, 0, i/c);

   fill(col);
   arc(x, y, d, d, -a, a, CHORD);
 }
}
lerpColor()でグラデーションをしながら図形を重ねて描画しています。
先ほどの方法と比べてこちらはグラデーションの方向などを調整することができます。
lerpColor()がnoise()と相性良さそうなのもいいです。
lerpColor(col1, col2, noise())とこんな感じにできるので。
arc()を重ねて円を作る綺麗なグラデーションを作ることができます。
何度も重ねて描画しているので図形の数が増えると重くなります。
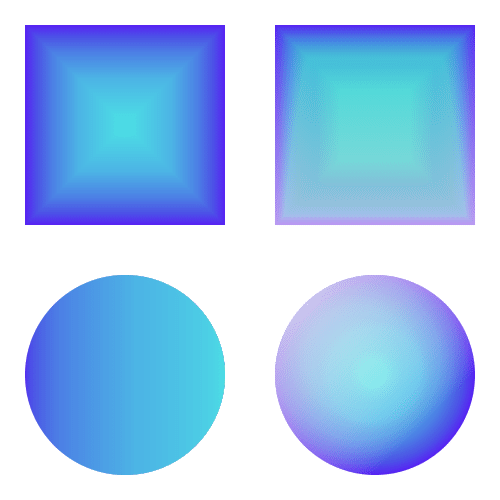
半透明の図形を重ねる
color col1, col2, col3;

void setup() {
 size(500, 500);
 rectMode(CENTER);
 colorMode(HSB, 360, 100, 100, 100);
 col1 = color(255, 85, 95);
 col2 = color(167, 85, 95);
 col3 = color(360);

 background(360);
 noStroke();
 grdRect1(width*0.25, height*0.25, 200, 200);
 grdRect2(width*0.75, height*0.25, 200, 200);
 grdCircle1(width*0.25, height*0.75, 200);
 grdCircle2(width*0.75, height*0.75, 200);

 saveFrame("gradation.png");
}

void grdRect1(float x, float y, float w, float h) {
 float c = 100;
 fill(col1);
 rect(x, y, w, h);
 for (int i=0; i<c; i++) {
   float ww = lerp(0, w, i/c);
   float hh = lerp(0, h, i/c);

   fill(col2, 2);
   rect(x, y, ww, hh);
 }
}

void grdRect2(float x, float y, float w, float h) {
 float c = 100;
 fill(col1);
 rect(x, y, w, h);

 for (int i=0; i<c; i++) {
   float ww = lerp(0, w, i/c);
   float hh = lerp(0, h, i/c);

   fill(col2, 4);
   rect(x, y, ww, hh);
 }

 for (int i=0; i<c; i++) {
   float hh = lerp(0, h, i/c);
   float yy = lerp(y+(h/2), y, i/c);

   fill(col3, 1);
   rect(x, yy, w, hh);
 }
}

void grdCircle1(float x, float y, float d) {
 float c = 100;
 fill(col1);
 ellipse(x, y, d, d);

 for (int i=0; i<c; i++) {
   float a = lerp(0, PI, i/c);

   fill(col2, 2);
   arc(x, y, d, d, -a, a, CHORD);
 }
}


void grdCircle2(float x, float y, float d) {
 float c = 100;

 pushMatrix();
 translate(x, y);
 fill(col1);
 ellipse(0, 0, d, d);

 for (int i=0; i<c; i++) {
   float dd = lerp(0, d, i/c);

   fill(col2, 2);
   ellipse(0, 0, dd, dd);
 }

 c = 50;
 rotate(PI*1.25);
 for (int i=0; i<c; i++) {
   float a = lerp(0, PI*0.75, i/c);

   fill(col3, 3);
   arc(0, 0, d, d, -a, a, CHORD);
 }
 popMatrix();
}
最初に図形を描きその上から半透明の図形を重ねて描きグラデーションを表現しています。
lerpColor()と似たようなやり方ですけど微妙な色の差が出ます。
うまく調整すれば何色も重ねることができそうです。
こちらもlerpColorを使う方法同様、動作が重くなります。
以上。
Processingクンフー奥義書『大鹿の舞 その一』でした。
おわりに
今回紹介したこれらを組み合わせたり、改変したりすればもっと様々な表現ができると思うので、色々試してみると面白いと思います。
アイデアとしては
・stroke()にグラデーションを加えて何か面白い表現はできないか。
・グラデーションをアニメーションさせる。徐々に赤に染まっていくとか。
・プリミティブな図形ではなく、もっと複雑な形にグラデーションを加える。
・グラデーションを沢山の点で表現して、粒子とグラデーションの質感のバケモノにする。
とパッと思いついたものを書いてみました。
ありがとうございました。
応援してくださる方は購入&サポートをお願いします!
Happy coding!
ここから先は
¥ 100
応援してくださる方!いつでもサポート受け付けてます!