
いまさら聞けないDrawThings 生成AI入門(第3回 DrawThingsのJavaScriptA~入門編)

なぜ、Script(Javascript)を使うの?
DrawThingsでは、JavaScript用に用意されたAPIを利用するだけで、DrawThingsの操作が可能になるため、制作の幅も広がるためです。
アイデア次第で効率的に制作することが可能になります。
ここでは、DrawThingsのAPI解説のみであり、JavaScriptについては解説をしていません。
どんなことができるの?
たとえば、
画像ファイルを自動的に複数読み込ませたい。
違うポーズから自動的に画像生成したい。
自動的にレイヤー情報の読み出しを行いたい。
… etc
アイデア次第になってくると思いますが、上記のようなものはすぐに作成可能です。
今回は入門編なので、スクリプト作成・Logsの使い方・APIの確認までの基本を解説します。
(APIの確認方法は、スクリプト作成の際コメント(英語)に書かれています。ただし、内容の網羅がされていないため、すべてのAPIを表示(確認)するためのスクリプトをこの記事では作成しています。下記に用意しました。)
DrawThings Javascript API
@api-1.0
//
"Scripts" is a way to enhance Draw Things experience with custom JavaScript snippets. Over time,
we will enhance Scripts with more APIs and do neccessary modifications on the said APIs, but we
will also keep the API stable. In particular, you can mark your script with a particular API
version and it will make sure we use the proper API toolchain to execute the script even in
the future some of the APIs changed.
//
Existing APIs:
//
We currently provides three global objects for you to interact with: `canvas`, `pipeline` and `filesystem`.
//
`canvas` is the object to manipulate the existing infinite canvas on Draw Things interface. It
supports the following methods:
//
`canvas.boundingBox`: return the bounding box of existing images collectively on the canvas.
`canvas.clear()`: remove all images on the canvas, same effect as you tap on the "New Canvas" button.
`canvas.createMask(width, height, value)`: create a mask with a given size and fill-in value.
`canvas.currentMask`: return the current mask on the view, you can further manipulate the mask through `Mask` APIs.
`canvas.loadImage(file)`: load image from a file (a path).
`canvas.moveCanvas(left, top)`: move the canvas to a particular coordinate, these coordinates work as if the zoom scale is 1x.
`canvas.moveCanvas(rect)`: move the canvas to a particular rectangle, this function will move and zoom the canvas to a particular rectangle with x, y, width, height properties.
`canvas.saveImage(file, visibleRegionOnly)`: save the image currently on canvas to a file.
`canvas.canvasZoom`: Set / get the zoom scale of the canvas.
`canvas.topLeftCorner`: return the coordinate the canvas currently at, these coordinates work as if the zoom scale is 1x.
`canvas.updateCanvasSize(configuration)`: extract the size from configuration object and then sync the canvas with that size.
`canvas.loadMaskFromPhotos()`: load mask from photo picker. It's one of a family of functions in the format of load[layer_name]FromPhotos.
Possible layer names: Mask, DepthMap, Scribble, Pose, Color, CustomLayer, Moodboard. Ex: loadDepthMapFromPhotos()
`canvas.loadMaskFromFiles()`: load mask from file picker. It's one of a family of functions in the format of load[layer_name]FromFiles.
Possible layer names: Mask, DepthMap, Scribble, Pose, Color, CustomLayer, Moodboard. Ex: loadDepthMapFromFiles()
`canvas.loadMaskFromSrc(srcContent)`: load mask from src content similar to html <img> src.
Supported src content types: "data:image/png;base64," "data:image/jpeg;base64," "data:image/webp;base64," "file://"
Ex: "data:image/png;base64,<base 64 encoded image string>", or "file://" + filesystem.pictures.path + "/filename"
It's one of a family of functions in the format of load[layer_name]FromSrc.
Possible layer names: Mask, DepthMap, Scribble, Pose, Color, CustomLayer, Moodboard. Ex: loadDepthMapFromSrc(srcContent)
loadPoseFromJson(jsonString) load pose from json string
canvas.detectFaces() returns an array of squares containing the faces
//
`pipeline` is the object to run the image generation pipeline. It supports the following methods:
//
`pipeline.configuration`: extract the current configuration, whether it is on screen or after pipeline.run.
`pipeline.findControlByName(name)`: using the display name to find a particular control.
`pipeline.findLoRAByName(name)`: using the display name to find a particular LoRA.
`pipeline.downloadBuiltin(name)`: download a builtin model / LoRA / ControlNet / upscaler from Draw Things server.
`pipeline.prompts`: return prompt and negativePrompt currently on the screen.
`pipeline.run({prompt: null, negativePrompt: null, configuration: configuration, mask: null})`: run image generation through
this API. You can optionally provides prompt / negativePrompt, or it can take prompt from the screen. mask can be provided
optionally too and sometimes it can be helpful.
//
`filesystem` provides a simple access to the underlying file system. Note that Draw Things is
sandboxed so we can only have access to particular directories within the user file system.
//
`filesystem.pictures.path`: get the path of the pictures folder. It is the system Pictures folder on macOS, and a Pictures
folder under Draw Things within Files app for iOS / iPadOS.
`filesystem.pictures.readEntries`: enumerate all the files under the pictures folder.
応用編では具体的なスクリプトも掲載予定です。
早速、スクリプト作成方法をみてみましょう。
Script作成
ここから、Scriptについて解説します。
JavaScriptをDrawThingsで扱うには、まず、
[ Presets > manage Script ]を選択します。

2 Script Window(注1)が開きますので、Add…(注2)を押し新規Scriptファイルを作成します。
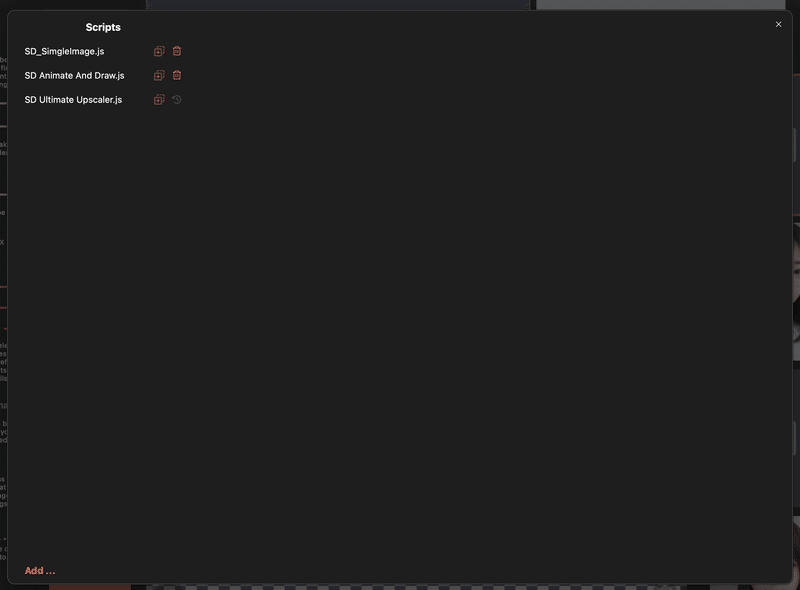
初めてのJavascript.jsというファイル名でファイルを作成します。
作成したファイルを選択し、中に書かれている内容(コメント)を削除し、空にします。
以下の[ 初めてのScript.js ]をスクリプトにコピー&ペーストし、Saveボタンを押し保存しましょう。
// 初めてのScript.js
// DrawThingsで値を表示します。

let conf = pipeline.configuration; // Draw ThingsAPI(設定オブジェクト)
// 幅を取得し、表示
console.log(`ここにScriptが表示されます。`);
console.log(`DrawThings(幅):${conf.width}`);
次にScriptウィンドウを閉じ、Presets > 初めてのScript.jsを選択、実行します。実行後、Script Logを開きます。
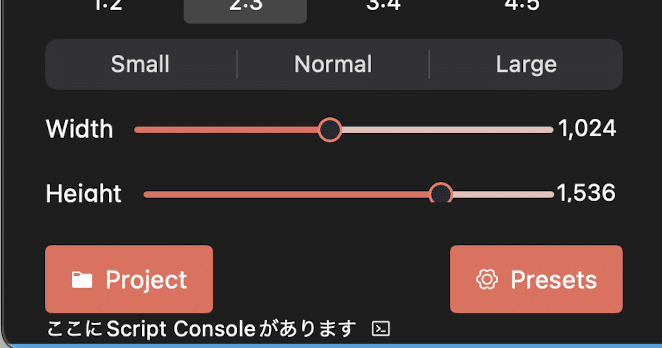
成功すると、Script Consoleに下記のように表示されます。

ここにScriptが表示されます。
DrawThings(幅):1024 (※ 現在利用しているWidthの値)
Scriptの保存場所
作成したScriptは
~/Library/Containers/com.liuliu.draw-things/Data/Documents/Scripts/の中にファイルが入っています。
エイリアスを作成しておくと直接編集もでき、スクリプトウィンドウを開かずテキストエディタで直接編集できるので便利です。
以上がスクリプトの基本的な利用方法です。
ここからの有料部分では、API一覧を出力するスクリプトと実行結果(一覧)を読むことができます。(DrawThingsでそのまま利用可能です)
API確認スクリプトはAPIの一覧をScript Console内に表示する動作確認用スクリプトです。
API確認スクリプトは関数の引数や関数名・現在の値を確認するため用意しました。
(下記は有料部分サンプルです。)
※ 具体的なAPI利用については応用編で解説します。
(※注 Sampleのため、このコードをコピー&ペーストしても実行できません。)
// API確認.js
// DrawThings JavaScript APIを確認するためのスクリプト
class _DT_API_Confirmation{
    config = pipeline.configuration;
.....
// 実行結果 (※注 Sample)
=================== Config ====================================================
pipeline.configuration.controls is [object Object] -> [Type: object]
pipeline.configuration.originalImageHeight is 1536 -> [Type: number]
pipeline.configuration.negativeOriginalImageWidth is 576 -> [Type: number]
pipeline.configuration.cropTop is 0 -> [Type: number]
pipeline.configuration.imageGuidanceScale is 1.5 -> [Type: number]
pipeline.configuration.hiresFix is true -> [Type: boolean]
pipeline.configuration.aestheticScore is 6 -> [Type: number]
....API確認用スクリプト
以下のスクリプトをDrawthingsのスクリプトウィンドウに[API確認.js]として新規追加・保存して下さい。
(またはScriptディレクトリに直接作成しても構いません。)

この記事が気に入ったらサポートをしてみませんか?