Ubuntu22.04 MariaDBのインストールとデータベースの作成
本記事では、2022年4月21日に正式リリースされたUbuntu22.04にMariaDBサーバをインストールしてデータベースを作成する方法について説明します。
MariaDBは、代表的なオープンソースのリレーショナルデータベース(RDB)の1つであり、世界中で広く利用されています。
1.本記事で構築するデータベースについて
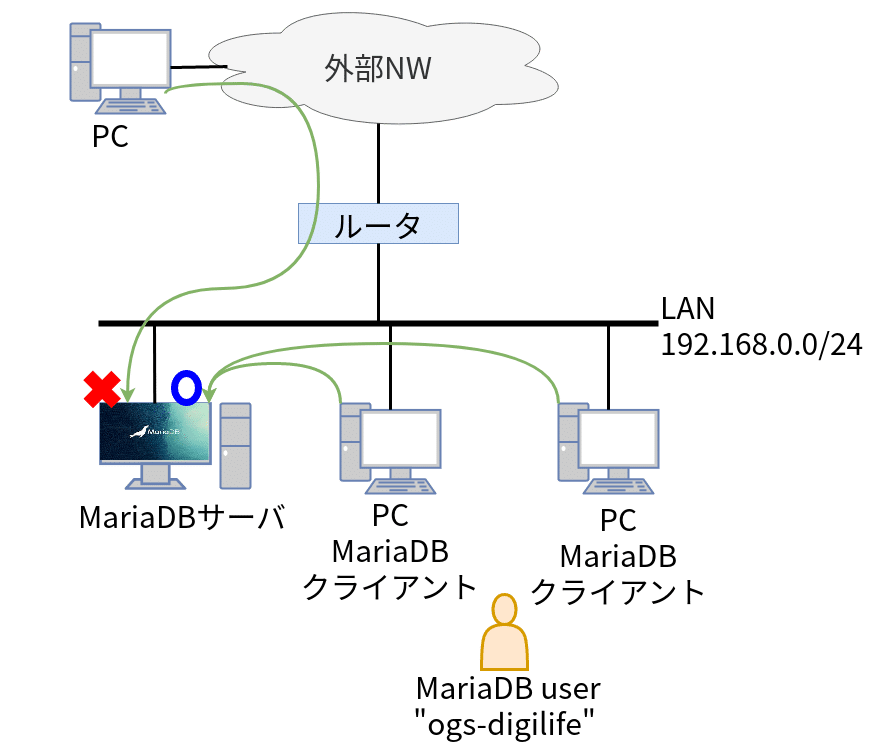
本記事で構築するMariaDBサーバの構成は、以下の通りです。適宜ご自身の環境に置き換えてください。
以下の記事では、「データベースサーバ」と「データベース」を明確に使い分けています。1台のデータベースサーバの中に、複数のデータベースを作成できるからです。
また、サーバが提供する機能のことを「サービス」、サービスを提供する実行プログラム(プロセス)やホストのことを「サーバ」といいます

(1)MariaDBサーバが接続されるIPネットワーク(LAN)セグメントは192.168.0.0/24とします。
(2)MariaDBサーバのrootユーザは、MariaDBがインストールされたローカルホストからのみ、ログインできる設定とします。
(3)MariaDBにアクセスできるユーザとして、"ogs-digilife"を作成します。
(4)ユーザ"ogs-digilife"は、MariaDBがインストールされたローカルホスト、及び同じIPネットワークセグメント(192.168.0.0/24)に接続された外部ホストからMariaDBサーバに接続できる設定とします。(異なるIPネットワークセグメントに接続されたホストからはアクセスできないように設定します。)
(5)このMariaDBサーバに、”testDB"という名前のデータベースを作成します。
(6)ユーザ"ogs-digilife"に、データベース"testDB"の全ての管理権限を付与します。
2.MariaDBのインストール
MariaDBサーバ、MariaDBクライアントをUbuntu22.04ホストにインストールします。MariaDBサーバはデータベースサーバのアプリケーション、MariaDBクライアントは、MariaDBサーバに接続、ログインするためのコマンドツールです。MariaDBサーバに接続、ログインするためには、MariaDBクライアントが必要です。
MariaDBサーバ、MariaDBクライアントは、Ubuntuの公式リポジトリから、aptコマンドを使ってインストールします。
$ sudo apt update
$ sudo apt -y install mariadb-server mariadb-client
MariaDBサーバが正常にインストールできたか確認します。
$ systemctl status mariadb
● mariadb.service - MariaDB 10.6.7 database server
    Loaded: loaded (/lib/systemd/system/mariadb.service; enabled; vendor preset: enabled)
    Active: active (running) since Fri 2022-05-13 06:26:29 UTC; 2h 19min ago
    << 後略
つづいて、MariaDBクライアントが正常にインストールできたか確認します。MariaDBサーバに接続する際のクライアント機能のコマンドは"mariadb”コマンドです。
$ mariadb --version
mariadb  Ver 15.1 Distrib 10.6.7-MariaDB, for debian-linux-gnu (x86_64) using  EditLine wrapper
Ver 15.1がMariaDBクライアントの、Distrib 10.6.7がMariaDBサーバのバージョンです。クライアント(mariadb-client)しかインストールされていないホストでは、クライアントのバージョンのみが表示されます。
3.MariaDBサーバの初期セットアップ
MariaDBサーバの初期セットアップを行います。初期セットアップは、MariaDBクライアントの"mysql_secure_installation"コマンドを使います。
初期セットアップでは、MariaDBサーバのrootユーザのパスワード設定を行います。本記事では、rootユーザはローカルホストからのみ、MariaDBサーバに接続できる設定とします。
rootユーザは、MariaDBサーバの全ての操作権限をもつ特権ユーザです。
MariaDBは、MySQLから派生したリレーショナルデータベースで、MySQLの初期セットアップコマンドでもある"mysql_secure_installation"コマンドを使って初期セットアップを行います。広く利用されているmysqlの操作をそのまま継続するため、”mysql"の名前がそのまま残っています。
ちなみに、本記事で説明している"mariadb"コマンドの代わりに、"mysql"コマンドを同じ形式で使うこともできます。
"<<"の後ろは、補足コメントです。
$ sudo mysql_secure_installation
NOTE: RUNNING ALL PARTS OF THIS SCRIPT IS RECOMMENDED FOR ALL MariaDB
     SERVERS IN PRODUCTION USE!  PLEASE READ EACH STEP CAREFULLY!
In order to log into MariaDB to secure it, we'll need the current
password for the root user. If you've just installed MariaDB, and
haven't set the root password yet, you should just press enter here.
Enter current password for root (enter for none): << 初期インストールのときはEnterキー押すだけ
OK, successfully used password, moving on...
Setting the root password or using the unix_socket ensures that nobody
can log into the MariaDB root user without the proper authorisation.
You already have your root account protected, so you can safely answer 'n'.
Switch to unix_socket authentication [Y/n] n
... skipping.
You already have your root account protected, so you can safely answer 'n'.
Change the root password? [Y/n] y << mariadb rootユーザのパスワードを設定
New password:  << パスワードを入力
Re-enter new password:  << パスワードを入力
Password updated successfully!
Reloading privilege tables..
... Success!

By default, a MariaDB installation has an anonymous user, allowing anyone
to log into MariaDB without having to have a user account created for
them.  This is intended only for testing, and to make the installation
go a bit smoother.  You should remove them before moving into a
production environment.
Remove anonymous users? [Y/n] y << 普通は匿名ユーザ作る必要ないので、y。
... Success!
Normally, root should only be allowed to connect from 'localhost'.  This
ensures that someone cannot guess at the root password from the network.
Disallow root login remotely? [Y/n] y << rootユーザはローカルホストからのみ許可し、リモートホストからのアクセスは不許可にする。y。
... Success!
By default, MariaDB comes with a database named 'test' that anyone can
access.  This is also intended only for testing, and should be removed
before moving into a production environment.
Remove test database and access to it? [Y/n] y  << 自分でデータベース作るのでtest databaseはいらない。y
- Dropping test database...
... Success!
- Removing privileges on test database...
... Success!
Reloading the privilege tables will ensure that all changes made so far
will take effect immediately.
Reload privilege tables now? [Y/n] y << 上で設定したrootユーザのパスワードなどを反映させる。y。
... Success!
Cleaning up...
All done!  If you've completed all of the above steps, your MariaDB
installation should now be secure.
Thanks for using MariaDB!
これでMariaDBサーバの初期設定は完了です。今は、rootユーザでローカルホストからのみ、MariaDBサーバに接続できる状態です。
4.rootユーザでデータベースサーバに接続してみる
mariaコマンドを使って、rootユーザでローカルホストのMariaDBサーバに接続します。パスワードは上記で設定したrootユーザのパスワードです。
$ mariadb -u root -p
Enter password:  << パスワードを入力

MariaDB [(none)]>
MariaDBサーバに接続すると、MariaDBサーバのプロンプトが表示されます。"MariaDB [(none)]> "の部分です。
"quit"、"\q"、または"exit"でMariaDBサーバを切断し、シェルコマンドラインに戻ることができます。
MariaDB [(none)]> exit
$
5.データベースを作成する
rootユーザの権限でSQLのCREATE DATABASE文を使って新しいデータベース"testDB"を作成します。その後、show databasesでMariaDBサーバ内のデータベース一覧を表示してtestDBが作成できたか確認します。
汎用データベース言語であるSQLは他のデータベースサーバでも広く採用されています。SQLは大文字、小文字を区別しません。
$ mariadb -u root -p
Enter password:
MariaDB [(none)]> CREATE DATABASE testDB;
Query OK, 1 row affected (0.001 sec)
MariaDB [(none)]> show databases;
+--------------------+
| Database           |
+--------------------+
| information_schema |
| mysql              |
| performance_schema |
| sys                |
| testDB             |
+--------------------+
5 rows in set (0.001 sec)
MariaDB [(none)]>
testDB以外のデータベースは、MariaDBサーバ自身が使うなどの目的でインストール時に自動作成されたデータベースです。
6.ユーザを作成する
rootユーザでtestDBのすべての操作権限をもつユーザ"ogs-digilife"を作成します。ユーザ名とパスワードは適宜ご自身が作成するものに置き換えてください。
MariaDBサーバのユーザは、ユーザ名と、アクセス元のホスト(MariaDBクライアントがインストールされたPC)の組み合わせで作成します。作成には、CREATE USER文を使います。
$ mariadb -u root -p
Enter password:
MariaDB [(none)]> CREATE USER 'ogs-digilife'@'localhost' IDENTIFIED BY '<このユーザのパスワード>';
Query OK, 0 rows affected (0.013 sec)
つづいて、LAN(192.168.0.0/24)の任意のホストからアクセスできるユーザを作成。
MariaDB [(none)]> CREATE USER 'ogs-digilife'@'192.168.0.%' IDENTIFIED BY '<このユーザのパスワード>';
Query OK, 0 rows affected (0.013 sec)
%はワイルドカードですので、LAN(192.168.0.0/24)の任意のホストを意味します。
補足
ローカルホストからアクセスできるユーザを作成する場合は、たとえローカルホストのアドレスが192.168.0.xであったとしても、"localhost"でcreate userする必要があります。
ユーザ"ogs-digilife"が作成されたかSELECT文を使って確認してみます。mysql.userは、データベース"mysql"のテーブル"user”を意味します。上記のとおり、データベースmysqlは、MariaDBサーバインストール時に自動で作成されたデータベースです。
MariaDB [(none)]>> SELECT user, host, password FROM mysql.user;
+--------------+-------------+-------------------------------------------+
| User         | Host        | Password                                  |
+--------------+-------------+-------------------------------------------+
| mariadb.sys  | localhost   |                                           |
| root         | localhost   | *・・・			                         |
| mysql        | localhost   | invalid                                   |
| ogs-digilife | localhost   | *・・・			                         |
| ogs-digilife | 192.168.0.% | *・・・			                         |
+--------------+-------------+-------------------------------------------+
これで、192.168.0.xとローカルホストからMariaDBサーバにアクセスできるユーザ"ogs-digilife"が作成できていることを確認できました。
7.ユーザにデータベースの管理権限を付与する
つづいて、作成したtestDBを管理/操作するための全ての権限をユーザogs-digilifeに付与します。GRANT ALL文を使います。
上記のとおり、ユーザはユーザ@アクセス元ホストの組み合わせごとに作成しました。権限も同様にユーザ@アクセス元ホストの組み合わせごとに設定します。
MariaDB [(none)]> GANT ALL ON testDB.* TO 'ogs-digilife'@'localhost';
Query OK, 0 rows affected (0.014 sec)
MariaDB [(none)]> GANT ALL ON testDB.* TO 'ogs-digilife'@'192.168.0.%';
Query OK, 0 rows affected (0.012 sec)
testDB.*の"*"はワイルドカードです。testDB内の「すべての」データベースオブジェクトを意味します。
SHOW GRANTS文を使ってユーザに権限を付与できたかを確認します。
MariaDB [(none)]> SHOW GRANTS FOR 'ogs-digilife'@'localhost';
+---------------------------------------------------------------------------------------------------------------------+
| Grants for ogs-digilife@localhost                                                                                   |
+---------------------------------------------------------------------------------------------------------------------+
| GRANT USAGE ON *.* TO `ogs-digilife`@`localhost` IDENTIFIED BY PASSWORD '*E6Q・・<< ハッシュ化されたパスワード' |
| GRANT ALL PRIVILEGES ON `testDB`.* TO `ogs-digilife`@`localhost`                                                   |
+---------------------------------------------------------------------------------------------------------------------+
2 rows in set (0.000 sec)
MariaDB [(none)]> SHOW GRANTS for 'ogs-digilife'@'192.168.0.%';
<< 省略
出力結果の上にあるGRANT USAGE ON・・・は、ユーザとして登録されているが、*.*(前の*は全てのデータベース、後ろの*はデータベース内のすべてのオブジェクト)に対して、なんの権限ももっていないことを表しています。
出力結果の下にあるGRANT ALL PRIVILEGES ON・・は、testDB.*(データベースtestDB内の全てのオブジェクト)に対して権限をもっていることを表しています。
これで、'ogs-digilife'@'localhost'と 'ogs-digilife'@'192.168.0.%'は、データベースtestDBに対してのみ、すべての権限が与えられていることを確認できました。
8.データベースサーバの設定
最後に、MariaDBデータベースサーバの設定ファイルを編集して反映します。本記事で説明するのは、MariaDBサーバにリモートホストからのアクセスを許可する設定です。この設定を変更しないと、ローカルホスト以外のホスト(リモートホスト)からMariaDBサーバにアクセスすることができません。
編集するファイルは
/etc/mysql/mariadb.conf.d/50-server.cnf
です。このファイルで、MariaDBサーバ全体の設定をしています。
なにか問題があった時に元に戻せるよう、最初に設定ファイルのバックアップをとり、nanoなどのUbuntuターミナルから利用できるテキストエディタでファイルを開きます。
$ cd /etc/mysql/mariadb.conf.d/
$ sudo cp 50-server.cnf 50-server.cnf.bak
$ sudo nano 50-server.cnf
ファイルにbind-address = 127.0.0.1と書かれている箇所の下に、
bind-address = 0.0.0.0
を追記して保存します。
<< 前略
# bind-address            = 127.0.0.1
bind-address            = 0.0.0.0
<< 後略
"bind-address"は、MariaDBサーバにアクセスできるホストの設定項目です。初期設定では"127.0.0.1"となっており、これはローカルホストを意味するIPアドレスです。初期設定なので、#で設定がコメントアウトされてますが、この下にbind-address = 0.0.0.0を追記すると、リモートホストからもこのMariaDBサーバにネットワーク越しにアクセスできるようになります。
詳しい説明は割愛しますが、IPアドレス127.0.0.1はローカルホストのことです。このままですと、ローカルホストからしかMariaDBサーバにアクセスすることができません。通常はMariaDBサーバのNICのipアドレスを括り付けますが、0.0.0.0に変えておくと、どのNIC経由からでもMariaDBサーバにアクセスできるようになります。
設定ファイルの編集が完了したら、サービスを再起動(restart)します。
$ sudo service mysqld restart
$
以上でMariaDBの設定は完了です。
9.データベースに接続、ログインする
ユーザ"ogs-digilife"でデータベース"testDB"にアクセスしてみます。まずは、MariaDBサーバのローカルホストからアクセスしてみます。
$ mariadb -u ogs-digilife -p
Enter password:  << パスワードを入力
Welcome to the MariaDB monitor.  Commands end with ; or \g.
Your MariaDB connection id is 51
Server version: 10.6.7-MariaDB-2ubuntu1 Ubuntu 22.04

Copyright (c) 2000, 2018, Oracle, MariaDB Corporation Ab and others.

Type 'help;' or '\h' for help. Type '\c' to clear the current input statement.

MariaDB [(none)]>
"-u"でログインユーザを指定、"-p"はパスワードでログインすることを意味します。MariaDBサーバのプロンプトが表示されたらログイン成功です。
リモートホストからアクセスさせる場合は、-hオプションでMariaDBサーバホストを指定する必要があります。また、MariaDBサーバに接続するリモートホストにMariaDBクライアントがインストールされている必要があります。
本記事では、MariaDBサーバホストは、192.168.0.199の固定IPアドレスが設定されているものとします。IPアドレスは適宜ご自身の環境にあわせてください。
$ mysql -u ogs-digilife -h 192.168.0.199 -p
Enter password:
Welcome to the MySQL monitor.  Commands end with ; or \g.
Your MySQL connection id is 39
Server version: 5.5.5-10.6.7-MariaDB-2ubuntu1 Ubuntu 22.04
Copyright (c) 2000, 2022, Oracle and/or its affiliates.
Oracle is a registered trademark of Oracle Corporation and/or its
affiliates. Other names may be trademarks of their respective
owners.
Type 'help;' or '\h' for help. Type '\c' to clear the current input statement.
mysql>
MariaDBサーバのプロンプトの表示が、ローカルホストからアクセスしたときと違って、"mysql>"に変わってますが、このデータベースサーバのプロンプトが表示されたらログイン成功です。
10.データベースに接続する
ユーザ"ogs-digilife”でMariaDBサーバにログインしたら、データベース"testDB"にアクセスします。
SHOW DATABASES文でデータベース一覧を確認。
MariaDB [(none)]> SHOW DATABASES;
+--------------------+
| Database           |
+--------------------+
| information_schema |
| testDB             |
+--------------------+
2 rows in set (0.001 sec)
ユーザ"ogs-digilife"が何らかの権限をもっているデータベースのみリスト表示されます。データベース"information_schema"には、MariaDBのデータベースに関するさまざまな情報が格納されてます。ここでは詳細説明を省略します。
つづいて、データベース"testDB"にアクセス。
MariaDB [(none)]> USE testDB;
Database changed
MariaDB [testDB]>
”Database changed”と出力され、プロンプトが返ってきたら無事、testDBにアクセスできています。ここからSQL文を実行してデータベースを操作します。
