HORIのHAYABUSAレバーに8角ガイドをとりつける / Install the octagonal guide on the HORI HAYABUSA lever.

The Japanese article is followed by the English article.
HAYABUSA(隼)レバーとは
HAYABUSA(隼)レバーとはHORIオリジナルのレバーユニット。現在発売されているリアルアーケードシリーズにはもれなく使われているのだが、ポピュラーな三和のレバーなんかと比べて操作感が違うため(斜めに入りにくいということが4gamerで記事にされてしまうほど)、あまり評判はよくないようである。
そのHAYABUSAレバーのガイドを交換し、操作感を向上させようというのが今回の試みとなる。
必要なもの
・HAYABUSAレバー
・プラスドライバー(3番)
・JLFレバー用8角ガイド
・穴あけ用工具
三和レバー用の8角ガイドは楽天の三和公式ショップや、千石電商などで買える。穴あけ用の工具はピンバイスか電動ドリルあたりで。3mmの穴をあける必要があり、ガイドのプラスチックが割と硬いことを考えると電動ドリルを使うのが理想。
ちなみに8角ガイドは4角ガイドのものから真ん中の部分だけ取り外して交換するパーツが海外で売っているのだが(本文中で使用している8角ガイドは実はそうして作ったもの)、発送まで時間がかかるし、輸送費も結構かかるので最初から8角ガイドを購入したほうが早い。
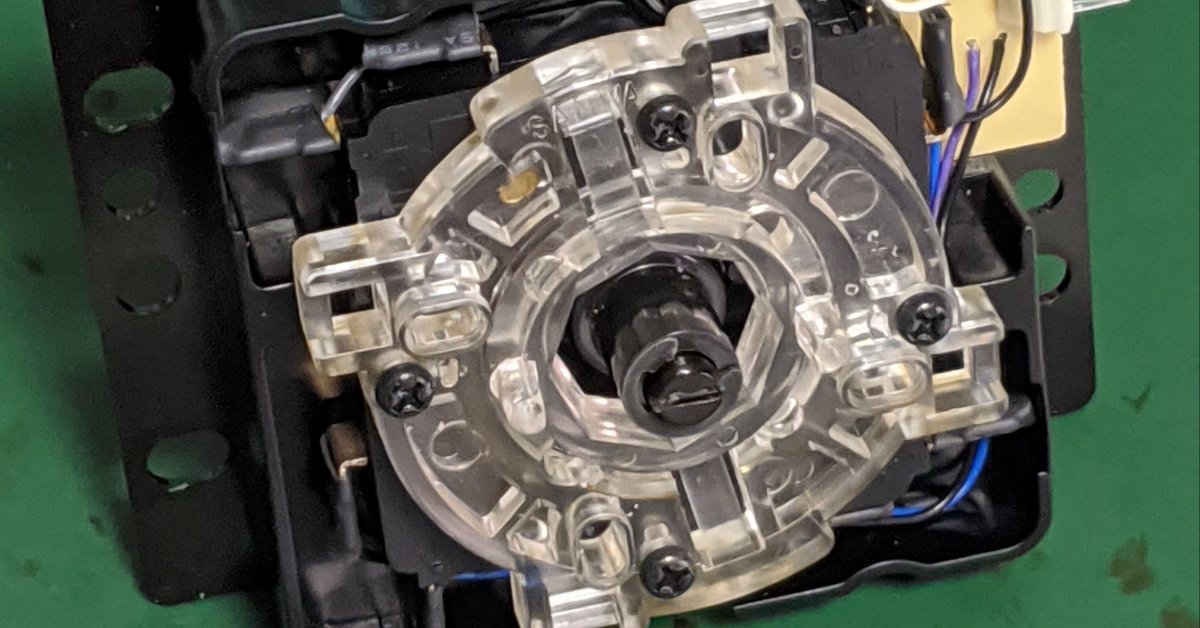
ステップ①:HAYABUSAレバーからガイドを外す
HAYABUSAレバーにはガイドがネジ止めされているので、これをまず外す。

外したガイドは使いみちがない(HAYABUSAのガイドは三和のレバーには使えない)ので、大事にしまっておく。ねじは8角ガイドをとめるのに使うのでこちらはしまわないように。

ステップ②:8角ガイドを加工する(穴あけ)
8角ガイドをHAYABUSAレバーに取り付けられるように加工する。実は無加工でもHAYABUSAレバーのスイッチのくぼみに8角ガイドがぴったりはまるのだが、これだと固定があまく、プレイ中にガイドが落下する可能性が高い。なので、ネジ止めできるように穴あけしていく。
穴あけする部分はHAYABUSAガイドのネジ穴と一緒の位置。要はスイッチがはまるポッチの片方に穴をあければいい。4箇所に3mmの穴をあけていくと、以下の写真のような形になる。

穴あけはガイドのプラスチックの硬さを考えると、電動ドリルがあると楽。ポッチだけニッパーで切ればいいじゃんと思いがちだが、ニッパーで切っても貫通はしていない状態なので、どちらにせよ穴あけをしないといけない。
ステップ③:8角ガイドをネジ止めする
8角ガイドに穴をあけたらあとはHAYABUSAレバーにとりつけるだけ。元からついていたネジを使ってはめ込んでいく。

結びに:操作感について
あくまでも主観だが、HAYABUSAレバーよりは操作性は向上しているように感じる。それなら、HAYABUSAではなく三和のレバーに変えたほうがよいじゃないかといってしまったら身も蓋もないが、HAYABUSAレバーのほうが三和レバーよりも操作感はやや重いという特徴がある。セイミツほどではないが重みがほしいというような場合は、試してみる余地もあるのではないだろうか。
What is HAYABUSA lever?
The HAYABUSA lever is a HORI original lever unit. The HAYABUSA lever is used in all of the Real Arcade series currently on the market, but it has a different feel compared to the popular Sanwa lever (so much so that 4gamer even wrote an article about how difficult it was to get the lever to go in at an angle), and is not very popular.
This time, we are going to replace the guide of the Hayabusa lever to improve the feel.
What you need
・Hayabusa lever
・Phillips screwdriver (No.3)
・8 square guide for JLF lever
・Drilling tool
The octagonal guide for the Sanwa lever can be purchased at the official Sanwa store on Rakuten or at Sengoku Densho. You can use a pin vice or an electric drill to drill a 3mm hole, and considering that the plastic of the guide is rather hard, an electric drill is ideal.
By the way, the octagonal guide is sold overseas as a replacement for the middle part of the 4-square guide (the octagonal guide used in the text was actually made that way), but it takes time to ship and shipping costs are quite high, so it is better to buy the octagonal guide from the beginning.
Step 1: Remove the guide from the HAYABUSA lever.
The HAYABUSA lever has a guide screwed into it, so remove this first.
The guide you removed is useless (Hayabusa guides cannot be used with Sanwa levers), so keep it in a safe place. The screw is used to fasten the octagonal guide, so don't put it away.
Step 2: Process the octagonal guide (drilling)
Modify the octal guide so that it can be attached to the HAYABUSA lever. In fact, the octagonal guide fits perfectly into the hollow of the Hayabusa lever switch without any modification, but the fixation is too loose and the guide is likely to fall off during play. So I drilled a hole so that I could screw it in.
The hole to be drilled is the same position as the screw hole in the Hayabusa guide. If you drill 3mm holes in four places, it will look like the picture below.
Drilling is easier with an electric drill, considering the hardness of the plastic of the guide. It is easy to think that you can just cut the patches with nippers, but even if you cut them with nippers, they are not penetrated, so you have to drill them anyway.
Step 3: Screw in the octagonal guide.
After drilling the holes in the octagonal guide, all that is left is to attach it to the Hayabusa lever. Use the screws that came with the lever to insert it.
How does it feel?
The Hayabusa lever is a little heavier than the Sanwa lever, so if you want more weight but not as much as the Seimitsu lever, you may want to try it.
いただいたサポートはnote上における活動の源泉とし、記事の形で還元いたします。