
【Unreal Engine5】入力とタグを紐づける

※注意※
・この記事はUnreal Engine 5でC++を使った実装をやっている記事です。Blueprintも使いますが、主にC++について記述しているので、Blueprintだけで実装する類の記事ではありません。
・C++を使って実装する部分やソースコードが多々出てくるので、ある程度C++が読める方向けです(雰囲気はわかるように書くつもりですが、仕組みがある程度分かっている方が見た方がいいかもしれません)
・これが必ずしも正しい!一番効率的!というものではないので、間違っている部分や考え方がおかしい部分もあることをご承知おきください(本業が企画職なので知識が浅いです)
上記内容でも気になるという方は続きをお読みください。
前準備→https://note.com/mok0/n/nea9bf02f40cd
これが終わっている状態からのスタートになります。このプロジェクトを改造していく形になります。
Unreal Engine5のサンプルゲームプロジェクトに「Lyra」というサードパーソンのシュータゲームや、ボン〇ーマンみたいなトップビューで
爆弾を置いて壁を壊してみたいなゲームが同じプロジェクトに一緒くたになった不思議なものがあります。
この中の1つににInputTagという入力を受け付けた時にGamePlayTagというタグを発行する仕組みがあり、その機能を移植するのが今回の目的になります。
Enhanced Inputの機能を拡張したもので、入力とタグを紐づけた中間のデータアセットを用意し、そのデータをもとに入力をしたらタグが発行される仕組みを実現しています。
この辺の仕組みはDeveloperのサイトにサンプルとして作った方がいましたが、少し開発をするには面倒なバグが潜んでいたのでLyraのソースを読み解いていき
必要部分だけ抜き出して動作までこぎつけることができたので、忘れないように記事として残しておこうという形です。
ここから本編
※〇〇となっているところは任意で大丈夫ですが、今回はTagInputSampleの略で「TIS」とすべて入力しています。
◆今回やったこと
・データアセット(InputConfig)を作る
・タグ管理用のファイルを作る(〇〇GamePlayTags)
・EnhancedInputComponentを継承したカスタムクラスを作る(〇〇InputComponent)
・BP_Playerの継承元になっている「[プロジェクト名] Character」クラスを編集する
◆データアセット
InputConfigというDataAssetを継承したクラスを作成します。
前準備
・FGameplayTagを使えるようにする
[プロジェクト名].build.csの「PublicDependencyModuleNames.AddRange」に「GameplayTags」を追加する。
※プロジェクト名は任意でつけてもらっていいですが、今回は投稿者は「TagInputSample」とつけています。
PublicDependencyModuleNames.AddRange(new string[] { "Core", "CoreUObject", "Engine", "InputCore", "EnhancedInput", "GameplayTags"});その後、Unreal Engine5のエディタを開き、新しくC++ファイルを作成します。
ツール→新規C++クラス...を選択します。
↓
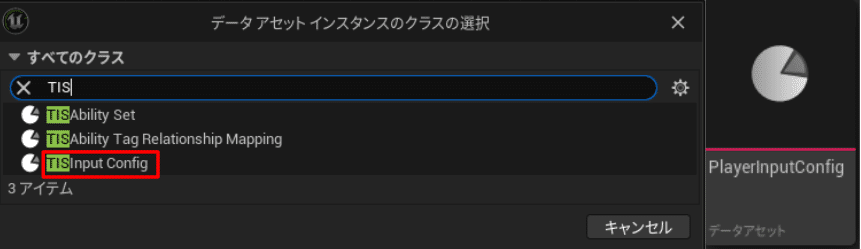
クラスを選択する画面が表示されるので、全てのクラス→DataAssetを選択して次へ
※検索でDataAssetと入力するとすぐにわかる位置に出てきます。
↓
ファイル名を〇〇InputConfigと名付けて作成します。
※〇〇はプロジェクト名もしくはその略称とかを入れるといいです。(今回はTagInputSampleとプロジェクト名をつけているのでTISInputCofifと名付けています)
↓
ファイルを作成すると自動でコンパイルが走り、コンパイルが通るとVSCodeでファイルが開かれます。
※コンパイルエラーになってもファイルは作成されるので、VSCodeを開いて該当のファイルを編集することは可能です。
以下のようにコードを書きます。
[コード]〇〇InputConfig.h
#pragma once

#include "CoreMinimal.h"
#include "Engine/DataAsset.h"
#include "GameplayTagContainer.h"

#include "〇〇InputConfig.generated.h"

class UInputAction;
class UObject;
struct FFrame;

USTRUCT(BlueprintType)
struct F〇〇InputAction
{
	GENERATED_BODY()

public:

	UPROPERTY(EditDefaultsOnly, BlueprintReadOnly)
	TObjectPtr<const UInputAction> InputAction = nullptr;

	UPROPERTY(EditDefaultsOnly, BlueprintReadOnly, Meta = (Categories = "InputTag"))
	FGameplayTag InputTag;
};

UCLASS(BlueprintType, Const)
class U〇〇InputConfig : public UDataAsset
{
	GENERATED_BODY()

public:

	U〇〇InputConfig(const FObjectInitializer& ObjectInitializer);

	UFUNCTION(BlueprintCallable, Category = "〇〇|Pawn")
	const UInputAction* FindNativeInputActionForTag(const FGameplayTag& InputTag, bool bLogNotFound = true) const;

public:
	UPROPERTY(EditDefaultsOnly, BlueprintReadOnly, Meta = (TitleProperty = "InputAction"))
	TArray<F〇〇InputAction> NativeInputActions;

};
[コード]〇〇InputConfig.cpp
#include "〇〇InputConfig.h"

U〇〇InputConfig::U〇〇InputConfig(const FObjectInitializer& ObjectInitializer)
{
}

const UInputAction* U〇〇InputConfig::FindNativeInputActionForTag(const FGameplayTag& InputTag, bool bLogNotFound) const
{
	for (const F〇〇InputAction& Action : NativeInputActions)
	{
		if (Action.InputAction && (Action.InputTag == InputTag))
		{
			return Action.InputAction;
		}
	}

	if (bLogNotFound)
	{
		UE_LOG(LogTemp, Error, TEXT("Can't find NativeInputAction for InputTag [%s] on InputConfig [%s]."), *InputTag.ToString(), *GetNameSafe(this));
	}

	return nullptr;
}
詳しいことは書かないですが、以下の様な事を書いています。
【〇〇InputConfig.h】
・struct(構造体)でDataAssetに入力するためのデータ構造を定義
・classでその構造体データを使うための定義をする
【〇〇InputConfig.cpp】
・定義した関数の処理を記述
FindNativeInputActionForTagで作成されているデータを読み込んで、関数に入ってきたタグと同じInputActionデータを返す。なければNullptrを返す
これでまず、コンパイルが通ることをVSCode内でビルドをする。
ターミナル→ビルドタスクの実行を選択する。中央のバーからビルドメニューがたくさん出てくるので
「〇〇 Win64 Development Build」を探して選択(開発ビルドを64ビットでビルドする方式)します。
↓
問題なければビルドが通りターミナルに終了した旨が表示されます。
エラーが出ると赤字で内容が記載されるので修正をしましょう(何が出るかは記述内容によって変わるので調べながら修正してください)
↓
Unreal Engine5のエディタの方に戻り画面右下の方にあるコンパイルマーク(画像参考)をクリックしてコンパイルします。
※投稿者はホットリロードを採用しているので、コンパイルしていますが、ライブコーディングをしている場合でも同じようにコンパイル可能です。
↓
Unreal Engine5側でコンパイルが通ったら、コンテンツドロワーからコンテンツブラウザを開き
右ックリック→その他→データアセットを選択しデータアセットを作ります。
名前はなんでもいいですが、今回は「PlayerInputConfig」と名付けました。

※画像では先のものを作っている状態なので、違うものがありますが「〇〇InputConfig」を選択します。
作った「PlayerInputConfig」を開くと何も定義されていないが項目だけ存在する画面が開きます。
そこで0配列エレメントの右にある+マークをクリックすることで項目が追加されます。
↓
以下のようにデータを作ってみてください。

ここでInputActionは入れられるがInputTagは見つからないと思います。
◆タグ管理用のファイルを作る(〇〇GamePlayTags)
次に実際のInputTagにあたるものを作ります。
Unreal Engine5のエディタを開き、新しくC++ファイルを作成します。
ツール→新規C++クラス...を選択します。
↓
クラスは「なし」で次を選択し「〇〇GamePlayTags」と名付けて作成します。
以下のようにコードを書きます。
[コード]〇〇GamePlayTags.h
#pragma once

#include "CoreMinimal.h"

#include "NativeGameplayTags.h"

namespace 〇〇GameplayTags
{
	TAGINPUTSAMPLE_API	FGameplayTag FindTagByString(const FString& TagString, bool bMatchPartialString = false);

	TAGINPUTSAMPLE_API	UE_DECLARE_GAMEPLAY_TAG_EXTERN(InputTag_Move);

};
※TAGINPUTSAMPLE_APIは作成したプロジェクトの名前になります
aiueoというプロジェクトであれば「AIUEO_API」となる。
[コード]〇〇GamePlayTags.cpp
#include "〇〇GameplayTags.h"

#include "Engine/EngineTypes.h"
#include "GameplayTagsManager.h"

namespace 〇〇GameplayTags
{
	UE_DEFINE_GAMEPLAY_TAG_COMMENT(InputTag_Move, "InputTag.Move", "Move input.");

	FGameplayTag FindTagByString(const FString& TagString, bool bMatchPartialString)
	{
		const UGameplayTagsManager& Manager = UGameplayTagsManager::Get();
		FGameplayTag Tag = Manager.RequestGameplayTag(FName(*TagString), false);

		if (!Tag.IsValid() && bMatchPartialString)
		{
			FGameplayTagContainer AllTags;
			Manager.RequestAllGameplayTags(AllTags, true);

			for (const FGameplayTag& TestTag : AllTags)
			{
				if (TestTag.ToString().Contains(TagString))
				{
					UE_LOG(LogTemp, Display, TEXT("Could not find exact match for tag [%s] but found partial match on tag [%s]."), *TagString, *TestTag.ToString());
					Tag = TestTag;
					break;
				}
			}
		}

		return Tag;
	}
}
【〇〇GamePlayTags.h】
・FindTagByStringの定義(実際には使わないですが、サンプルから持ってきているものをそのまま入れたままにしていました。不要なら消しておいてもらって問題ないです。)
・InputTag_MoveというタグをNative側で定義しています。
【〇〇GamePlayTags.cpp】
・UE_DEFINE_GAMEPLAY_TAG_COMMENT(InputTag_Move, "InputTag.Move", "Move input.");
InputTag_Moveを「InputTag.Move」として使うことを定義しています。もう一つ右は説明用のコメントの記述です。
・FindTagByStringはヘッダ側で定義した関数の内容になります。今は使っていないので、不要ならば消しても動作すると思います。
↓
上記記載後、VSCode側でビルド→Unreal Engine5のエディタ側でコンパイルをします。
↓
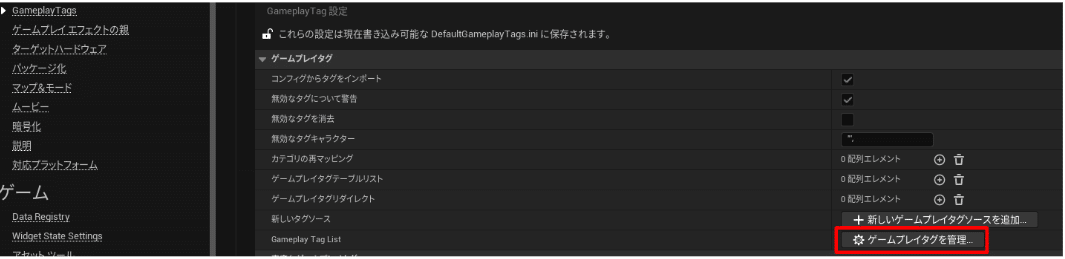
コンパイルが通ったらタグが新しく追加されているか確認します。
プロジェクト設定のプロジェクト→GameplayTagsの中にある「ゲームプレイタグを管理」ボタンをタップ
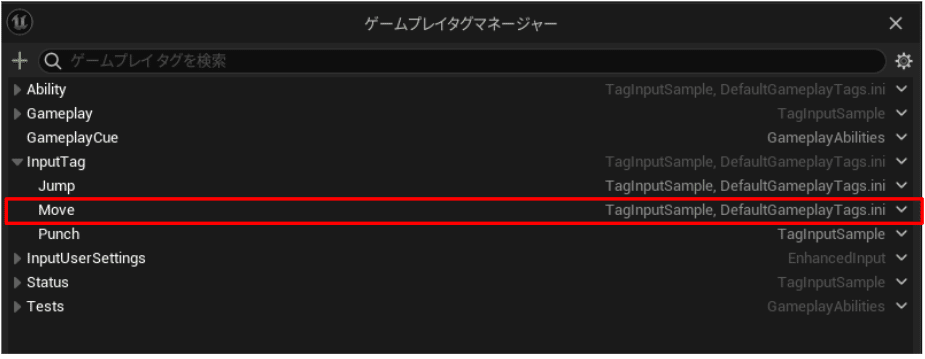
InputTag
┗Move
が作成されていることを確認します。できていなかったらエディタを再起動もしくは一度ゲームを起動してみて下さい。
※タグのコードに記載してもうまく反映されないことがあった記憶があったので、うまく登録されていなかった場合は手動でも追加できます。
画像の左上にある+ボタンをクリックすると新しくタグが設定できるので「IntupTag.Move」と名前に入力して、ソースにDefaultGameplayTags.iniを選択して「新しいタグを追加」ボタンをクリックして追加します。
※下部に追加されたものはどこに記載があるかが右側に記載されます。プロジェクト名が記載されている場合は先程作ったソースに、iniの名称が入っている場合は手動追加になります。この画像だと両方に記載されている、ということになります。
↓
タグの登録が終わったので、InputConfigにタグが追加できるようになったかと思います(上記の画像の参考)
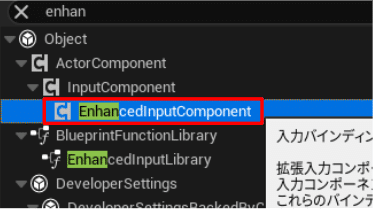
◆EnhancedInputComponentを継承したカスタムクラスを作る
上記でInputConfigファイルを作ったと思いますが、このコンフィグファイルをEnhancedInputComponentに読み込ませて、タグと入力内容を紐づけるカスタムクラスを作ります。
名前は「〇〇InputComponent」と名付けておきます。
以下のようにコードを書きます。
[コード]〇〇InputComponent.h
#pragma once

#include "CoreMinimal.h"
#include "EnhancedInputComponent.h"
#include "〇〇InputConfig.h"

#include "〇〇InputComponent.generated.h"

class UEnhancedInputLocalPlayerSubsystem;
class UInputAction;
class U〇〇InputConfig;
class UObject;

UCLASS(Config = Input)
class U〇〇InputComponent : public UEnhancedInputComponent
{
	GENERATED_BODY()

public:

	U〇〇InputComponent(const FObjectInitializer& ObjectInitializer);

	void AddInputMappings(const U〇〇InputConfig* InputConfig, UEnhancedInputLocalPlayerSubsystem* InputSubsystem) const;
	void RemoveInputMappings(const U〇〇InputConfig* InputConfig, UEnhancedInputLocalPlayerSubsystem* InputSubsystem) const;

	template<class UserClass, typename FuncType>
	void BindNativeAction(const U〇〇InputConfig* InputConfig, const FGameplayTag& InputTag, ETriggerEvent TriggerEvent, UserClass* Object, FuncType Func, bool bLogIfNotFound);

	void RemoveBinds(TArray<uint32>& BindHandles);
};


template<class UserClass, typename FuncType>
void U〇〇InputComponent::BindNativeAction(const U〇〇InputConfig* InputConfig, const FGameplayTag& InputTag, ETriggerEvent TriggerEvent, UserClass* Object, FuncType Func, bool bLogIfNotFound)
{
	check(InputConfig);
	if (const UInputAction* IA = InputConfig->FindNativeInputActionForTag(InputTag, bLogIfNotFound))
	{
		BindAction(IA, TriggerEvent, Object, Func);
	}
}
[コード]〇〇InputComponent.cpp
#include "〇〇InputComponent.h"

#include "EnhancedInputSubsystems.h"

class U〇〇InputConfig;

U〇〇InputComponent::U〇〇InputComponent(const FObjectInitializer& ObjectInitializer)
{
}

void U〇〇InputComponent::AddInputMappings(const U〇〇InputConfig* InputConfig, UEnhancedInputLocalPlayerSubsystem* InputSubsystem) const
{
	check(InputConfig);
	check(InputSubsystem);

}

void U〇〇InputComponent::RemoveInputMappings(const U〇〇InputConfig* InputConfig, UEnhancedInputLocalPlayerSubsystem* InputSubsystem) const
{
	check(InputConfig);
	check(InputSubsystem);

}

void U〇〇InputComponent::RemoveBinds(TArray<uint32>& BindHandles)
{
	for (uint32 Handle : BindHandles)
	{
		RemoveBindingByHandle(Handle);
	}
	BindHandles.Reset();
}
【〇〇InputComponent.h】
・BindNativeActionというtemplete処理を使って、特定のタグが来たらInputActionデータをバインドする処理を記載しています。
【〇〇InputComponent.cpp】
・こちらでは大きなことはやっていなく、定義している関数のチェック処理をしているだけになります。
・RemoveBindでは紐づけたハンドルを解除する処理が入っています。
◆BP_Playerの継承元になっている「[プロジェクト名] Character」クラスを編集する
ここまで準備ができればあと少し。キャラクターに特定のデータを設定できるように改造し、処理を追記していきます。
※今回はシンプルにやることが目的なので、PlayerController、GameState、PlayerStateなど、基礎のフレームワークに出てくるようなところは使いません。(デフォルトのものを使います)
[プロジェクト名]Characterを開きます。
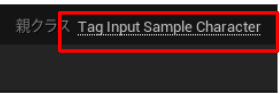
BP_Playerのブループリントを開くと右上に親クラス [プロジェクト名]Characterという記載がある部分があり、名称のところがリンクの様な形になっていると思います。
ここをクリックすることで該当のCharacterのヘッダを開くことができます。
【今回追記すること】
・定義したInputConfigをブループリントから設定できるようにする
・キャラクターのオーバーライドされている「SetupPlayerInputComponent」に入力内容をバインドする
この大きく2点です。
以下のようにコードを書きます。
[コード]〇〇Character.h
#pragma once

#include "CoreMinimal.h"
#include "GameFramework/Character.h"
#include "Logging/LogMacros.h"
#include "TagInputSampleCharacter.generated.h"

class USpringArmComponent;
class UCameraComponent;
class UInputMappingContext;
class UInputAction;
class U〇〇InputConfig; // この辺にInputConfigのclass宣言を入れる
struct FInputActionValue;

DECLARE_LOG_CATEGORY_EXTERN(LogTemplateCharacter, Log, All);

UCLASS(config=Game)
class ATagInputSampleCharacter : public ACharacter, public IAbilitySystemInterface
{
	GENERATED_BODY()

	/** Camera boom positioning the camera behind the character */
	UPROPERTY(VisibleAnywhere, BlueprintReadOnly, Category = Camera, meta = (AllowPrivateAccess = "true"))
	USpringArmComponent* CameraBoom;

	/** Follow camera */
	UPROPERTY(VisibleAnywhere, BlueprintReadOnly, Category = Camera, meta = (AllowPrivateAccess = "true"))
	UCameraComponent* FollowCamera;

	/** MappingContext */
	UPROPERTY(EditAnywhere, BlueprintReadOnly, Category = Input, meta = (AllowPrivateAccess = "true"))
	UInputMappingContext* DefaultMappingContext;

	/** InputConfig  ここにInputConfig型のデータを宣言してブループリントからのアクセスをできるようにする*/
	UPROPERTY(EditAnywhere, BlueprintReadOnly, Category = Input, meta = (AllowPrivateAccess = "true"))
	U〇〇InputConfig* DefaultInputConfig;

public:
	ATagInputSampleCharacter();


	//~AActor interface
	virtual void PreInitializeComponents() override;
	//virtual void BeginPlay() override;
	virtual void EndPlay(const EEndPlayReason::Type EndPlayReason) override;
	virtual void Reset() override;
	virtual void GetLifetimeReplicatedProps(TArray<FLifetimeProperty>& OutLifetimeProps) const override;
	virtual void PreReplication(IRepChangedPropertyTracker& ChangedPropertyTracker) override;
	//~End of AActor interface

	//~APawn interface
	virtual void NotifyControllerChanged() override;
	//~End of APawn interface

protected:

	/** Called for movement input →Move以外の関数は不要なので消しておく*/
	void Move(const FInputActionValue& Value);

protected:

	// APawn interface
	virtual void SetupPlayerInputComponent(class UInputComponent* PlayerInputComponent) override;

	// To add mapping context
	virtual void BeginPlay();

public:
	/** Returns CameraBoom subobject **/
	FORCEINLINE class USpringArmComponent* GetCameraBoom() const { return CameraBoom; }
	/** Returns FollowCamera subobject **/
	FORCEINLINE class UCameraComponent* GetFollowCamera() const { return FollowCamera; }
};
[コード]〇〇Character.cpp
#include "TagInputSampleCharacter.h"
#include "Engine/LocalPlayer.h"
#include "Camera/CameraComponent.h"
#include "Components/CapsuleComponent.h"
#include "GameFramework/CharacterMovementComponent.h"
#include "GameFramework/SpringArmComponent.h"
#include "GameFramework/Controller.h"
#include "EnhancedInputComponent.h"
#include "EnhancedInputSubsystems.h"
#include "InputActionValue.h"

#include "〇〇InputComponent.h" //作成したInputComponent
#include "〇〇GameplayTags.h"   //作成したタグファイル

DEFINE_LOG_CATEGORY(LogTemplateCharacter);

//////////////////////////////////////////////////////////////////////////
// ATagInputSampleCharacter

ATagInputSampleCharacter::ATagInputSampleCharacter()
{
	// Set size for collision capsule
	GetCapsuleComponent()->InitCapsuleSize(42.f, 96.0f);

	// Don't rotate when the controller rotates. Let that just affect the camera.
	bUseControllerRotationPitch = false;
	bUseControllerRotationYaw = false;
	bUseControllerRotationRoll = false;

	// Configure character movement
	GetCharacterMovement()->bOrientRotationToMovement = true; // Character moves in the direction of input...
	GetCharacterMovement()->RotationRate = FRotator(0.0f, 500.0f, 0.0f); // ...at this rotation rate

	// Note: For faster iteration times these variables, and many more, can be tweaked in the Character Blueprint
	// instead of recompiling to adjust them
	GetCharacterMovement()->JumpZVelocity = 700.f;
	GetCharacterMovement()->AirControl = 0.35f;
	GetCharacterMovement()->MaxWalkSpeed = 500.f;
	GetCharacterMovement()->MinAnalogWalkSpeed = 20.f;
	GetCharacterMovement()->BrakingDecelerationWalking = 2000.f;
	GetCharacterMovement()->BrakingDecelerationFalling = 1500.0f;

	// Create a camera boom (pulls in towards the player if there is a collision)
	CameraBoom = CreateDefaultSubobject<USpringArmComponent>(TEXT("CameraBoom"));
	CameraBoom->SetupAttachment(RootComponent);
	CameraBoom->TargetArmLength = 400.0f; // The camera follows at this distance behind the character
	CameraBoom->bUsePawnControlRotation = true; // Rotate the arm based on the controller

	// Create a follow camera
	FollowCamera = CreateDefaultSubobject<UCameraComponent>(TEXT("FollowCamera"));
	FollowCamera->SetupAttachment(CameraBoom, USpringArmComponent::SocketName); // Attach the camera to the end of the boom and let the boom adjust to match the controller orientation
	FollowCamera->bUsePawnControlRotation = false; // Camera does not rotate relative to arm

}

void ATagInputSampleCharacter::BeginPlay()
{
	// Call the base class
	Super::BeginPlay();
}

//////////////////////////////////////////////////////////////////////////
// Input

//ここにデータバインドする処理を諸々入れる
void ATagInputSampleCharacter::SetupPlayerInputComponent(UInputComponent* PlayerInputComponent)
{
	if (APlayerController* PlayerController = Cast<APlayerController>(Controller))
	{
		if (UEnhancedInputLocalPlayerSubsystem* Subsystem = ULocalPlayer::GetSubsystem<UEnhancedInputLocalPlayerSubsystem>(PlayerController->GetLocalPlayer()))
		{
			Subsystem->AddMappingContext(DefaultMappingContext, 0);
			if (U〇〇InputComponent* 〇〇IC = Cast<U〇〇InputComponent>(PlayerInputComponent))
			{
				〇〇IC->AddInputMappings(DefaultInputConfig, Subsystem);

				〇〇IC->BindNativeAction(DefaultInputConfig, 〇〇GameplayTags::InputTag_Move, ETriggerEvent::Triggered, this, &ThisClass::Move, /*bLogIfNotFound=*/ false);
			}
			else
			{
				UE_LOG(LogTemplateCharacter, Error, TEXT("'%s' Failed to find an Enhanced Input component! This template is built to use the Enhanced Input system. If you intend to use the legacy system, then you will need to update this C++ file."), *GetNameSafe(this));
			}
		}
	}
}

//上記でバインドしたMoveに該当する入力が来た時に呼ばれる関数(デリゲード先の
void ATagInputSampleCharacter::Move(const FInputActionValue& Value)
{
	// input is a Vector2D
	FVector2D MovementVector = Value.Get<FVector2D>();

	if (Controller != nullptr)
	{
		// find out which way is forward
		const FRotator Rotation = Controller->GetControlRotation();
		const FRotator YawRotation(0, Rotation.Yaw, 0);

		// get forward vector
		const FVector ForwardDirection = FRotationMatrix(YawRotation).GetUnitAxis(EAxis::X);

		// get right vector
		const FVector RightDirection = FRotationMatrix(YawRotation).GetUnitAxis(EAxis::Y);

		// add movement
		AddMovementInput(ForwardDirection, MovementVector.Y);
		AddMovementInput(RightDirection, MovementVector.X);
	}
}
【〇〇Character.h】
・U〇〇InputConfigのクラスを宣言する
・ブループリントでデータの設定ができるようにUPROPERTYで変数を宣言する
※UPROPERTYについてはここでは言及しません。
【〇〇Character.cpp】
・作成したInputComponentとGameplayTagsを使うのでヘッダを宣言する
・BeginPlayのところにあったUEnhancedInputLocalPlayerSubsystemの読み込み処理を消す(SetupPlayerInputComponentの処理で全部やるため)
・SetupPlayerInputComponentにてSubsystemを使って、ブループリントに設定しているIMCファイルとInputCofigを読み込んで、プレイヤーにバインドする。
ここで先程作成したBindNativeActionを使って、Config情報とタグ情報を入れて紐づける
ここまで作ったらVSCodeにてビルドしておきます。
Unreal Engine5のエディタ側でもコンパイルします。
↓
Unreal Engine5のエディタのBP_Playerを開き以下の設定をします。
・IMC_PlayerDefault →IMC_PlayerDefaultを設定
・Default Input Config →PlayerInputConfigを設定
※他のMoveやLook、Jumpなどは消えていると思います。
すべてが設定された状態で実行をすると・・・
準備編と同じように移動することができるようになります。
色々とやったのに見た目何も変わってないです(汗
特定のInputTagという定義したGameplayTagに紐づいて入力をバインドする処理にしたというのが主なところになります。
この部分だけでは処理自体はブループリントでやったりC++で処理を書いて動かすのと大きな違いはありません。
ただ、次回投稿予定の「GameplayAbilitySystem」を使ったタグとアビリティを紐づける機能を使うと世界が変わります。
それぞれの入力処理を書かなくてもボタンを入力されたときにタグを発行し、そのタグによってアクションが実行される仕組みになるので
設定ファイルにタグとアビリティを設定することで個別に作ったアビリティを実行できるようになります。
次回は「Lyraのアビリティとタグの入力機能の移植」部分をやれればと思います(多分この部分は他サイトでもなかなか記載がないところかと思っています)
この記事が気に入ったらサポートをしてみませんか?