C# WPFで選択した画像を別の領域に転記する方法

1. はじめに
今回は、C#WPFで選択した画像を別の領域に転記する方法をまとめる。
2. 作成済みのプログラム
現状作成済みのプログラムを作成する。現状は、画像を読み込むと、分割して左の画面に表示する。
<Window x:Class="MapEditor.MainWindow"
        xmlns="http://schemas.microsoft.com/winfx/2006/xaml/presentation"
        xmlns:x="http://schemas.microsoft.com/winfx/2006/xaml"
        xmlns:d="http://schemas.microsoft.com/expression/blend/2008"
        xmlns:mc="http://schemas.openxmlformats.org/markup-compatibility/2006"
        xmlns:local="clr-namespace:MapEditor"
        mc:Ignorable="d"
        Title="MainWindow" Height="450" Width="800">
    <Grid>
        <Grid.ColumnDefinitions>
            <ColumnDefinition Width="300"></ColumnDefinition>
            <ColumnDefinition Width="*"></ColumnDefinition>
        </Grid.ColumnDefinitions>

        <Menu Grid.ColumnSpan="2">
            <MenuItem Header="ファイル">
                <MenuItem Header="開く" Click="MenuItem_Click"></MenuItem>
            </MenuItem>
        </Menu>

        <StackPanel Grid.Column="0" Margin="0,15,0,0">
            <Label Content="左側のエリア"></Label>
            <ItemsControl Name="ImageListControl">
                <ItemsControl.ItemsPanel>
                    <ItemsPanelTemplate>
                        <WrapPanel Orientation="Horizontal"></WrapPanel>
                    </ItemsPanelTemplate>
                </ItemsControl.ItemsPanel>
                <ItemsControl.ItemTemplate>
                    <DataTemplate>
                        <Border x:Name="ImageBorder" BorderThickness="0" BorderBrush="Red">
                            <Image Name="LeftImage" Source="{Binding}" Width="32" Height="32" MouseUp="Image_MouseUp"></Image>
                        </Border>
                    </DataTemplate>
                </ItemsControl.ItemTemplate>
            </ItemsControl>
        </StackPanel>
        <StackPanel Grid.Column="1" Margin="0,15,0,0">
            <Label Content="右側のエリア"></Label>
        </StackPanel>
    </Grid>
</Window>
using Microsoft.Win32;
using System.Text;
using System.Windows;
using System.Windows.Controls;
using System.Windows.Data;
using System.Windows.Documents;
using System.Windows.Input;
using System.Windows.Media;
using System.Windows.Media.Imaging;
using System.Windows.Navigation;
using System.Windows.Shapes;
namespace MapEditor
{
public partial class MainWindow : Window
{
private Border _selectedBorder;
public MainWindow()
{
InitializeComponent();
}
private void MenuItem_Click(object sender, RoutedEventArgs e)
{
//ファイルダイアログをオープンする
OpenFileDialog openFileDialog = new OpenFileDialog();
openFileDialog.Filter = "PNG files (*.png)|*.png";
if (openFileDialog.ShowDialog() == true)
{
//PNGファイルを読み込む
BitmapImage bitmap = new BitmapImage();
bitmap.BeginInit();
bitmap.UriSource = new Uri(openFileDialog.FileName);
bitmap.EndInit();
//分割画像のリスト
List<ImageSource> tiles = new List<ImageSource>();
//タイルのサイズを割ってインデックスを算出
int numTilesPerRow = bitmap.PixelWidth / 32;
int numTilesPerColumn = bitmap.PixelHeight / 32;
for (int y = 0; y < numTilesPerColumn; y++)
{
for (int x = 0; x < numTilesPerRow; x++)
{
//32px * 32pxに分割する
CroppedBitmap cb = new CroppedBitmap(bitmap, new Int32Rect(x * 32, y * 32, 32, 32));
//リストに追加する
tiles.Add(cb);
}
}
//画像を表示
ImageListControl.ItemsSource = tiles;
}
}
private void Image_MouseUp(object sender, RoutedEventArgs e)
{
//前回選択された枠をリセット
if (_selectedBorder != null) {
_selectedBorder.BorderThickness = new Thickness(0);
}
//選択した画像の選択済み枠を取得する
var image = sender as Image;
var border = (Border)image.Parent;
//選択済み枠の太さを1に設定する
border.BorderThickness = new Thickness(1);
_selectedBorder = border;
}
}
}3. 分割した画像を別の領域に転記する
今回は、左側に表示している画像を右側に転記する。
3.1 罫線を引く
処理の流れを下記に示す。
(1) <Canvas>で表示領域を作成する。
(2) 四角系を描画し、<Canvas>に貼り付ける。
罫線を引いてみましょう。罫線を引くためには、<Canvas>プロパティを作る。
<Canvas Name="GridCanvas" Background="White"></Canvas><Canvas>を作成し、ここに四角形を記述する。
・Background:表示領域の背景色である。
<Window x:Class="MapEditor.MainWindow"
        xmlns="http://schemas.microsoft.com/winfx/2006/xaml/presentation"
        xmlns:x="http://schemas.microsoft.com/winfx/2006/xaml"
        xmlns:d="http://schemas.microsoft.com/expression/blend/2008"
        xmlns:mc="http://schemas.openxmlformats.org/markup-compatibility/2006"
        xmlns:local="clr-namespace:MapEditor"
        mc:Ignorable="d"
        Title="MainWindow" Height="450" Width="800">
    <Grid>
        <Grid.ColumnDefinitions>
            <ColumnDefinition Width="300"></ColumnDefinition>
            <ColumnDefinition Width="*"></ColumnDefinition>
        </Grid.ColumnDefinitions>

        <Menu Grid.ColumnSpan="2">
            <MenuItem Header="ファイル">
                <MenuItem Header="開く" Click="MenuItem_Click"></MenuItem>
            </MenuItem>
        </Menu>

        <StackPanel Grid.Column="0" Margin="0,15,0,0">
            <Label Content="左側のエリア"></Label>
            <ItemsControl Name="ImageListControl">
                <ItemsControl.ItemsPanel>
                    <ItemsPanelTemplate>
                        <WrapPanel Orientation="Horizontal"></WrapPanel>
                    </ItemsPanelTemplate>
                </ItemsControl.ItemsPanel>
                <ItemsControl.ItemTemplate>
                    <DataTemplate>
                        <Border x:Name="ImageBorder" BorderThickness="0" BorderBrush="Red">
                            <Image Name="LeftImage" Source="{Binding}" Width="32" Height="32" MouseUp="Image_MouseUp"></Image>
                        </Border>
                    </DataTemplate>
                </ItemsControl.ItemTemplate>
            </ItemsControl>
        </StackPanel>
        <StackPanel Grid.Column="1" Margin="0,15,0,0">
            <Label Content="右側のエリア"></Label>
            <Canvas Name="GridCanvas" Background="White"></Canvas>
        </StackPanel>
    </Grid>
</Window>
cs側は、線を引く。線を引くには、Lineクラスを使用する。
・Stroke:色を設定する
・X1:Xの始点
・X2:Xの終点X
・X2:Yの始点
・Y2:Yの終点
・StrokeThickness: 線の太さ
上記から下記に線を引く。
Line verticalLine = new Line
{
    Stroke = Brushes.Black,
    X1 = i * 32,
    Y1 = 0,
    X2 = i * 32,
    Y2 = 32 * 5,
    StrokeThickness = 1
};
今回は、縦、横に5 * 5の罫線を引く。さらに、先ほど作成したXAML側に設定する。よって、プログラムは次のようになる。
        private void DrawGridLines()
        {
            double canvasWidth = 32 * 5;

            for (int i = 0; i <= 5; i++)
            {
                Line verticalLine = new Line
                {
                    Stroke = Brushes.Black,
                    X1 = i * 32,
                    Y1 = 0,
                    X2 = i * 32,
                    Y2 = 32 * 5,
                    StrokeThickness = 1
                };
                GridCanvas.Children.Add(verticalLine);

                // 横線
                Line horizontalLine = new Line
                {
                    Stroke = Brushes.Black,
                    X1 = 0,
                    Y1 = i * 32,
                    X2 = canvasWidth,
                    Y2 = i * 32,
                    StrokeThickness = 1
                };
                GridCanvas.Children.Add(horizontalLine);
            }
        }
最終的な結果は、このようになる。
using Microsoft.Win32;
using System.Text;
using System.Windows;
using System.Windows.Controls;
using System.Windows.Data;
using System.Windows.Documents;
using System.Windows.Input;
using System.Windows.Media;
using System.Windows.Media.Imaging;
using System.Windows.Navigation;
using System.Windows.Shapes;

namespace MapEditor
{
    public partial class MainWindow : Window
    {
        private Border _selectedBorder;

        public MainWindow()
        {
            InitializeComponent();
            DrawGridLines();
        }
        private void MenuItem_Click(object sender, RoutedEventArgs e)
        {
            //ファイルダイアログをオープンする
            OpenFileDialog openFileDialog = new OpenFileDialog();
            openFileDialog.Filter = "PNG files (*.png)|*.png";
            if (openFileDialog.ShowDialog() == true)
            {
                //PNGファイルを読み込む
                BitmapImage bitmap = new BitmapImage();
                bitmap.BeginInit();
                bitmap.UriSource = new Uri(openFileDialog.FileName);
                bitmap.EndInit();

                //分割画像のリスト
                List<ImageSource> tiles = new List<ImageSource>();

                //タイルのサイズを割ってインデックスを算出
                int numTilesPerRow = bitmap.PixelWidth / 32;
                int numTilesPerColumn = bitmap.PixelHeight / 32;

                for (int y = 0; y < numTilesPerColumn; y++)
                {
                    for (int x = 0; x < numTilesPerRow; x++)
                    {
                        //32px * 32pxに分割する
                        CroppedBitmap cb = new CroppedBitmap(bitmap, new Int32Rect(x * 32, y * 32, 32, 32));

                        //リストに追加する
                        tiles.Add(cb);
                    }
                }
                //画像を表示
                ImageListControl.ItemsSource = tiles;
            }
        }
        private void Image_MouseUp(object sender, RoutedEventArgs e)
        {
            //前回選択された枠をリセット
            if (_selectedBorder != null) {
                _selectedBorder.BorderThickness = new Thickness(0);
            }
            //選択した画像の選択済み枠を取得する
            var image = sender as Image;
            var border = (Border)image.Parent;

            //選択済み枠の太さを1に設定する
            border.BorderThickness = new Thickness(1);
            _selectedBorder = border;
        }

        private void DrawGridLines()
        {
            double canvasWidth = 32 * 5;

            for (int i = 0; i <= 5; i++)
            {
                Line verticalLine = new Line
                {
                    Stroke = Brushes.Black,
                    X1 = i * 32,
                    Y1 = 0,
                    X2 = i * 32,
                    Y2 = 32 * 5,
                    StrokeThickness = 1
                };
                GridCanvas.Children.Add(verticalLine);

                // 横線
                Line horizontalLine = new Line
                {
                    Stroke = Brushes.Black,
                    X1 = 0,
                    Y1 = i * 32,
                    X2 = canvasWidth,
                    Y2 = i * 32,
                    StrokeThickness = 1
                };
                GridCanvas.Children.Add(horizontalLine);
            }
        }
    }
}
実行すると、下記のように罫線が表示されることがわかる。
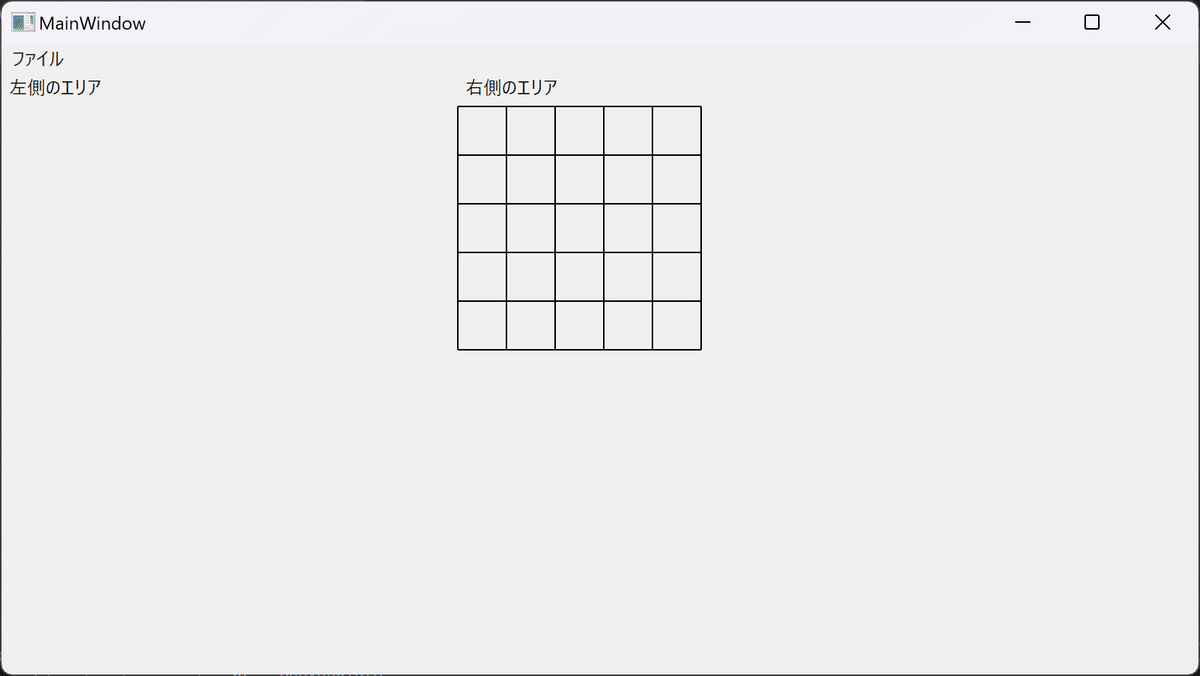
5 * 5の罫線が引かれていることがわかる。
3.2 罫線に画像を転記する
次に、罫線に画像を転記する。
(1) 画像を読み込ませる。
(2) 左側のエリアにある画像を選択した状態で、右側のエリアの罫線をクリックする。
(3) クリックすると、選択マスにに画像を転記する。
具体的な処理の流れは、下記である。
(1) クリックした画像の位置(X、Y)を取得する。
(2) クリックした位置の画像を設定する。
(3) 画像を右側のエリアに設定する。
XAML側には、MouseUpイベントを追加する。
<StackPanel Grid.Column="1" Margin="0,15,0,0">
    <Label Content="右側のエリア"></Label>
    <Canvas Name="GridCanvas" Background="White" Width="300" Height="300"  MouseUp="GridCanvas_MouseUp"></Canvas>
</StackPanel>
cs側には、選択画像を保持する。
private void Image_MouseUp(object sender, RoutedEventArgs e)
{
    //前回選択された枠をリセット
    if (_selectedBorder != null) {
        _selectedBorder.BorderThickness = new Thickness(0);
    }
    //選択した画像の選択済み枠を取得する
    var image = sender as Image;
    var border = (Border)image.Parent;

    //選択済み枠の太さを1に設定する
    border.BorderThickness = new Thickness(1);
    _selectedBorder = border;

    // 選択したタイルを更新
    _selectedTile = image.Source;
}
保持した画像を右側のエリアに表示する。その際は、選択位置のインデックスを取得し、貼り付ける。
        private void GridCanvas_MouseUp(object sender, MouseButtonEventArgs e)
        {
            if (_selectedTile == null) return;

            var position = e.GetPosition(GridCanvas);
            int gridX = (int)position.X / 32 * 32;
            int gridY = (int)position.Y / 32 * 32;

            Image tileImage = new Image
            {
                Width = 32,
                Height = 32,
                Source = _selectedTile
            };
            Canvas.SetLeft(tileImage, gridX);
            Canvas.SetTop(tileImage, gridY);
            GridCanvas.Children.Add(tileImage);
        }
3.3 最終的なコード
3.3.1 XAML
最終的なXAMLを下記に示す。
<Window x:Class="MapEditor.MainWindow"
        xmlns="http://schemas.microsoft.com/winfx/2006/xaml/presentation"
        xmlns:x="http://schemas.microsoft.com/winfx/2006/xaml"
        xmlns:d="http://schemas.microsoft.com/expression/blend/2008"
        xmlns:mc="http://schemas.openxmlformats.org/markup-compatibility/2006"
        xmlns:local="clr-namespace:MapEditor"
        mc:Ignorable="d"
        Title="MainWindow" Height="450" Width="800">
    <Grid>
        <Grid.ColumnDefinitions>
            <ColumnDefinition Width="300"></ColumnDefinition>
            <ColumnDefinition Width="*"></ColumnDefinition>
        </Grid.ColumnDefinitions>

        <Menu Grid.ColumnSpan="2">
            <MenuItem Header="ファイル">
                <MenuItem Header="開く" Click="MenuItem_Click"></MenuItem>
            </MenuItem>
        </Menu>

        <StackPanel Grid.Column="0" Margin="0,15,0,0">
            <Label Content="左側のエリア"></Label>
            <ItemsControl Name="ImageListControl">
                <ItemsControl.ItemsPanel>
                    <ItemsPanelTemplate>
                        <WrapPanel Orientation="Horizontal"></WrapPanel>
                    </ItemsPanelTemplate>
                </ItemsControl.ItemsPanel>
                <ItemsControl.ItemTemplate>
                    <DataTemplate>
                        <Border x:Name="ImageBorder" BorderThickness="0" BorderBrush="Red">
                            <Image Name="LeftImage" Source="{Binding}" Width="32" Height="32" MouseUp="Image_MouseUp"></Image>
                        </Border>
                    </DataTemplate>
                </ItemsControl.ItemTemplate>
            </ItemsControl>
        </StackPanel>
        <StackPanel Grid.Column="1" Margin="0,15,0,0">
            <Label Content="右側のエリア"></Label>
            <Canvas Name="GridCanvas" Background="White" Width="300" Height="300"  MouseUp="GridCanvas_MouseUp"></Canvas>
        </StackPanel>
    </Grid>
</Window>
3.3.2 cs側
cs側のコードは下記となった。
using Microsoft.Win32;
using System.Text;
using System.Windows;
using System.Windows.Controls;
using System.Windows.Data;
using System.Windows.Documents;
using System.Windows.Input;
using System.Windows.Media;
using System.Windows.Media.Imaging;
using System.Windows.Navigation;
using System.Windows.Shapes;

namespace MapEditor
{
    public partial class MainWindow : Window
    {
        private Border _selectedBorder;
        private ImageSource _selectedTile;

        public MainWindow()
        {
            InitializeComponent();
            DrawGridLines();
        }
        private void MenuItem_Click(object sender, RoutedEventArgs e)
        {
            //ファイルダイアログをオープンする
            OpenFileDialog openFileDialog = new OpenFileDialog();
            openFileDialog.Filter = "PNG files (*.png)|*.png";
            if (openFileDialog.ShowDialog() == true)
            {
                //PNGファイルを読み込む
                BitmapImage bitmap = new BitmapImage();
                bitmap.BeginInit();
                bitmap.UriSource = new Uri(openFileDialog.FileName);
                bitmap.EndInit();

                //分割画像のリスト
                List<ImageSource> tiles = new List<ImageSource>();

                //タイルのサイズを割ってインデックスを算出
                int numTilesPerRow = bitmap.PixelWidth / 32;
                int numTilesPerColumn = bitmap.PixelHeight / 32;

                for (int y = 0; y < numTilesPerColumn; y++)
                {
                    for (int x = 0; x < numTilesPerRow; x++)
                    {
                        //32px * 32pxに分割する
                        CroppedBitmap cb = new CroppedBitmap(bitmap, new Int32Rect(x * 32, y * 32, 32, 32));

                        //リストに追加する
                        tiles.Add(cb);
                    }
                }
                //画像を表示
                ImageListControl.ItemsSource = tiles;
            }
        }
        private void Image_MouseUp(object sender, RoutedEventArgs e)
        {
            //前回選択された枠をリセット
            if (_selectedBorder != null) {
                _selectedBorder.BorderThickness = new Thickness(0);
            }
            //選択した画像の選択済み枠を取得する
            var image = sender as Image;
            var border = (Border)image.Parent;

            //選択済み枠の太さを1に設定する
            border.BorderThickness = new Thickness(1);
            _selectedBorder = border;

            // 選択したタイルを更新
            _selectedTile = image.Source;
        }
        private void GridCanvas_MouseUp(object sender, MouseButtonEventArgs e)
        {
            if (_selectedTile == null) return;

            var position = e.GetPosition(GridCanvas);
            int gridX = (int)position.X / 32 * 32;
            int gridY = (int)position.Y / 32 * 32;

            Image tileImage = new Image
            {
                Width = 32,
                Height = 32,
                Source = _selectedTile
            };
            Canvas.SetLeft(tileImage, gridX);
            Canvas.SetTop(tileImage, gridY);
            GridCanvas.Children.Add(tileImage);
        }
        private void DrawGridLines()
        {
            double canvasWidth = 32 * 5;

            for (int i = 0; i <= 5; i++)
            {
                //縦線
                Line verticalLine = new Line
                {
                    Stroke = Brushes.Black,
                    X1 = i * 32,
                    Y1 = 0,
                    X2 = i * 32,
                    Y2 = 32 * 5,
                    StrokeThickness = 1
                };
                GridCanvas.Children.Add(verticalLine);

                // 横線
                Line horizontalLine = new Line
                {
                    Stroke = Brushes.Black,
                    X1 = 0,
                    Y1 = i * 32,
                    X2 = canvasWidth,
                    Y2 = i * 32,
                    StrokeThickness = 1
                };
                GridCanvas.Children.Add(horizontalLine);
            }
        }
    }
}
4. 実行結果
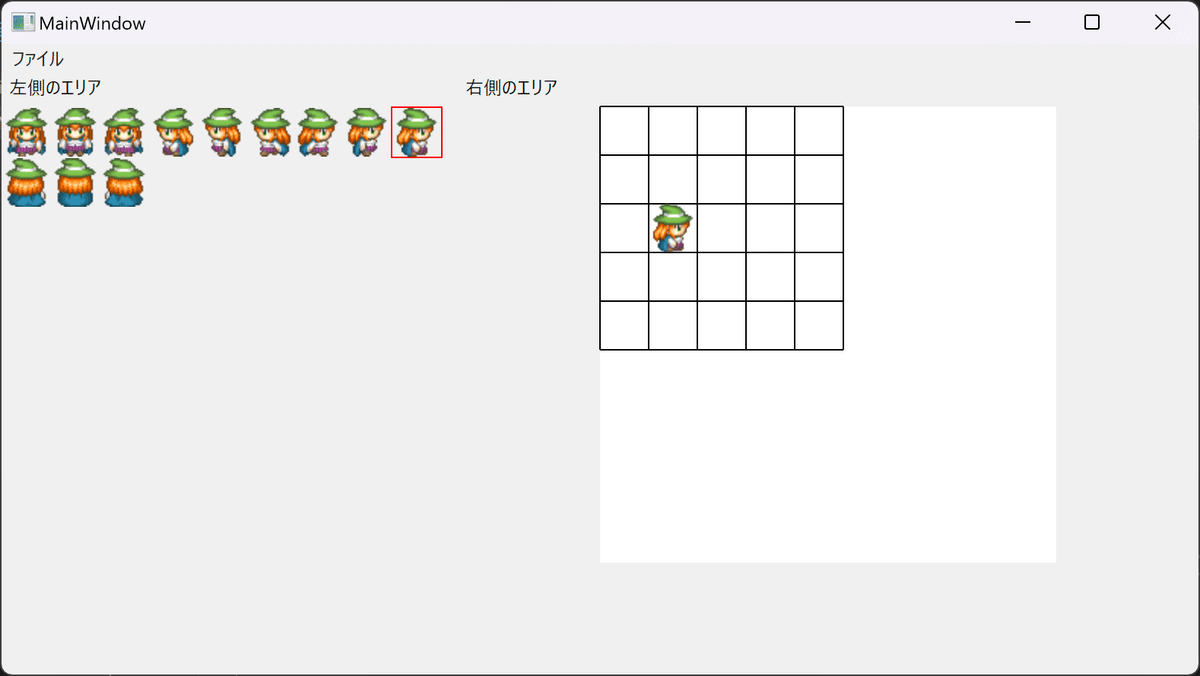
実行結果を確認する。左側のエリアの分割画像を選択し、右側のエリアの罫線内を選択すると画像が転記できることがわかる。
この記事が気に入ったらサポートをしてみませんか?