
2自由度のロボットアームの動き

google colabによるpythonプログラミングに慣れることも考えて、計算しました。プログラミングにあたりchatGPTの支援を受けながら作成をしました。
1.今回の計算例
2自由度のロボットアームの座標を計算する。
<条件>
腕1の長さ:1、腕2の長さ:2
腕1の角度:30°、腕2の長さ:45°
<座標値>
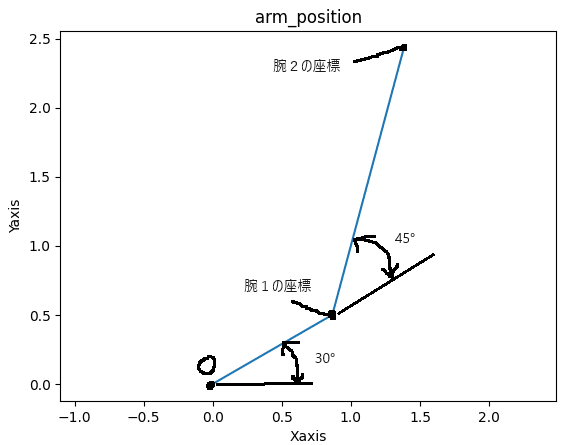
腕1先端の座標(0.866,0.5)
腕2先端の座標(1.383,2.432)
これらは三角関数の計算でできます。
腕1の場合
腕1のX座標 = 1*cos(30°)
腕1のY座標 = 1*sin(30°)
腕2の場合、
腕2のX座標 = 腕1のX座標+2*cos(75°)
腕2のX座標 = 腕1のX座標+2*sin(75°)
で計算ができます。
2.google colabによるプログラミング
2.1 同次変換行列による計算
同時変換行列は、ある座標からの移動と原点からの計算を行列の積で計算ができます。この考え方を用いて、計算をおこないました。
今回の問題の場合は、2次元で済むのですが、ロボットアームの座標を計算する場合は、3次元で計算しておくと作ったコードが流用しやすいので3次元で作成を行いました。
2.1.1 作成したコード
ソースコードは、chatgptで作成を行いました。TransformationMatrixというクラス定義をしたものがつくられたため、一部コードを修正しました。
rotete_xは任意の角度を入れると、X軸周りに回転します。
rotete_yは任意の角度を入れると、Y軸周りに回転します。
rotete_zは任意の角度を入れると、Z軸周りに回転します。
translateは、任意のX,Y,Zの値を入れると、この値分だけ移動をします。
「#使用例」はコードの動きを実際にテストしています。
import numpy as np

class TransformationMatrix:
    def __init__(self):
        # 初期化メソッドで単位行列を作成
        self.matrix = np.eye(4)

    def rotate_x(self, theta_deg):
        theta = np.radians(theta_deg)
        rotation_matrix = np.array([
            [1, 0, 0, 0],
            [0, np.cos(theta), -np.sin(theta), 0],
            [0, np.sin(theta), np.cos(theta), 0],
            [0, 0, 0, 1]
        ])
        self.matrix = np.dot(self.matrix, rotation_matrix)

    def rotate_y(self, theta_deg):
        theta = np.radians(theta_deg)
        rotation_matrix = np.array([
            [np.cos(theta), 0, np.sin(theta), 0],
            [0, 1, 0, 0],
            [-np.sin(theta), 0, np.cos(theta), 0],
            [0, 0, 0, 1]
        ])
        self.matrix = np.dot(self.matrix, rotation_matrix)
    # Z軸回転
    def rotate_z(self, theta_deg):
        theta = np.radians(theta_deg)
        translation_matrix= np.array([
            [np.cos(theta), -np.sin(theta), 0, 0],
            [np.sin(theta), np.cos(theta), 0, 0],
            [0, 0, 1, 0],
            [0, 0, 0, 1]
        ])
        self.matrix = np.dot(self.matrix, translation_matrix)

    def translate(self, dxdydz):
        translation_matrix = np.array([
            [1, 0, 0, dxdydz[0]],
            [0, 1, 0, dxdydz[1]],
            [0, 0, 1, dxdydz[2]],
            [0, 0, 0, 1]
        ])
        self.matrix = np.dot(self.matrix, translation_matrix)

    def reset(self):
        # 行列を単位行列に戻す(初期化する)
        self.matrix = np.eye(4)

    def transform_point(self, point):
        # 与えられた点を変換し、変換後の座標を返す
        point = np.append(point,1) #配列を追加
        transformed_point = np.dot(self.matrix,point)  # 転置行列を使用
        return transformed_point[:3]  # 最後の要素(1)は無視して、前の3つを返す

    def get_matrix(self):
        return self.matrix

# 使用例
deg1 = 30 #腕1の回転角度
deg2 = 45 #腕2の回転角度
zeropoint = [0, 0, 0]
arm1 = [1,0,0] #腕1の長さ(x,y,z方向)
arm2 = [2,0,0] #腕2の長さ(x,y,z方向)

translate = TransformationMatrix()
print(f"初期化後配列",translate.get_matrix())
translate.rotate_z(Jdeg1)
print(f"配列回転",translate.get_matrix())
translate.reset()
print(f"配列回転",translate.get_matrix())
translate.translate([1,1,1])
print(f"配列移動",translate.get_matrix())
translate.reset()

#腕1の計算
translate.reset()
point1 = translate.transform_point(arm1)#移動
print("移動後腕1",point1)
translate.reset()
translate.rotate_z(Jdeg1)
point1 =translate.transform_point(point1)
print("回転後腕1",point1)

#腕2の計算
translate.reset()
move = translate.transform_point(arm2)#移動
translate.reset()
translate.rotate_z(deg1+deg2)
move =translate.transform_point(move)
print("腕2の動き",move)
point2 =point1+move
print("回転後腕2",point2)
2.1.2 作成したコードの確認
初期化後の配列は、4x4の単位行列が出力されています。
配列回転は、30°の回転を入れているのでcos(30)=0.866,sin(30)=0.5として計算しています。
配列移動は、X方向のみ1の移動をいれているのでこの座標です。
初期化後配列 [[1. 0. 0. 0.]
[0. 1. 0. 0.]
[0. 0. 1. 0.]
[0. 0. 0. 1.]]
配列回転 [[ 0.8660254 -0.5 0. 0. ]
[ 0.5 0.8660254 0. 0. ]
[ 0. 0. 1. 0. ]
[ 0. 0. 0. 1. ]]
配列回転 [[1. 0. 0. 0.]
[0. 1. 0. 0.]
[0. 0. 1. 0.]
[0. 0. 0. 1.]]
配列移動 [[1. 0. 0. 1.]
[0. 1. 0. 1.]
[0. 0. 1. 1.]
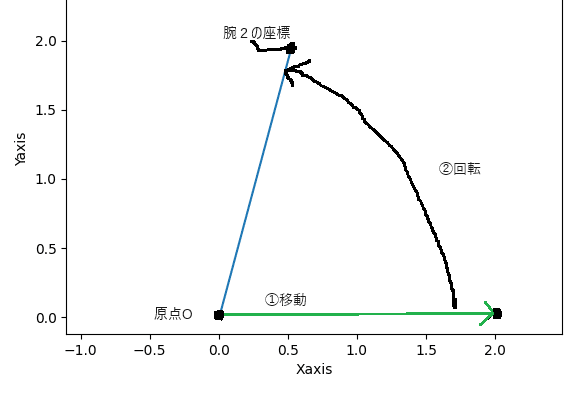
[0. 0. 0. 1.]]腕1の動きを計算します。
移動後腕1 [1. 0. 0.]
回転後腕1 [0.8660254 0.5       0.       ]
腕2の動き [0.51763809 1.93185165 0.        ]
回転後腕2 [1.38366349 2.43185165 0.        ]
腕1の座標を移動させてから回転をさせます。
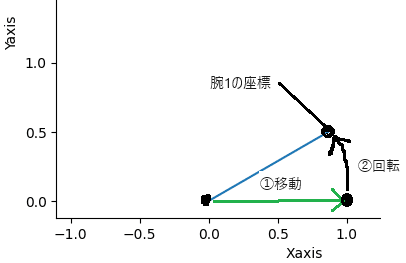
腕2の計算は、腕1の座標を原点Oとして腕2の座標の動きを計算してから、
腕1の座標を加算します。この計算概念図は、腕2の動きです。
この時に注意が必要なのは、角度が腕1の回転角度+腕2の回転角度になっていることです。そのため、回転行列には75°を入力しています。
腕2の座標は、回転後腕2の結果です。
2.2 同次変換行列のソースコード化+グラフ表示
2.1で見せたように行数が長くなることから、計算するものは小分けにしながらプログラミングをしていくと、小分けにしたものは再利用可能ですし、プログラムの計算が楽になります。
「class TransformationMatrix:」部分をpythonのスプリクトファイル(douji.py)にて保存してから、計算をおこないグラフにしました。
計算の手順
1.指定したgoogledriveへの接続
2.ライブラリ類のインポート
3.ロボットアームの座標計算
4.グラフ出力(アームの可視化)
#1.初期化
from google.colab import drive
drive.mount('/content/drive')
#2.ライブラリ類のインポート
import os
import matplotlib.pyplot as plt
import numpy as np
os.getcwd()#現在のディレクトリの設定
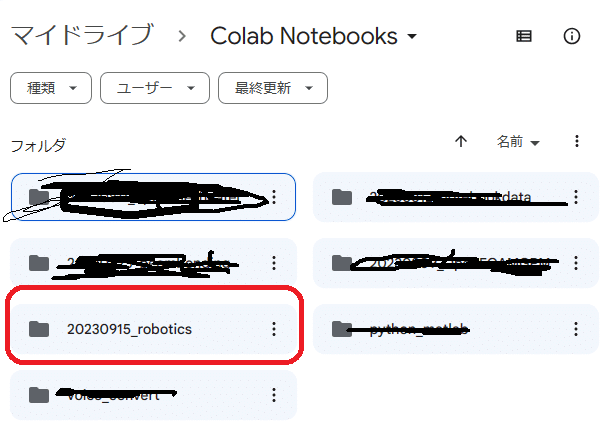
os.chdir('/content/drive/MyDrive/Colab Notebooks/20230915_robotics') #現在のディレクトリの設定
import douji #同時行列のインポートos.chdirは、pythonスプリクトでのパスを指しており、googledriveの舞ドライブ直下に、ColabNotebookというフォルダを作ります。
その下に20230915_roboticsというフォルダをつくり、pythonプログラムやnotebook経由で呼び出せるようにしました。
douji.pyをこのフォルダ内に保存すると、import doujiで「class TransformationMatrix:」のクラスを呼び出せます。
#3.ロボットアームの座標計算
# 使用例
deg1 = 30
deg2 = 45
zeropoint = [0, 0, 0]
arm1 = [1,0,0]
arm2 = [2,0,0]

#腕1の計算
translate = douji.TransformationMatrix()
translate.reset()
point1 = translate.transform_point(arm1)#移動
print("移動後腕1",point1)
translate.reset()
translate.rotate_z(deg1)
point1 =translate.transform_point(point1)
print("回転後腕1",point1)

#腕2の計算
translate.reset()
move = translate.transform_point(arm2)#移動
translate.reset()
translate.rotate_z(deg1+deg2)
move =translate.transform_point(move)
print("腕2の動き",move)
point2 =point1+move
print("回転後腕2",point2)
#4.グラフ出力(データ前処理)
link = np.vstack(([0,0,0],point1,point2))
print(link)
linkplot = np.delete(link,[2],axis=1)
print(linkplot)#4.グラフ出力(データ前処理)グラフ表示
# データをプロット
plt.plot(linkplot[:,0], linkplot[:,1])
# ラベルとタイトルを追加
plt.xlabel("Xaxis")
plt.ylabel('Yaxis')
plt.title('arm_position')
# 軸の範囲を設定
plt.xlim([0, 3])
# プロットエリアを正方形に
plt.axis('equal')
# グラフを表示
plt.show()
<グラフ出力結果>
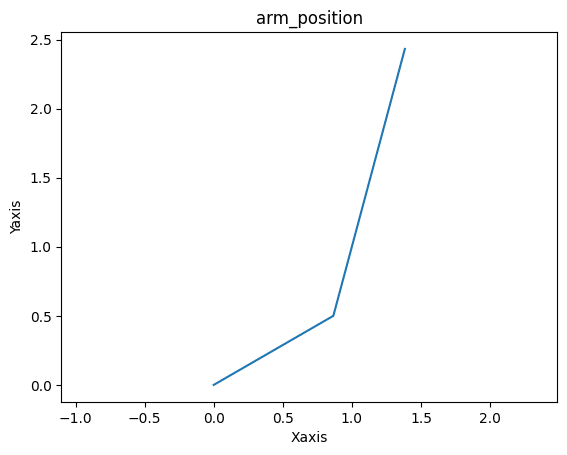
3.まとめ
同時変換行列を使用した2自由度のロボットアームにおける各腕の先端座標を計算しました。
googledriveを接続することで、スプリクトをインポートできることから、csvファイルの入出力できるため、データの入出力も読み込みが可能です。
ソフトウェアエンジニアでなければ、googleアカウントをお持ちであれば、既に環境設定済みであるgooglecolabを活用するのがよいと考えます。
google colabで動かすスプリクトは、jupyter notebookやjupyterlabで使うノートブックと同じファイル形式のため、本格的に使うようになったら、これらに移行ができます。
ChatGPTがあると、1からプログラムコードを書かなくともよいので、日常的にプログラムを書かない人間としてはプログラム作成の支援に有効です。
この記事が気に入ったらサポートをしてみませんか?