
画像生成AIにおけるClip Skip値の優位性

はじめに
皆さん、Clip Skipの値を気に留めたことはありますか?
画像生成AIには、Clip Skipという項目を目にしたことがある方が多いと思いますが、正直何のことかよくわかっていない方も多いと思います。
そこで、今回はClip Skipに関する内容を、紐解いていってみようと思います。
Clip Skipとは
This is a slider in settings, and it controls how early the processing of prompt by CLIP network should be stopped.
A more detailed explanation:
CLIP is a very advanced neural network that transforms your prompt text into a numerical representation. Neural networks work very well with this numerical representation and that's why devs of SD chose CLIP as one of 3 models involved in stable diffusion's method of producing images. As CLIP is a neural network, it means that it has a lot of layers. Your prompt is digitized in a simple way, and then fed through layers. You get numerical representation of the prompt after the 1st layer, you feed that into the second layer, you feed the result of that into third, etc, until you get to the last layer, and that's the output of CLIP that is used in stable diffusion. This is the slider value of 1. But you can stop early, and use the output of the next to last layer - that's slider value of 2. The earlier you stop, the less layers of neural network have worked on the prompt.
Some models were trained with this kind of tweak, so setting this value helps produce better results on those models.
https://github.com/AUTOMATIC1111/stable-diffusion-webui/wiki/Features#clip-skip
Using Hidden States of CLIP’s Penultimate Layer
Stable Diffusion uses the final hidden states of CLIP’s transformer-based text encoder to guide generations using classifier free guidance.
In Imagen (Saharia et al., 2022), instead of the final layer’s hidden states, the penultimate layer’s hidden states are used for guidance.
Discussions on the EleutherAI Discord also indicated, that the penultimate layer might give superior results for guidance, as the hidden state values change abruptly in the last layer, which prepares them for being condensed into a smaller vector usually used for CLIP based similarity search.
During experimentation, we found that Stable Diffusion is able to interpret the hidden states from the penultimate layer, as long as the final layer norm of CLIP’s text transformer is applied, and generate images that still match the prompt, although with slightly reduced accuracy.
Further testing led us to perform our training with the penultimate layer’s hidden states rather than the final layer’s because we found it let the model make better use of the dense information in tag based prompts, allowing the model to more quickly learn how to disentangle certain concepts. For example, when using the final layer, the model had more difficulties disentangling disparate concepts and, for example, correctly assigning colors.
“Hatsune Miku, Red Dress”
During the experimentation phase, we evaluated training runs with different parameters on different prompts like “Hatsune Miku, Red Dress”, which tended to have the red of the dress leak into Miku’s hair and eye color until a certain point in training, especially when using the final layer’s hidden states. We also used other more complex prompts to evaluate the ability of different training runs to combine tagged concepts accurately, such as:
Tags: purple eyes, 1girl, short hair, smile, open mouth, ruffled blouse, red blouse, pleated skirt, blonde hair, green scarf, waving at viewer
Generation with NovelAI Diffusion (Curated), our anime model for “Tags: purple eyes, 1girl, short hair, smile, open mouth, ruffled blouse, red blouse, pleated skirt, blonde hair, green scarf, waving at viewer”
https://blog.novelai.net/novelai-improvements-on-stable-diffusion-e10d38db82ac
※2023.05.03 引用元の内容に誤りがあった為、引用元を変更しています。
と、ズラッと英語が並んでいてぱっと見、何のことかわからないと思いますので、要点だけを纏めて説明します。
Clip Skipの要約
上記の説明を纏めて、要点を図解しています。

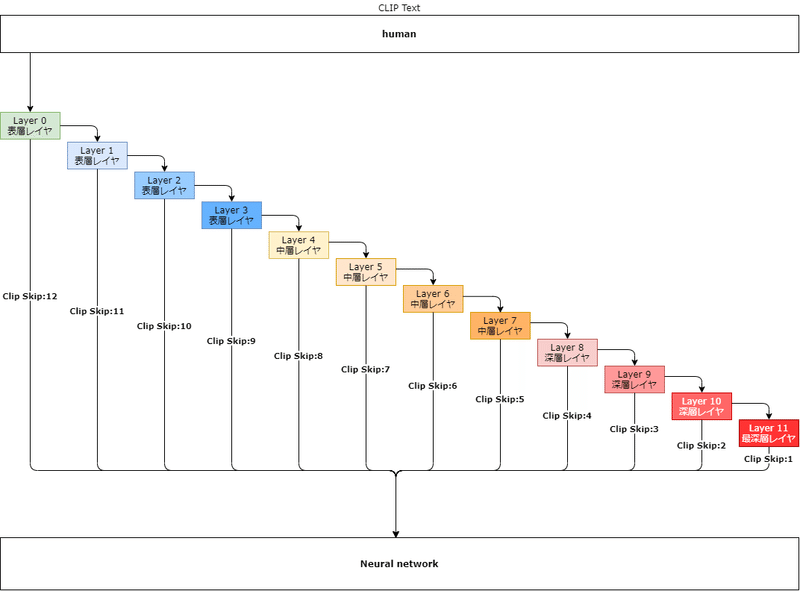
※2023.05.03 引用元の内容に誤りがあった為、図を修正しています。
この図では、引用元の文章に習い、CLIP Textが「human」+Clip Skip:2であった場合、どのような挙動をするか図解しています。
実際、ニューラルネットワークでは、「human」という文字列をそのまま受け取ることはできません。
CLIP Textで言語化された文字列を用いて、数値化(Text-EncodingによるToken化)し、ニューラルネットワークへ引き渡しています。
この数値化された情報をどのレイヤでストップさせ、ニューラルネットワークへ引き渡すかを定めるのが「Clip Skip」です。
上図から想像付くと思いますが、参照レイヤの深度が浅い段階でスキップされると、引き渡す情報量も少なくなり、結果的に不正確な情報ノイズとして生成される画像に影響を及ぼすこととなります。
Clip Skipの影響度
実際にClip Skip値を設定し、画像を生成してみましょう。
ちょっとClip Skip値の変化で、どれだけ変化量に対する優位性が見られるか検証してみました!😇
— とーふのかけら (@konapieces) April 23, 2023
画像を見てもらえば分かりますが、数値が1上がるだけで、構図自体も変化しているのが分かります🤔
当たり前ですが、同呪文、同Seedです🥹#AIイラスト #AI術師さんと繋がりたい #stablediffusion pic.twitter.com/oVoidZsa7I
画像生成プロンプトと各設定値は以下で固定。
best quality,masterpiece,illustration,beautiful detailed glow,textile shading,absurdres,highres,dynamic lighting,intricate detailed,beautiful eyes,
BREAK,
[backlighting],face lighting,(pov:1.3),
BREAK,
(1 girl, solo:1.5),asymmetric bang,black hair,(smile),(jeans pants and shirts)
Steps: 30
Sampler: DPM++ 2M Karras
CFG scale: 11
Seed: 2881122569
Denoising strength: 0.5
Clip skip: 1 to 12
Hires upscale: 2
Hires steps: 40
Hires upscaler: None

上図を見てもらうと分かる通り、大幅な変化が見て取れます。
構図自体の変遷としては、Clip Skip:5を超えたあたりから、大部分の構図が一定になるものの、画像の鮮明度としては非常に悪いものになっています。
これは、参照レイヤの深度が浅く、引き渡す情報量が少なくなり、正しい言語変換が出来ずに、不正確な情報がノイズとなり、それが引き渡された影響と判断できるでしょう。
Clip SkipとCFG Scaleの関係
生成画像に大きく関わってくる要素として、CFG Scaleと呼ばれるものがあります。
これは、恐らく皆さんもご存じと思われるので、説明については割愛させて頂きます。
では、Clip SkipとCFG Scaleで相互作用はあるのかを紐解いていきましょう。
CFG ScaleとClip Skipの変化量に対して、どのような関係性がみられるか検証してみました🥰
— とーふのかけら (@konapieces) April 24, 2023
とりあえず、考察は次に回すとして、画像をぺたり。
画像めっちゃでかいから気を付けてね!
次!🥺#AIイラスト #AI術師さんと繋がりたい #stablediffusion pic.twitter.com/Q8XOwaeqRE

上図を見てもらうと分かる通り、構図の大きな変化はなく、Clip Skip値に沿った画像内で軽微な変化のみ見て取れます。
従って、Clip SkipとCFG Scaleに相互作用はなく、全くの別物と思っても良いと思います。
Clip Skipの使い道
ここまで見ると、勘の良い人なら、ある程度Clip Skipの使い道が見えてくるのではないでしょうか。
ここでは、筆者がClip Skipを実際に使用してる手法をお伝えしようと思います。
Text 2 Image+Seed値固定+Clip Skip変更
t2iで好きな構図を出す
Seed値を確定させる
Clip Skipを変化させ生成する
構図に対する影響度は「高」
ニッチな用途だが、あと少しの変化が欲しいというときに利用しています。
Image 2 Image+Seed値固定+Clip Skip変更
t2iで好きな構図を出す
Seed値を確定させる
i2iにてClip Skipを変化させ生成する
構図に対する影響度は「低」
i2i+Clip Skip変更は、思ったよりも大きな構図変化が見られません。
それは、i2iの特性上、画像データの情報が優位的に働いているためです。
構図に変化を加えたくないが、細部の変化が欲しいというときに利用しています。
Clip Skipに関するライフハック
AUTOMATIC1111 WebUIだと、Clip Skipの設定箇所が設定タブでしか変更できません。
その為、設定項目をCheckpointなどがあるUIヘッダ部分へ移動してしまいましょう。
設定は、[設定]タブ -> [ユーザーインターフェース]項目 -> [クイック設定]から行えます。

上図では、
Checkpoint
VAE
Clip Skip
の設定をUIヘッダ部へ表示するようにしています。
クイック設定欄に以下を入力して、[設定を適用]してみましょう。
sd_model_checkpoint,sd_vae,CLIP_stop_at_last_layers設定適用後、UIを再度読み込めば…

このように表示することができました。
おまけで、VAEもよく使う項目なので、追加しています。
おわりに
今回はClip Skipに関するお話をしました!
ちょっと堅苦しい内容になりましたけど、Clip Skipに関して詳しく取り上げてる記事が少ないので、少し踏み込んで解説しました。
皆さんもClip Skip使ってみてはいかがですか?
よろしければサポートお願いします!✨ 頂いたサポート費用は活動費(電気代や設備費用)に使わさせて頂きます!✨