VRC Style Menu 導入ガイド/Setup Instructions/설정 지침

【重要】VRC Style Menuをセットアップする前に、必ずアバターのすべてのWrite Defaultsをオフにしてください。一つでもオンになっている場合、VRC Style Menuは動作しない場合があります。詳しくは以下のリンクをご覧ください。
また、作業前にプロジェクトのバックアップを取ることをお勧めします。
【Important】Before installing VRC Style Menu, be sure to turn off all Write Defaults in your avatar. If even one of them is turned on, VRC Style Menu may not work. Please see the following link for more information.
I would also suggest to you to make a backup of your project before working on it.
【중요】VRCStyleMenu를 설치하기 전에 아바타의 모든 WriteDefaults를 꺼야 합니다. 둘 중 하나라도 켜져 있으면 VRC 스타일 메뉴가 작동하지 않습니다. 자세한 내용은 다음 링크를 참조하십시오.
또한 작업하기 전에 프로젝트를 백업하는 것이 좋습니다.
STEP.0
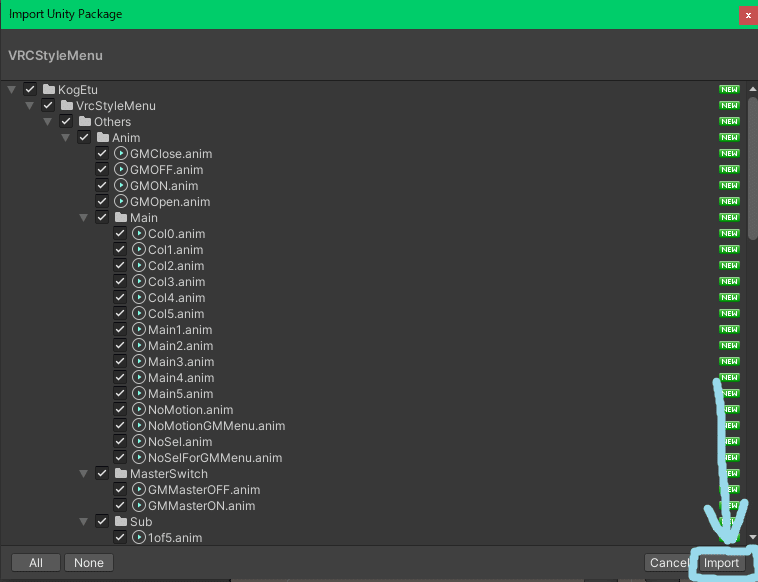
VRC Style Menuをインポートする前に、以下をインポートしてください。
このガイドでは、VRCSDK 2022.08.29.20.48で解説しています。旧バージョンではUIが異なる場合があります。
Before importing the VRC Style Menu, please import the following This guide is explained in VRCSDK 2022.08.29.20.48. Older versions may have a different UI.
VRC Style Menu를 가져오기 전에 다음을 가져오십시오. 이 가이드는 VRCSDK 2022.08.29.20.48에 설명되어 있습니다. 이전 버전은 다른 UI를 가질 수 있습니다.
1.VRCSDK
2.Liltoon
3.VRCAvatarFXControllerIntegration
4.VRC Avatar Parameters Integration
STEP.1
VRCStyleMenuをダウンロードして、Unityにインポートしてください。
最新版はVRCStyleMenu1_0_1です。
Download the VRC Style Menu and import it into Unity.
The latest version is VRCStyleMenu1_0_1.
VRC Style Menu를 다운로드하고 Unity로 가져옵니다.
최신 버전은 VRCStyleMenu1_0_1입니다.
https://kogetu.booth.pm/items/4189278
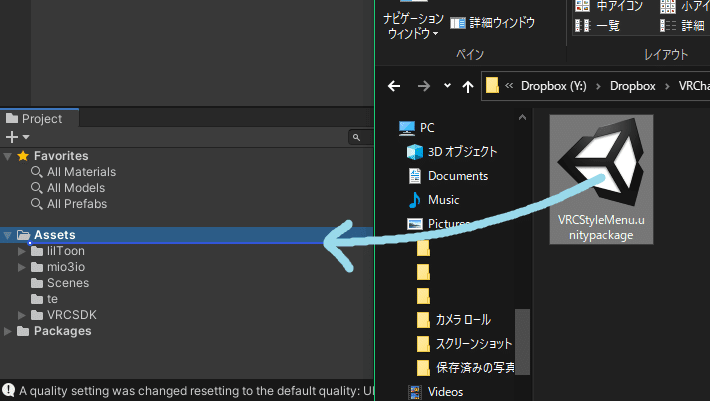
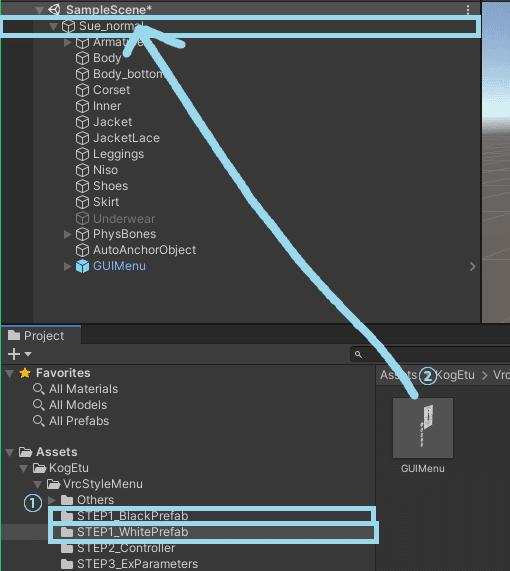
その後、「STEP1_BlackPrefab」「STEP1_WhitePrefab」のどちらか好きな色のフォルダを開き、中にあるPrefabをアバターにドラッグ&ドロップしてください。
Then, open a folder of your favorite color, either "STEP1_BlackPrefab" or "STEP1_WhitePrefab," and drag and drop the prefab inside to your avatar.
그런 다음 "STEP1_BlackPrefab" 또는 "STEP1_WhitePrefab" 중 원하는 색상의 폴더를 열고 내부의 프리팹을 아바타로 끌어다 놓습니다.
次に、あなたのアバターに合わせて高さを調整します。GUIMenuを選択して、一番上のボタンの上部が顎と同じ高さになるようにします。また、頭とメニューの距離は画像の通り頭一個分がおすすめです。
なお、作業が終了してVRChat内で確認した際にVRCStyleMenuが大きすぎる(近すぎる)と感じた場合、Positionを変更するのではなくScaleを小さくすることをおすすめします。
Next, adjust the height according to your avatar: select GUIMenu and make sure that the top of the top button is at the same height as your chin. Also, the distance between the head and the menu is recommended to be one head as shown in the image.
Note that if you feel that VRCStyleMenu is too big (too close) when you check it in VRChat after finishing the work, I recommend that you reduce Scale instead of changing Position.
다음으로 아바타에 따라 높이를 조정합니다. GUIMenu를 선택하고 상단 버튼의 상단이 턱과 같은 높이에 있는지 확인합니다. 또한 헤드와 메뉴 사이의 거리는 이미지와 같이 1개의 헤드가 되도록 하는 것이 좋습니다.
작업을 마친 후 VRChat에서 확인했을 때 VRCStyleMenu가 너무 가깝다고 생각되면 Position을 변경하는 대신 Scale을 줄이는 것이 좋습니다.

続いて、GUI Menuの丸いアイコンがちょうどアバターの真ん中に来るようX軸を調整してください。
Then, adjust the X axis so that the round icon on the GUI Menu is exactly in the middle of your avatar.
그런 다음 GUI 메뉴의 둥근 아이콘이 아바타의 중앙에 정확히 오도록 X축을 조정합니다.
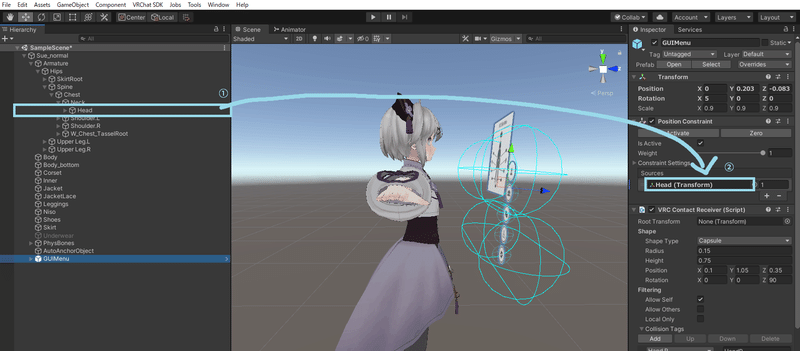
そして、Armatureの中にあるHeadを、GUIMenuのPosition ConstraintのSourcesにドラッグ&ドロップします。
Then drag and drop the Head in Armature to the Sources in GUIMenu's Position Constraint.
그런 다음 Head in Armature를 GUIMenu의 Position Constraint에 있는 Sources로 끌어다 놓습니다.
STEP1の最後です。Position ConstraintのConstraint Settingsのプルダウンメニューを開き、Lockにチェックを付けてください。
This is the last part of STEP 1. open the Constraint Settings pull-down menu of Position Constraint and check the Lock checkbox.
이것은 STEP 1의 마지막 부분입니다. Position Constraint의 Constraint Settings 풀다운 메뉴를 열고 Lock 체크박스를 체크하십시오.

STEP.2
まず、TearRain氏のVRCAvatarFXControllerIntegrationを起動してください。
First, launch TearRain's VRCAvatarFXControllerIntegration.
먼저 TearRain의 VRCAvatarFXControllerIntegration을 시작합니다.

アバターのFX Controllerを用意してください。念のため、アバターのFX Controllerを選択して、Ctrl + DでFX Controllerのバックアップを取っておいてください。
Prepare your avatar's FX Controller. Just to be safe, please select the FX Controller of your avatar and use Ctrl + D to back up the FX Controller.
아바타의 FX 컨트롤러를 준비합니다. 안전을 위해 아바타의 FX 컨트롤러를 선택하고 Ctrl + D를 사용하여 FX 컨트롤러를 백업하십시오.
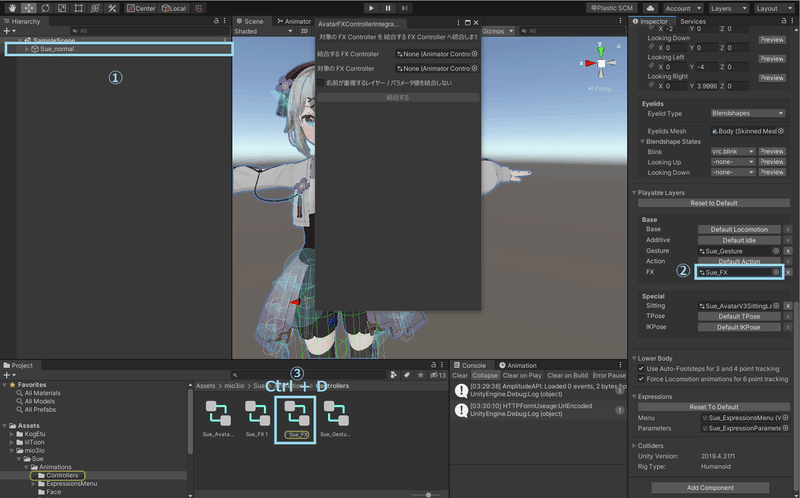
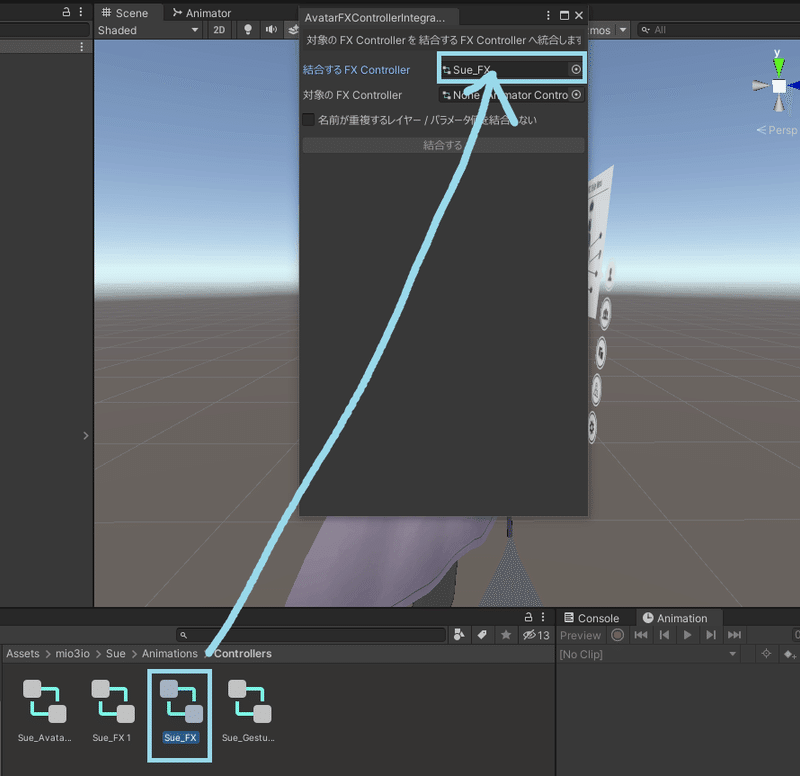
次に、FX ControllerをTearRain氏のツールの上の枠に入れてください。
Next, place the FX Controller in the top frame of Mr. TearRain's tool.
다음으로 TearRain 도구의 상단 프레임에 FX 컨트롤러를 배치합니다.
次に、VRCStyleMenuのSTEP2_Controllerの中にあるVSMControllerをTearRain氏のツールの下側に入れ、チェックボックスにチェックを入れてください。
Next, put VSMController in STEP2_Controller in VRCStyleMenu under TearRain's tool and check the checkbox.
다음으로 TearRain 도구 아래 VRCStyleMenu의 STEP2_Controller에 VSMController를 넣고 체크박스를 체크합니다.
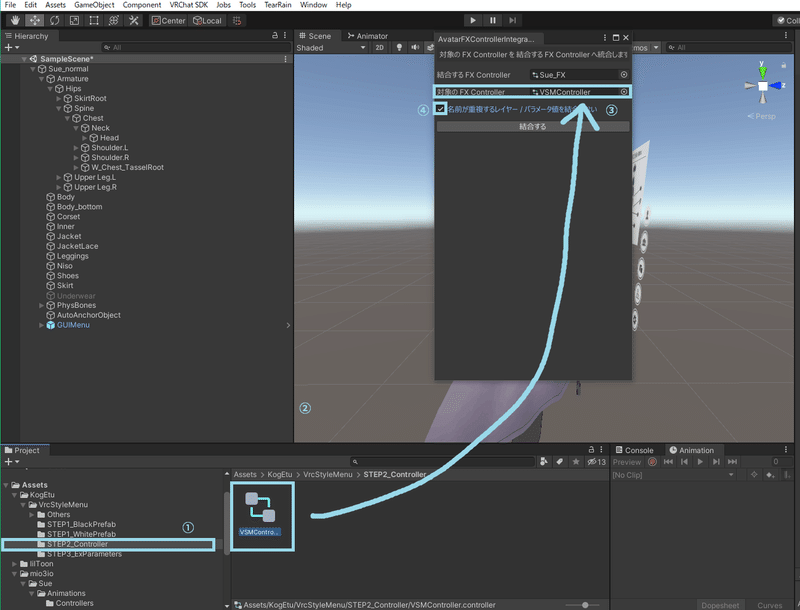
結合ボタンをクリックして、出てくるメッセージウィンドウにもOKをクリックします。それが終わったら、TearRain氏のツールは閉じても構いません。
Click the Merge button and also click OK on the message window that comes up. Once that is done, you may close TearRain's tool.
병합 버튼을 클릭하고 나타나는 메시지 창에서 확인을 클릭합니다. 완료되면 TearRain의 도구를 닫을 수 있습니다.

STEP.3
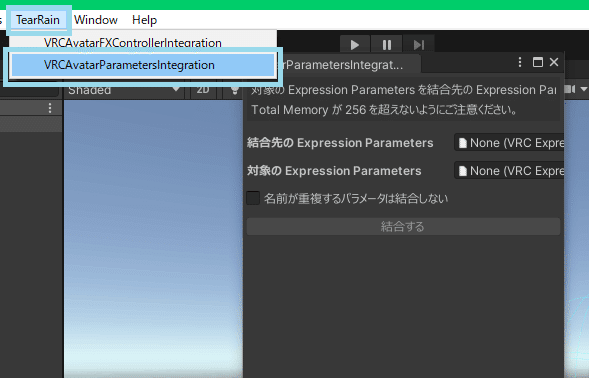
TearRain氏のVRCAvatarParametersIntegrationを起動してください。
Launch TearRain's VRCAvatarParametersIntegration.
TearRain의 VRCAvatarParametersIntegration을 시작합니다.
アバターのExpressionParametersファイルを用意し、念のためCtrl + Dでバックアップを取っておいてください。
Prepare the ExpressionParameters file for your avatar and back it up with Ctrl + D just in case.
아바타용 표현식 매개변수 파일을 준비하고 만일을 대비하여 Ctrl + D로 백업하십시오.
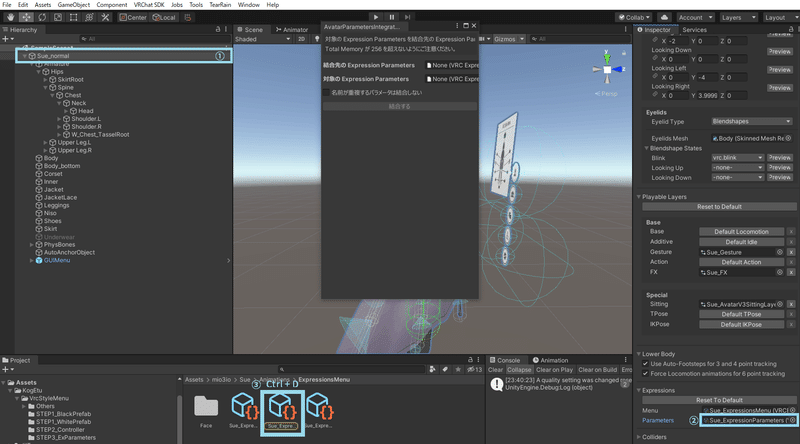
次に、TearRain氏のVRC Avatar Parameters Integrationの上のボックスにアバターのExpressionParametersファイルをドラッグ&ドロップしてください。
Next, drag and drop your avatar's ExpressionParameters file into the box above TearRain's VRC Avatar Parameters Integration.
다음으로 아바타의 ExpressionParameters 파일을 TearRain의 VRC Avatar Parameters Integration 위의 상자로 끌어다 놓습니다.

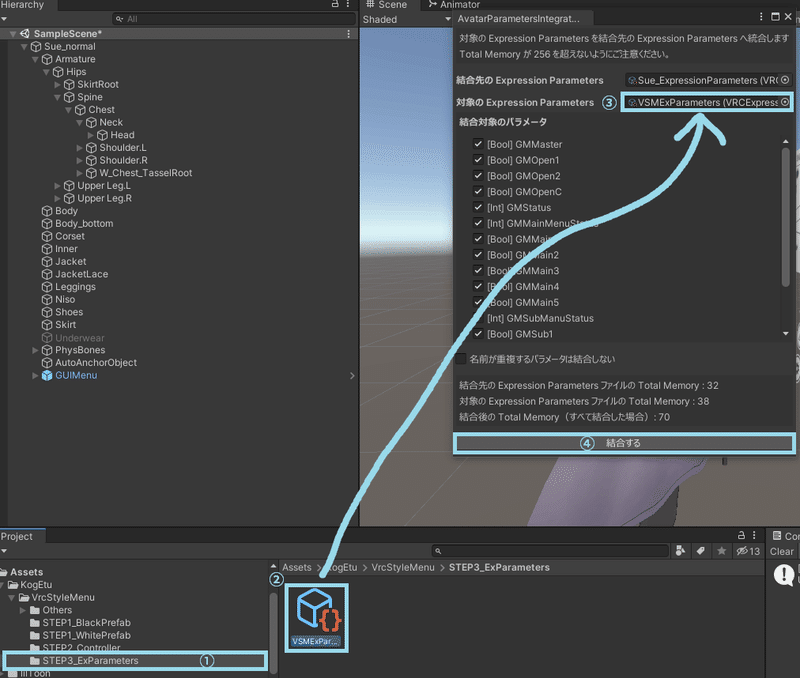
次に、VRCStyleMenuのSTEP3_ExParametersの中にあるVSMExParametersをTearRain氏のVRC Avatar Parameters Integration下のボックスに入れ、結合ボタンをクリックしてください。その後、出てくるメッセージウィンドウのOKを押したら、このツールは閉じても構いません。
Next, place the VSMExParameters in STEP3_ExParameters of the VRCStyleMenu into the box under TearRain's VRC Avatar Parameters Integration and click the Merge button. Then, after pressing OK on the message window that comes up, you may close this tool.
그런 다음 VRCStyleMenu의 STEP3_ExParameters에 있는 VSMExParameters를 TearRain의 VRC Avatar Parameters Integration 아래 상자에 넣고 Merge 버튼을 클릭합니다. 그런 다음 표시되는 메시지 창에서 확인을 누른 후 이 도구를 닫을 수 있습니다.
STEP.4
VRC Style Menuの無効化スイッチをアバターのExpressionsMenuに追加します。このスイッチはデフォルトではオンになっており、オフにするとVRChat内でVRC Style Menuが出なくなります。
まずは、アバターのExpressionsMenuファイルを用意してください。
Add a switch to disable VRC Style Menu to the avatar's ExpressionsMenu. This switch is on by default, and when turned off, the VRC Style Menu will not appear in VRChat. First, prepare your avatar's ExpressionsMenu file.
아바타의 ExpressionsMenu에 VRC 스타일 메뉴를 비활성화하는 스위치를 추가합니다. 이 스위치는 기본적으로 켜져 있으며 끄면 VRC 스타일 메뉴가 VRChat에 나타나지 않습니다. 먼저 아바타의 ExpressionsMenu 파일을 준비합니다.

ExpressionsMenuファイルをクリックして、Add Controlをクリックしてください。
Click on the ExpressionsMenu file and click on Add Control.
ExpressionsMenu 파일을 클릭하고 컨트롤 추가를 클릭합니다.
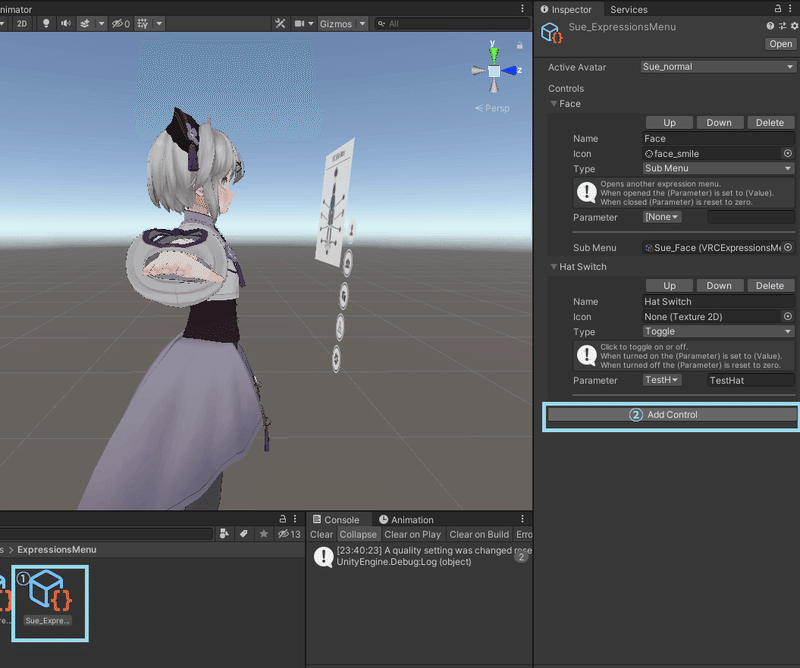
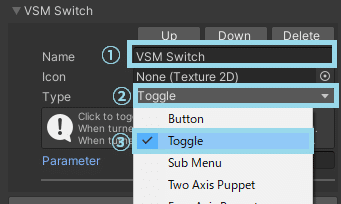
次に、好きな名前を設定し、TypeをToggleに変更します。
Next, set a name of your choice and change Type to Toggle.
그런 다음 원하는 이름을 설정하고 유형을 토글로 변경합니다.
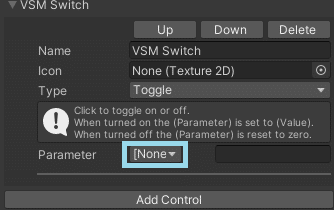
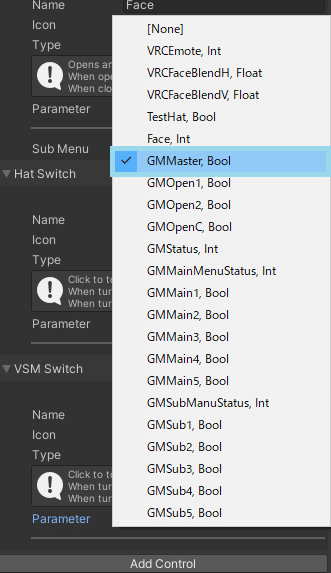
そして、ParameterをNoneからGMMasterに変更してください。
Then change the Parameter from None to GMMaster.
그런 다음 매개변수를 없음에서 GMMaster로 변경합니다.
STEP.5
ここではお着替え改変や、装飾品の出し入れ改変をした際に作ったパラメーターを使用しますので、事前に確認しておくとスムーズです。まだ行ったことがない方は、以下のリンクをご覧ください。
I would recommend that you check the parameters of the clothing alteration or ornament in/out switch that you have created here before you do so. If you have not already done so, please see the link below.
여기에서 생성한 의복 수선 또는 장식 입/출력 스위치의 매개변수를 확인하기 전에 확인하는 것이 좋습니다. 아직 해보지 않으셨다면 아래 링크를 참고해주세요.
VRC Style Menuのサブメニューを押したときに装飾品のオンオフを切り替えられるようにします。例として、事前に帽子のオンオフをTestHatというパラメーター(Bool型)で設定したアバターで解説します。
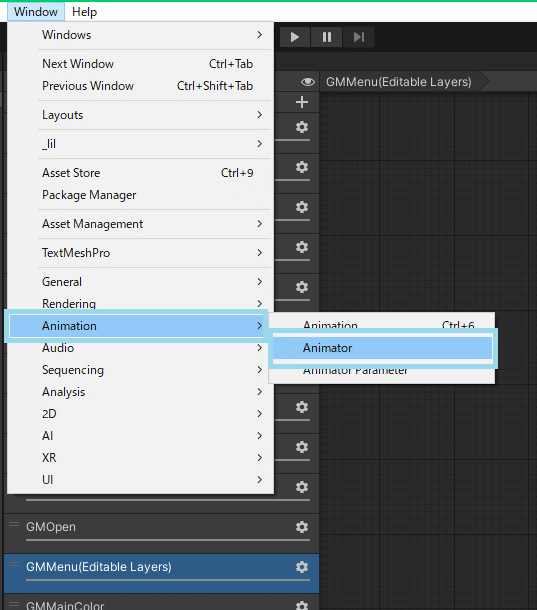
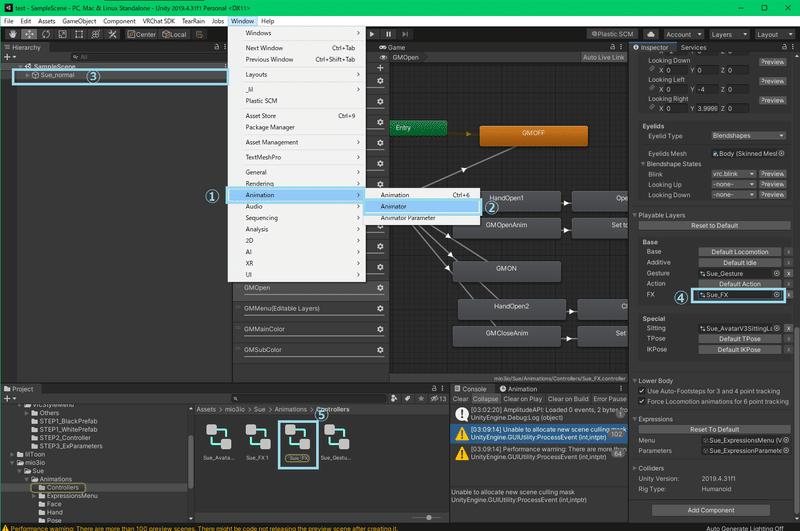
まずはAnimatorウィンドウを開いてください。
We want to be able to toggle the adornments on and off when the VRC Style Menu sub-menu is pressed. As an example, we will use an avatar with a parameter called TestHat (Bool type) to turn on/off the hat in advance. First, open the Animator window.
마지막으로 VRC 스타일 메뉴 하위 메뉴를 눌렀을 때 장식품을 켜고 끌 수 있기를 원합니다. 예를 들어 TestHat(Bool 유형)라는 매개변수가 있는 아바타를 사용하여 모자를 미리 켜고 끕니다. 먼저 Animator 창을 엽니다.
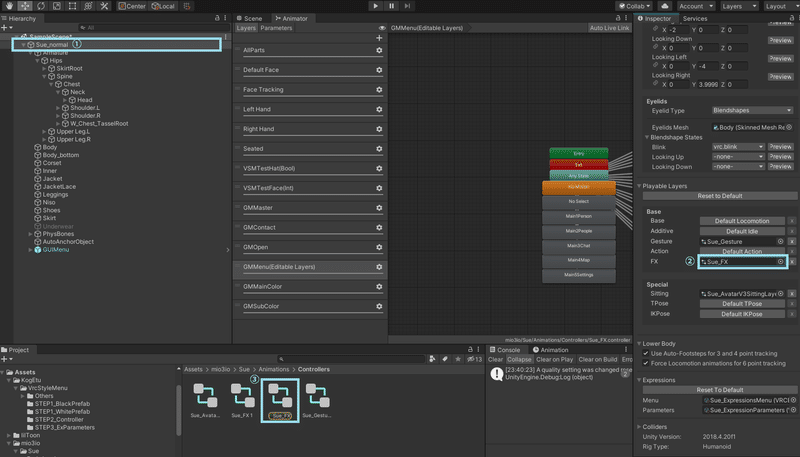
次に、アバターのFXレイヤーを用意して選択します。
Next, prepare and select an FX layer of your avatar.
다음으로 아바타의 FX 레이어를 준비하고 선택합니다.
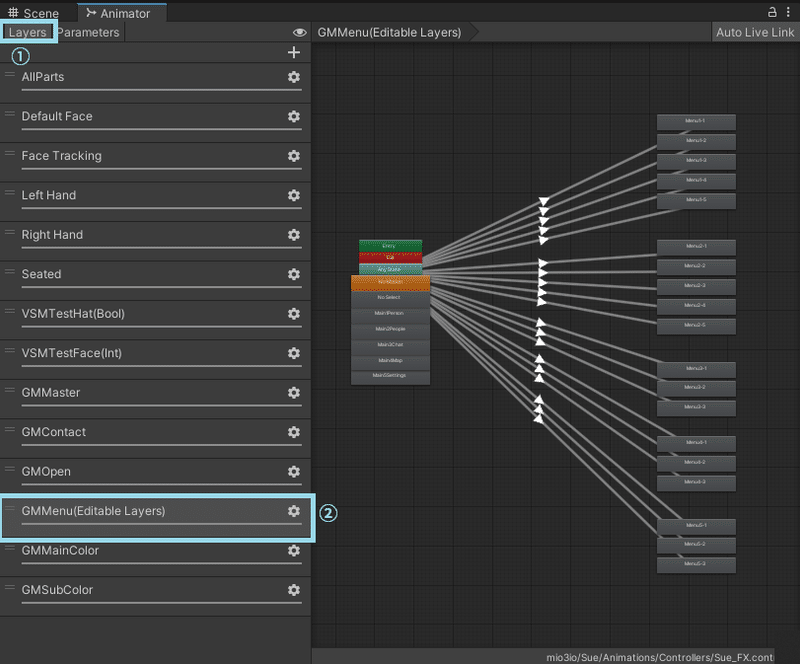
その後AnimatorでLayersを選択して、GMMenu(Editable Layer)というレイヤーを選択してください。
Then select Layers in Animator and choose the layer called GMMenu (Editable Layer).
그런 다음 Animator에서 레이어를 선택하고 GMMenu(Editable Layer)라는 레이어를 선택합니다.
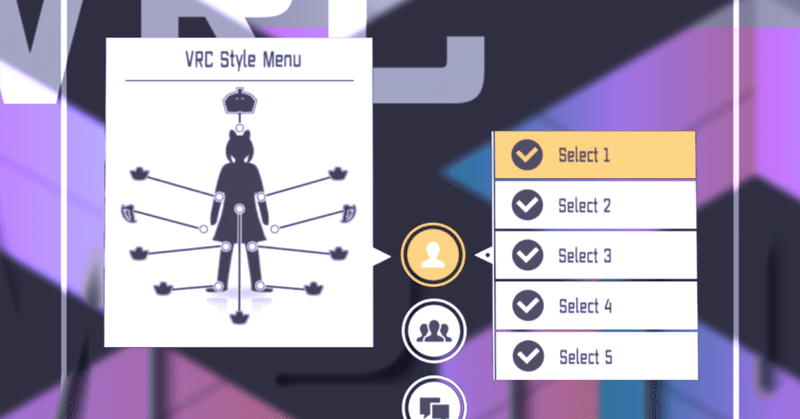
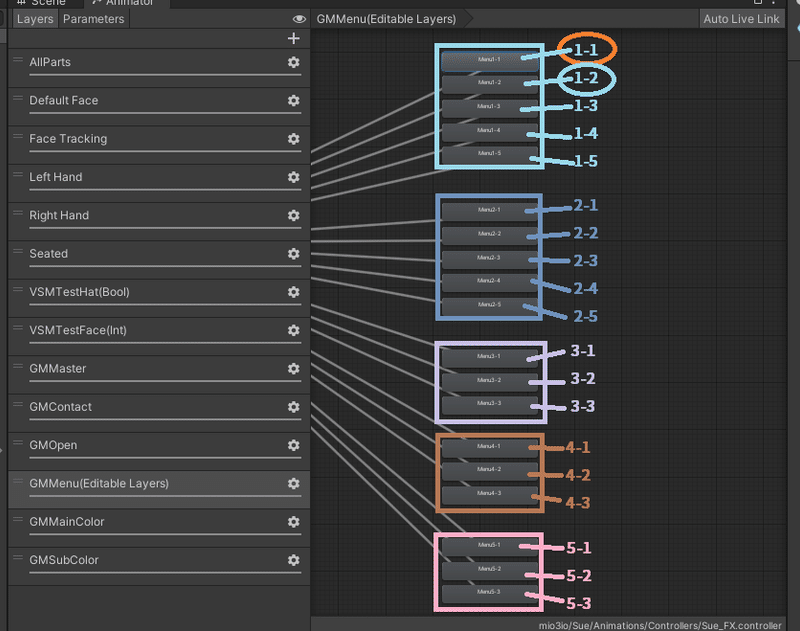
ここで、VRC Style Menuのサブメニューの位置に対応するGMMenuのステートを解説します。VRC Style Menuには以下の画像の通りメインメニューが5つあり、そのうち①と②は5段サブメニュー、③と④と⑤は3段サブメニューを持っています。
Here is an explanation of the GMMenu states corresponding to the submenu positions in the VRC Style Menu: the VRC Style Menu has five main menus as shown in the following image, of which ① and ② have five-level submenus, and ③, ④, and ⑤ have three-level submenus.
다음은 VRC 스타일 메뉴의 하위 메뉴 위치에 해당하는 GMenu 상태에 대한 설명입니다. VRC 스타일 메뉴에는 다음 이미지와 같이 5개의 기본 메뉴가 있으며 그 중 ①과 ②에는 5단계 하위 메뉴가 있고 ③, ④, ⑤ 3단계 하위 메뉴가 있습니다.
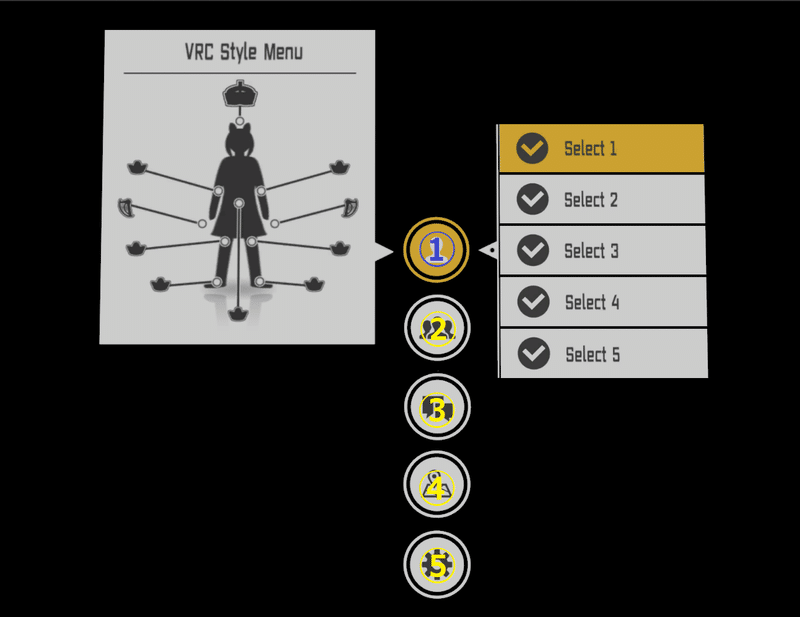
GMMenuレイヤーの中では、メインメニュー1のサブメニュー1は「1-1」、メインメニュー3のサブメニュー4は「3-4」となっています。今回は帽子の「オン」を「1-1」に設定、帽子の「オフ」を「1-2」に設定しようと思います。
In the GMMenu layer, submenu 1 of main menu 1 is defined as "1-1" and submenu 4 of main menu 3 as "3-4". In this case, I will set the hat "on(True)" to "1-1" and the hat "off(False)" to "1-2".
GMMenu 레이어에서 메인 메뉴 1의 하위 메뉴 1은 "1-1"로 정의되고 메인 메뉴 3의 하위 메뉴 4는 "3-4"로 정의됩니다. 이 경우 모자 "on(True)"을 "1-1"로, 모자 "off(False)"를 "1-2"로 설정하겠습니다.
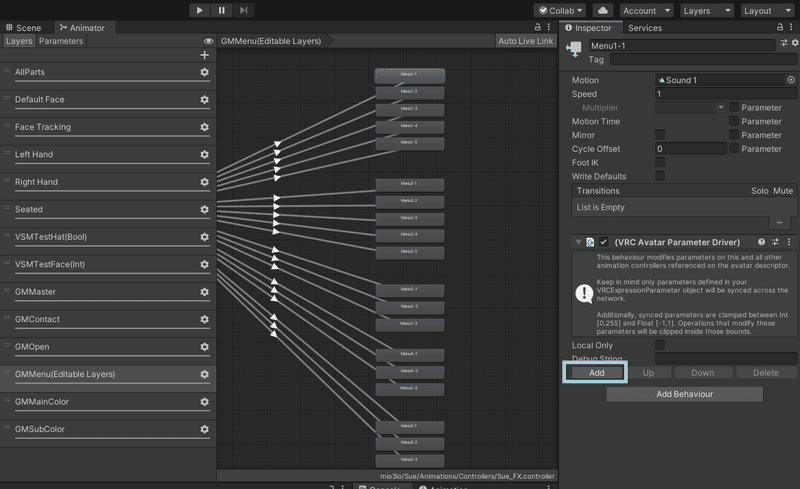
まずは、Menu1-1を選択してください。
First, select Menu1-1.
먼저 메뉴1-1을 선택합니다.

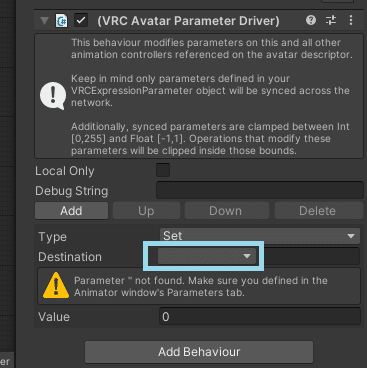
※2022/9/24追記
VRCStyleMenu1_0_0では、「Menu1-1」と「Menu1-2」にこの記事の作成時に使用したパラメーターが残ってしまっており、以下の画像のようになってしまっている不具合が見つかりました。このパラメーターが残っていた場合はDeleteを押していただいたうえで作業を進めていただきますようお願いいたします。
なお、本日リリースしたVRCStyleMenu1_0_1にて修正しております。
In VRCStyleMenu1_0_0, I found a bug that the parameters used when creating this article remain in "Menu1-1" and "Menu1-2", as shown in the following image. If these parameters remain, please click Delete before proceeding. This has been fixed in VRCStyleMenu1_0_1 released today.
VRCStyleMenu1_0_0에서 다음 이미지와 같이 이 글을 작성할 때 사용한 매개변수가 "Menu1-1"과 "Menu1-2"에 그대로 남아 있는 버그를 발견했습니다. 이러한 매개변수가 남아 있으면 계속하기 전에 삭제를 클릭하십시오. 이것은 오늘 출시된 VRCStyleMenu1_0_1에서 수정되었습니다.

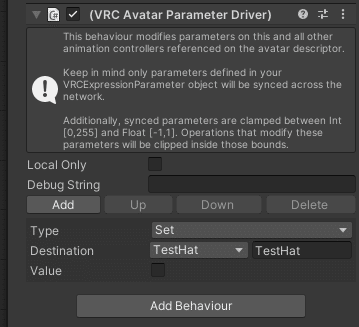
右側にある、VRC Avatar Parameter DriverのAddを選択します。
2022.05.04.17.47などの以前のVRCSDKでは、Add Parameterと表示されています。
On the right side, select Add for VRC Avatar Parameter Driver.
In earlier VRCSDKs, such as 2022.05.04.17.47, it is labeled Add Parameter.
오른쪽에서 VRC Avatar Parameter Driver에 대해 추가를 선택합니다.
2022.05.04.17.47과 같은 이전 VRCSDK에서는 Add Parameter라는 레이블이 지정되었습니다.
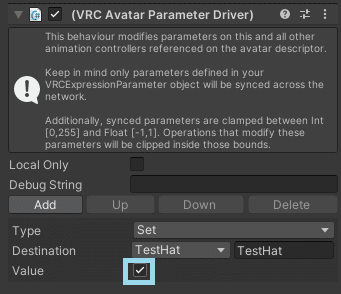
ここでは、Destinationに帽子のオンオフを制御するパラメーターである「TestHat」を選択します。実際に皆さんがこの工程を行う際は、皆さん自身に合わせたパラメーターを選択してください。
以前のバージョンのVRCSDKでは、「Destination」ではなく「Name」と表示されています。
Here, select "TestHat," a parameter that controls the on/off of the hat, for Destination. When you actually perform this process, please choose the parameters that match your avatar.
In the previous VRCSDK, the name is simply displayed as "Name" instead of "Destination".
여기서 Destination에 대해 모자의 온/오프를 제어하는 매개변수인 "TestHat"을 선택합니다. 실제로 이 프로세스를 수행할 때 아바타와 일치하는 매개변수를 선택하십시오.
이전 VRCSDK에서는 이름이 "Destination" 대신 "Name"으로 간단히 표시되었습니다.


1-1では帽子をオンにしたいので、Valueのチェックボックスにチェックを入れます。
In 1-1, we want to turn on the hat, so check the Value checkbox.
1-1에서는 모자를 켜고 싶으므로 값 확인란을 선택합니다.
これで、メインメニュー1のサブメニュー1を押したときに帽子が現れるようになりました。次に、「1-2」で帽子をオフにするにするよう設定します。
まずは、1-2を選択してください。
Now the hat will appear when you press submenu 1 of main menu 1 in VRChat. Next, set "1-2" to turn off the hat. First, select 1-2.
이제 VRChat에서 메인 메뉴 1의 하위 메뉴 1을 누르면 모자가 나타납니다. 다음으로 "1-2"를 설정하여 모자를 끕니다. 먼저 1-2를 선택합니다.

上記と同じように、VRC Avatar Parameter DriverのAddを選択し、DestinationからTestHatを選択します。
As before, select Add in the VRC Avatar Parameter Driver and select TestHat from Destination.
이전과 마찬가지로 VRC Avatar Parameter Driver에서 Add를 선택하고 Destination에서 TestHat을 선택합니다.


1-2で帽子をオフとしたいので、今回はValueのチェックボックスは外したままで構いません。
Since we want to turn off the hat in 1-2, we can leave the Value checkbox unchecked this time.
1-2에서 모자를 끄고 싶기 때문에 이번에는 Value 확인란을 선택하지 않은 상태로 둘 수 있습니다.
これで、メインメニュー1のサブメニュー2を押したときに帽子が消えるようになりました!Int型でも同じ手順を行い、Valueを設定することで問題なく扱うことができます。
Now the hat will disappear when you press submenu 2 of main menu 1 in VRChat! Of course, the Int type can also be handled by following the same procedure and setting the Value.
이제 VRChat에서 메인 메뉴 1의 하위 메뉴 2를 누르면 모자가 사라집니다! 물론 Int 타입도 같은 절차에 따라 Value를 설정하여 처리할 수 있습니다.
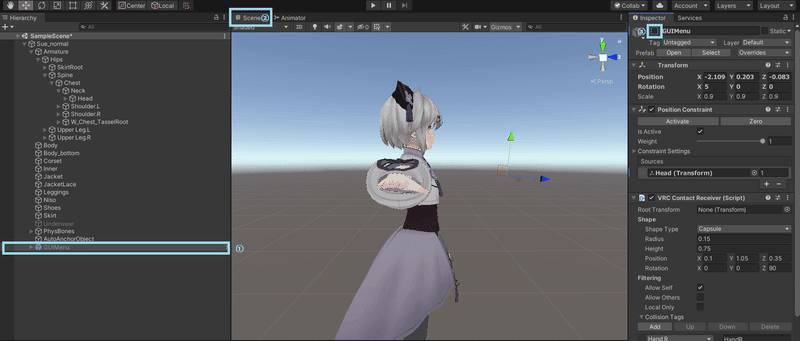
最後に、Scene画面に戻り、GUIMenuを非表示にしておきましょう。
Finally, return to the Scene screen and hide GUIMenu.
마지막으로 Scene 화면으로 돌아가 GUIMenu를 숨깁니다.
基本的な解説は以上となります。VRCにアップロードして、実際の動作を確認してみてください。お疲れさまでした!
¦VRChat内でのVRC Style Menuの操作方法¦
・メニューを開くには右手をOpenハンドサイン(パー)にして自分の前方を上から下にスワイプしてください。
・メニュー内では、ボタンに指を触れると反応します。
・メニューを閉じるには右手をOpenハンドサイン(パー)にして前方を下から上にスワイプしてください。
※デフォルトでは右手のみでメニューの開閉が行えますが、左手に変更することも可能です。FAQをご覧ください。
※Contactsの使用を許可しているフレンドなどはVRCStyleMenuに触れて操作することができます。メニューの開閉はあなた自身のみ行えます。誰にもVRC Style Menuを操作されたくない場合についてはFAQをご参照ください。
※誤操作防止機能として、メニューを閉じた後、一旦Open以外のハンドサインにするまでメニューを再度開くことはできません。メニューを閉じた後すぐメニューを開きたい場合、Open→Fist→Openなど一旦別のハンドサインを経由してください。
That's all for the basic explanation, please upload it to VRC and see how it works in action. Thanks for your time!
¦How to operate the VRC Style Menu¦
・To open the menu, swipe your right hand in the Open hand sign (paper) and swipe your front from top to bottom.
・In the menu, touch your finger on a button to react to it.
・To close the menu, put your right hand in the Open hand sign (paper) and swipe your front from bottom to top.
*By default, you can open and close menus with your right hand only, but you can change this to your left hand, see FAQ.
*Friends and others you have allowed to use Contacts in VRChat can touch and operate the VRCStyleMenu. However, only you can open and close the menu. If you don't want anyone else to manipulate the menu, please see the FAQ.
*As a function to prevent accidental operation, after closing the menu, the menu cannot be reopened until the hand sign is changed to a hand sign other than Open. If you want to open the menu immediately after closing the menu, please go through another hand sign such as Open→Fist→Open.
기본적인 설명은 여기까지입니다. VRC에 업로드하고 작동 방식을 확인하세요. 시간 내 줘서 고마워!
¦VRC 스타일 메뉴 조작 방법¦
・메뉴를 열려면 오픈 핸드 기호(파)에서 오른손을 스와이프하고 앞에서 아래로 스와이프합니다.
・메뉴에서 버튼에 손가락을 대면 반응합니다.
・메뉴를 닫으려면 오른손을 오픈 핸드 기호(파)에 놓고 앞을 아래에서 위로 스와이프합니다.
*기본적으로 오른손으로만 메뉴를 열고 닫을 수 있지만 왼손으로도 변경할 수 있습니다. FAQ를 참조하세요.
*VRChat에서 연락처를 사용하도록 허용한 친구 및 다른 사람들은 VRCStyleMenu를 터치하여 조작할 수 있습니다. 그러나 메뉴를 열고 닫을 수 있는 사용자만 있습니다. 다른 사람이 메뉴를 조작하는 것을 원하지 않으면 FAQ를 참조하십시오.
*오조작을 방지하기 위한 기능으로 메뉴를 닫은 후 Open 이외의 핸드 사인으로 변경될 때까지 메뉴를 다시 열 수 없습니다. 메뉴를 닫은 후 바로 메뉴를 열고 싶다면 열기→주먹→열기 등의 또 다른 핸드 사인을 거쳐주세요.
FAQ
Q.
左手でメニューを開閉するには?
How do I open and close VRC Style Menu with my left hand?
왼손으로 VRC Style Menu를 열고 닫으려면 어떻게 합니까?
A.
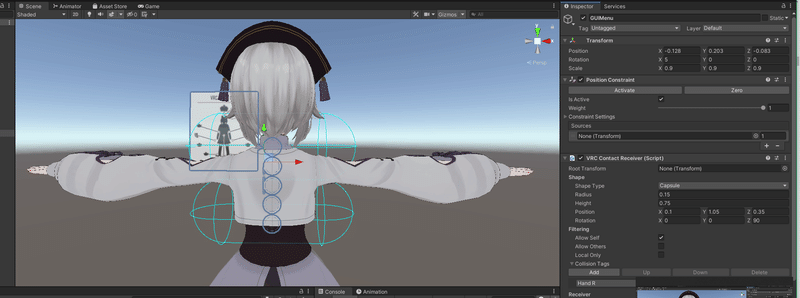
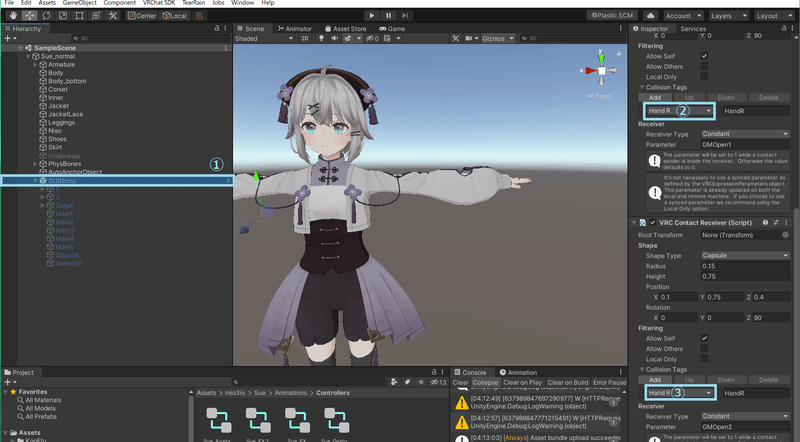
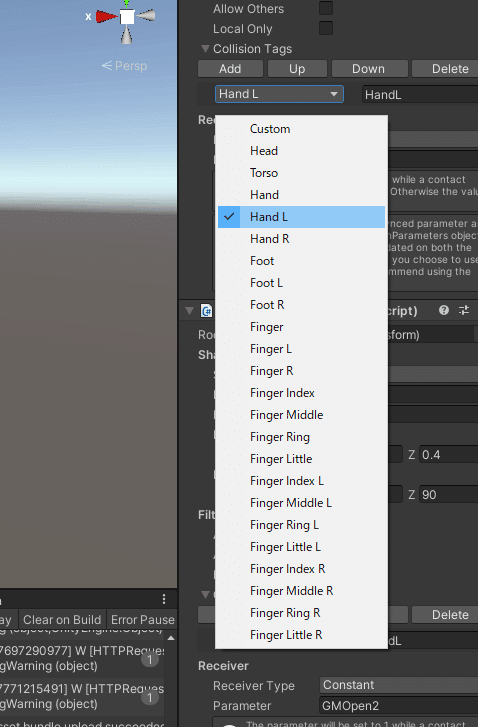
GUIMenuを選択し、二つのVRC Contact RecieverのCollision Tagsを、両方ともHand Lに変更してください。
Select GUIMenu and change the Collision Tags for the two VRC Contact Recievers to both Hand L.
GUIMenu를 선택하고 두 VRC Contact Receiver의 Collision Tags를 모두 Hand L로 변경합니다.
その後、Animatorウィンドウを開き、アバターのFXレイヤーを選択してください。
Then open the Animator window and select the FX layer of the avatar.
그런 다음 Animator 창을 열고 아바타의 FX 레이어를 선택합니다.
Animatorウィンドウで、GMOpenレイヤーを選択します。その後、画像の矢印を選択し、CnoditionsのGestureRightをGestureLeftに変更します。皆さんの好きなジェスチャーに変更することもできます。
In the Animator window, select the GMOpen layer. Then select the arrows in the image and change GestureRight to GestureLeft in Cnoditions. You can even change it to your favorite gesture.
Animator 창에서 GMOpen 레이어를 선택합니다. 그런 다음 이미지에서 화살표를 선택하고 Cnoditions에서 GestureRight를 GestureLeft로 변경합니다. 좋아하는 제스처로 변경할 수도 있습니다.
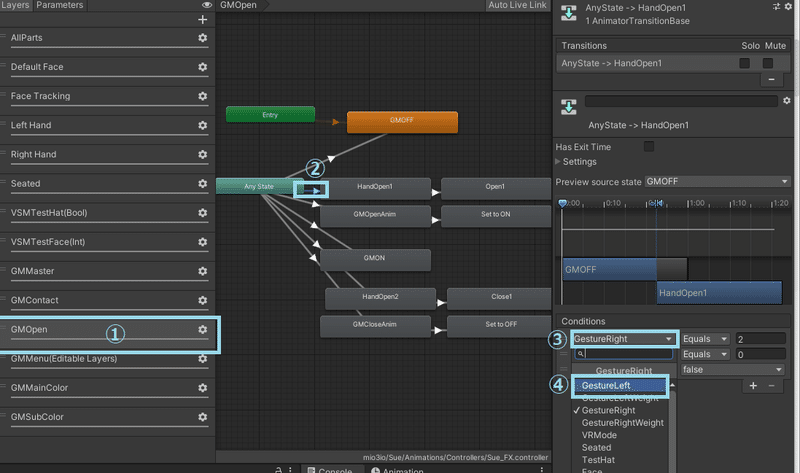
これを以下の画像の5つの矢印に対しても繰り返してください。
Repeat this for the five arrows in the following image.
다음 이미지의 5개 화살표에 대해 이 작업을 반복합니다.

Q.
VRChat内でVRCStyleMenuを自分以外操作できなくするには?
How can I make VRCStyleMenu only available to me in VRChat?
VRChat에서만 VRCStyleMenu를 사용할 수 있도록 하려면 어떻게 해야 합니까?
A.
GUIMenuのプルダウンを展開し、その後出てくる「5」と「3」のプルダウンも展開します。
Expand the GUIMenu pull-down, and then also expand the "5" and "3" pull-downs that appear.
GUIMenu 풀다운을 확장한 다음 표시되는 "5" 및 "3" 풀다운도 확장합니다.

menu5-1を選択し、VRC Contact ReceiverのAllow Othersのチェックボックスを外してください。
Select menu5-1 and uncheck the Allow Others checkbox for VRC Contact Receiver.
menu5-1을 선택하고 VRC Contact Receiver의 다른 사람 허용 확인란을 선택 취소합니다.

これを以下の画像のオブジェクトにそれぞれ繰り返してください。
Repeat this for each of the objects in the following images.
다음 이미지의 각 개체에 대해 이 작업을 반복합니다.

Q.
アバターをアップロードしたのに反映されない
I uploaded my avatar, but it is not reflected.
아바타를 업로드했는데 반영되지 않습니다.
A.
Blueprint IDをDetachしてアップロードしなおしてください。
Detach the Blueprint ID and re-upload.
Blueprint ID를 분리하고 다시 업로드하십시오.

Q.
VRC Style Menuを導入したら表情がおかしくなった
After installing VRC Style Menu, the expression went wrong.
VRCStyleMenu를 설치한 후 표현식이 잘못되었습니다.
A.
FXレイヤー(特に表情、ジェスチャー)のWrite Defaultsを全て切り、VRC Style Menuセットアップで使用したファイルや改変を全て以前の状態に戻し、セットアップをやり直してください。
Turn off all Write Defaults for FX layers (especially expressions and gestures), revert all files and modifications used in the VRC Style Menu setup to their previous state, and redo the setup.
FX 레이어(특히 표정 및 제스처)에 대한 모든 WriteDefaults를 끄고 VRC 스타일 메뉴 설정에 사용된 모든 파일과 수정 사항을 이전 상태로 되돌린 다음 설정을 다시 실행합니다.
Q.
VRC Style Menuを開いてない時は問題ないが、VRC Style Menuを開くと手の形(表情)が固定されてしまう。
When VRC Style Menu is not open, There is no problem.
But when VRC Style Menu is opened, the hand shape (facial expression) is stuck.
VRCStyleMenu가 열리지 않으면 문제가 없습니다.
그런데 VRCStyleMenu를 열면 손 모양(표정)이 멈춥니다.
A.
FX Layer内の「All Parts」「Left Hand」「Right Hand」のAvatar Maskをそれぞれ削除してください。
Delete the Avatar Masks of "All Parts", "Left Hand" and "Right Hand" in the FX Layer, respectively.
FX Layer에서 "All Parts", "Left Hand" 및 "Right Hand"의 AvatarMask를 삭제합니다.
Q.
VRChat内でVRCStyleMenuが開かない
VRCStyleMenu does not open in VRChat
VRCStyleMenu가 VRChat에서 열리지 않음
A.
手がメニューを開けるContactsの判定に届いてない場合があります。
Contactsの判定は、Expressions Menuを開き、Option→Config→Avater Overlay→Contactsと選択することで表示できます。
Your hand may not have reached the Contacts determination that opens the VRCStyleMenu; the Contacts determination can be displayed by opening the Expressions Menu and selecting Option→Config→Avater Overlay→Contacts.
VRCStyleMenu를 여는 연락처 결정에 손이 닿지 않았을 수 있습니다. 연락처 결정은 식 메뉴를 열고 옵션→구성→Avater 오버레이→연락처를 선택하여 표시할 수 있습니다.
Q.
Contactsの判定の表示は出るが、反応している様子がない(手を判定のカプセルに接触させてもカプセルの色が変わらない)
Contacts capsule's appear, but do not seem to be reacting (the capsule does not change color when the hand is in contact with the capsule).
접촉 캡슐이 나타나지만 반응하지 않는 것 같습니다(손이 캡슐에 닿았을 때 캡슐의 색이 변하지 않음).
A.
VRChat内の設定にある、Avater Interactionsの項目を確認してください。
Allow InteractionとSelf Interactをオンにする必要があります。
Check the Avater Interactions section in the settings within VRChat, Allow Interaction and Self Interact must be turned on.
VRChat 설정에서 Avater Interactions 섹션을 확인하고 Allow Interaction 및 Self Interact가 켜져 있어야 합니다.
Q.
メニューが開くくらい近づけると大きすぎる
Too big if you get close enough to open the menu.
메뉴를 열 수 있을 만큼 가까이 다가가면 너무 큽니다.
A.
GUIMenuを選択して、お好みのScaleに変更してください。まずは0.9からためすのがおすすめです。
Select GUIMenu and change to your preferred Scale. We recommend that you start with 0.9.
GUIMenu를 선택하고 원하는 Scale로 변경합니다. 0.9부터 시작하는 것이 좋습니다.
この記事が気に入ったらサポートをしてみませんか?