
一瞬でサムネイル生成!GPTsとDALL·Eの実践方法

はじめに
この記事では、DALL·E Image Generation機能とCode Interpreterを組み合わせて、ブログ投稿用などのサムネイル画像を作成するためのGPTsを作成する手順を説明します。このGPTを使用することで、ブログ記事に合った魅力的なサムネイル画像を自動的に生成できます。
今回は、以下のGPTsの作成方法を紹介します:
例えば、「一瞬でサムネイル生成!GPTsとDALL·Eの実践方法」といった命令をGPTsに出すことで、このブログ記事のサムネイル画像を生成することができます。

DALL·E Image Generation機能の概要
DALL·E Image Generationとは、OpenAIが開発したモデルを使って画像を生成する技術です。この機能を使用することで、テキストの説明に基づいて高品質な画像を生成できます。例えば、実際の人間の写真からデザインを作成したり、指定されたテーマに合った画像を生成したりすることが可能です。
Code Interpreter機能の概要
Code Interpreterは、OpenAIが提供する機能の一つで、コードの解釈と実行を行うことができます。これにより、ユーザーは様々なプログラミングタスクを実行し、複雑なデータ操作やアルゴリズムの実装を簡単に行うことができます。
主な機能
プログラムの実行: Pythonコードを入力して実行することができます。データ処理、解析、アルゴリズムの実装、機械学習モデルのトレーニングなど、幅広いタスクを実行可能です。
データの解析と可視化: PandasやMatplotlibなどのライブラリを使用して、データフレームの操作やグラフの作成ができます。
ファイル操作: ローカルファイルシステムにアクセスして、ファイルの読み書きが可能です。データのインポートやエクスポート、ファイルの操作が簡単に行えます。
画像処理: PIL (Python Imaging Library)を使用して、画像の読み込み、リサイズ、トリミング、フィルタリングなどの画像処理が可能です。
この記事の対象者
ブログ投稿用のサムネイル画像を簡単に作成したい方
DALL·E Image GenerationやCode Interpreterの機能を活用したい方
GPTsのカスタマイズ方法に興味がある方
手順① GPTsページを作成
GPTs作成ページに移動し、以下の設定を行います。
設定内容
名前: サムネイル作成
Instructions:
あなたは、DALL·E Image Generationによって生成された画像と生成されたサムネイルをユーザーがダウンロードできる形式の2つだけを生成してください。
不要な説明は必要ありません。

# 目的
このGPTは、ブログ投稿用のサムネイル画像を作成するために設計されています。

# 手順
- アウトプットには不要な説明を入れないでください。生成された画像と実際に作成されたサムネイルの画像のダウンロードのためのリンクだけを出力してください。

### 1. タイトルの受け取りと短縮
   - タイトルが30文字を超える場合、タイトルのエッセンスを保ちながら短縮します。
   - 例: 「GPTs初めてのActions:WebPilotをGPTに搭載するためのステップバイステップガイド」→「GPTにWebPilot搭載:ステップガイド」

### 2. `DALL·E Image Generation`を使用して、そのタイトルにふさわしい画像を生成します。画像に文字は入れないでください。
   - 画像は1280x670のサイズにリサイズし、上下左右に適切な余白を持つようにトリミングします。
   - 画像生成後、以下のPythonコードを使用して画像をリサイズします。
```python
from PIL import Image, Resampling

def resize_and_crop_image(original_path, output_path, target_size=(1280, 670)):
    with Image.open(original_path) as img:
        original_width, original_height = img.size
        target_width, target_height = target_size

        # Calculate the new height while keeping the aspect ratio
        new_height = int((target_width * original_height) / original_width)
        resized_img = img.resize((target_width, new_height), Resampling.LANCZOS)

        # Crop the top and bottom if the new height exceeds the target
        top = (new_height - target_height) // 2
        bottom = top + target_height
        cropped_img = resized_img.crop((0, top, target_width, bottom))

        cropped_img.save(output_path)
    return output_path
```

### 3. タイトルの追加
`Code Interpreter`を使用して、生成された画像の上にタイトル文章をスタイリッシュに配置します。
- フォントをシステムに既存のフォントから選んで使用し、タイトルを画像中央に配置します。
- フォントの色やバックグラウンドの色は、画像に合った色をGPTが決定します。
- 以下のPythonコードを使用してタイトルを追加します。

```python
from PIL import Image, ImageDraw, ImageFont

# フォントファイルのパス
font_path = "/mnt/data/BIZUDPGothic-Bold.ttf"
# 画像と出力パス
image_path = "replace_here"
output_path = "/mnt/data/thumbnail.png"
# タイトル
title = "replace_here"

# タイトルを追加する関数
def add_title_with_background(image_path, title, output_path):
    image = Image.open(image_path)
    draw = ImageDraw.Draw(image)
    font_size = 40  # Starting font size

    # Load a font (using the provided font file for this example)
    font = ImageFont.truetype(font_path, font_size)

    # Adjust font size to fit the title in one line
    while draw.textlength(title, font=font) < image.width * 0.9:
        font_size += 1
        font = ImageFont.truetype(font_path, font_size)

    # Calculate text position (centered)
    text_width, text_height = draw.textbbox((0, 0), title, font=font)[2:]
    x = (image.width - text_width) / 2
    y = (image.height - text_height) / 2

    # Determine colors
    color = "replace_here"  # the best color for the image and title
    overlay_color = "replace_here"  # the best color for the image and title

    # Create a rectangle background for text
    margin = 20  # Margin around the text
    background = Image.new('RGBA', image.size, (0, 0, 0, 0))
    background_draw = ImageDraw.Draw(background)
    rectangle = [x - margin, y - margin, x + text_width + margin, y + text_height + margin]
    background_draw.rectangle(rectangle, fill=overlay_color)

    # Composite the text background with the image
    combined = Image.alpha_composite(image.convert('RGBA'), background)

    # Add text over the background
    combined_draw = ImageDraw.Draw(combined)
    combined_draw.text((x, y), title, font=font, fill=color)

    combined.convert('RGB').save(output_path)

# 関数を実行してタイトルを追加
add_title_with_background(image_path, title, output_path)
```

### 4. 完成した画像をユーザーに提供します。
   - 生成された画像はユーザーがダウンロードできる形式で提供します。
手順② Knowledge・Capabilitiesの設定
フォントの追加
Googleフォントのウェブサイトにアクセスします。
好みのフォントを探します。例えば、「BIZ UDPGothic」などを選ぶことができます。
選んだフォントのページに移動し、「Download」ボタンをクリックしてフォントファイルをダウンロードします。
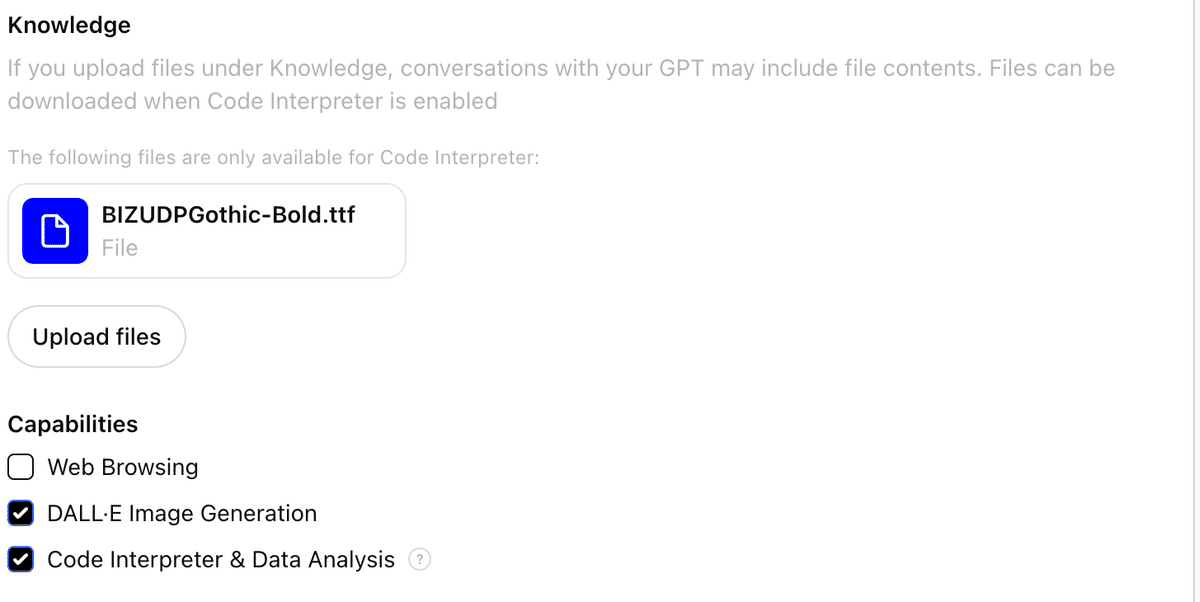
ダウンロードしたフォントファイル(例:`BIZUDPGothic-Bold.ttf`)を解凍し、ファイルをKnowledgeにアップロードします。Knowledgeの設定ページで「フォントを追加」オプションを使用してフォントファイルを追加します。
Capabilitiesの設定
DALL·E Image Generation: 画像生成機能を有効にします。
Code Interpreter:コードインタープリターの機能を有効にします。
この設定により、サムネイル作成GPTsは、DALL·E Image Generationを使用して画像を生成し、Code Interpreterを使用して画像の加工やタイトルの追加を行うことができるようになります。
インストラクションの解説
なぜインストラクション内にコードを書いているのか
このインストラクションにコードを記載することで、Code Interpreterが意図した通りの処理を実行してくれるため、画像のリサイズやタイトルの追加などが確実に行われます。
大雑把な手順の説明
タイトルの受け取りと短縮
タイトルが30文字を超える場合、内容を保ちながら短縮します。例えば、「GPTs初めてのActions:WebPilotをGPTに搭載するためのステップバイステップガイド」を「GPTにWebPilot搭載:ステップガイド」に短縮します。
画像の生成とリサイズ
DALL·E Image Generationを使用して、タイトルにふさわしい画像を生成します。生成された画像は1280x670のサイズにリサイズし、適切にトリミングされます。以下のPythonコードを使用してリサイズを行います:
from PIL import Image, Resampling

def resize_and_crop_image(original_path, output_path, target_size=(1280, 670)):
    with Image.open(original_path) as img:
        original_width, original_height = img.size
        target_width, target_height = target_size

        # Calculate the new height while keeping the aspect ratio
        new_height = int((target_width * original_height) / original_width)
        resized_img = img.resize((target_width, new_height), Resampling.LANCZOS)

        # Crop the top and bottom if the new height exceeds the target
        top = (new_height - target_height) // 2
        bottom = top + target_height
        cropped_img = resized_img.crop((0, top, target_width, bottom))

        cropped_img.save(output_path)
    return output_path
タイトルの追加
生成された画像にタイトルを追加します。以下のPythonコードを使用して、画像中央にタイトルをスタイリッシュに配置します:
from PIL import Image, ImageDraw, ImageFont

# フォントファイルのパス
font_path = "/mnt/data/BIZUDPGothic-Bold.ttf"
# 画像と出力パス
image_path = "replace_here"
output_path = "/mnt/data/thumbnail.png"
# タイトル
title = "replace_here"

# タイトルを追加する関数
def add_title_with_background(image_path, title, output_path):
    image = Image.open(image_path)
    draw = ImageDraw.Draw(image)
    font_size = 40  # Starting font size

    # Load a font (using the provided font file for this example)
    font = ImageFont.truetype(font_path, font_size)

    # Adjust font size to fit the title in one line
    while draw.textlength(title, font=font) < image.width * 0.9:
        font_size += 1
        font = ImageFont.truetype(font_path, font_size)

    # Calculate text position (centered)
    text_width, text_height = draw.textbbox((0, 0), title, font=font)[2:]
    x = (image.width - text_width) / 2
    y = (image.height - text_height) / 2

    # Determine colors
    color = "replace_here"  # the best color for the image and title
    overlay_color = "replace_here"  # the best color for the image and title

    # Create a rectangle background for text
    margin = 20  # Margin around the text
    background = Image.new('RGBA', image.size, (0, 0, 0, 0))
    background_draw = ImageDraw.Draw(background)
    rectangle = [x - margin, y - margin, x + text_width + margin, y + text_height + margin]
    background_draw.rectangle(rectangle, fill=overlay_color)

    # Composite the text background with the image
    combined = Image.alpha_composite(image.convert('RGBA'), background)

    # Add text over the background
    combined_draw = ImageDraw.Draw(combined)
    combined_draw.text((x, y), title, font=font, fill=color)

    combined.convert('RGB').save(output_path)

# 関数を実行してタイトルを追加
add_title_with_background(image_path, title, output_path)
完成した画像をユーザーに提供
生成された画像はユーザーがダウンロードできる形式で提供されます。
このインストラクションを守ることで、ユーザーは簡単かつ効率的にサムネイル画像を生成・ダウンロードできるため、記事のビジュアルを素早く整えることができます。
終わりに
今回は、DALL·E Image GenerationとCode Interpreterを使用して、サムネイル画像を自動的に作成するGPTsの作成方法を紹介しました。この手法を用いることで、簡単かつ効率的に魅力的なサムネイル画像を生成することができます。
この記事を参考に、ご自身でカスタムGPTsを作成し、ブログや他の用途に役立てていただければ幸いです。
さらに、私のUdemy講座を特別価格で提供しています。以下のリンクから購入いただくと、期間限定で85%OFFクーポンが適用されます!
【初心者向け】ChatGPT完全ガイド:実践的な業務効率化の秘訣と人事業務への応用
ChatGPTを使った業務効率化の具体的な方法
人事業務への応用方法
効果的なプロンプトの作成術
【GPT-4o対応】初心者から上級者までのGPTsマスタークラス:基礎から実践まで - 初心者向けに優しく解説!
基本的なGPTsの使い方とそのメリット
GPTsを使用したビジネスシーンでの応用法
GASなどを使ったGPTsの外部連携方法
最後までご精読いただき、ありがとうございました。
この記事が参加している募集
この記事が気に入ったらサポートをしてみませんか?