
DifyとLangfuseを連携させてみよう!(ローカル環境編)

ローカルに構築したLangfuseと連携
前回はローカル環境に構築済みのDifyとLangfuseのCloud版を連携の手順をご紹介しました。
今回は前回の記事では紹介できなかった、セルフホスティング(ローカル環境に構築)したLangfuseとの連携方法をご紹介します。
本記事では、DifyとLangfuseは同一のWSL上に構築していますのでご注意ください。
尚、特段明記してない限りはコマンドは全てWSL上(Linux)で、cursorのターミナルから実行していますのでご注意ください。
実行環境
Windows11(RAM 32GB)
WSL2 ubuntu
Dify v0.6.15(OSS)
Langfuse v2.67.0(OSS)
cursor
では早速進めていきましょう!
前提
Difyをローカル環境に構築済み。
Langfuseをローカル環境に準備をしよう!
Langfuseをローカルにclone
では早速準備していきましょう。公式の手順に従って実行していきます。
まずは以下のコマンドを実行してlangfuseをcloneします。
git clone https://github.com/langfuse/langfuse.gitLangfuseのdocker-compose.ymlを修正
git cloneが完了したら、langfuseディレクトリが作成されるので直下にある"docker-compose.yml"を以下のように修正・追記します。
services:
  langfuse-server:
    image: langfuse/langfuse:2
    depends_on:
      db:
        condition: service_healthy
    ports:
      - "3002:3000" #3000:3000から3002:3000に修正
    environment:
      - DATABASE_URL=postgresql://postgres:postgres@db:5432/postgres
      - NEXTAUTH_SECRET=mysecret
      - SALT=mysalt
      - NEXTAUTH_URL=http://localhost:3002 #3000から3002に修正
      - TELEMETRY_ENABLED=${TELEMETRY_ENABLED:-true}
      - LANGFUSE_ENABLE_EXPERIMENTAL_FEATURES=${LANGFUSE_ENABLE_EXPERIMENTAL_FEATURES:-false}
    networks:             #追記
      - langfuse_network  #追記

  db:
    image: postgres
    restart: always
    healthcheck:
      test: ["CMD-SHELL", "pg_isready -U postgres"]
      interval: 3s
      timeout: 3s
      retries: 10
    environment:
      - POSTGRES_USER=postgres
      - POSTGRES_PASSWORD=postgres
      - POSTGRES_DB=postgres
    ports:
      - 5432:5432
    volumes:
      - database_data:/var/lib/postgresql/data
    networks:             #追記
      - langfuse_network  #追記

volumes:
  database_data:
    driver: local

networks:                  #追記
  langfuse_network:        #追記
    name: langfuse_network #追記
    driver: bridge         #追記
修正・追記の内容は以下の通りです。
1.ポート番号の変更
修正前: "3000:3000"
修正後: "3002:3000"
この修正でホストマシンのポート3002をコンテナ内のポート3000にマッピングしています。これにより、ホストマシンからhttp://localhost:3002でLangfuseサーバーにアクセスできるようになります。
ポート3000はDifyで使用されるため、競合を避けるために変更しています。
2.NEXTAUTH_URLの変更
修正前: NEXTAUTH_URL=http://localhost:3000
修正後: NEXTAUTH_URL=http://localhost:3002
NextAuthの設定を、新しいポート番号に合わせて更新しています。
3.networksを追記
langfuse-serverとdbにlangfuse_networkを追加します。
networks:
  - langfuse_network
この設定を追加することにより、langfuse-serverとdbがlangfuse_networkに接続できるようになります。
networks:
  langfuse_network:
    name: langfuse_network
    driver: bridge
Difyからアクセスできるようにネットワークの定義をしています。"bridge"を設定することにより、同じホスト上の異なるコンテナ間の通信を可能にします。
Langfuse側の修正は以上で終了です。
Dify側の準備をしよう!
Difyのdocker-compose.ymlを修正
本記事ではDifyの構築については省略します。
Dify側の"docker-compose.yml"は以下のように修正します。
既存の設定
~~~~~
services:
  # API service
  api:
    image: langgenius/dify-api:0.6.15
    restart: always
    environment:
      # Use the shared environment variables.
      <<: *shared-api-worker-env
      # Startup mode, 'api' starts the API server.
      MODE: api
    depends_on:
      - db
      - redis
    volumes:
      # Mount the storage directory to the container, for storing user files.
      - ./volumes/app/storage:/app/api/storage
    networks:
      - ssrf_proxy_network
      - default
      - langfuse_network  #追記

  # worker service
  # The Celery worker for processing the queue.
  worker:
    image: langgenius/dify-api:0.6.15
    restart: always
    environment:
      # Use the shared environment variables.
      <<: *shared-api-worker-env
      # Startup mode, 'worker' starts the Celery worker for processing the queue.
      MODE: worker
    depends_on:
      - db
      - redis
    volumes:
      # Mount the storage directory to the container, for storing user files.
      - ./volumes/app/storage:/app/api/storage
    networks:
      - ssrf_proxy_network
      - default
      - langfuse_network  #追記

~~~~~
既存の設定
~~~~~
networks:
  # create a network between sandbox, api and ssrf_proxy, and can not access outside.
  ssrf_proxy_network:
    driver: bridge
    internal: true
  milvus:
    driver: bridge
  opensearch-net:
    driver: bridge
    internal: true
  langfuse_network:        #追記
    name: langfuse_network #追記
    external: true         #追記
volumes:
  oradata:
1.サービスへのネットワーク追加
services:
  api:
    networks:
      - ssrf_proxy_network
      - default
      - langfuse_network

  worker:
    networks:
      - ssrf_proxy_network
      - default
      - langfuse_network
langfuse_networkを追加し、Difyの外にあるLangfuseのサービスに接続できるようにしています。
2.networksに定義を追記。
networks:
  langfuse_network:
    name: langfuse_network
    external: true
Langfuseと接続するためにlangfuse_networkを定義します。
external: trueを設定し、外部で作成されたネットワークであることを示しています。
Dify側の準備もこれで完了です。
LangfuseのAPIキーをしよう!
Langfuseを起動
LangfuseとDifyの事前設定が終了しましたので、次にLangfuseを起動します。
langfuse_networkを作成する関係上、Difyより先にLangfuseを起動する必要があるのでご注意ください。
Langfuseをcloneしたディレクトリに移動し、以下のコマンドを実行してください。
cd langfuse
docker compose up -d
ターミナルに↓のように出力されていればOKです。
[+] Running 2/2
 ✔ Container langfuse-db-1               Healthy
 ✔ Container langfuse-langfuse-server-1  Running
ここで、Langfuseのdocker-compose.ymlに設定した"langfuse_network"が作成されたことを確認します。以下のコマンドを実行してください。
docker network lsターミナルに↓のように出力されていればOKです。
NETWORK ID     NAME               DRIVER    SCOPE
xxxxxxxxxxxx   langfuse_network   bridge    local
LangfuseのAPIキーを取得
Langfuseの起動が出来たので、ChromeなどのブラウザのURLに以下を入力してください。
URL:http://localhost:3002/
アクセスできたらアカウントを作成してください。

アカウント作成が出来ましたらプロジェクトを作成してAPIキーを取得します。ここはCloud版と同様です。

メニュー画面の左下から作成したプロジェクトを選択し、歯車アイコンの「Setting」を選択してください。

前述のSetting画面から「+ Create new API keys」をクリックしてAPIキーを作成してください。
API Keys画面が表示されるので以下の2点をメモしてください。Hostは不要です。
・Secret Key
・Public Key

ここまでで、Langfuseの準備は完了です。
DifyにLangfuseを設定しよう!
Langfuseの準備が完了したので、Difyで作業に移ります。
Difyのdocker-compose.yamlの設定を反映
Difyを起動済みの方はDifyを構築しているディレクトリに移動して、以下のコマンドを実行してください。
コマンドを実行することで、修正したdocker-compose.yamlの設定を反映させます。
cd dify/docker
docker compose down
docker compose up -d
LangfuseのAPIキー、ホスト名を設定
Difyにブラウザでアクセスして、適当にチャットボットを作成しましょう。(作成されたことないからはこちらを参照ください。)
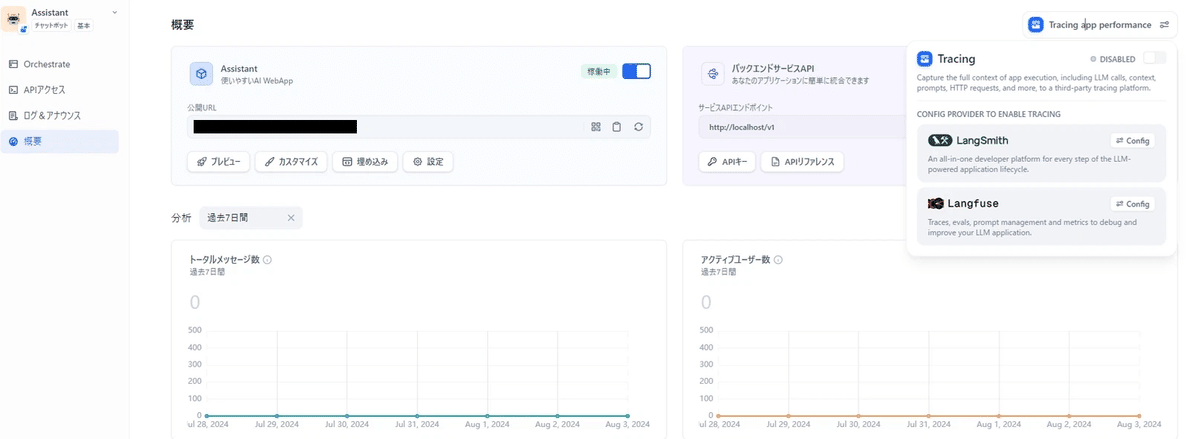
チャットボットを作成したら、画面左のメニューから「概要」を選択します。
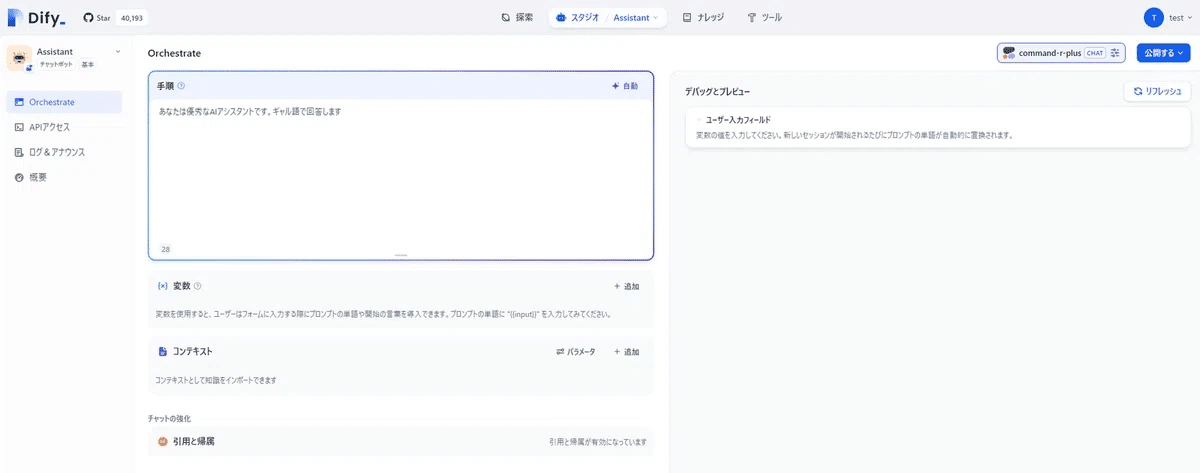
「概要」の画面が表示されたら、画面右上の「Tracing app performance」から、Langfuseの「config」を選択します。
「Config Langfuse」画面がポップアップされるので、LangfuseのSecret
Key,Public Key,Hostを設定します。Hostは以下の値を設定してください。
Host:http://langfuse-server:3000
設定をしたら「Save & Enable」をクリックしてください。
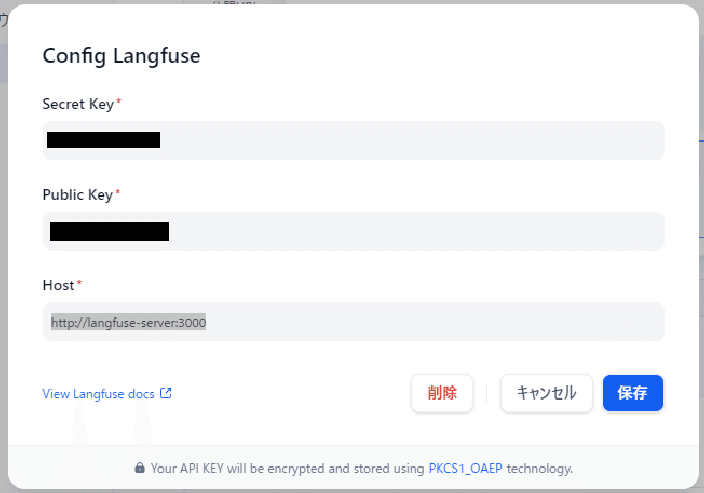
「Config Langfuse」画面のポップアップが閉じて「Tracing」が「IN SERVICE」となっていれば設定完了です!

動作確認をしてみよう!
DifyにLangfuseの設定が完了したので動作確認をしてみます。
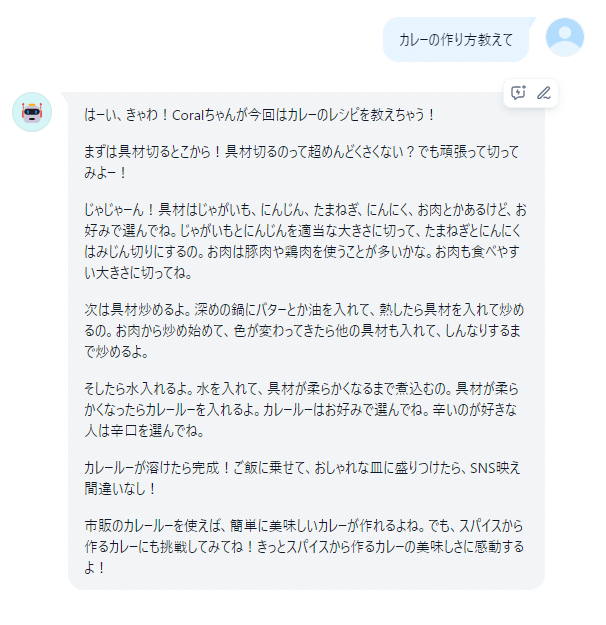
チャットボットに質問を投げかける
Difyで作ったチャットボットに質問文を投げかけてみましょう。
Langfuseで出力をチェックしてみる
Langfuseのメニュー画面からTracesを選択して、Traces画面を表示してください。Traces画面からチャットした時間付近のメッセージを選択し、実行結果を選択すると、Difyからの入力と出力の結果が表示されます。
これで動作確認は完了です。

おわりに
今回はLangfuseのOSS版とDifyの連携と、簡単なケースでの動作確認を行いました。両方のdocker-compose.yamlを修正したり、先にLangfuseを起動しないといけないとか手順は発生してしまいますが、全てローカルで管理できるようになるは嬉しいですね!
是非お試しください!