
Function Calling(機能)を用いて自律的なAIエージェントを構築する

https://towardsdatascience.com/build-autonomous-ai-agents-with-function-calling-0bb483753975
OpenAIは2023年7月からGPTモデルにFunction Callingを使用し始めました。現在、GoogleのGemini APIやAnthropicのClaudeなどもこれを使用しています。このツールは大規模言語モデル(LLM)に非常に役立ち、それをどのように使用するかを知ることは重要です。
Function Callingを実際にどのように使用するか、完全に自己機能するAIエージェントを作成する方法、さらに、Streamlitと接続してChatGPTのようなチャットインターフェースを作る方法も紹介します。このガイドはOpenAIに基づいていますが、GeminiのようなFunction Callingを使用する他のLLMでも使用できます。
Function Callingは何のために使うのか?
Function Callingは、開発者が関数(ツールとも呼ばれますが、これはモデルが行うアクション、つまり計算を行ったり、注文を行ったりすることを考えることができます)を記述し、モデルがそれらの関数を呼び出すための引数を含むJSONオブジェクトを出力することを知的に選択することを可能にします。より簡単な言葉で言えば、次のことが可能になります:
自律的な意思決定:モデルは知的にツールを選択して質問に応答することができます。
信頼性のあるパーシング:レスポンスはJSON形式で、より一般的な対話型のレスポンスではなく。初めて見た時には大したことがないように思えますが、これがLLMを、例えば構造化された入力を持つAPIなどの外部システムに接続することを可能にしています。
これにより、多くの可能性が開かれます:
自律的なAIアシスタント:ボットは、問い合わせに対する回答を提供するだけでなく、顧客の注文や返品などの内部システムとのタスクを交換することができます。
個人の研究アシスタント:旅行の計画を立てている場合など、アシスタントはWebを検索し、コンテンツをクロールし、オプションを比較し、結果をExcelでまとめることができます。
IoT音声コマンド:モデルは、ACの温度を調整するなど、検出された意図に基づいてデバイスを制御したり、アクションを提案したりすることができます。
Function Callingの構造
GeminiのFunction Callingドキュメンテーションから借りて、関数呼び出しには以下の構造があり、これはOpenAIでも同様に機能します。
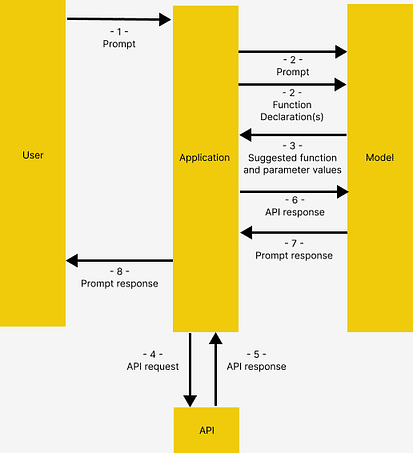
GeminiのFunction Callingドキュメンテーションからの画像
ユーザーがアプリケーションにプロンプトを発行します
アプリケーションは、ユーザーが提供したプロンプトとFunction Declaration(モデルが使用可能なツールの説明)を渡します
Function Declarationに基づいて、モデルは使用するツールと関連するリクエストパラメータを示します。モデルが関数を実際に呼び出すことなく、提案されたツールとパラメータのみを出力することに注意してください
& 5. レスポンスに基づいて、アプリケーションは関連するAPIを呼び出します
& 7. APIからのレスポンスは再度モデルにフィードされ、人間が読むことができるレスポンスを出力します
アプリケーションは最終的なレスポンスをユーザーに返し、1から繰り返します。
これは複雑に見えるかもしれませんが、例を用いて詳細に説明される概念です。
アーキテクチャ
コードに深く入る前に、デモアプリケーションのアーキテクチャについて少し説明します。
解決策
ここでは、ホテルを訪れる観光客のためのアシスタントを構築します。アシスタントは次のツールにアクセスでき、これによりアシスタントは外部アプリケーションにアクセスできます。
get_items, purchase_item:APIを介してデータベースに保存された商品カタログに接続し、商品リストの取得と購入をそれぞれ行います。
rag_pipeline_func:検索強化生成(RAG)を備えたドキュメントストアに接続し、構造化されていないテキストから情報を取得します。例えば、ホテルのパンフレットなど。

技術スタック
Embedding モデル: all-MiniLM-L6-v2
ベクトルデータベース: HaystackのInMemoryDocumentStore
LLM: OpenRouter経由でアクセス可能なGPT-4 Turbo。OpenRouterを使用すると、VPNなしで香港から異なるLLM APIにアクセスできます。他のLLMを使用するためには、Function Callingをサポートしていれば、コードを少し変更して流れを適応させることが可能です、例えばGemini
LLMフレームワーク: Haystack。使いやすさ、素晴らしいドキュメンテーション、パイプライン構築の透明性を提供しています。このチュートリアルは実際には、同じトピックの彼らの素晴らしいチュートリアルの拡張版です。
サンプルアプリケーション
準備
Githubに移動して私のコードをクローンしてください。以下の内容はfunction_calling_demoノートブックにあります。
また、仮想環境を作成して有効化し、pip install -r requirements.txtを実行して必要なパッケージをインストールしてください。
初期化
まず、OpenRouterに接続します。あるいは、api_base_urlを上書きせずにオリジナルのOpenAIChatGeneratorを使用することも可能ですが、その場合はOpenAI APIキーが必要です。
import os
from dotenv import load_dotenv
from haystack.components.generators.chat import OpenAIChatGenerator
from haystack.utils import Secret
from haystack.dataclasses import ChatMessage
from haystack.components.generators.utils import print\\_streaming\\_chunk

load_dotenv()
OPENROUTER\\_API\\_KEY = os.environ.get('OPENROUTER\\_API\\_KEY')

chat\\_generator = OpenAIChatGenerator(api\\_key=Secret.from\\_env\\_var("OPENROUTER\\_API\\_KEY"),
  api\\_base\\_url="<https://openrouter.ai/api/v1>",
  model="openai/gpt-4-turbo-preview",
        streaming\\_callback=print\\_streaming_chunk)
次に、chat_generatorが正常に呼び出されるかどうかをテストします
chat\\_generator.run(messages=\\[ChatMessage.from\\_user("Return this text: 'test'")\\])
\\-\\-\\-\\-\\-\\-\\-\\-\\-\\- The response should look like this ----------
{'replies': \\[ChatMessage(content="'test'", role=<ChatRole.ASSISTANT: 'assistant'>, name=None, meta={'model': 'openai/gpt-4-turbo-preview', 'index': 0, 'finish_reason': 'stop', 'usage': {}})\\]}
ステップ1:データストアの構築
ここでは、アプリケーションと二つのデータソース:非構造化テキストのための ドキュメントストアと、API経由のアプリケーションデータベースとの間の接続を確立します。
パイプラインでドキュメントをインデックス化
documentsには、モデルがRetrival Augmented Generation (RAG)を実行するためのサンプルテキストを提供します。これらのテキストはエンベディングに変換され、インメモリのドキュメントストアに保存されます。
from haystack import Pipeline, Document
from haystack.document\\_stores.in\\_memory import InMemoryDocumentStore
from haystack.components.writers import DocumentWriter
from haystack.components.embedders import SentenceTransformersDocumentEmbedder

documents = \\[
    Document(content="Coffee shop opens at 9am and closes at 5pm."),
    Document(content="Gym room opens at 6am and closes at 10pm.")
\\]

document_store = InMemoryDocumentStore()

indexing_pipeline = Pipeline()
indexing\\_pipeline.add\\_component(
    "doc_embedder", SentenceTransformersDocumentEmbedder(model="sentence-transformers/all-MiniLM-L6-v2")
)
indexing\\_pipeline.add\\_component("doc_writer", DocumentWriter(document\\_store=document\\_store))

indexing_pipeline.connect("doc_embedder.documents", "doc_writer.documents")

indexing_pipeline.run({"doc_embedder": {"documents": documents}})
これは、作成したサンプルとしての documents に対応する出力です
{'doc_writer': {'documents_written': 2}}
APIサーバーの起動
Flaskを使用したAPIサーバーは、SQLiteに接続するために db_api.pyの下に作成されます。ターミナルでpython db_api.pyを実行して起動してください。

これは、正常に実行された場合にターミナルに表示されます
また、db_api.pyに初期データが追加されたことにも注意してください

ステップ2:関数の定義
ここでは、モデルが関数呼び出し(関数呼び出しの構造で説明されているステップ4-5)の後に**呼び出すための実際の関数を準備します。
RAG関数
具体的には、rag_pipeline_funcです。これはモデルがドキュメントストアに格納されたテキストを検索して答えを提供するためのものです。まず、RAGの検索をHaystackパイプラインとして定義します
from haystack.components.embedders import SentenceTransformersTextEmbedder
from haystack.components.retrievers.in_memory import InMemoryEmbeddingRetriever
from haystack.components.builders import PromptBuilder
from haystack.components.generators import OpenAIGenerator

template = """
Answer the questions based on the given context.

Context:
{% for document in documents %}
    {{ document.content }}
{% endfor %}
Question: {{ question }}
Answer:
"""

rag_pipe = Pipeline()
rag\\_pipe.add\\_component("embedder", SentenceTransformersTextEmbedder(model="sentence-transformers/all-MiniLM-L6-v2"))
rag\\_pipe.add\\_component("retriever", InMemoryEmbeddingRetriever(document\\_store=document\\_store))
rag\\_pipe.add\\_component("prompt_builder", PromptBuilder(template=template))

rag\\_pipe.add\\_component("llm", OpenAIGenerator(api\\_key=Secret.from\\_env_var("OPENROUTER\\_API\\_KEY"),
  api\\_base\\_url="<https://openrouter.ai/api/v1>",
  model="openai/gpt-4-turbo-preview"))

rag_pipe.connect("embedder.embedding", "retriever.query_embedding")
rag_pipe.connect("retriever", "prompt_builder.documents")
rag_pipe.connect("prompt_builder", "llm")
関数が機能するかテストしてください
query = “When does the coffee shop open?”
rag_pipe.run({"embedder": {"text": query}, "prompt_builder": {"question": query}})
これにより、次の出力が得られます。モデルが提供したrepliesは、以前に提供したサンプルドキュメントからのものであることに注意してください。
{'llm': {'replies': \\['The coffee shop opens at 9am.'\\],
  'meta': \\[{'model': 'openai/gpt-4-turbo-preview',
    'index': 0,
    'finish_reason': 'stop',
    'usage': {'completion_tokens': 9,
     'prompt_tokens': 60,
     'total_tokens': 69,
     'total_cost': 0.00087}}\\]}}
その後、rag_pipeを関数に変換することができます。これにより、他の詳細を追加せずにrepliesのみが提供されます。
def rag\\_pipeline\\_func(query: str):
    result = rag_pipe.run({"embedder": {"text": query}, "prompt_builder": {"question": query}})

    return {"reply": result\\["llm"\\]\\["replies"\\]\\[0\\]}
APIの呼び出し
データベースとの対話のために、 get_items および purchase_item 関数を定義します
db\\_base\\_url = '<http://127.0.0.1:5000>'

import requests
import json

def get_categories():
    response = requests.get(f'{db\\_base\\_url}/category')
    data = response.json()
    return data

def get_items(ids=None,categories=None):
    params = {
        'id': ids,
        'category': categories,
    }
    response = requests.get(f'{db\\_base\\_url}/item', params=params)
    data = response.json()
    return data

def purchase_item(id,quantity):

    headers = {
    'Content-type':'application/json',
    'Accept':'application/json'
    }

    data = {
        'id': id,
        'quantity': quantity,
    }
    response = requests.post(f'{db\\_base\\_url}/item/purchase', json=data, headers=headers)
    return response.json()
ツールリストを定義する
関数が定義されたので、モデルがこれらの関数を認識し、それらがどのように使用されるかを指示するために、それらの説明を提供する必要があります。
ここではOpenAIを使用しているため、toolsは以下のようにフォーマットされています。これはOpen AIによって必要とされる形式に従っています。
tools = \\[
    {
        "type": "function",
        "function": {
            "name": "get_items",
            "description": "Get a list of items from the database",
            "parameters": {
                "type": "object",
                "properties": {
                    "ids": {
                        "type": "string",
                        "description": "Comma separated list of item ids to fetch",
                    },
                    "categories": {
                        "type": "string",
                        "description": "Comma separated list of item categories to fetch",
                    },
                },
                "required": \\[\\],
            },
        }
    },
    {
        "type": "function",
        "function": {
            "name": "purchase_item",
            "description": "Purchase a particular item",
            "parameters": {
                "type": "object",
                "properties": {
                    "id": {
                        "type": "string",
                        "description": "The given product ID, product name is not accepted here. Please obtain the product ID from the database first.",
                    },
                    "quantity": {
                        "type": "integer",
                        "description": "Number of items to purchase",
                    },
                },
                "required": \\[\\],
            },
        }
    },
    {
        "type": "function",
        "function": {
            "name": "rag\\_pipeline\\_func",
            "description": "Get information from hotel brochure",
            "parameters": {
                "type": "object",
                "properties": {
                    "query": {
                        "type": "string",
                        "description": "The query to use in the search. Infer this from the user's message. It should be a question or a statement",
                    }
                },
                "required": \\["query"\\],
            },
        },
    }
\\]
ステップ3:すべてをまとめる
これでFunction Callingのテストに必要な入力が揃いました!ここではいくつかのことを行います:
モデルに初期のプロンプトを提供し、一部のコンテキストを与えます
ユーザーが生成したメッセージのサンプルを提供します
最も重要なのは、tools内のチャットジェネレータにツールリストを渡すことです
context = f"""You are an assistant to tourists visiting a hotel.
You have access to a database of items (which includes {get_categories()}) that tourists can buy, you also have access to the hotel's brochure.
If the tourist's question cannot be answered from the database, you can refer to the brochure.
If the tourist's question cannot be answered from the brochure, you can ask the tourist to ask the hotel staff.
"""
messages = \\[
    ChatMessage.from_system(context),

    ChatMessage.from_user("Can I buy a coffee?"),
    \\]

response = chat\\_generator.run(messages=messages, generation\\_kwargs= {"tools": tools})
response
\\-\\-\\-\\-\\-\\-\\-\\-\\-\\- Response ----------
{'replies': \\[ChatMessage(content='\\[{"index": 0, "id": "call\\_AkTWoiJzx5uJSgKW0WAI1yBB", "function": {"arguments": "{\\\\\\"categories\\\\\\":\\\\\\"Food and beverages\\\\\\"}", "name": "get\\_items"}, "type": "function"}\\]', role=<ChatRole.ASSISTANT: 'assistant'>, name=None, meta={'model': 'openai/gpt-4-turbo-preview', 'index': 0, 'finish\\_reason': 'tool\\_calls', 'usage': {}})\\]}
さあ、レスポンスを調査してみましょう。モデルが選択した関数と、選択した関数を呼び出すための引数の両方を、関数呼び出しが返すことに注目してください。
function_call = json.loads(response\\["replies"\\]\\[0\\].content)\\[0\\]
function\\_name = function\\_call\\["function"\\]\\["name"\\]
function\\_args = json.loads(function\\_call\\["function"\\]\\["arguments"\\])
print("Function Name:", function_name)
print("Function Arguments:", function_args)
\\-\\-\\-\\-\\-\\-\\-\\-\\-\\- Response ----------
Function Name: get_items
Function Arguments: {‘categories’: ‘Food and beverages’}
別の質問が提示されたとき、モデルはより関連性の高い別のツールを使用します
messages.append(ChatMessage.from_user("Where's the coffee shop?"))

response = chat\\_generator.run(messages=messages, generation\\_kwargs= {"tools": tools})
function_call = json.loads(response\\["replies"\\]\\[0\\].content)\\[0\\]
function\\_name = function\\_call\\["function"\\]\\["name"\\]
function\\_args = json.loads(function\\_call\\["function"\\]\\["arguments"\\])
print("Function Name:", function_name)
print("Function Arguments:", function_args)
\\-\\-\\-\\-\\-\\-\\-\\-\\-\\- Response ----------
Function Name: rag\\_pipeline\\_func
Function Arguments: {'query': "Where's the coffee shop?"}
再度、ここでは実際の関数が呼び出されていないことに注意してください、これは次に行うことです!
関数の呼び出し
その後、選択した関数に引数をフィードできます
available_functions = {"get_items": get_items, "purchase_item": purchase_item,"rag\\_pipeline\\_func": rag\\_pipeline\\_func}
function\\_to\\_call = available\\_functions\\[function\\_name\\]
function\\_response = function\\_to\\_call(**function\\_args)
print("Function Response:", function_response)
\\-\\-\\-\\-\\-\\-\\-\\-\\-\\- Response ----------
Function Response: {'reply': 'The provided context does not specify a physical location for the coffee shop, only its operating hours. Therefore, I cannot determine where the coffee shop is located based on the given information.'}
rag_pipeline_funcからの応答は、それをmessagesの下に追加することでチャットのコンテキストとして渡すことができ、モデルは最終的な答えを提供します。
messages.append(ChatMessage.from\\_function(content=json.dumps(function\\_response), name=function_name))
response = chat_generator.run(messages=messages)
response_msg = response\\["replies"\\]\\[0\\]

print(response_msg.content)
\\-\\-\\-\\-\\-\\-\\-\\-\\-\\- Response ----------
For the location of the coffee shop within the hotel, I recommend asking the hotel staff directly. They will be able to guide you to it accurately.
以上でチャットサイクルが完了です。
ステップ4:対話型チャットに変換する
上記のコードは関数呼び出しがどのように行われるかを示していますが、これをさらに一歩進めて対話型のチャットに変えたいと思います。
ここでは、ノートブック自体にダイアログを表示するよりも原始的な input() から、それをStreamlit を通じてレンダリングしてChatGPTのようなUIを提供するまで、それを行うための2つの方法を紹介します。
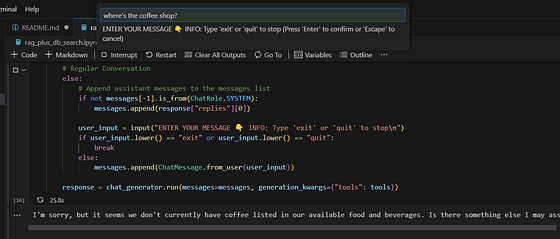
input()** ループ
このコードは Haystackのチュートリアル からコピーされており、モデルを素早くテストすることができます。注:このアプリケーションは関数呼び出しの考え方を示すために作られたものであり、同時に複数のアイテムの順序をサポートしたり、幻覚を起こさないなど、完全に堅牢であることを意味していません。
import json
from haystack.dataclasses import ChatMessage, ChatRole

response = None
messages = \\[
    ChatMessage.from_system(context)
\\]

while True:

    if response and response\\["replies"\\]\\[0\\].meta\\["finish_reason"\\] == "tool_calls":
        function_calls = json.loads(response\\["replies"\\]\\[0\\].content)

        for function_call in function_calls:

            function\\_name = function\\_call\\["function"\\]\\["name"\\]
            function\\_args = json.loads(function\\_call\\["function"\\]\\["arguments"\\])

            function\\_to\\_call = available\\_functions\\[function\\_name\\]
            function\\_response = function\\_to\\_call(**function\\_args)

            messages.append(ChatMessage.from\\_function(content=json.dumps(function\\_response), name=function_name))

    else:

        if not messages\\[-1\\].is_from(ChatRole.SYSTEM):
            messages.append(response\\["replies"\\]\\[0\\])

        user_input = input("ENTER YOUR MESSAGE 👇 INFO: Type 'exit' or 'quit' to stop\\\\n")
        if user_input.lower() == "exit" or user_input.lower() == "quit":
            break
        else:
            messages.append(ChatMessage.from\\_user(user\\_input))

    response = chat\\_generator.run(messages=messages, generation\\_kwargs={"tools": tools})
それが機能している間、もっと見栄えのいいものを持つことを望むかもしれません。
Streamlit インターフェース
Streamlitはデータスクリプトを共有可能なWebアプリに変換し、私たちのアプリケーションに対してきちんとしたUIを提供します。上記に示したコードは、私のリポジトリのstreamlitフォルダの中にあるStreamlitアプリケーションに適応されています。
実行するには:
まだ行っていない場合、python db_api.pyでAPIサーバーを起動します。
環境変数としてOPENROUTER_API_KEYを設定します。例:export OPENROUTER_API_KEY = ‘@YOUR API KEYに置き換えてください’ Linux / git bashで実行する場合を仮定しています。
ターミナルでstreamlitフォルダに移動します。cd streamlitを使用します。
streamlit run app.pyでStreamlitを実行します。新しいタブが自動的にブラウザで開かれ、アプリケーションが実行されるはずです。
この記事が気に入ったらサポートをしてみませんか?