How to make a water drop with Live2D (Tutorial)

〇About this article
This is an article about using Live2D to make "dripping and falling liquids". You can make something like this.
Live2Dで水滴を作りました#Live2D pic.twitter.com/qFg5cmLnsY
— hino36 (@hino1296) August 26, 2021
・Sample data is available at nizima.
https://nizima.com/item/detailItem/24492
・The explanation is based on a simplified model. In addition, it is intended for people who have at least done the official Live2D tutorials, so there is no explanation of terminology.
・This article is based on the following article.
〇Self Introduction
I draw fan arts of some animes, as a hobby. I tend to create animations using single pictures rather than standing pictures (like Vtuber models).
〇About Parts Separation (the original picture)
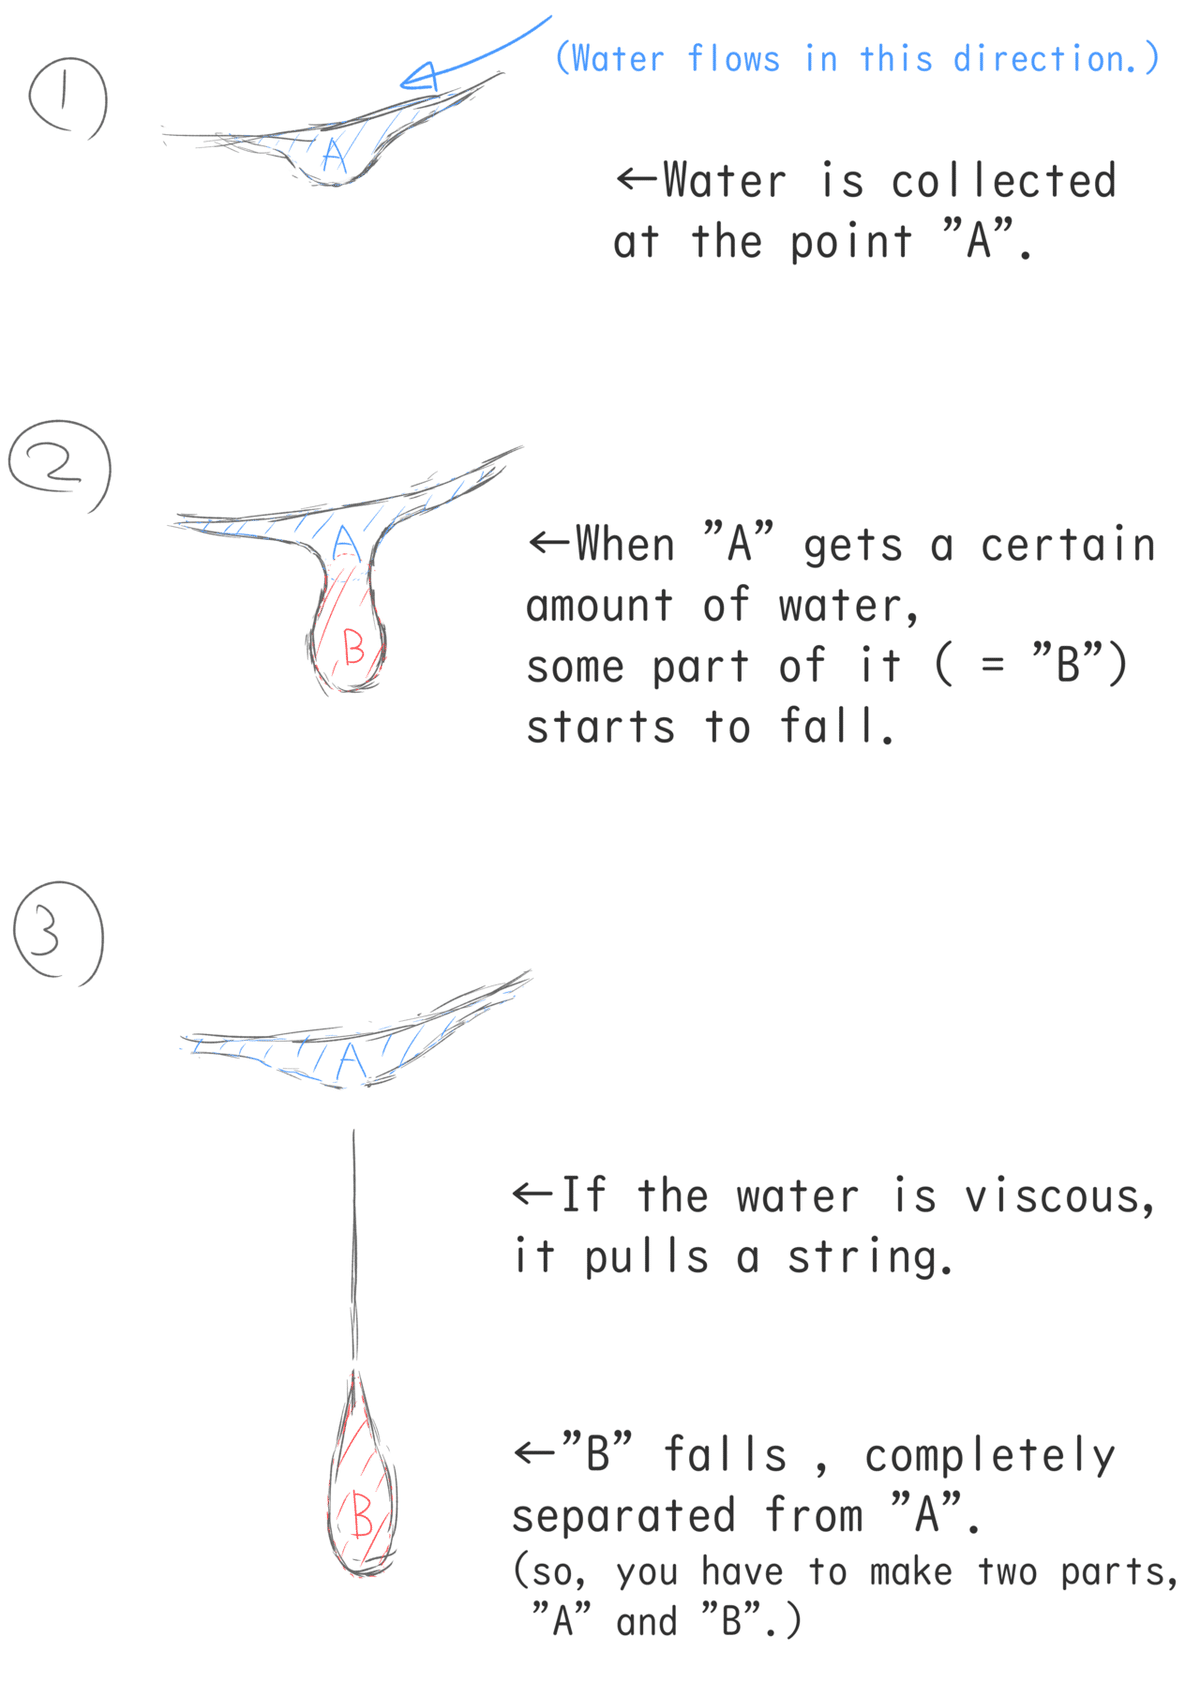
The following image shows how water falls.
■Assigning parameters with the model
(Premise)
・Only one parameter is used. So, the parameter to be used is simply called "parameter" in the text.
・We will assume that the minimum value of the parameter is 0, the maximum value is 80, the initial value is 0, and the key form is added in increments of 10.
・In addition, you may see "parameter: number" in the text, which means "when the parameter is that number". For example, "Parameter: 50" means "when the parameter is 50".
As a rough guide, we want to make the water droplets separate with the parameter: 50~60, so set ①~② in the image diagram to be 0~50, and ②~③ to be 50~80 (as shown below).
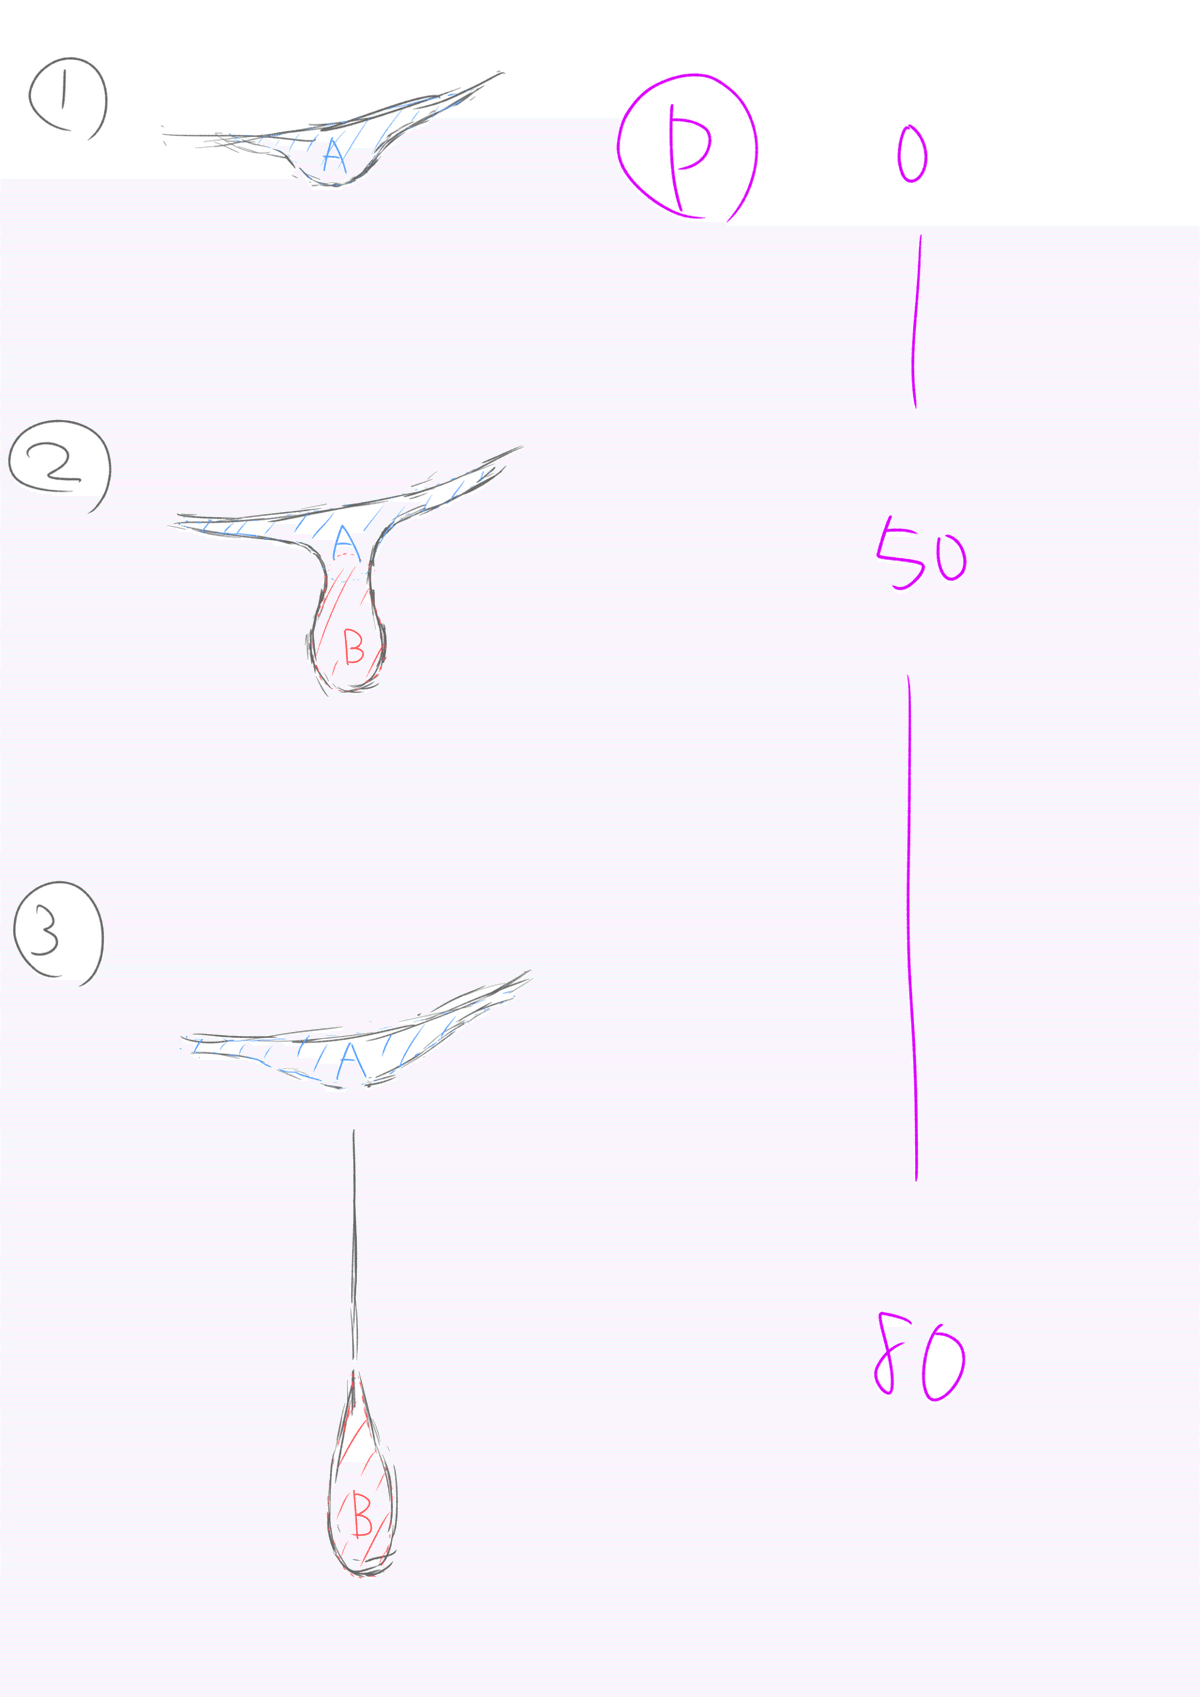
(*P in the figure refers to the parameter.)
TIPS
I think it's okay if the water droplets are separated a little earlier, but I personally recommend separating them at around 40-60, because it's much easier to animate them if you do the easing (slowing in and out) at the time of parameterization.
(*Easing is, roughly speaking, something like "making rhythms". It's much easier if you incorporate the movement of water droplets slowly accumulating and then quickly falling at a certain timing when setting the parameters in the first place.
■Drawing the original picture
Based on the above, here is the original drawing with the parameters assumed to be around 50.
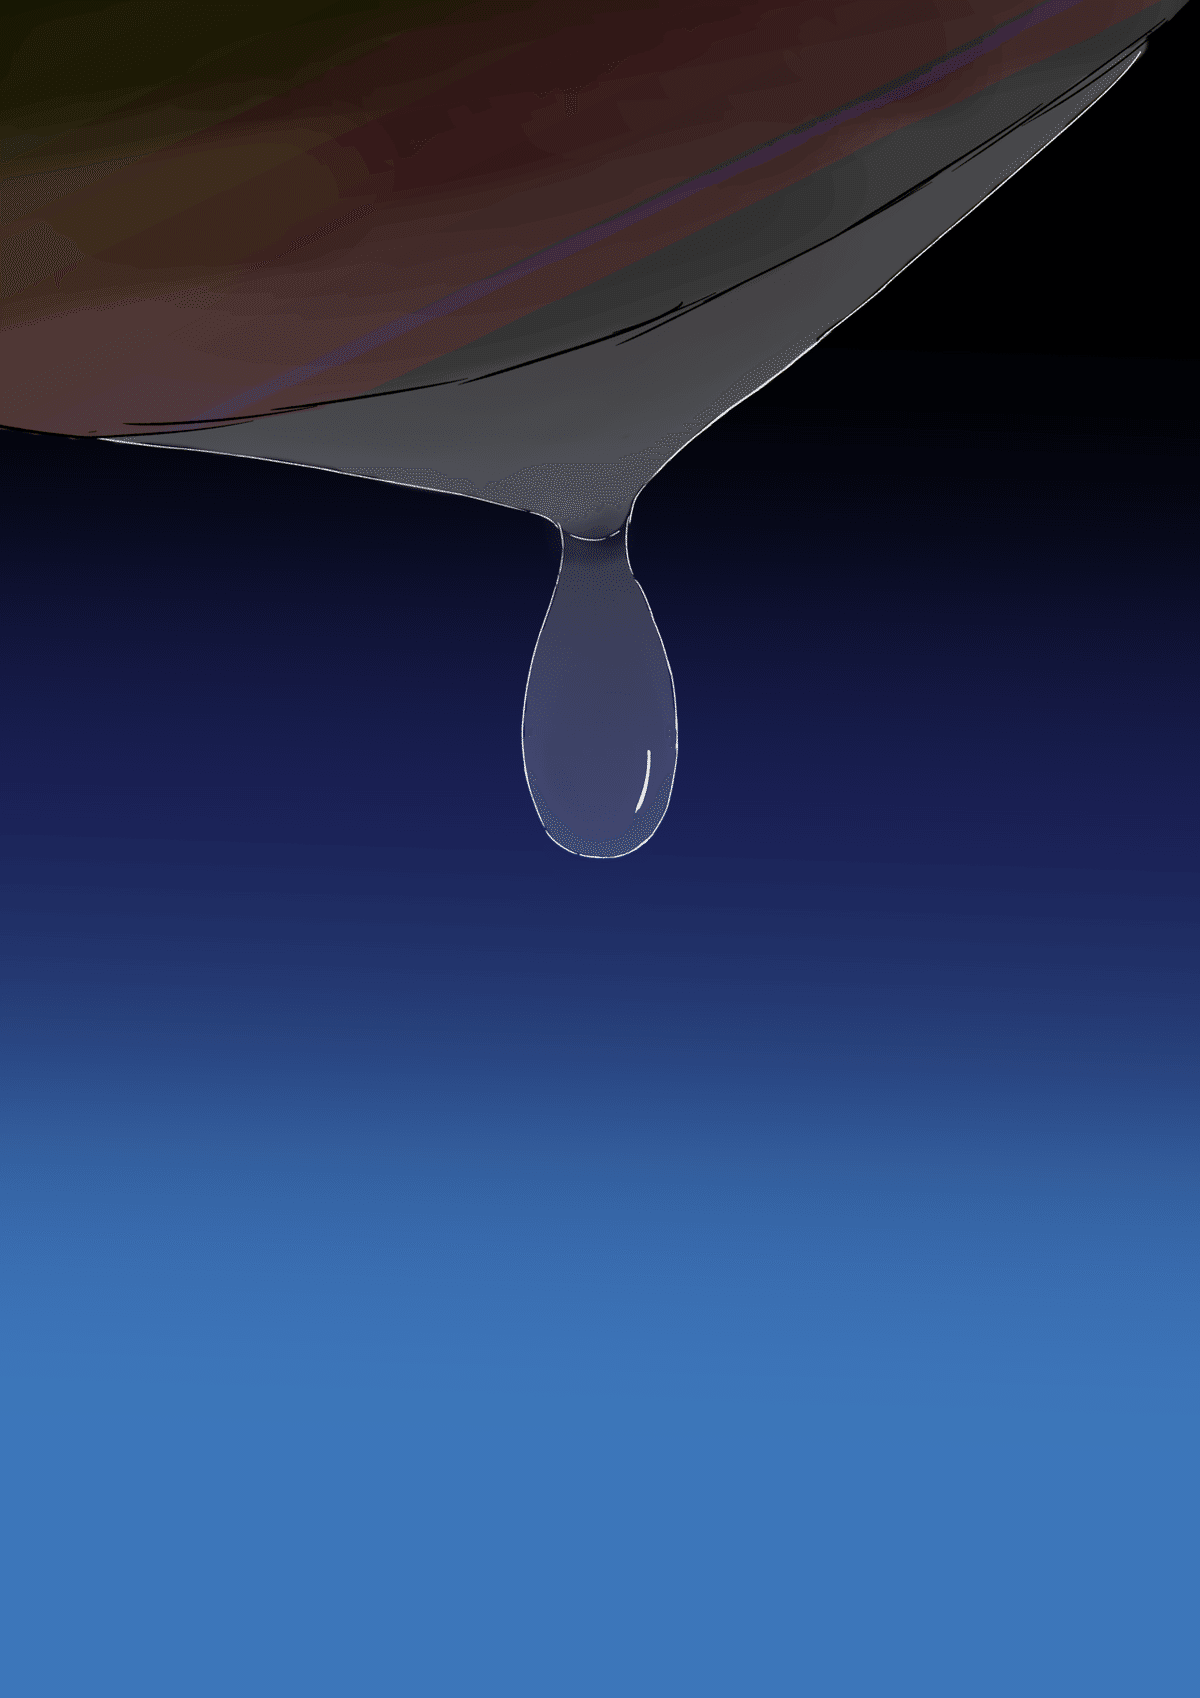
(You may not know what it is, but the translucent part in the middle represents a liquid.)
A and B are shown below, respectively. "A” is where the water is collected (top) and “B” is the part of the water droplet that falls (bottom), as shown in the first image of the modeled liquid.

(Only A / OnlyB)
The actual division into parts looks like this.

TIPS
・It would be easier to move it if you draw the original image "in the middle" of the movement. In addition, in Live2D, it is often easy to shrink a large object, but difficult to make a small object larger. In this case, I drew the image so that both "A" and "B" sizes are (almost) the maximum, with a parameter value of about 50.
・I think it's better to exaggerate the drawing, even if it's a little weird (because you can fix the whole original drawing during the modeling stage).
・Depending on the original drawing, it may be better to reverse the layer order of A and B.
〇Modeling
・First, model the A parameters: 0~50 first, and then match the B parameters: 0~50 one by one.
・Both "A" and "B" will automatically divide the mesh with "Standard" for now, but you may want to modify the mesh near the line drawing (I will explain this later).

(The figure shows that the mesh was generated automatically with "Standard".)
・Delete all the preset parameters because they are in the way, and set up a new parameter named "Water Drop"(「水滴」) (all "parameters" in the following text refer to this "Water Drop" parameter). The minimum value of the "water drop" parameter is 0, the maximum value is 80, and the initial value is 0. For both "A" and "B", we will enter the key form in increments of 10.

(I think it goes like this.)
(1) Create parameter "A": 0~50.
*There is no need to make it exact at this stage, as it can be modified later.
Assuming that the original image will be shown when the parameter value is "50", we will start with A and fill in the parameters from "0~50".
First, I created the state with the parameter: 0, and then filled in the space between the parameter: 50 (the state of the original image). However, when the parameter was 0, the shape of the tip (the part where A and B connect) was broken, and it seemed a little difficult to restore the natural shape manually, so I made the shapes from 0 to 30 in the order of 0, 10, 20, and 30, copying and pasting the shapes each time. Only when the parameter was 40, I created the shape based on the shape of 50.
By doing this, you can avoid creating a deformation of the critical part (the software will generate the inbetween from "30" to "40"), which I think is quite useful as a way to avoid a deformation that may be quite difficult.
The actual "A" parameters: 0 to 50, respectively, are as follows.


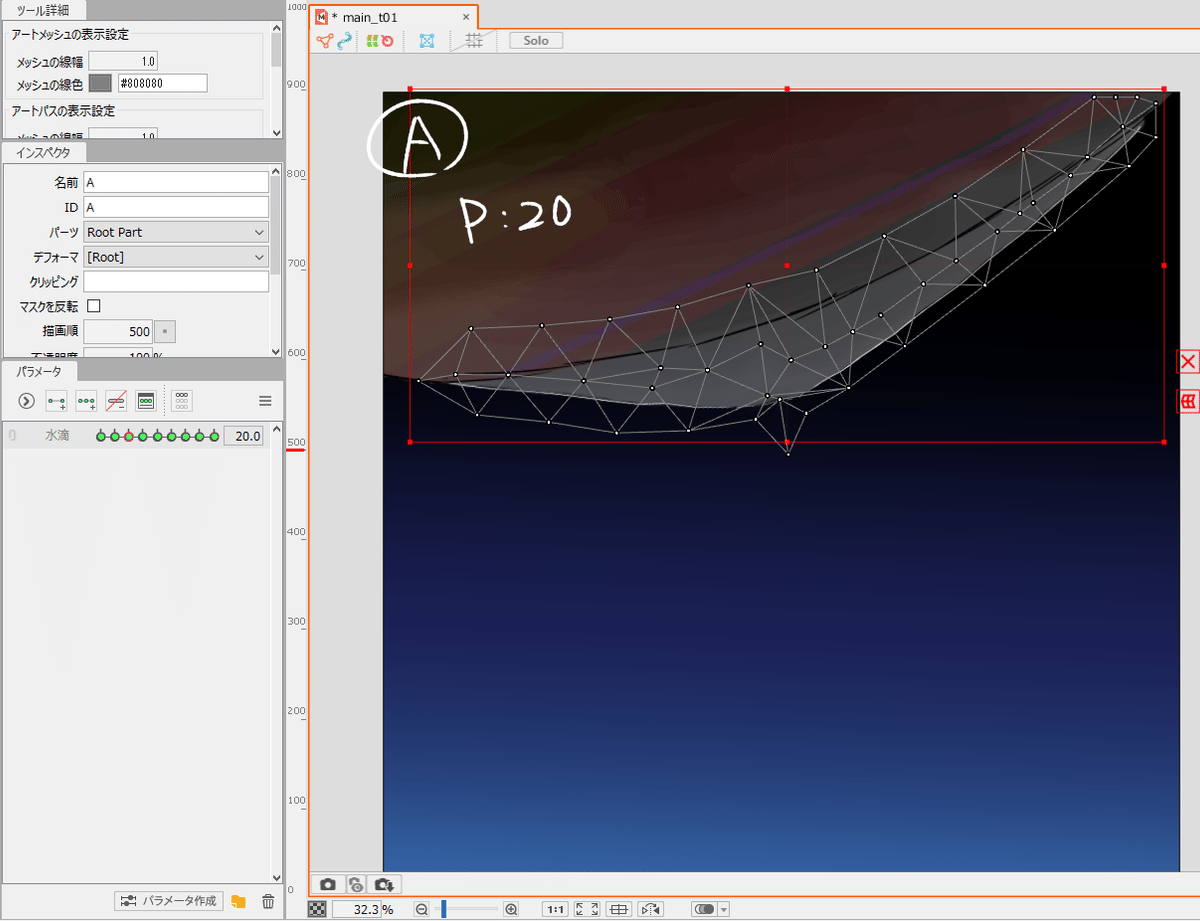


(*The notation "P:0" in the figure means that the "water droplet" parameter is zero. This notation will be used thereafter.)
(*Also, in some of the subsequent screenshots, you may see a capital A or B. This means "This is a diagram about A (or B)".)
TIPS
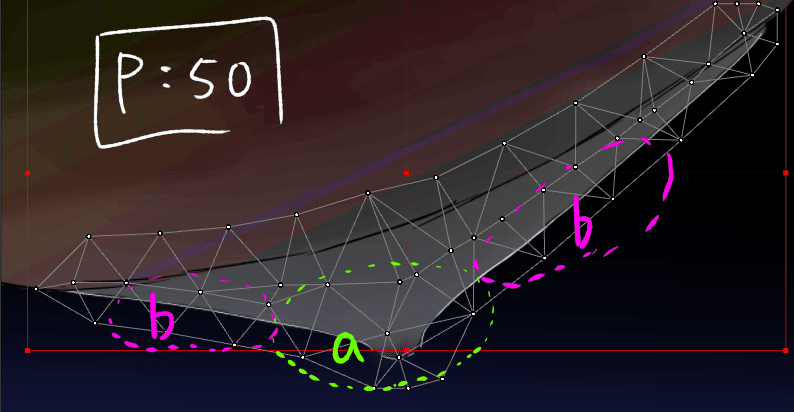
・Note that there are "some places that move (a)" and "some places that don't move so much (b)" (see the figure below). In particular, the tip around the middle of the bottom (the part where A and B are originally connected, indicated by "a" in the figure) moves a lot, so the movement of the surrounding area (indicated by "b" in the figure) should match that.
・You can set shortcut keys to move to the previous parameter and the next parameter. This is really useful (I have assigned them to 4 and 6 on the numeric keypad, respectively).
(2) Move "B" in accordance with the movement of "A".
Before I do that, I'm going to redivide the auto-split mesh because it's too far away from the line drawing and it's hard to do.
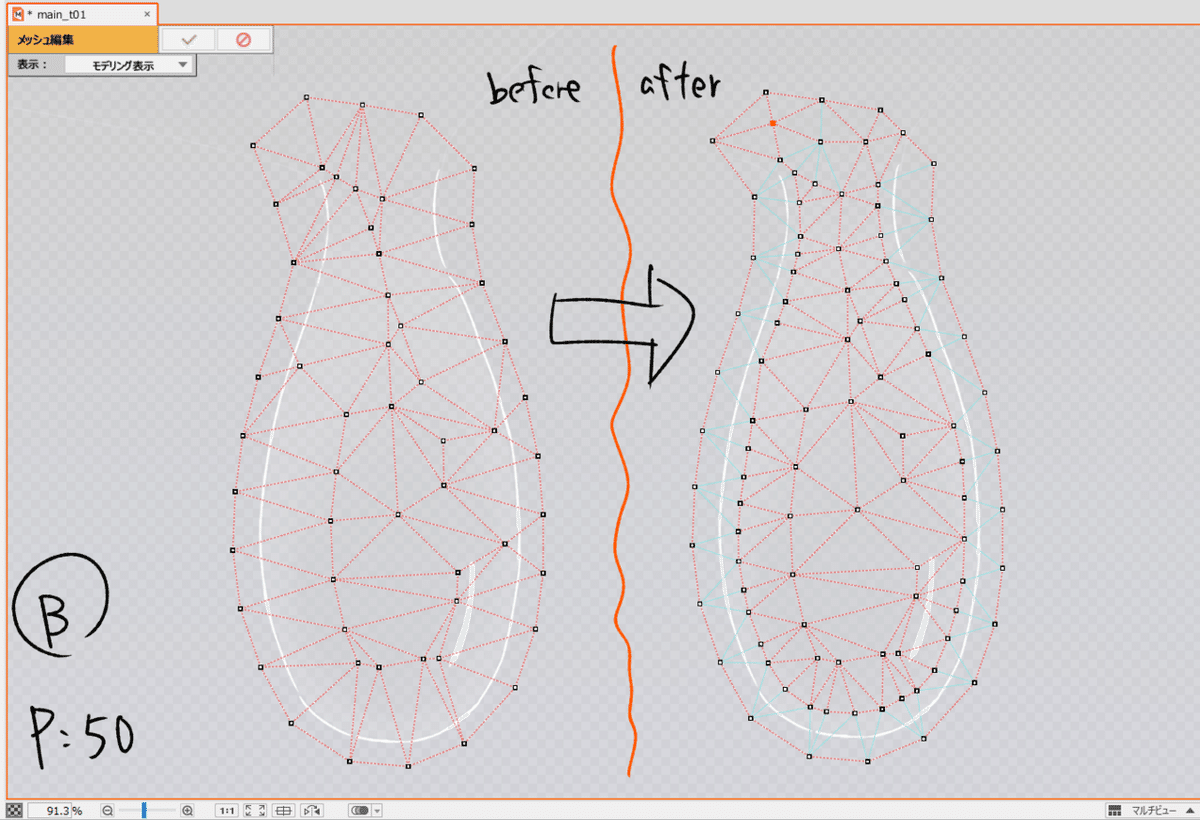
(It should look like the right side of the figure. Don't forget to auto-connect the mesh.)
Before we move it, we will introduce deformed path. B will basically be deformed while focusing on the silhouette, by using deformed path.
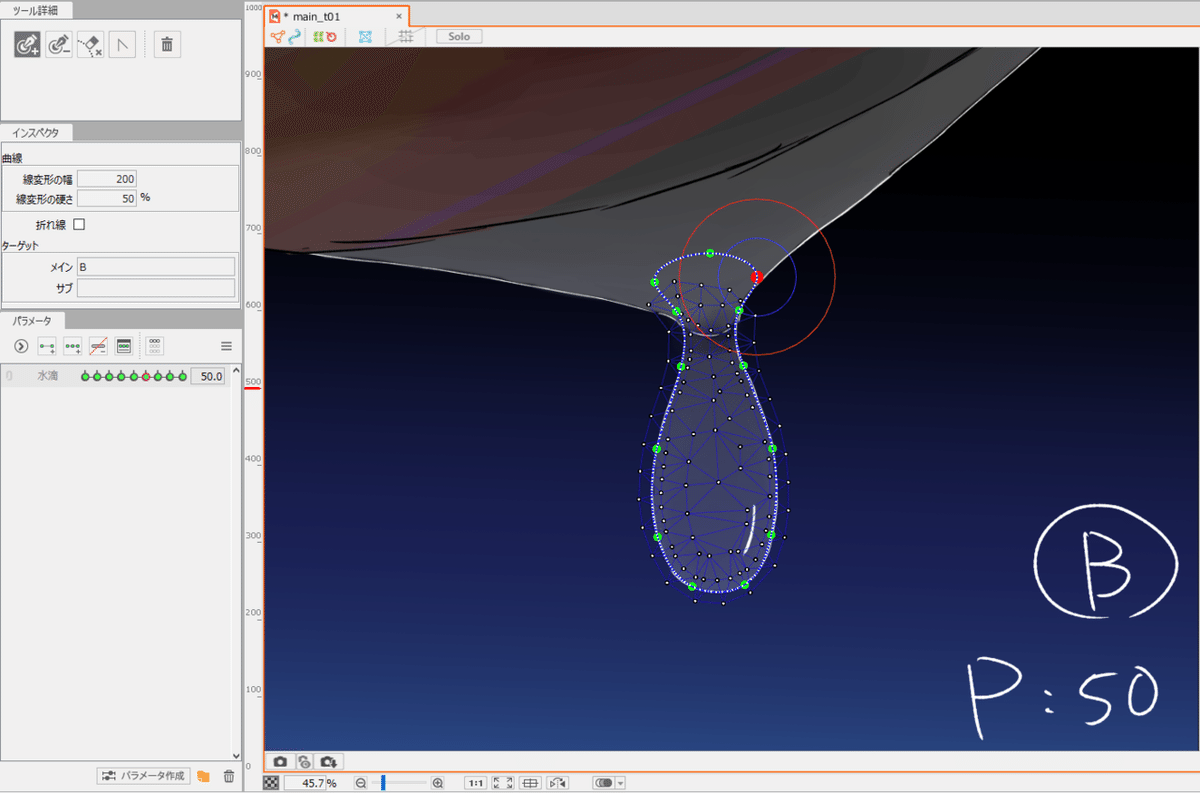
TIPS
It is better to match the deformed path and the line drawing as accurately as possible. Also, it is easier to move the object with as few control points as possible. You don't need to be strict about the top part of the object that doesn't have a line drawing, but adjacent control points will affect each other, so try not to lose the shape of the area with the line drawing.
(*Deformed paths are useful because they are resilient in themselves and are hard to break, especially when moving spherical objects.)
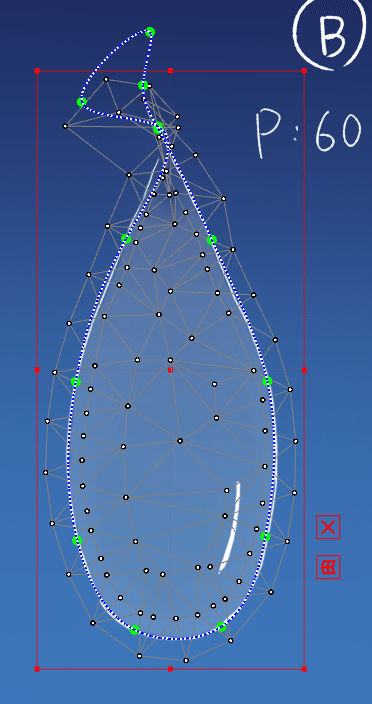
Create "B" in the order of parameter: 50, 40, 30, and so on.
The following are the results of creating the 50~30 parameters.
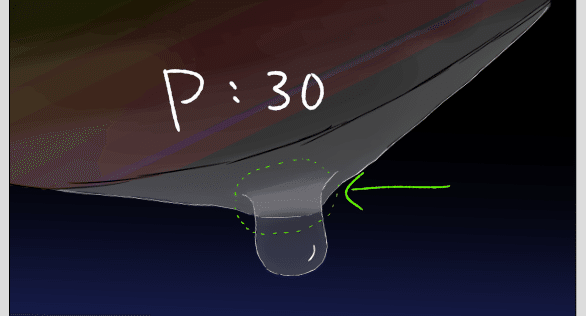
It's broken at the parameter: 30, so I'll fix it.
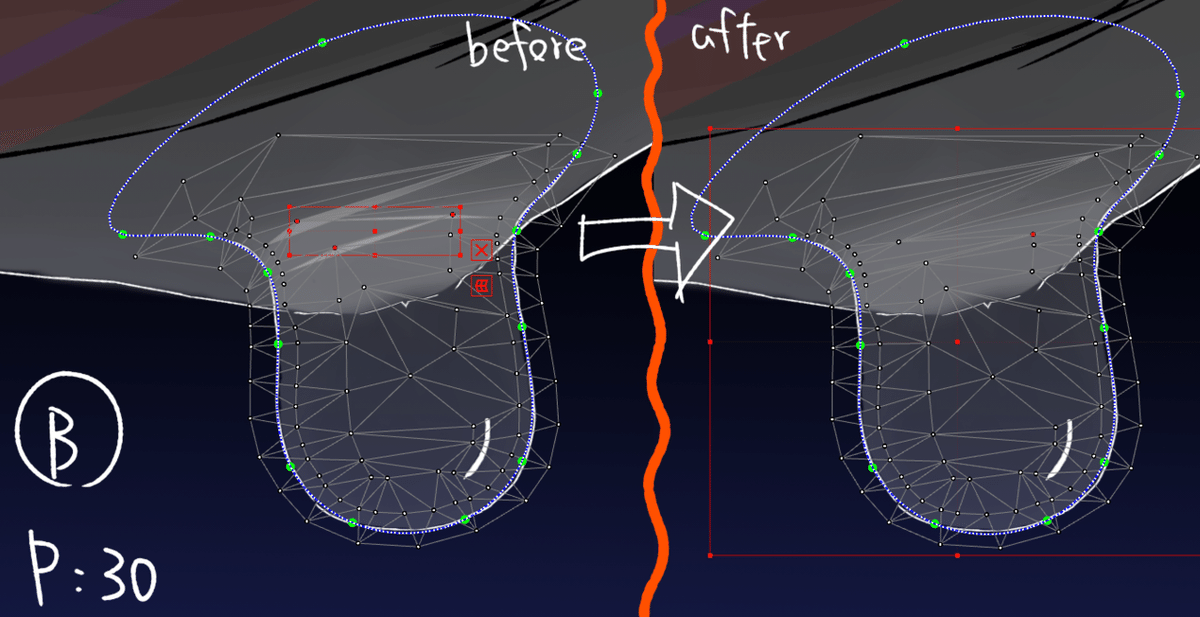
We will continue to build the parameters for "B": 20 -> 10 -> 0.
As for the parameter: 20, we will fix the broken points one by one as well.

For parameters: 10 and 0, we will create it in the same way, but we will set the opacity to about 70 for "10" and 0 for "0" to make it fade in.
At any rate, here's what I typed in from 0-50.
TIPS
(If necessary, we can modify the movement of the parameters "0" to "50" at this point, but we will not do that this time.)
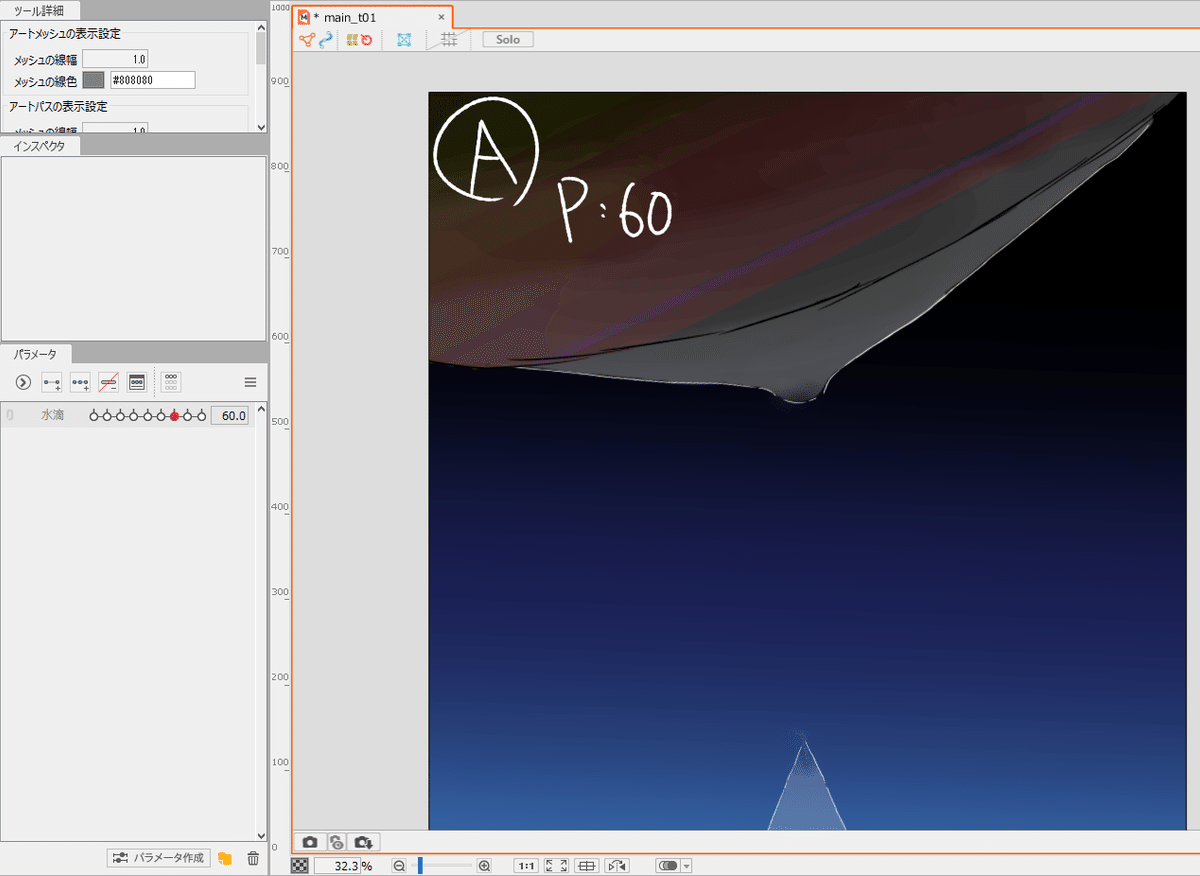
(3) Create a part where the parameter is 50-80 (after the water drops fall).
・Start with "B" and create the motion. Make 60, 70, and 80 in that order.
・At Parameter: 60, connect the top of the "B" and also stretches it a little vertically.

I think it's OK if it looks roughly like this.
It's okay if it's a little broken in the still image.
・At parameter: 70, it will disappear off the screen. The rough locations for parameters: 50-70 are shown below (80 can be anywhere as long as it is off-screen).

TIPS
Because of the gravitational acceleration, make the distance between 60 and 70 larger than the distance between 50 and 60 in the parameter. Make it at least about evenly spaced.
・B is complete.
・The "A" parameter: 50-80 will be made to look like a recoil of falling water drops.
As with "B", create "60" and then "70" in that order. For "80", copy and paste the shape for "0" to make a clean loop.


・It's finished for now. Here is a slightly reshaped version.
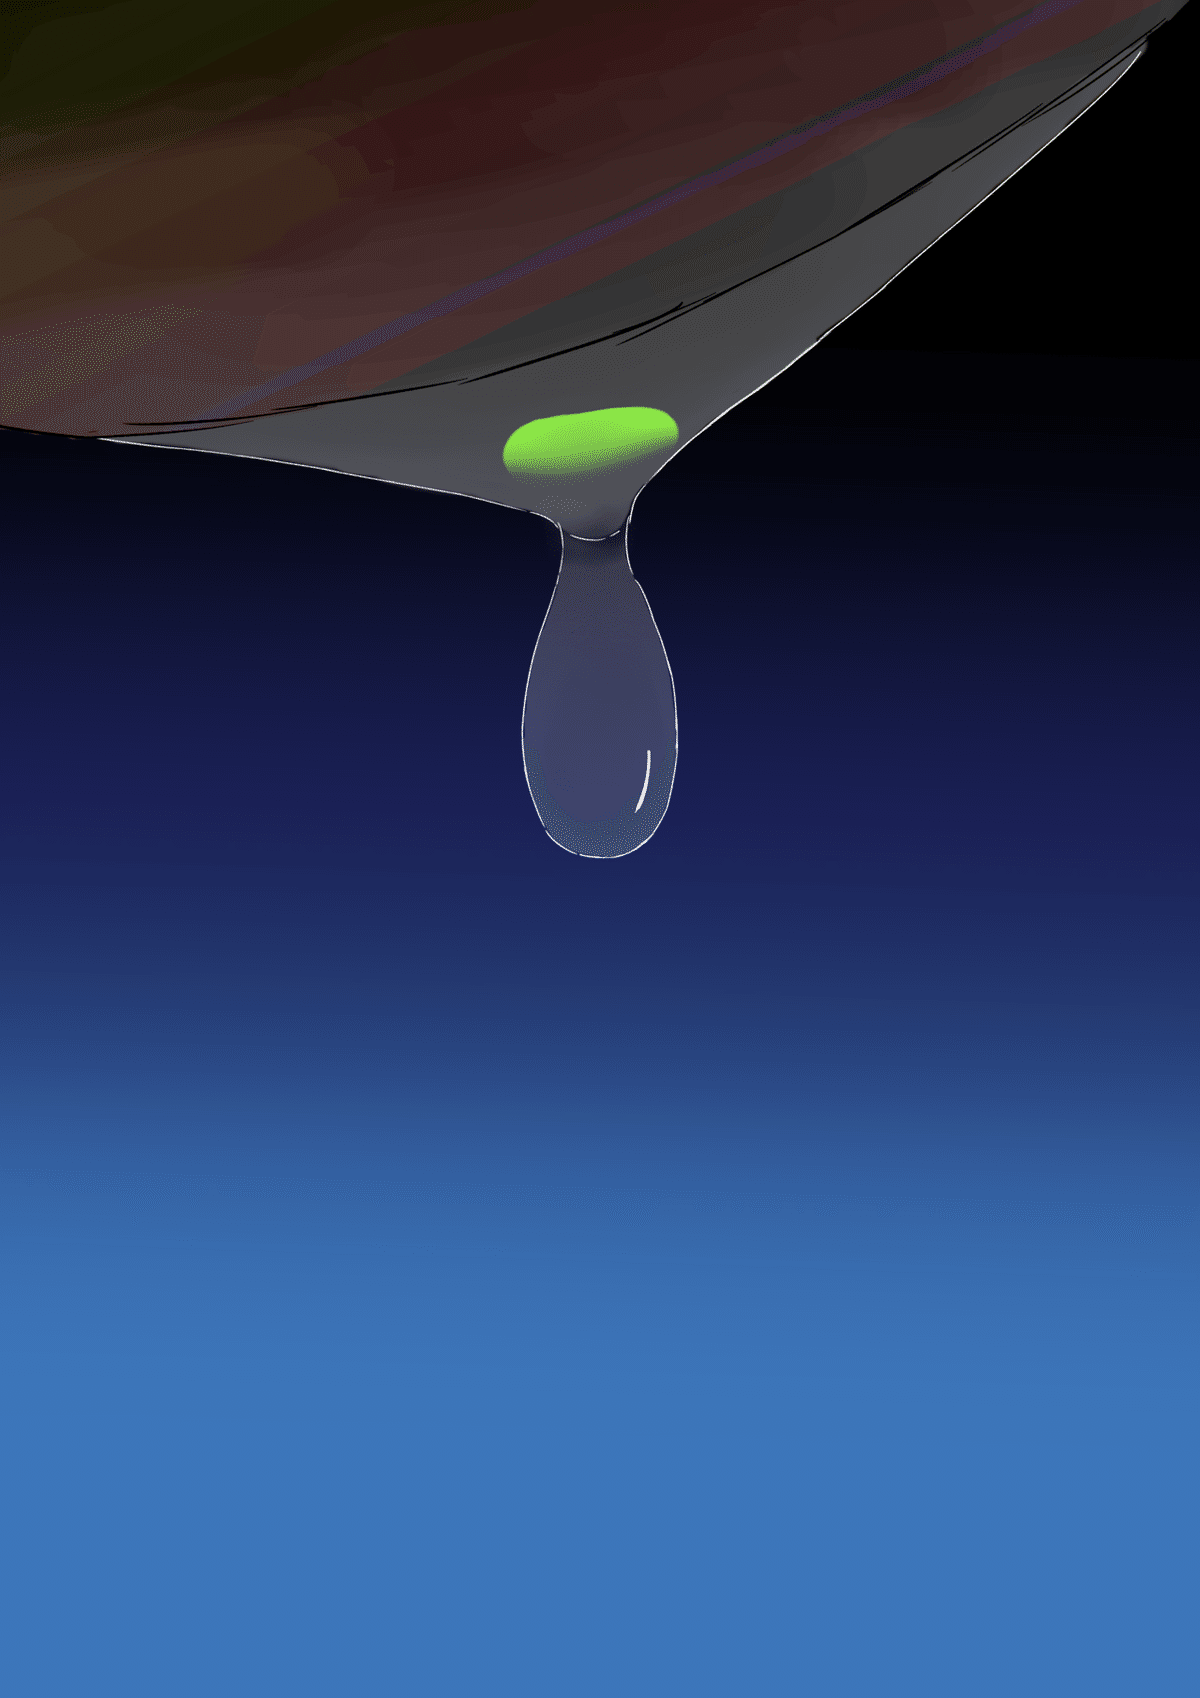
(4)Revise
At about parameter: 30, I noticed that the area where "A" and "B" overlapped was quite dark, so I decided to use the clipping mask to erase only the "B" side.
I drew the parts of the mask using the images at parameters "20" and "30" output by "Export Images" on the Live2D as a draft (We will set the opacity of the mask to 0 on the Live2D later, so the color can be anything).
(This is the state of the original painting.)
Set the clipping mask and apply "Invert" to "B".
(You can see that it's transparent, right?)
The parts of the mask were also transformed according to the parameters, and here is the finished product.
(5) Animation creation
We will create an animation in Live2D's Animation mode.
In the first part of this article, I mentioned that it is useful to incorporate easing into the parameters, which means that even if you just type two points at the beginning and end, "0" and "80" respectively, it will look like a drop of water is falling.
I wanted the "A" part to look like it was slowly filling with water, so I made the following adjustments. Now it's finished.
〇Afterwords
・I thought there was a possibility that it would be easier to express the kind of effects compared to 3DCG (I can't say for sure).
・To be honest, Live2D work depends on the quality of the original illustration, so I think it would be even better with a high-quality original illustration (imagine a super beautiful drop of water falling with its super beautiful image intact).
・In addition, "effects in Live2D" could possibly be used and distributed like BB materials (which are widely used in Japanese meme videos. BB stands for Blue Background, and you’ll understand what I mean if you do a Google image search for “BB素材” ). This means that individuals can share their own creations... which will be really great. For example, in paint software, you can download and use brushes created by other people, and in the MMD community, models and motions are distributed.
Similarly, in Live2D community, you may one day be able to get effect materials from online or other external sources, import them into Animator, and use them in your own animations.
(.........but fundamentally, we need to adjust the material to fit each individual Live2D model, so there are probably some issues with how to solve that...)
This is the end of the article. This is my first time to write an explanation article, so there may be some parts that are difficult to understand, but thank you for reading to the end.
(Based on the translation at DeepL, with some modifications)
この記事が気に入ったらサポートをしてみませんか?