
reForgeのインストールコマンドとdev_upstream版について(一時ディレクトリ版):v2 +deforum@paperspace

上の内容を参考にreForgeでもインストールコマンドを変えてみました。
理由としては、reForgeをpytorch2.4で動かしたいというところでこの記事を書いています。
基本的には以前の記事とreForgeのインストールされているディレクトリは同じなので、モデルのダウンロードなどは同じコマンドになります。
※今回の方法でインストールした後の表示は以下「dev_upstream」版


torch2.40+cu124になっています。
また、reForgeについてですが、前の記事で紹介したものは「main」版ですが、その他「dev_upstream」版、「dev_upstream_experimental」版、「main_new_forge」版があります。
ざっくりとした違いとしては、「main」はこれまでのと大きく変わらない感じで、「dev_upstream」は、拡張機能が増えていますがやや不安定なようです。若干速度が速くなっているとのこと。
「main_new_forge」は、新版Forgeとほぼ同じ感じで、サンプラーなどがreForgeと同じ感じということで、このバージョンは既存の拡張機能が一部使えなくなります。
pytorch2.4でのインストールになりますので、pytorch2.3のコンテナでインスタンスを立ち上げて、pytorch変換を行います。
# PyTorchの再インストール
!pip uninstall -y torch torchvision torchaudio
!pip install torch==2.4.0+cu124 torchvision torchaudio --extra-index-url https://download.pytorch.org/whl/cu124

# 必要なCUDAライブラリのリンクを作成
!sudo ln -s /usr/local/cuda/lib64/libcudart.so /usr/local/cuda/lib64/libcudart.so.11.0
!sudo ln -s /usr/local/cuda/lib64/libcudart.so /usr/local/cuda/lib64/libcudart.so.12.0

# 環境変数の設定
!echo 'export BNB_CUDA_VERSION=124' >> ~/.bashrc
!echo 'export LD_LIBRARY_PATH=$LD_LIBRARY_PATH:/usr/local/cuda/lib64' >> ~/.bashrc
!source ~/.bashrc

# bitsandbytesの再インストール
!pip uninstall -y bitsandbytes
!pip install bitsandbytes

# bitsandbytesの状態確認
!python3 -m bitsandbytes
試してみて分かったことですが、pythonスクリプトに関しては、Noteのコードのコピーだとエラーが出るようです(多分)。
requirementsは以下を適当に修正してください。
<reForgeインストール手順>
①依存環境のインストール
# Install the dependencies
import requests, os, importlib
force_reinstall = False

# Set to true only if you want to install the dependencies again.

#-------------------
import DependenceInstall
from DependenceInstall import *;

Deps(force_reinstall)
②ReForgeのインストール(※②-1, ②-2, ②-3のどれか一つにする)
②-1:「main」
%cd /tmp
!git clone https://github.com/Panchovix/stable-diffusion-webui-reForge.git
②-2:「dev_upstream」
%cd /tmp
!git clone --branch dev_upstream https://github.com/Panchovix/stable-diffusion-webui-reForge.git
②-3:「dev_upstream_experimental」
%cd /tmp
!git clone --branch dev_upstream_experimental https://github.com/Panchovix/stable-diffusion-webui-reForge.git
③ReForgeの起動(A4000用)
%cd /tmp/stable-diffusion-webui-reForge
!python3.10 launch.py --enable-insecure-extension-access --share --gradio-queue --xformers --pin-shared-memory --cuda-malloc --cuda-stream
④モデルなどのダウンロード(setup_comfyui.pyの修正要)
# Jupyter Notebook

# Hugging FaceのURLとローカルパスを指定
base_url = "https://huggingface.co/John6666/pony-realism-v21main-sdxl/resolve/main"
base_path = " /tmp/stable-diffusion-webui-reForge/models/Stable-diffusion/pony-realism-v21main-sdxl"

# /notebooks/setup_comfyui.py を実行
!python3 /notebooks/setup_comfyui.py {base_url} {base_path}
⑤VAEのダウンロード
!cd /tmp/stable-diffusion-webui-reForge/models/VAE && \
wget -nc https://huggingface.co/stabilityai/sdxl-vae/resolve/main/sdxl_vae.safetensors?download=true -O sdxl_vae.safetensors
⑥コントロールネットモデルのダウンロード
# コントロールネットDEPTHfull
!cd /tmp/stable-diffusion-webui-reForge/models/ControlNet && \
wget -nc https://huggingface.co/lllyasviel/sd_control_collection/resolve/main/diffusers_xl_depth_full.safetensors?download=true -O diffusers_xl_depth_full.safetensors

# コントロールネットip-adapter
!cd /tmp/stable-diffusion-webui-reForge/models/ControlNet && \
wget -nc https://huggingface.co/lllyasviel/sd_control_collection/resolve/main/ip-adapter_xl.pth?download=true -O ip-adapter_xl.pth

# コントロールネットcannyfull
!cd /tmp/stable-diffusion-webui-reForge/models/ControlNet && \
wget -nc https://huggingface.co/lllyasviel/sd_control_collection/resolve/main/diffusers_xl_canny_full.safetensors?download=true -O diffusers_xl_canny_full.safetensors
⑦拡張機能(Deforum)のインストール例
%cd /tmp/stable-diffusion-webui-reForge/extensions
!git clone --branch main https://github.com/deforum-art/sd-forge-deforum.git
「dev_upstream」版について
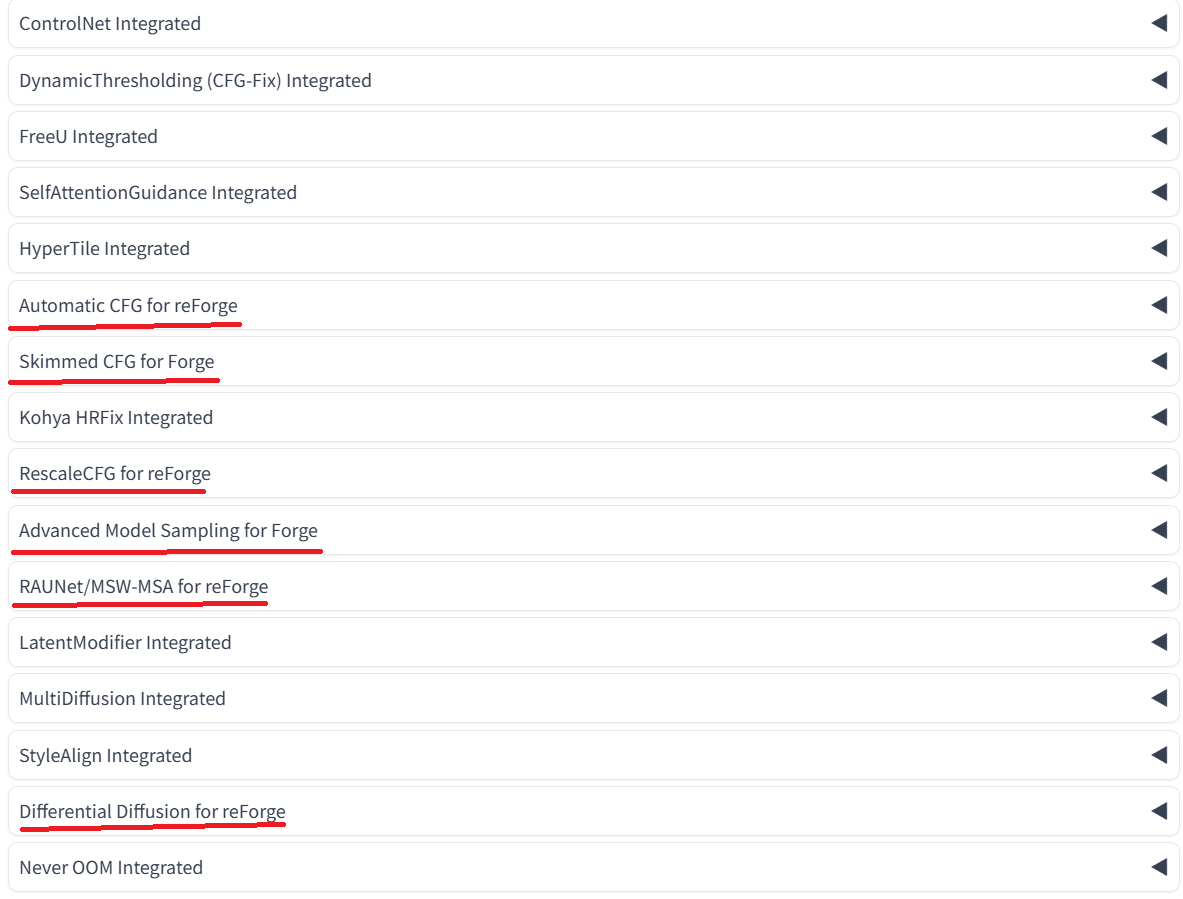
「dev_upstream」版についてどんなものか以下に提示しておきます。
①UIに追加されている拡張機能です。以下の赤線が追加されています。
②サンプラーについて
以下は設定のところを見たものですが、数が多いです。

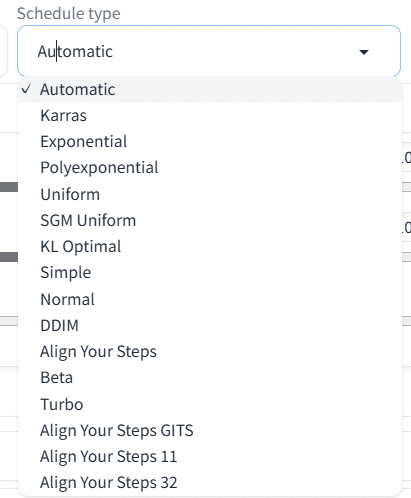
③スケジューラーについて
いくつか増えています。
Deforumについて
reForgeで使用するDeforumは、本家からForge様に作成されたブランチになります。更新頻度が低いため、古いバージョンのpythonモジュールでないと対応していないところもあり、修正が必要になります。
Deforumを使用する場合は以下のインストールが必要と思われます。
(特に3Dモードでdepth zoeを使用する場合)
opencv-pythonは最新版だとエラーが出ることがあり、バージョンを指定してダウングレードする必要があります。
timmは、depth zoeを使用するためにはバージョンを指定してダウングレードする必要があります。
※Deforumは新版Forgeではインストールが出来ません。そのため、Forgeでdeforumを使用する場合は、reForgeか以前のForgeのバージョンになります。reForgeは「main」と「dev_upstream」で動くのを確認しています。
!pip install timm==0.6.7
!pip uninstall -y opencv-python
!pip uninstall -y opencv-python-headless
!pip install opencv-python==4.9.0.80
!pip install opencv-python-headless==4.9.0.80

上記のは以前の記事で紹介したDeforumのプリセットの設定を少し修正したものです。コントロールネットは不使用です。
3Dモードで、depth zoeを使用しているため、少し時間がかかります。
ただ、depth zoeを使用すると、人物の変形が少なくなります。
この記事が気に入ったらサポートをしてみませんか?