
nextjs with typescript:42 RTK(Redux Took Kit)

【1】RTK(Redux Tool Kit)のインストール
RTK(Redux Tool Kit)を使えば、グローバルなstate(store)の作成をもっと楽にできる。Reduxを使うならRTKで楽をしよう。
yarn add @reduxjs/toolkit
yarn add react-redux
yarn add --dev @types/react-redux
▲「yarn add redux」でredux自体のインストールはしなくてよい。RTKの中に含まれている。
【2】RTKの使い方
■RTK(Redux Tool Kit)はあくまでstore作成を楽にするもの。
そのため、上位コンポーネントとしてラップして、useSelector、dispatchを使ってグローバルなstateにアクセスするところはほぼ同じ。
変わるのは「createStore()」⇒「configureStore()」とするところ。
▲RTKでは「configureStore()」でReduxで利用可能な「storeオブジェクト」を作成する。
■storeを指定(useSelector)して、指定の処理をコール(dispatch)する使い方は変わらない。
※再掲
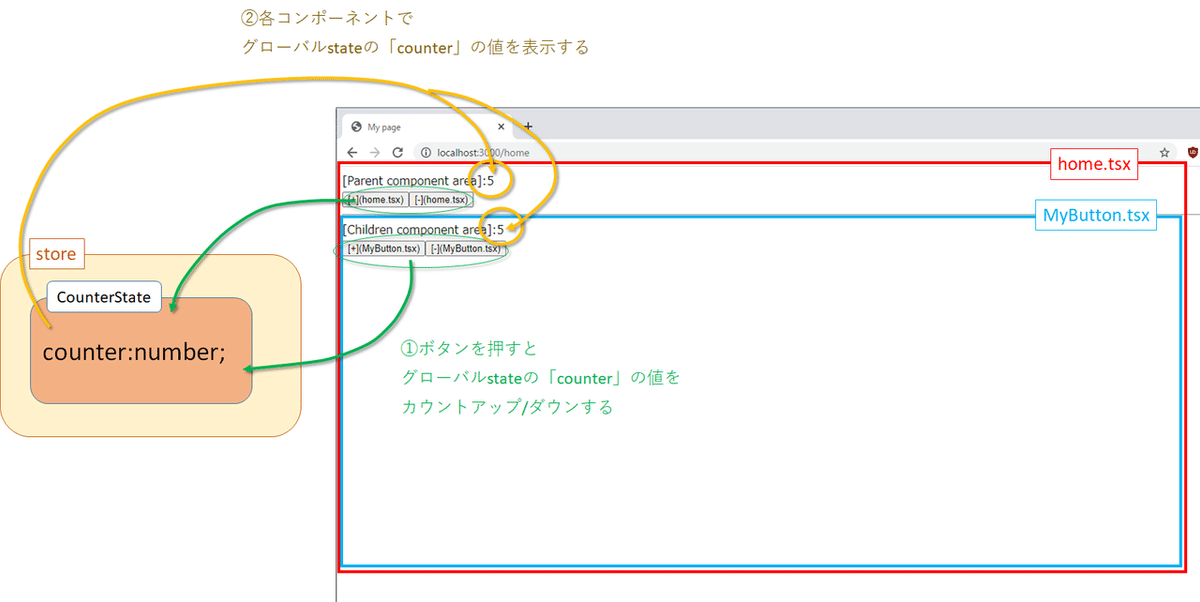
【3】サンプルアプリ(カウントアップ/ダウンアプリ)について
説明にあたり以下のようなサンプルアプリを例にする。
フォルダやファイルの配置の仕方は今回も適当に。
【4】コード作成:Slice(スライス)オブジェクトの作成
RTK(Redux Tool Kit)にでてくるSliceオブジェクトは簡単にというと
・slice(スライス)=actions + reducer
まずはSliceオブジェクトを作成する
例:【./features/counterSlice.ts】
import { createSlice, PayloadAction } from "@reduxjs/toolkit";

//グローバルなstateの型定義
export interface CounterState{
   counter:number;
};
//初期値
const initialState:CounterState = {
   counter:0
};


//Sliceオブジェクト
const counterSlice = createSlice( {
   name:'counter',
   initialState:initialState, //initalStateで以下のstateは型推論
   reducers:{
       //action名:その処理 を定義する
       increment:(state,action:PayloadAction<number>) =>({...state, counter:state.counter + action.payload}),
       decrement:(state,action:PayloadAction<number>) =>({...state, counter:state.counter - action.payload})
   },
}
);

export default counterSlice
Reducerと違い、actionタイプに対するswitch文は書かなくてよくなる。
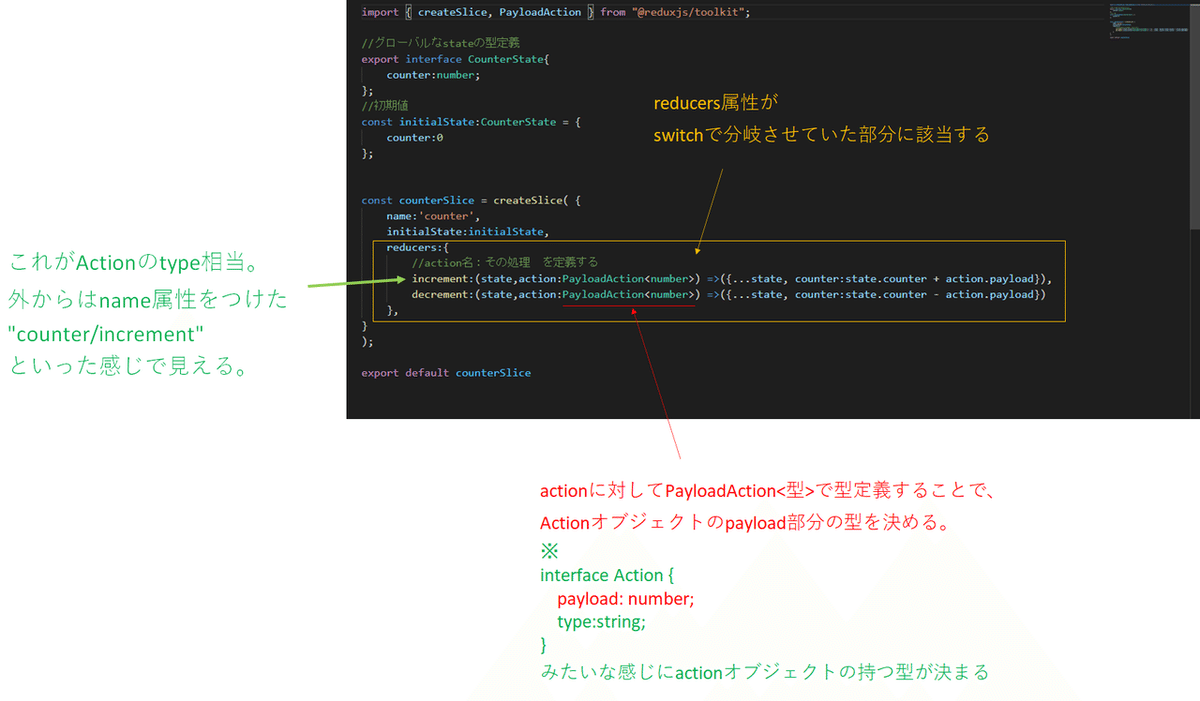
▲RTKではreducers属性部分に適当なaction名と、stateとactionを引数に取る関数オブジェクトを書く。これによりRTK側が呼び出すときにいい感じに処理分岐(switch分岐相当)が動くようにしてくれる。
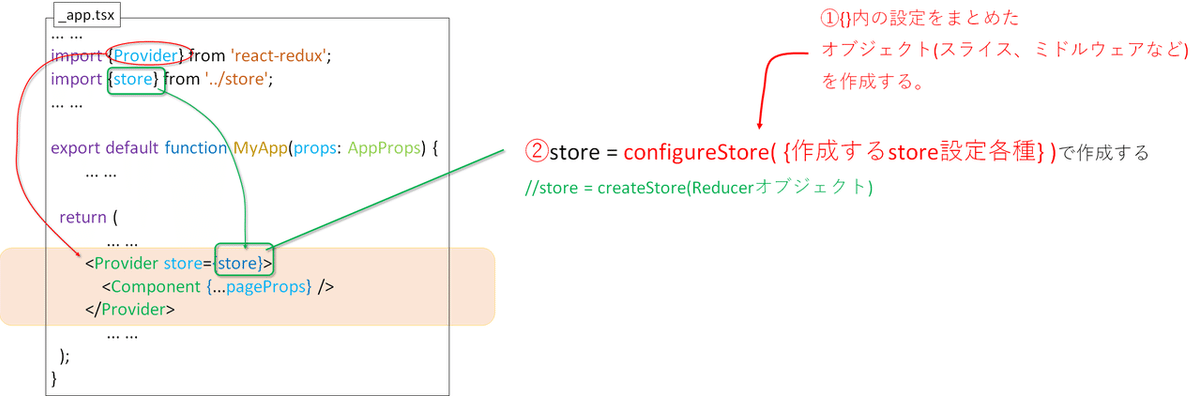
【5】コード作成:storeをつくって上位コンポーネントとしてラップ
RTKにおいてstoreは「configureStore()」で作成する。
【./store.ts】
「configureStore()」に渡す「オブジェクトのreducer属性」に「作成したSliceのreducer部分を指定」すればよい。
import { configureStore } from "@reduxjs/toolkit";
import counterSlice from "./features/counterSlice";

export const store = configureStore({
   reducer:counterSlice.reducer
});▲Sliceオブジェクトは「.reducer」でreducer部分を取り出せる。
「configureStore()」にて設定をいれることができるパラメータは以下の通り。
↓ これを使って「_app.tsx」でコンポーネントをラップする
【./pages/_app.tsx】※Redux時と変更なし
import React from 'react';
import Head from 'next/head';
import { AppProps } from 'next/app';


import {Provider} from 'react-redux';
import {store} from '../store';

export default function MyApp(props: AppProps) {
const { Component, pageProps } = props;

React.useEffect(() => {
  // Remove the server-side injected CSS.
  const jssStyles = document.querySelector('#jss-server-side');
  if (jssStyles) {
    jssStyles.parentElement!.removeChild(jssStyles);
  }
}, []);

return (
  <React.Fragment>
    <Head>
      <title>My page</title>
      <meta name="viewport" content="minimum-scale=1, initial-scale=1, width=device-width" />
    </Head>

      <Provider store={store}>
          <Component {...pageProps} />
      </Provider>
  </React.Fragment>
);
}
これでstoreの作成ができたので、実際にコンポーネント側で使ってみる。
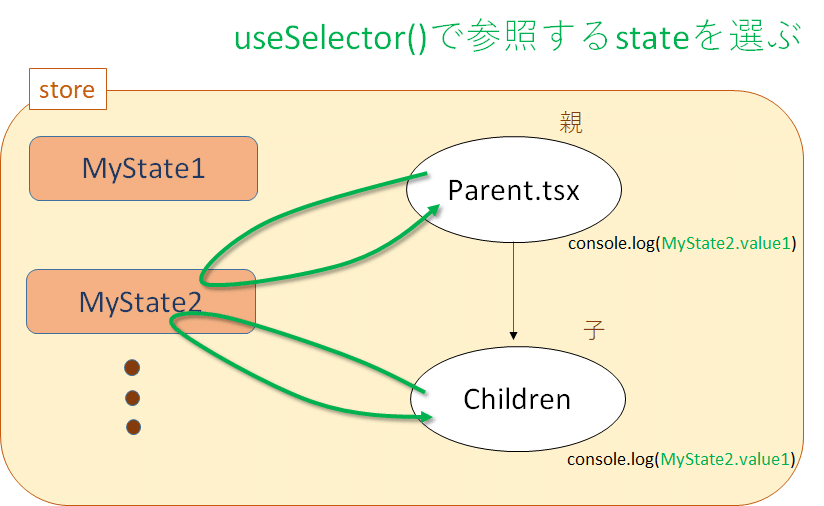
【6】各コンポーネントでグローバルなstateを参照(useSelector)しdispatchする
使用するフックも変わらない。useSelectorで使用するstoreを選んで、dispatch()でグローバルなstateへの処理を動かす。
【./pages/home.tsx】
import { Dispatch,PayloadAction } from "@reduxjs/toolkit";
import { useDispatch, useSelector } from "react-redux";
import MyButton from "../components/MyButton";
import counterSlice, { CounterState} from "../features/counterSlice";
const Home = () =>{
const counter = useSelector<CounterState,CounterState["counter"]>((state)=>state.counter);
const dispatch = useDispatch<Dispatch<PayloadAction<number>>>();
const {increment,decrement} = counterSlice.actions;
//console.log(counterSlice.reducer);
const handleCountUpBtn = (value:number)=> {
dispatch(increment(value));
//console.log(increment(value));
}
const handleCountDownBtn = (value:number)=> {
dispatch(decrement(value));
}
return(
<div>
[Parent component area]:{counter}
<div>
<button onClick={()=>handleCountUpBtn(1)}>[+](home.tsx)</button>
<button onClick={()=>handleCountDownBtn(1)}>[-](home.tsx)</button>
</div>
<hr/>
<div>
<MyButton />
</div>
</div>
);
}
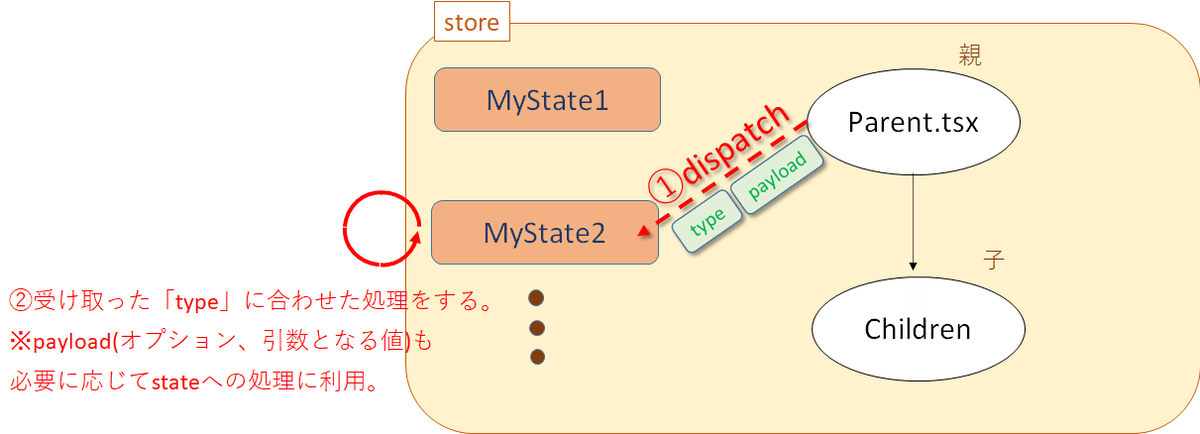
export default Home▲「dispatch()」部分に「作成したSliceオブジェクトのactionオブジェクト(payloadとtype)」を渡せば処理が起動する。
上の例のように
const {increment,decrement} = counterSlice.actions;みたいに「Sliceオブジェクト.actions」とすると、Actionオブジェクト(※payloadとtypeを持ったオブジェクト)が返ってくる。
例:「Sliceオブジェクト.actions」の中身を確認してみる
console.log(increment(1)); ⇒ {type: "counter/increment", payload: 1}
console.log(increment(5)); ⇒ {type: "counter/increment", payload: 5}
つまり
dispatch(counterSlice.actions.increment(1));
       ||
dispatch({type: "counter/increment", payload: 1});
というイメージ。
home.tsxと同様に子コンポーネントがも作成する
【./components/MyButton.tsx】
import { Dispatch, PayloadAction } from "@reduxjs/toolkit";
import { useDispatch, useSelector } from "react-redux";
import counterSlice, { CounterState } from "../features/counterSlice";

const MyButton = () =>{

   const counter = useSelector<CounterState,CounterState["counter"]>((state)=>state.counter);
   const dispatch = useDispatch<Dispatch<PayloadAction<number>>>();

   const {increment,decrement} = counterSlice.actions;

   const handleCountUpBtn = (value:number)=> {
       dispatch(increment(value));
   }

   const handleCountDownBtn = (value:number)=> {
       dispatch(decrement(value));
   }

   return(
       <div>
           <div>
               [Children component area]:{counter}
           </div>
           <div>
               <button onClick={()=>handleCountUpBtn(1)}>[+](MyButton.tsx)</button>
               <button onClick={()=>handleCountDownBtn(1)}>[-](MyButton.tsx)</button>
           </div>
       </div>
   );
}

export default MyButton
実行結果
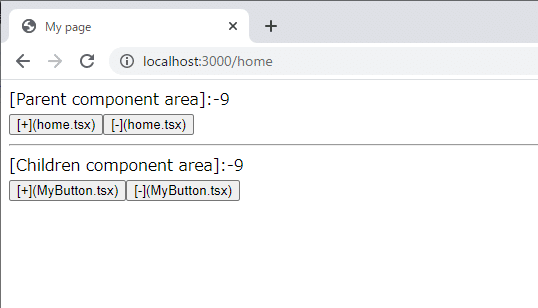
▲どのボタンを押してもグローバルなstateとして作成したstore(※今回はnumber型のcounter)がカウントアップ、ダウンする。
もっと応援したいなと思っていただけた場合、よろしければサポートをおねがいします。いただいたサポートは活動費に使わせていただきます。