割烹エディターβ版リリースメモ8(テンプレート機能)

さて、残りの基本機能もこれで最後です。
テンプレートの作成機能を作っていきます。
基本的にブログは、あらかじめ作っておいたテンプレート部品を使って作る方が効率的です。よく使うテンプレートは人によって違うので、それぞれの人がテンプレートを作れるようにしておきます。なお、ログイン状態でのみ作れるようにします。また公開テンプレートと非公開テンプレートを作れるようにしておきます。
公開テンプレートは色々な人が使えるようにログインしていなくても使えるように、非公開テンプレートは作成者のみが使えるようにします。
ということで作っていきます。データモデルは前回に作ったので、まずはURLから決めていきます。
editor/urls.py
   path('create/', views.CreateTemplate.as_view(), name='template_create'),
   path('template/list/',views.TemplateList.as_view(), name='template_list'),
  path('template/mylist/',views.TemplateMyList.as_view(), name='template_mylist'),
   path('template/<int:pk>/', views.TemplateDetail.as_view(), name='template_detail'),
   path('template/<int:pk>/update/', views.TemplateUpdate.as_view(), name='template_update'),
   path('template/<int:pk>/edit/', views.TemplateEdit.as_view(), name='template_edit'),
   path('template/<int:pk>/delete/', views.TemplateDelete.as_view(), name='template_delete'),
とりあえず
・create:新規作成(ログイン必須)
・template/list/:公開テンプレートリスト(ログイン不要)
・template/mylist/:自分が作成したテンプレートリスト(ログイン必須 非公開テンプレートも閲覧可)
・template/<int:pk>/:テンプレートの詳細(ログイン不要 非公開テンプレートは作成者のみ閲覧可 デバッグ用)
・template/<int:pk>/update/:テンプレートのアップデート(作成者のみ)
・template/<int:pk>/edit/:テンプレートからkeditorを起動(ログイン不要)
・template/<int:pk>/delete/:テンプレートの削除(作成者のみ)
これだけ作っていきます。ほぼ箇条書き
新規作成
ログイン必須で、公開テンプレート、非公開テンプレートを作れるようにします。
class CreateTemplate(LoginRequiredMixin, generic.CreateView):
   model = Kappo
   template_name = 'editor/template_create.html'
   form_class = KappoCreateForm
   success_url = reverse_lazy('editor:template_mylist')

   def form_valid(self, form):
       kappo = form.save(commit=False)
       kappo.author = self.request.user
       kappo.save()
       return super().form_valid(form)

   def form_invalid(self, form):
       return super().form_invalid(form)
{% block content %}
{% if user.is_authenticated %}
<h1>新規作成</h1>
<form method="POST">
{% csrf_token %}
{{ form.as_p }}
<button type="submit" id="save-button">投稿する</button>
</form>
<section class="keditor-edit">
<strong>文章を書くところ:</strong><br>
<div id="editor"></div>
</section>
{% else %}
新規作成機能はユーザー登録必須です。
{% endif %}
{% endblock %}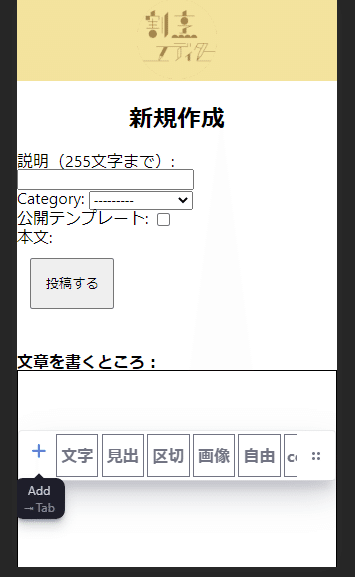
説明文(タイトル)が255文字まで、カテゴリーを選んで、公開か非公開かが選べます。
公開テンプレートリスト
公開テンプレートリストはログイン不要で使えて、タイトルとカテゴリで判断できるようなものにしようと思います。ということで作っていきます。
urls.py
path('template/list/',views.TemplateList.as_view(), name='template_list'),views.py
class TemlateList(generic.ListView):
   model = Kappo
   template_name = 'editor/template_list.html'
   paginate_by = 10

   def get_queryset(self):
       kappo = Kappo.objects.filter(public=True).order_by('-created_date')
       return kappo
template/editor/template_list.html
{% extends 'base.html' %}
{% load static %}
{% block header %}
   <link rel="stylesheet" href="{% static 'editor/editor.css' %}"
{% endblock %}
{% block content %}
   <article class="sites">
   <h1 class="sites__title">テンプレート一覧</h1>
   {% for kappo in kappo_list %}
       <div class="info-block">
           <h2 class="info-title">{{ kappo.title }} </h2>
           <p class="info-content">
               <strong>{{ kappo.author.first_name }}</strong><br>
               <span class="info-category{{ kappo.category.pk }}">{{ kappo.category }}</span> {{ kappo.created_date | date:"Y.m.d" }}
           </p>
           <a class="info-link" href=""></a>
        </div>
   {% endfor %}
   {% include 'page_nation.html' %}
   </article>
{% endblock %}
ページネーションは別に作って読み込みます。(色々なところで使うので部品化しておくと便利)
template/page_nation.html
<!-- ページネーション -->
<ul class="pagination">
{% if page_obj.has_previous %}
    <li class="page-item"><a href="?page={{ page_obj.previous_page_number }}">前へ</a></li>
{% endif %}
{{ page_obj.number }}/{{ page_obj.paginator.num_pages }}
{% if page_obj.has_next %}
   <li class="page-item"><a href="?page={{ page_obj.next_page_number }}">次へ</a></li>
{% endif %}
</ul>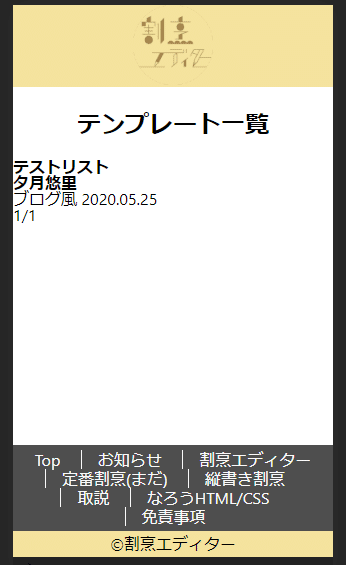
CSSはまた後で作ります。
参考
自分が作成したテンプレートリスト
(ログイン必須 非公開テンプレートも閲覧可)
さっき作ったテンプレートを基本として、ログイン必須、またフィルターに自分が投稿した物だけに限定します。
class TemlateList(LoginRequiredMixin, generic.ListView):
   model = Kappo
   template_name = 'editor/template_list.html'
   paginate_by = 20

   def get_queryset(self):
       kappo = Kappo.objects.filter(author=self.request.user).order_by('-created_date')
       return kappo
これで自分の書いたものだけ見ることができます。
テンプレートの詳細
ログイン不要で非公開テンプレートは作成者のみ閲覧可。デバッグ用
class TemplateDetail(generic.DetailView):
   model = Kappo
   template_name = 'editor/template_detail.html'
テンプレート
{% extends 'base.html' %}
{% load static %}
{% block header %}
   <link rel="stylesheet" href="{% static 'editor/editor.css' %}"
{% endblock %}
{% block content %}
   <article class="sites">
       {% if kappo.public or user.pk == kappo.author.pk %}
           <span class="info-category{{ kappo.category.pk }}">{{ kappo.category }}</span> {{ kappo.created_date | date:"Y-m-d" }}
           <h1 class="sites__title">{{ kappo.title }}</h1>
           <p class="sites__content-text">{{ kappo.text }}</p>
       {% else %}
            <h1>テンプレートが見つかりません</h1>
       {% endif %}
       <br><a href="{% url 'editor:template_list' %}">テンプレート一覧に戻る</a>
   </article>
{% endblock %}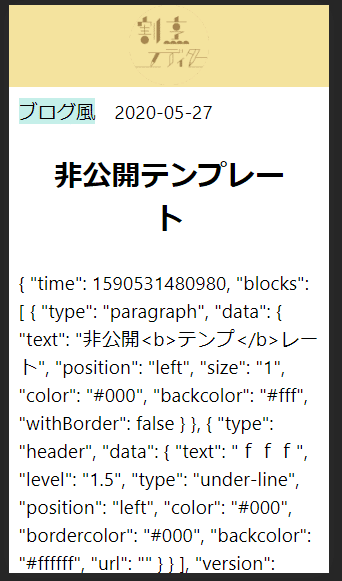
デバッグ用に保存されたデータを表示する用。
テンプレートのアップデート
新規作成のテンプレートに、保存したものを突っ込むだけ。
class TemplateUpdate(OnlyYouMixin, generic.UpdateView):
   model = Kappo
   template_name = 'editor/template_create.html'
   form_class = KappoCreateForm
   success_url = reverse_lazy('editor:template_mylist')
参考
テンプレートからkeditorを起動
(ログイン不要 非公開テンプレートの場合は作者のみ閲覧可)
class TemplateEdit(generic.DetailView):
   model = Kappo
   template_name = 'editor/template_edit.html'
<article class="sites">
{% if kappo.public or user.pk == kappo.author.pk %}
<span class="info-category{{ kappo.category.pk }}">{{ kappo.category }}</span> {{ kappo.created_date | date:"Y.m.d" }} 作成<br>
作成者:<strong>{{ kappo.author.first_name }}</strong>
<h2 class="sites__title">{{ kappo.title }}</h2>
<textarea id="template-text" class="sites__content-text">{{ kappo.text }}</textarea>
<section class="keditor-edit">
<strong>文章を書くところ:</strong><br>
<div id="editor"></div>
</section>
<section class="editor-output">
<button id="save-button">押すと変換される</button><br>
<strong>変換した後のソースコードが出力されるところ:</strong><p id="length-count"></p>
<textarea id="output-text"></textarea>
<button id="copy-button">押すとコピーすることができる</button><br>
上手くいかない場合は、割烹エディターの部分にフォーカスが当たっているので外してください<br>
割烹エディターは<a href="https://editorjs.io/">Editor.js</a>をベースに開発しています。<br><br>
<a href="https://mypage.syosetu.com/mypageblog/view/userid/1090932/blogkey/2554795/" class="help-link" target="_blank" rel="noopener">使い方はこちら</a><br><br>
</section>
{% else %}
<h1>テンプレートが見つかりません</h1>
{% endif %}
<br><a href="{% url 'editor:template_list' %}">テンプレート一覧に戻る</a>
</article>
テンプレートの削除
作成者のみ
削除
    <article class="sites">
       {% if user.pk == kappo.author.pk %}
           <h1>削除確認画面</h1>
           <form method="post">
               {% csrf_token %}
               <p>{{ kappo.title }}を削除しますか?</p>
               <input type="submit" value="削除する">
           </form>
       {% else %}
            <h1>自分のテンプレート以外は削除できません</h1>
       {% endif %}
       <br><a href="{% url 'editor:template_mylist' %}">テンプレート一覧に戻る</a>
   </article>
class TemplateDelete(OnlyYouMixin, generic.DeleteView):
model = Kappo
template_name = 'editor/template_delete.html'
success_url = reverse_lazy('editor:template_mylist')ということで、登録機能だとか終わりました。
色々と作ってみて、考えることが沢山あるんだなぁと思いました。
登録関係の処理が分かると作れる範囲が結構広がりますね。
ログイン関係の備忘録
ログイン限定処理(View側)
from django.contrib.auth.mixins import LoginRequiredMixin

LoginRequiredMixin
viewクラスにこれを指定するとログインしている場合のみ有効になる。
ログイン限定処理(Template側)
{% if user.is_authenticated %}ログインしているかどうか判別。ログイン者のみ見られるページの実装などに使う。なお、userでログインしている人の情報を取得できる。
user.pkユーザーのプライマリーキー。これで作成者本人かどうか判別に使う。
良ければサポートお願いします。サポート費用はサーバー維持などの開発費に使わせていただきます。