
LangGraphの始め方(オリジナルのAI(LLM)マルチエージェントを作る)

はじめに
話題のAIエージェント(LLMエージェント)がサクッと作れるという噂のLangGraphを使ってみました。
AIエージェント(LLMエージェント)界隈は最近かなり盛り上がってきましたので、今後多種多様なエージェントが乱立してくるので、エージェントを作るフレームワークは押さえておきたいところです。
でも、もともとLangChainにはAgentsというエージェントが作れる機能がありましたが何が違うのでしょうか?
v0.1のドキュメントを読むと、「マルチアクターアプリケーションを構築するためのライブラリ」とありました。
要するにシングルエージェントではなく、複数のエージェントが共同作業するような「マルチエージェント」を作る場合に、最適なようですね。
従来のLangChainでは、Chainのように順番に処理するだけでループができないと思いますが、ループを実現するときにLangGraphが役に立つということのようです。
LangGraph は、LLM を使用してステートフルなマルチアクター アプリケーションを構築するためのライブラリです。PregelとApache Beamにヒントを得た LangGraph では、通常の Python 関数 (またはJS )を使用して、循環的な計算ステップ全体で複数のチェーン (またはアクター) を調整し、チェックポイントを設定できます。パブリックインターフェイスはNetworkXからヒントを得ています。
主な用途は、 LLM アプリケーションにサイクルと永続性を追加することです。迅速な有向非巡回グラフ (DAG) のみが必要な場合は、 LangChain Expression Languageを使用してこれを実現できます。
サイクルは、LLM をループで呼び出して次に実行するアクションを尋ねるエージェントの動作にとって重要です。
以下のようなイメージです。
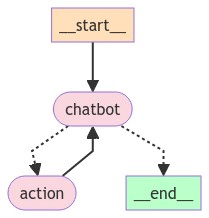
ドキュメントを読んでいると、「エッジ」とか「ノード」とか「グラフ」とか聞きなれない用語が並んでますね・・・
なんとなくはわかりそうですが、こういう場合は読むより手を動かす方が理解が早いことが多いので、とにかく動かしてみました。
LangGraph始め方
以下のサイトのリンクにPythonのサンプルプログラムが掲載されています。
さっそく動かしてみましょう。
記事の内容はサンプルを翻訳して引用しています。
インストール
pip install -U langgraph
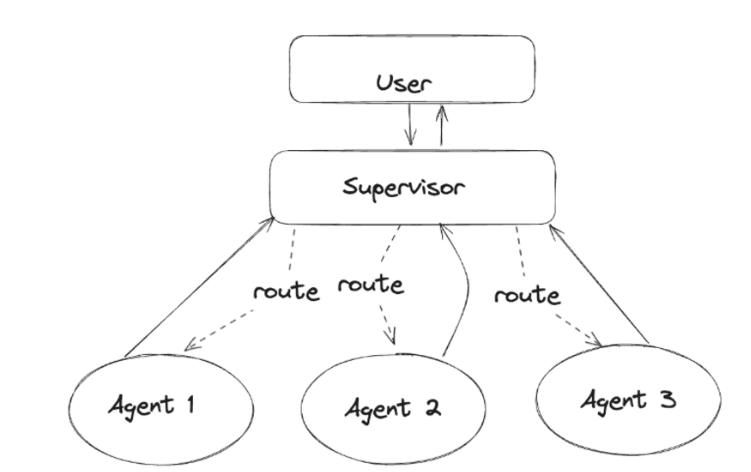
pip install langchain_openaiLLM を使用してさまざまなエージェントを調整することも選択できます。
以下では、タスクの委任を支援するエージェント スーパーバイザーを含むエージェント グループを作成します。
各エージェント ノードのコードを簡素化するために、LangChain の AgentExecutor クラスを使用します。 このノートブックおよび他の「高度なエージェント」ノートブックは、LangGraph で特定の設計パターンを実装する方法を示すように設計されています。 パターンがニーズに合っている場合は、最高のパフォーマンスを得るために、ドキュメントの他の場所で説明されている他の基本パターンと組み合わせることをお勧めします。
ビルドする前に、環境を構成しましょう。
サンプルはJupyter notebookで記述されているのでブロックごとに説明がありました。
Jupyterでなくても、そのままで動きそうでしたので、Pythonコードとして順番にそのまま記述していきます。
Create tools
この例では、検索エンジンを使用して Web 調査を行うエージェントと、プロットを作成するエージェントを 1 つ作成します。 以下で使用するツールを定義します。
from typing import Annotated, List, Tuple, Union

from langchain_community.tools.tavily_search import TavilySearchResults
from langchain_core.tools import tool
from langchain_experimental.tools import PythonREPLTool

tavily_tool = TavilySearchResults(max_results=5)

# This executes code locally, which can be unsafe
python_repl_tool = PythonREPLTool()
Web検索にはTavilySearchを使用します。
APIキーが必要ですので、事前に以下からアカウント作成してAPIキーを取得します。
もう1つ「PythonREPLTool()」というツールが使われていますが、これはPythonコードを実行するためのツールです。
Helper Utilities
以下のヘルパー関数を定義します。これにより、新しいエージェント ワーカー ノードの追加が簡単になります。
def create_agent(llm: ChatOpenAI, tools: list, system_prompt: str):
    # Each worker node will be given a name and some tools.
    prompt = ChatPromptTemplate.from_messages(
        [
            (
                "system",
                system_prompt,
            ),
            MessagesPlaceholder(variable_name="messages"),
            MessagesPlaceholder(variable_name="agent_scratchpad"),
        ]
    )
    agent = create_openai_tools_agent(llm, tools, prompt)
    executor = AgentExecutor(agent=agent, tools=tools)
    return executor
グラフ内のノードとして使用する関数を定義することもできます。この関数は、エージェントの応答を人間のメッセージに変換します。 これはグラフのグローバル状態に追加する方法なので重要です。
def agent_node(state, agent, name):
    result = agent.invoke(state)
    return {"messages": [HumanMessage(content=result["output"], name=name)]}
Create Agent Supervisor
関数呼び出しを使用して次のワーカーノードを選択するか、処理を終了します。
from langchain_core.prompts import ChatPromptTemplate, MessagesPlaceholder
from langchain_core.output_parsers.openai_functions import JsonOutputFunctionsParser

members = ["Researcher", "Coder"]
system_prompt = (
    "You are a supervisor tasked with managing a conversation between the"
    " following workers:  {members}. Given the following user request,"
    " respond with the worker to act next. Each worker will perform a"
    " task and respond with their results and status. When finished,"
    " respond with FINISH."
)
# Our team supervisor is an LLM node. It just picks the next agent to process
# and decides when the work is completed
options = ["FINISH"] + members
# Using openai function calling can make output parsing easier for us
function_def = {
    "name": "route",
    "description": "Select the next role.",
    "parameters": {
        "title": "routeSchema",
        "type": "object",
        "properties": {
            "next": {
                "title": "Next",
                "anyOf": [
                    {"enum": options},
                ],
            }
        },
        "required": ["next"],
    },
}
prompt = ChatPromptTemplate.from_messages(
    [
        ("system", system_prompt),
        MessagesPlaceholder(variable_name="messages"),
        (
            "system",
            "Given the conversation above, who should act next?"
            " Or should we FINISH? Select one of: {options}",
        ),
    ]
).partial(options=str(options), members=", ".join(members))

llm = ChatOpenAI(model="gpt-4-1106-preview")

supervisor_chain = (
    prompt
    | llm.bind_functions(functions=[function_def], function_call="route")
    | JsonOutputFunctionsParser()
)
「system_prompt」のところは、日本語に翻訳したほうがよいかなとも思いましたが、少々面倒だったのでそのまま英語のまま利用します。
Construct Graph
グラフの構築を開始する準備ができました。 以下では、先ほど定義した関数を使用して状態ノードとワーカーノードを定義します。
import operator
from typing import Annotated, Any, Dict, List, Optional, Sequence, TypedDict
import functools

from langchain_core.prompts import ChatPromptTemplate, MessagesPlaceholder
from langgraph.graph import StateGraph, END

# The agent state is the input to each node in the graph
class AgentState(TypedDict):
    # The annotation tells the graph that new messages will always
    # be added to the current states
    messages: Annotated[Sequence[BaseMessage], operator.add]
    # The 'next' field indicates where to route to next
    next: str

research_agent = create_agent(llm, [tavily_tool], "You are a web researcher.")
research_node = functools.partial(agent_node, agent=research_agent, name="Researcher")

# NOTE: THIS PERFORMS ARBITRARY CODE EXECUTION. PROCEED WITH CAUTION
code_agent = create_agent(
    llm,
    [python_repl_tool],
    "You may generate safe python code to analyze data and generate charts using matplotlib.",
)
code_node = functools.partial(agent_node, agent=code_agent, name="Coder")

workflow = StateGraph(AgentState)
workflow.add_node("Researcher", research_node)
workflow.add_node("Coder", code_node)
workflow.add_node("supervisor", supervisor_chain)
次に、グラフ内のすべてのエッジを接続します。
for member in members:
    # We want our workers to ALWAYS "report back" to the supervisor when done
    workflow.add_edge(member, "supervisor")
# The supervisor populates the "next" field in the graph state
# which routes to a node or finishes
conditional_map = {k: k for k in members}
conditional_map["FINISH"] = END
workflow.add_conditional_edges("supervisor", lambda x: x["next"], conditional_map)
# Finally, add entrypoint
workflow.set_entry_point("supervisor")

graph = workflow.compile()
Invoke the team
グラフが作成されたので、それを呼び出して、どのように実行されるかを確認できます。
for s in graph.stream(
    {
        "messages": [
            HumanMessage(content="Code hello world and print it to the terminal")
        ]
    }
):
    if "__end__" not in s:
        print(s)
        print("----")
実行結果
{'supervisor': {'next': 'Coder'}}
----
Python REPL can execute arbitrary code. Use with caution.
{'Coder': {'messages': [HumanMessage(content='The message "Hello, World!" has been successfully printed to the terminal.', name='Coder')]}}
----
{'supervisor': {'next': 'FINISH'}}
----
ここはPythonREPLが動く程度なので、Hello, world!が表示されています。
サンプルの実行結果だと、print('Hello, World!')とPythonのコードが出力されていました。環境によって何か違うでしょうか。
サンプルの実行結果
{'supervisor': {'next': 'Coder'}}
----
Python REPL can execute arbitrary code. Use with caution.
{'Coder': {'messages': [HumanMessage(content="The code `print('Hello, World!')` was executed, and the output is:\n\n```\nHello, World!\n```", name='Coder')]}}
----
{'supervisor': {'next': 'FINISH'}}
----
以下のプロンプトはサンプルから少し変えてみました。
大谷翔平の歴史に関して日本語で10000文字くらいのレポートを作 ってください。
for s in graph.stream(
    #{"messages": [HumanMessage(content="Write a brief research report on pikas.")]},
    {"messages": [HumanMessage(content="大谷翔平の歴史に関して日本語で10000文字くらいのレポートを作 ってください。")]},
    {"recursion_limit": 100},
):
    if "__end__" not in s:
        print(s)
        print("----")
実行結果
{'supervisor': {'next': 'Researcher'}}
----
{'Researcher': {'messages': [HumanMessage(content='大谷翔平選手(おおたに しょうへい)は、日本のプロ野球選手であり、メジャーリーグベースボール(MLB)のロサンゼルス・エンゼルスに所属しています。彼は野 球界で「二刀流」として知られており、投手としても打者としても卓越した能力を持つ稀有な存在です。大谷選手のキャリアを振り返り、その成就と影響について詳細に掘り下げていきます。\\n\\n### 初期の背景とプロ入り前\\n大谷翔平は1994年7月5日、岩手県奥州市に生まれました。少年時代から野球の才能を示し、高校時代には花巻東高等学校でその能力をさらに磨きました。高校3年生の時、彼は最速160キロを記録する速球を投げることができ、また、打者としても高い打率と本塁打を記録しました。\\n\\n2012年に行われたプロ野球ドラフト会議で、北海道日本ハムファイターズから1位指名を受け、プロ入りしました。大谷選手は入団当初から投手としてだけ でなく、打者としても定期的に出場することを球団に要求し、日本プロ野球(NPB)での「二刀流」としてのキ ャリアをスタートさせました。\\n\\n### NPBでの活躍\\nプロ入り後、大谷選手はすぐにその才能を開花させます 。投手としては、彼の速球はさらに速くなり、最速163キロを記録。打者としても強力なスラッガーとして成長 し、多くのホームランを放ちました。2016年には、22歳にしてシーズン24本塁打を記録し、10勝(投手として)を挙げるという驚異的な成績を残しました。\\n\\n### MLBへの挑戦\\n2017年のオフシーズン、大谷選手はNPBからポスティングシステムを利用してMLBへ移籍することを表明しました。彼のこうした決断は、国内外のメディア から大きな注目を集め、多くのMLBチームが彼の獲得に乗り出しました。最終的にロサンゼルス・エンゼルスと 契約を結び、アメリカでの新たなキャリアをスタートさせることになります。\\n\\n### MLBでの成功と挑戦\\nエ ンゼルス入団後、大谷選手は投手としても打者としても素晴らしい成績を残し、多くのファンを魅了しました。特に2018年のルーキーシーズンは、彼の名を世界に知らしめるシーズンとなりました。その年、彼は22本のホームランを打ち、投手としても4勝を挙げるという二刀流として類を見ない活躍を見せました。この年の終わりに は、アメリカンリーグの新人王に選ばれる栄誉を手にしました。\\n\\nしかし、彼のキャリアは順風満帆ではありませんでした。2018年には右肘の靱帯に問題を抱え、トミー・ジョン手術を受けることになります。この手術は彼の投手としての活動を一時的に制限しましたが、打者としては依然として高いパフォーマンスを維持しました。\\n\\n### 継続的な成長と記録\\n手術から復帰後も大谷選手の進化は続きます。2021年シーズンには、彼は投手としての活動を再開し、その年のオールスターゲームに投手としても打者としても選出されるという史上初の快挙を成し遂げました。同年、彼は46本のホームランを放ち、23盗塁を記録するなど、そのオールラウンドな才能を遺憾なく発揮しました。\\n\\n大谷選手のこれまでのキャリアは、野球史における画期的なものとされています。彼の存在は、野球というスポーツの枠を超え、世界中の多くの人々に影響を与えています。今後も彼の活躍から目が離せません。', name='Researcher')]}}
----
{'supervisor': {'next': 'FINISH'}}
----
実行結果を見やすく引用にしました。
ちゃんとレポートっぽく出力されていますね。
{'supervisor': {'next': 'Researcher'}} ---- {'Researcher': {'messages': [HumanMessage(content='大谷翔平選手(おおたに しょうへい)は、日本のプロ野球選手であり、メジャーリーグベースボール(MLB)のロサンゼルス・エンゼルスに所属しています。彼は野 球界で「二刀流」として知られており、投手としても打者としても卓越した能力を持つ稀有な存在です。大谷選手のキャリアを振り返り、その成就と影響について詳細に掘り下げていきます。\n\n### 初期の背景とプロ入り前\n大谷翔平は1994年7月5日、岩手県奥州市に生まれました。少年時代から野球の才能を示し、高校時代には花巻東高等学校でその能力をさらに磨きました。高校3年生の時、彼は最速160キロを記録する速球を投げることができ、また、打者としても高い打率と本塁打を記録しました。\n\n2012年に行われたプロ野球ドラフト会議で、北海道日本ハムファイターズから1位指名を受け、プロ入りしました。大谷選手は入団当初から投手としてだけ でなく、打者としても定期的に出場することを球団に要求し、日本プロ野球(NPB)での「二刀流」としてのキ ャリアをスタートさせました。\n\n### NPBでの活躍\nプロ入り後、大谷選手はすぐにその才能を開花させます 。投手としては、彼の速球はさらに速くなり、最速163キロを記録。打者としても強力なスラッガーとして成長 し、多くのホームランを放ちました。2016年には、22歳にしてシーズン24本塁打を記録し、10勝(投手として)を挙げるという驚異的な成績を残しました。\n\n### MLBへの挑戦\n2017年のオフシーズン、大谷選手はNPBからポスティングシステムを利用してMLBへ移籍することを表明しました。彼のこうした決断は、国内外のメディア から大きな注目を集め、多くのMLBチームが彼の獲得に乗り出しました。最終的にロサンゼルス・エンゼルスと 契約を結び、アメリカでの新たなキャリアをスタートさせることになります。\n\n### MLBでの成功と挑戦\nエ ンゼルス入団後、大谷選手は投手としても打者としても素晴らしい成績を残し、多くのファンを魅了しました。特に2018年のルーキーシーズンは、彼の名を世界に知らしめるシーズンとなりました。その年、彼は22本のホームランを打ち、投手としても4勝を挙げるという二刀流として類を見ない活躍を見せました。この年の終わりに は、アメリカンリーグの新人王に選ばれる栄誉を手にしました。\n\nしかし、彼のキャリアは順風満帆ではありませんでした。2018年には右肘の靱帯に問題を抱え、トミー・ジョン手術を受けることになります。この手術は彼の投手としての活動を一時的に制限しましたが、打者としては依然として高いパフォーマンスを維持しました。\n\n### 継続的な成長と記録\n手術から復帰後も大谷選手の進化は続きます。2021年シーズンには、彼は投手としての活動を再開し、その年のオールスターゲームに投手としても打者としても選出されるという史上初の快挙を成し遂げました。同年、彼は46本のホームランを放ち、23盗塁を記録するなど、そのオールラウンドな才能を遺憾なく発揮しました。\n\n大谷選手のこれまでのキャリアは、野球史における画期的なものとされています。彼の存在は、野球というスポーツの枠を超え、世界中の多くの人々に影響を与えています。今後も彼の活躍から目が離せません。', name='Researcher')]}} ---- {'supervisor': {'next': 'FINISH'}} ----
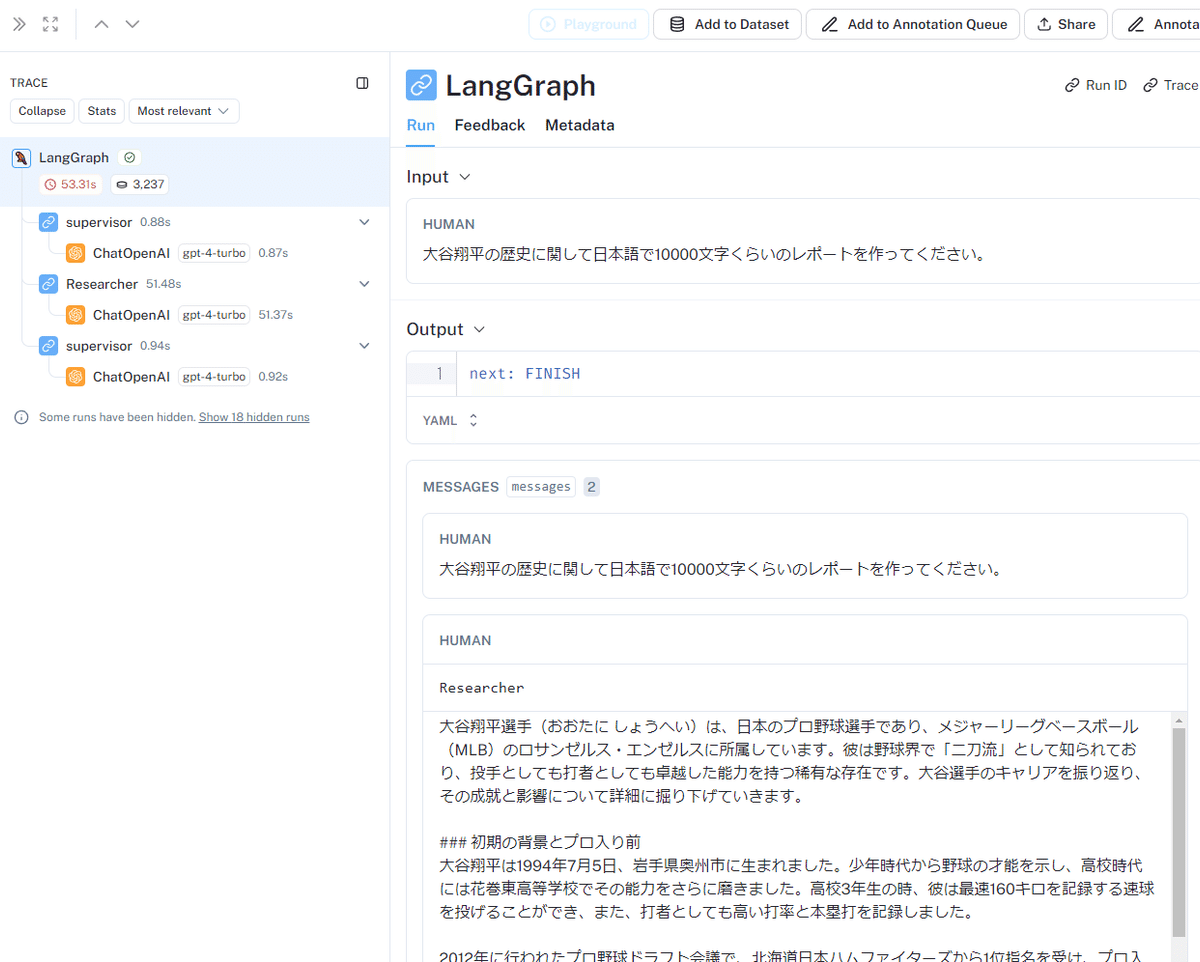
LangSmithで状況を見てみましょう。
もしアカウントを持っていない場合は、以下にアクセスしてアカウントを取得しておきましょう。
アカウント作成後、APIキーなどを環境変数にセットしておきます。
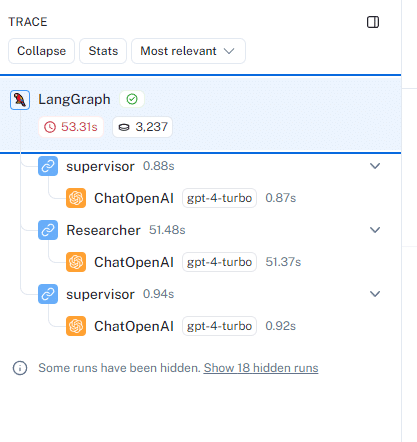
以下のように「supervisor」、「Researcher」などが動ていました。
コード全文
import getpass
import os

def _set_if_undefined(var: str):
    if not os.environ.get(var):
        os.environ[var] = getpass.getpass(f"Please provide your {var}")


_set_if_undefined("OPENAI_API_KEY")
_set_if_undefined("LANGCHAIN_API_KEY")
_set_if_undefined("TAVILY_API_KEY")

# Optional, add tracing in LangSmith
os.environ["LANGCHAIN_TRACING_V2"] = "true"
os.environ["LANGCHAIN_PROJECT"] = "Multi-agent Collaboration"


from typing import Annotated, List, Tuple, Union

from langchain_community.tools.tavily_search import TavilySearchResults
from langchain_core.tools import tool
from langchain_experimental.tools import PythonREPLTool

tavily_tool = TavilySearchResults(max_results=5)

# This executes code locally, which can be unsafe
python_repl_tool = PythonREPLTool()


from langchain.agents import AgentExecutor, create_openai_tools_agent
from langchain_core.messages import BaseMessage, HumanMessage
from langchain_openai import ChatOpenAI


def create_agent(llm: ChatOpenAI, tools: list, system_prompt: str):
    # Each worker node will be given a name and some tools.
    prompt = ChatPromptTemplate.from_messages(
        [
            (
                "system",
                system_prompt,
            ),
            MessagesPlaceholder(variable_name="messages"),
            MessagesPlaceholder(variable_name="agent_scratchpad"),
        ]
    )
    agent = create_openai_tools_agent(llm, tools, prompt)
    executor = AgentExecutor(agent=agent, tools=tools)
    return executor

def agent_node(state, agent, name):
    result = agent.invoke(state)
    return {"messages": [HumanMessage(content=result["output"], name=name)]}


from langchain_core.prompts import ChatPromptTemplate, MessagesPlaceholder
from langchain_core.output_parsers.openai_functions import JsonOutputFunctionsParser

members = ["Researcher", "Coder"]
system_prompt = (
    "You are a supervisor tasked with managing a conversation between the"
    " following workers:  {members}. Given the following user request,"
    " respond with the worker to act next. Each worker will perform a"
    " task and respond with their results and status. When finished,"
    " respond with FINISH."
)
# Our team supervisor is an LLM node. It just picks the next agent to process
# and decides when the work is completed
options = ["FINISH"] + members
# Using openai function calling can make output parsing easier for us
function_def = {
    "name": "route",
    "description": "Select the next role.",
    "parameters": {
        "title": "routeSchema",
        "type": "object",
        "properties": {
            "next": {
                "title": "Next",
                "anyOf": [
                    {"enum": options},
                ],
            }
        },
        "required": ["next"],
    },
}
prompt = ChatPromptTemplate.from_messages(
    [
        ("system", system_prompt),
        MessagesPlaceholder(variable_name="messages"),
        (
            "system",
            "Given the conversation above, who should act next?"
            " Or should we FINISH? Select one of: {options}",
        ),
    ]
).partial(options=str(options), members=", ".join(members))

llm = ChatOpenAI(model="gpt-4-turbo")

supervisor_chain = (
    prompt
    | llm.bind_functions(functions=[function_def], function_call="route")
    | JsonOutputFunctionsParser()
)


import operator
from typing import Annotated, Any, Dict, List, Optional, Sequence, TypedDict
import functools

from langchain_core.prompts import ChatPromptTemplate, MessagesPlaceholder
from langgraph.graph import StateGraph, END


# The agent state is the input to each node in the graph
class AgentState(TypedDict):
    # The annotation tells the graph that new messages will always
    # be added to the current states
    messages: Annotated[Sequence[BaseMessage], operator.add]
    # The 'next' field indicates where to route to next
    next: str


research_agent = create_agent(llm, [tavily_tool], "You are a web researcher.")
research_node = functools.partial(agent_node, agent=research_agent, name="Researcher")

# NOTE: THIS PERFORMS ARBITRARY CODE EXECUTION. PROCEED WITH CAUTION
code_agent = create_agent(
    llm,
    [python_repl_tool],
    "You may generate safe python code to analyze data and generate charts using matplotlib.",
)
code_node = functools.partial(agent_node, agent=code_agent, name="Coder")

workflow = StateGraph(AgentState)
workflow.add_node("Researcher", research_node)
workflow.add_node("Coder", code_node)
workflow.add_node("supervisor", supervisor_chain)


for member in members:
    # We want our workers to ALWAYS "report back" to the supervisor when done
    workflow.add_edge(member, "supervisor")
# The supervisor populates the "next" field in the graph state
# which routes to a node or finishes
conditional_map = {k: k for k in members}
conditional_map["FINISH"] = END
workflow.add_conditional_edges("supervisor", lambda x: x["next"], conditional_map)
# Finally, add entrypoint
workflow.set_entry_point("supervisor")

graph = workflow.compile()

for s in graph.stream(
    {
        "messages": [
            HumanMessage(content="Code hello world and print it to the terminal")
        ]
    }
):
    if "__end__" not in s:
        print(s)
        print("----")


for s in graph.stream(
    {"messages": [HumanMessage(content="大谷翔平の歴史に関して日本語で10000文字くらいのレポートを作 ってください。")]},
    {"recursion_limit": 100},
):
    if "__end__" not in s:
        print(s)
        print("----")
まとめ
今回、LangGraphについて学んでみようと思いましたが、理解するのに時間がかかりそうでしたので、とりあえずLangGraphのサンプルをそのまま動かしてみました。
率直に、これだけだと何がうれしいかわかりにくいですが、このあと1つずつ理解しながら自分オリジナルのマルチエージェントを作っていこうと思います。
この記事が気に入ったらサポートをしてみませんか?