Navigating pictSQUARE as a general participant

About
This guide will show you how to set up an account, set up your avatar and navigate virtual events on pictSQUARE.
For the event, you will need to create an account, log in, use your avatar, and depending on the vendor, shop using pictSPACE, a group company of pictSQUARE.
In this guide, I will show you the following:
how to set up an account
how to set up your avatar
how to navigate
How to shop using pictSPACE, pictSQUARE's associated shopping service.
Registration
Here is the link to the pictSQUARE top page.
To register, it is better if you have the following ready:
Your Twitter account logged in, if you plan to register with your Twitter Account
A mobile phone that can make international calls (This is used for identity verification for a call that lasts only a few seconds) WITH caller ID
Access to your e-mail account you will use to register
Nickname
Profile Image
This is the link to the howtos for beginners.
Most pages are shown in Japanese, English, Chinese, and Korean, while FAQs are only in Japanese and Chinese.

From this page, click Registration.
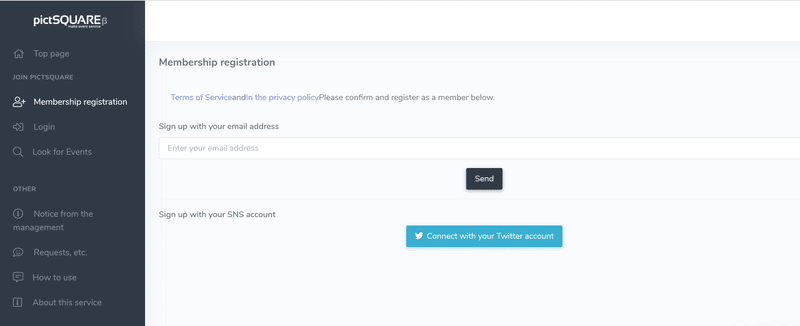
You can also sign up with your Twitter account.
Once you connect using your Twitter account, you will be prompted to fill out the rest of the account information.

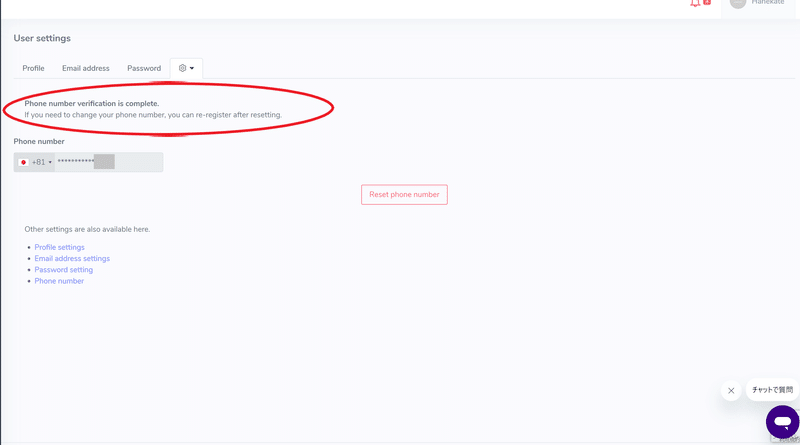
You will be prompted to verify your mobile phone once you click the "Complete the membership registration" button. They use this process to verify your ID so that they can ban users who violate the terms of use indefinitely.
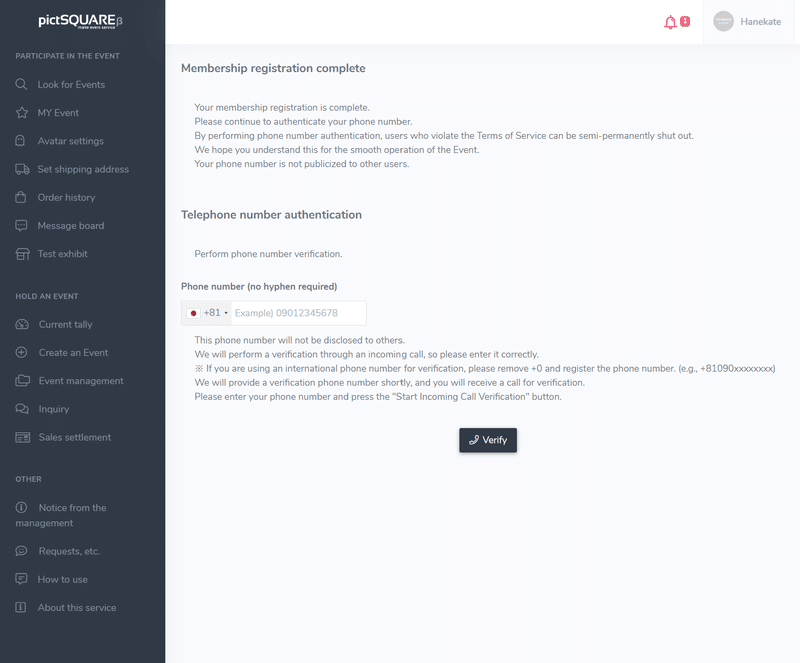
Once you enter your phone number and click Verify, you will be prompted to a screen showing a phone number you should call.
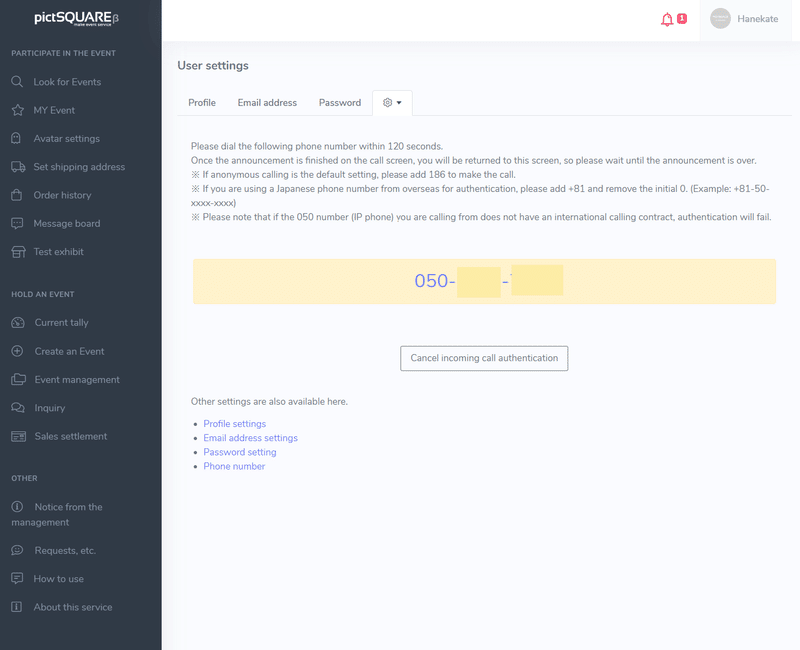
Once you call the number WITH caller ID, it will automatically hang up after a few seconds, and the screen will show that the verification is complete.
You will be prompted to add an e-mail address to your account. Enter your e-mail address and click send.
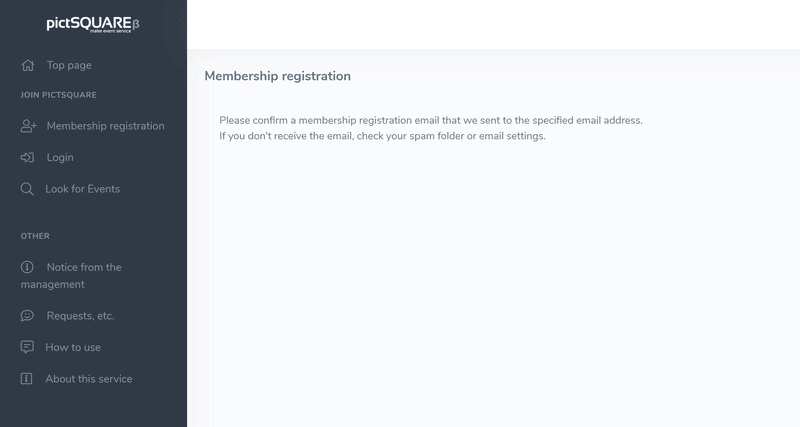
Then, check your inbox. It would be best if you had an e-mail from pictSQUARE waiting for you. Click on the verification e-mail, and your registration is complete.
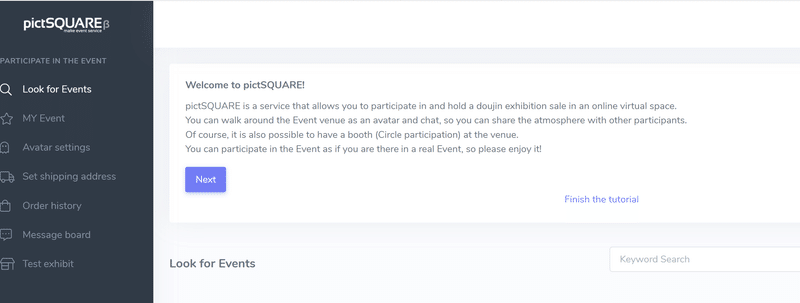
Search for events
You can search for events from the dashboard and save them on your account for easy access later.
Here is an example. Search by ながいきのかみさま
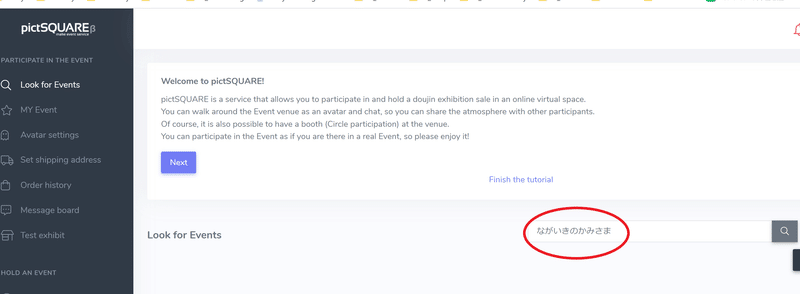
Here is a link to the search result:
You can then click on the event. This takes you to the event page. Click on ☆Add to Favorites. Next time you want to access the event, you can go to "MY Event" from the Dashboard.
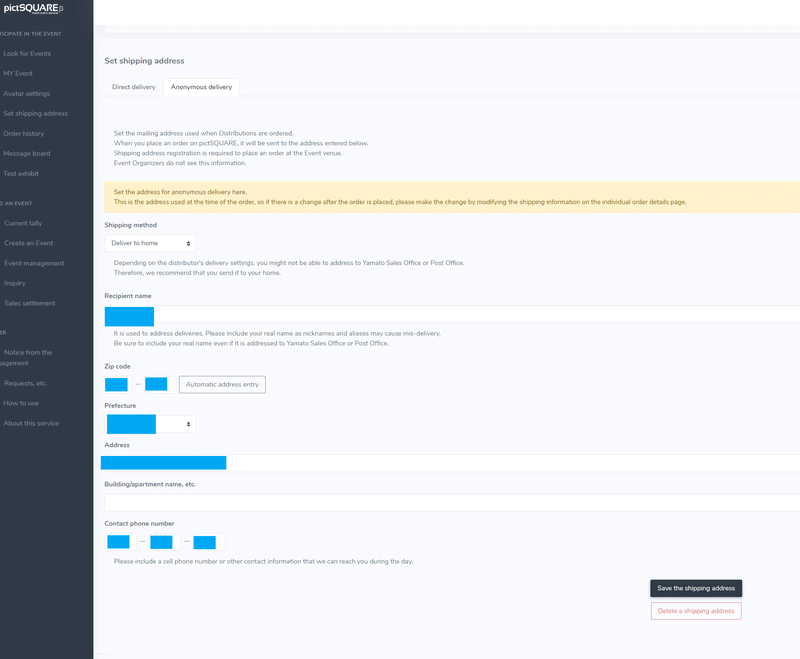
Shipping Address
You should also register your shipping address if you expect to shop during the event. To register your shipping address, you first need to go to your dashboard.

Click on "Set shipping address" on the bar on the left side.
You can set up shipping addresses provided by TENSO.com or other forwarders for both direct shipping and anonymous shipping. Anonymous shipping allows the seller and the buyer to send and receive the goods without disclosing personal information. This method is available if the seller includes this in the shipping option when setting up the shop.
Address registration form: Direct delivery.

Address registration form: Anonymous delivery.
Avatar
You can always use the ready-made avatars, but you have the option to create and use your own avatar. Here is how.
You can create your own avatar and save it in your account.
Specifications
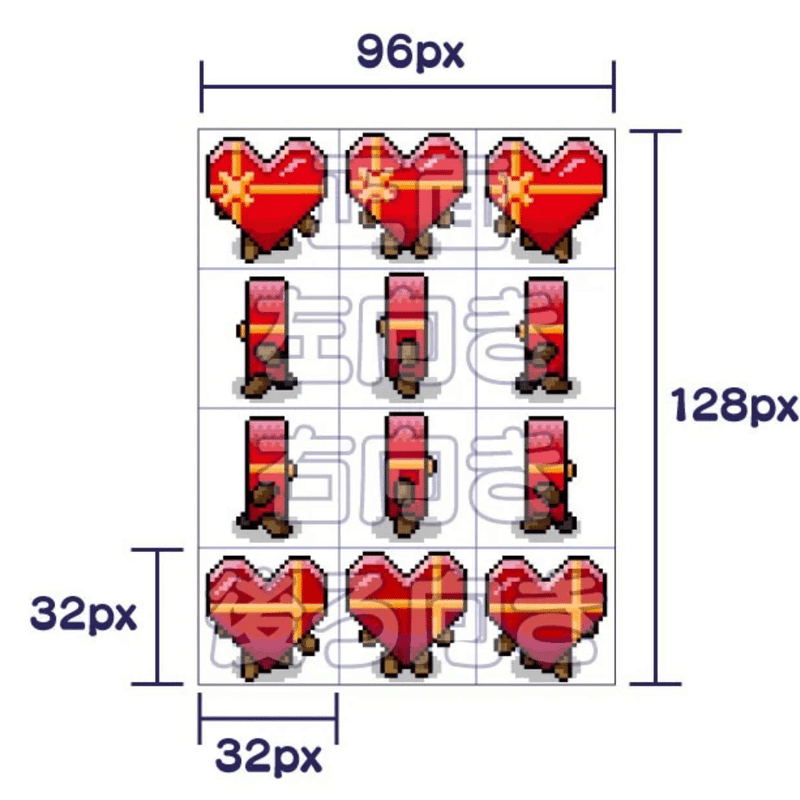
This is an example of a finished avatar data from the pictSQUARE website.
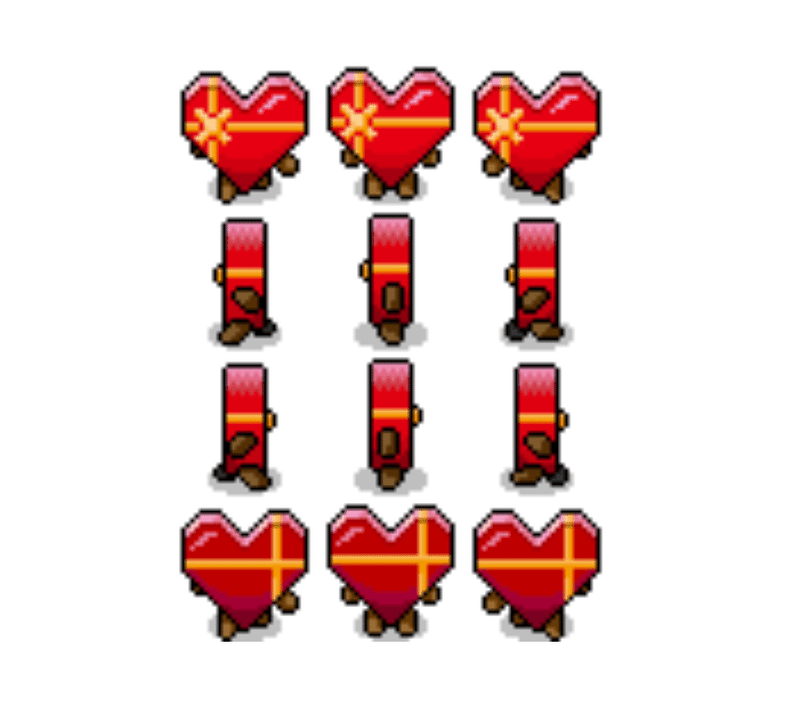
The overall size of the file should be 96px wide and 128px tall. Sizing differences will cause errors when uploading. To make sure that they look like they are walking when animated, you should create 12 cuts consisting of 3 cuts each of front x 3 facing left x 3 facing right x 3 back x 3in this order.
The size of each cut should be 32px x 32px
File format: PNG
The background must be transparent (sample image from pictSQUARE)
*Ignore the watermarks in the sample picture. You do NOT want watermarks!
Create an avatar
Prepare a grid like this with a photo editor app, sized 98px wide and 128px long.
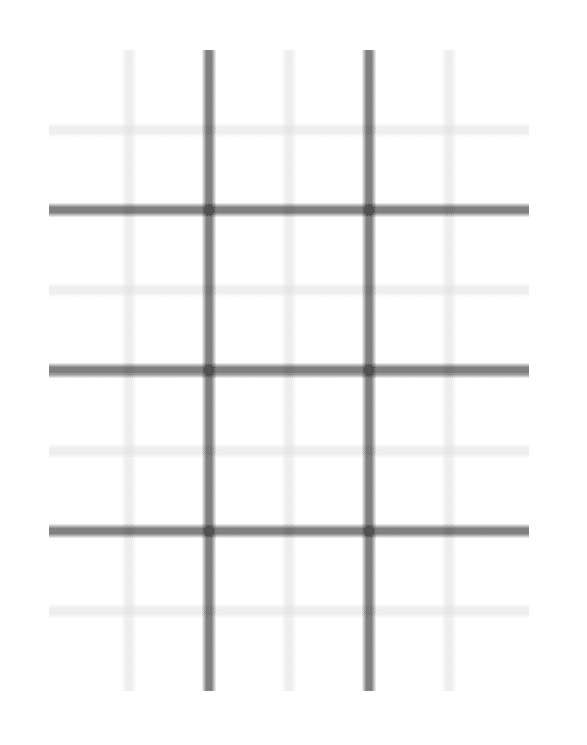
You can use this as one of the layers when making the avatar, then hide this grid when saving the finished image file. Make one cut with the right foot out, one cut standing still, and another cut with the left foot forward. (if your avatar will not have arms and legs)
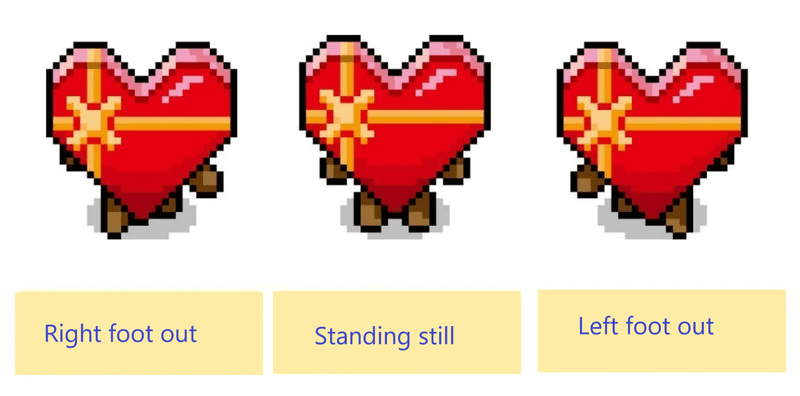
From each image you created, make those face left, then right, then back. Using the reverse feature of the software may be useful.

When you are finished, make sure that the background of the image is transparent, then save it in PNG format.
You can also use a software linked here, provided by a vendor of pictSQUARE.
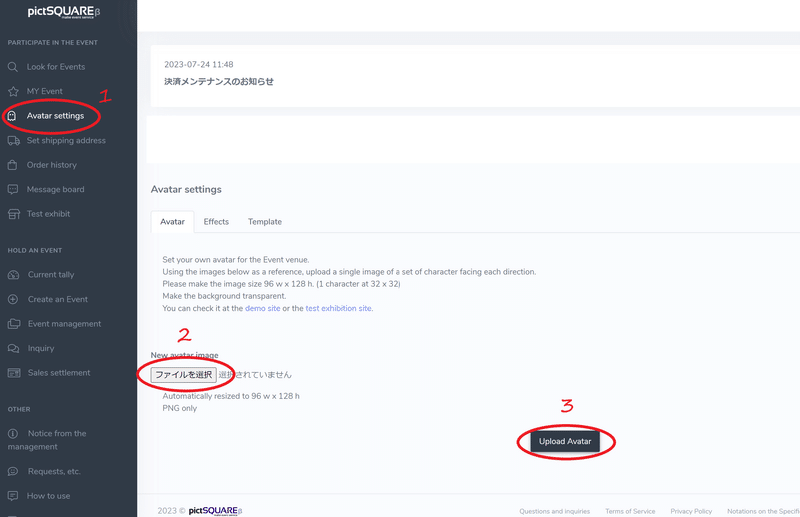
Upload your avatar file
Go to your dashboard.

Then click Avatar Settings, upload New Avatar Image, and Save.
Setting fixed phrases
Go to the menu bar on the left of the Dashboard, and click on Avatar Settings.
From Avatar Settings, select the tab "Template." This is where you can save up to 20 fixed phrases that you can use to post comments during the event.
Setting up effects
Here is the link to the related FAQ:
"Effect" is an animation you can display around your avatar. By using the "Effect," you can show your reactions more. You can create your own EFFECT and save it to use during the event. Here is what the finished Effect will look like.

Specifications
Total size: 384px x 384 px
16 cuts of 96px x 96px
File format: PNG
The background must be translucent
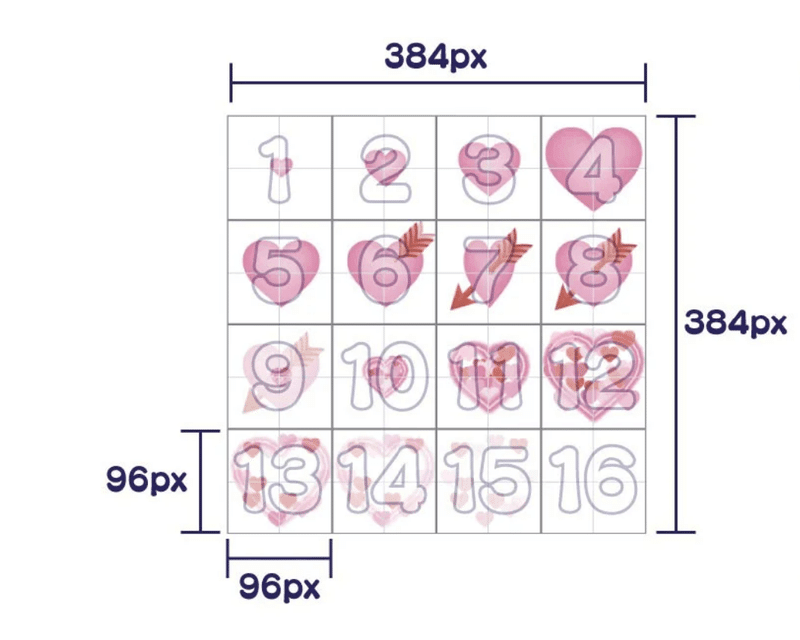
How to make an Effect file
You can create the effect using this grid template, then hide the layer grid to save the image.

Using this grid, you need to create an animation comprised of 16 cuts. The cuts should move from top left to right.
16カットで再現できるアニメーションを作っていきます。
アニメーションは左上から右に順番に進んでいきます。(ガイドライン画像参照)
完成イメージのエフェクトはこのようにアバターを中心に表示されます。アバターの中心から表示されるもの以外にも、このように左下から表示させるアニメーションにもできます。 他にも1カットあたりの上部1/3くらいのみに吹き出しを描画し、リアクション用のエフェクトを作ることもできます。
Once the image file is done, you can upload it in the Avatar Settings in the tab "Effect." You can save up to 10 Effects. You can test-run it on the demo site or exhibition site.
Navigating pictSQUARE
Navigate
PC Browser (Safari, Google Chrome, Firefox): You can use your arrow keys to move around
Smartphone: You can move around by flicking the screen
You will be automatically be exited from the venue if there is no activity for approximately 60 minutes.
Post messages
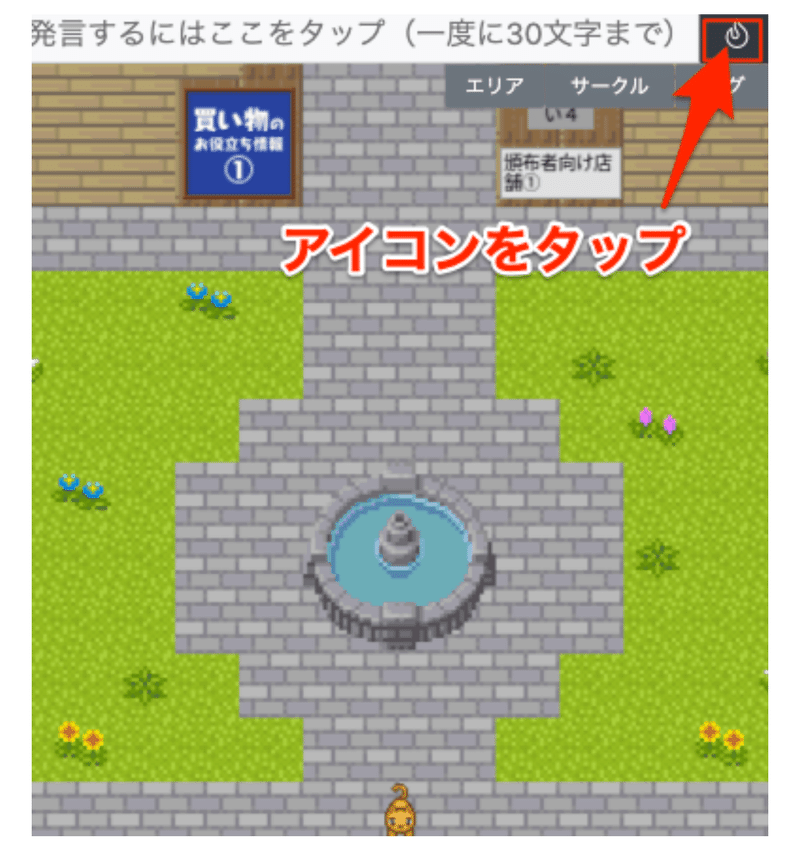
You can post a comment by tapping on the box where the red arrow is pointing, then type your message. Max 30 letters are allowed, including emojis. The comment will be viewable to everyone in the same area.
Post preset messages
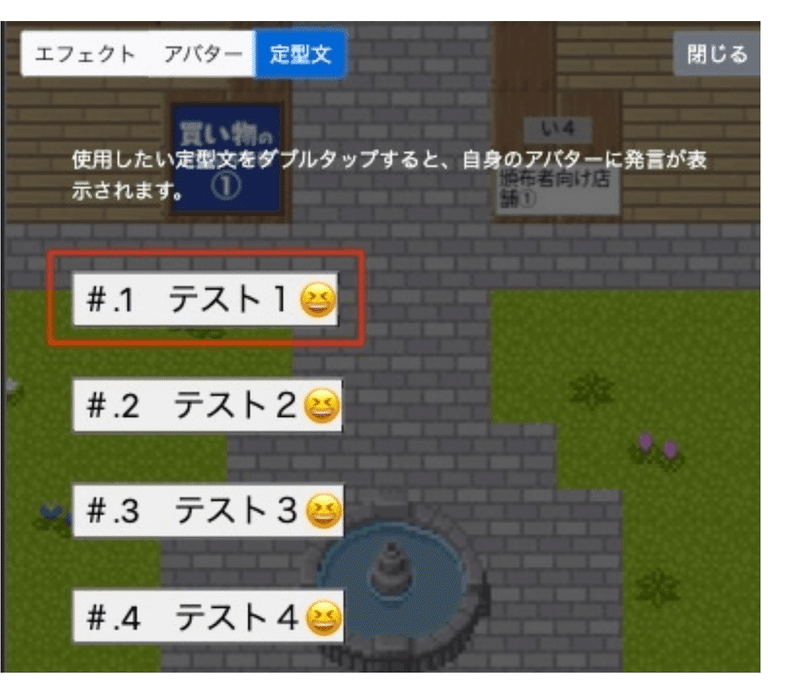
You can also post your preset messages here. To do so, tap on the icon where the red arrow is pointing,
then double-click on the preset message you want to post.
Post a fixed message.
If you start your comment with an @ mark (both single and double-digit fonts permitted), your comment will not be auto-deleted. You can use this, for example, when your avatar stays inside the venue but you will be away from your PC for a while.
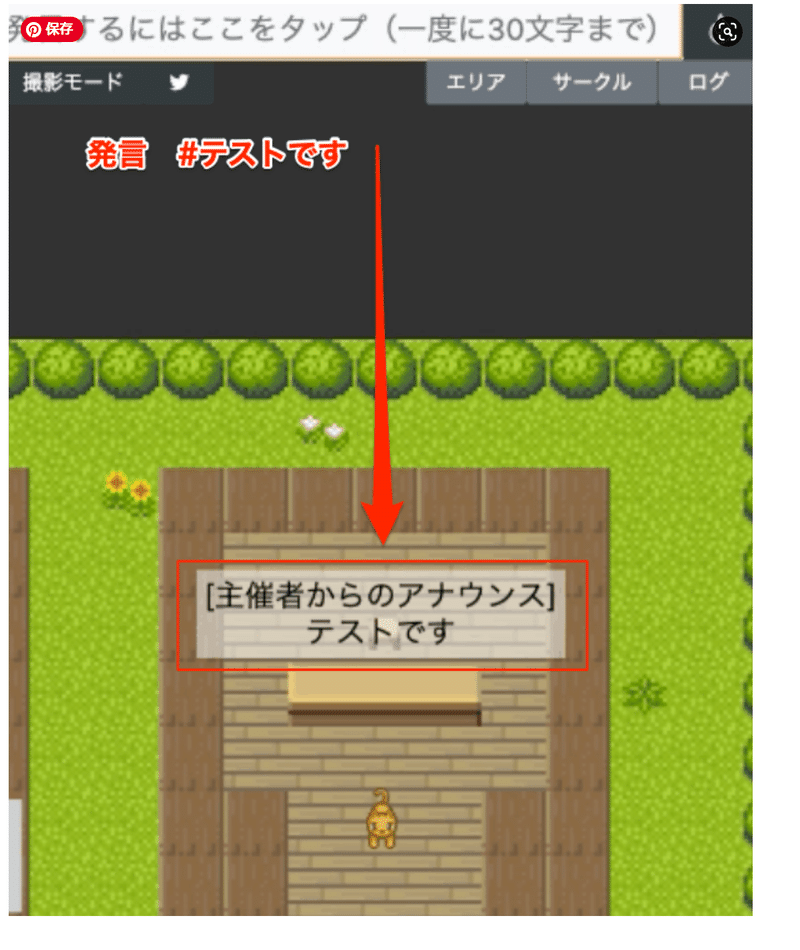
Only the event admin can make a "public" announcement by typing a comment starting with a #. The announcement will be visible from all areas.
How to view the Circle Cut
You can view the Circle cut and the menu or item list of the store by tapping on the store sign. A circle cut is an image of the doujin circle used for this event, showing the name, identity, genre, or CP.

External Store Sites
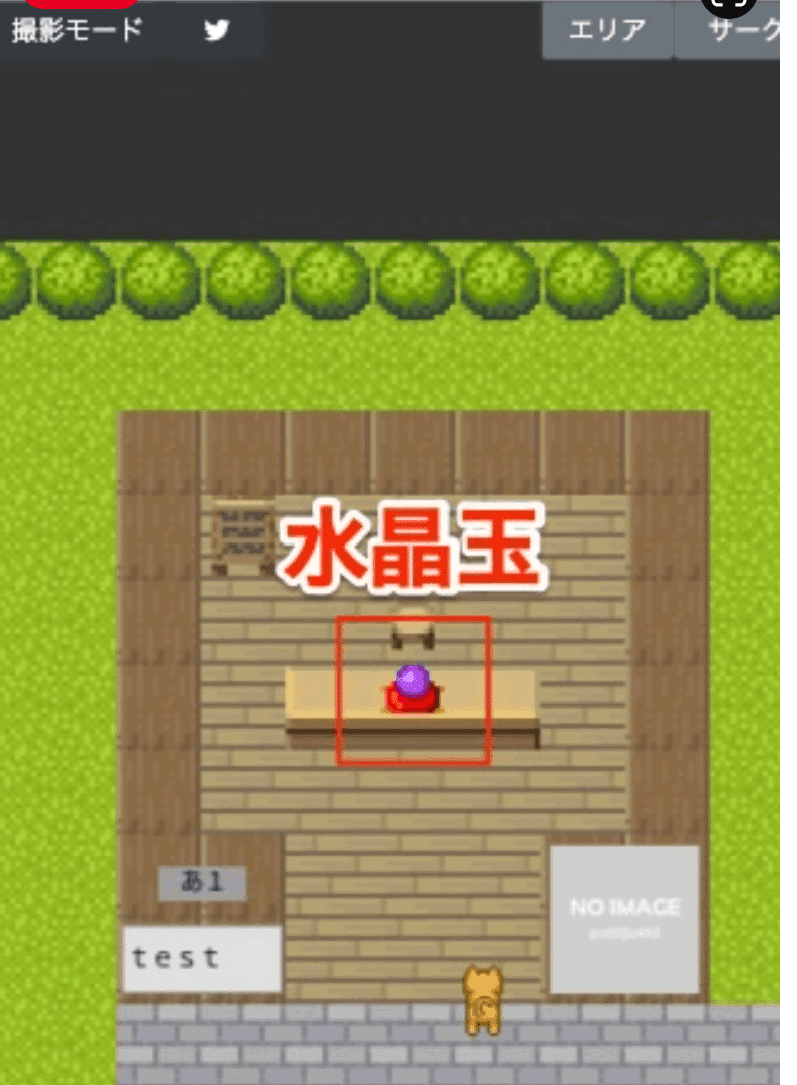
If the novelty /goods are sold at EC sites other than pictSPACE stores, you will see a purple crystal ball on the table. Tapping on the crystal ball will redirect you to external store sites such as TORANOANA, MELONBOOKS, BOOTH, MINNE, etc.
pictSPACE stores
If the novelty/goods are sold on a pictSPACE store platform, you will see a red book on the table. You will be able to view the details of the goods by tapping on the red book.

International shipping
pictSPACE does not ship internationally but is partnered with TENSO.COM and BUYEE. HOWEVER, Buyee does not work with pictSPACE, so between TENSO.COM and BUYEE, TENSO.COM appears to be your only option. Refer to pages TENSO.COM, TORANOANA, and BOOTH for more information on TENSO.
Here is a link to the pictSPACE store notice on international shipping.
https://pictspace.net/informations/detail/114
Below is a link to an FAQ about international shipping. To summarize, you can obtain a domestic shipping address from TENSO.COM and register them as your direct shipping address and anonymous shipping address.
Anonymous shipping allows both the seller and the buyer to send and receive the goods without disclosing any personal information. This method is available if the seller includes this in the shipping option when setting up the shop.
How to order
From the product detail, you can place an order.
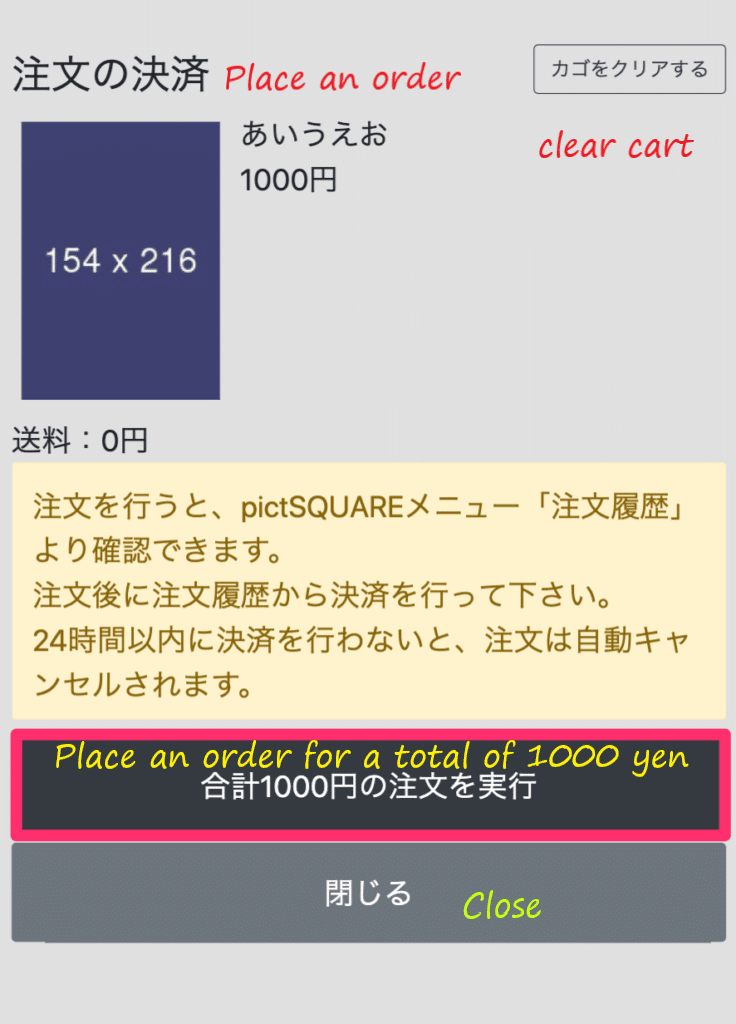
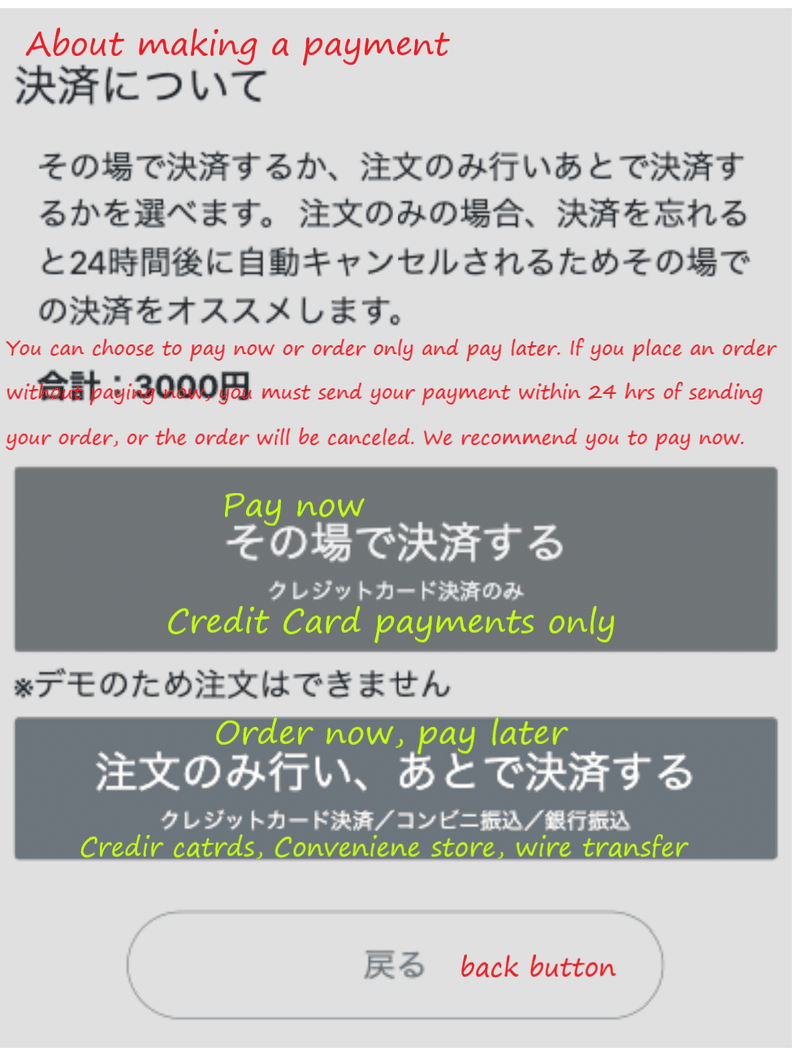
BY tapping "Add to Cart," the goods will be added to your cart. If you tap 「注文画面へ」(Proceed to the order menu), you will see the menu below. You can choose to pay immediately or place the order and pay later. You must process your payment within 24 hours of placing your order, or it will be canceled. (There is a typo on the screenshot...Credit Cards, Convenience Stores)
Steps are shown in this FAQ:
https://pictspace.net/statics/how_to_order/sample_3
In summary, you need to:
Add the goods to your cart
Enter your shipping address and e-mail address, phone number
Click "order": this will be a provisional order
Check your e-mail and click on the link to confirm your order within 10 minutes of placing your provisional order
Process your payment within 24 hours of placing your order, or it will be canceled.
If the product is a downloadable content, you will be able to download the content from your "Order History" page.
Once your payment is processed and the funds are transferred, you will receive a confirmation e-mail. The store owner will also be notified. From here, you will be able to correspond with your seller directly.
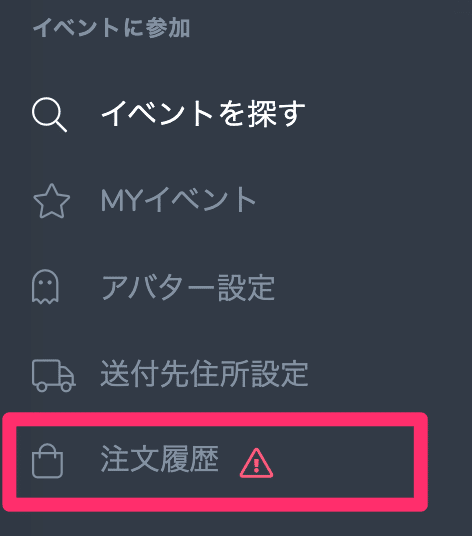
How to pay
If you did not process your payment upon ordering, you can go to your Order History and pay from there. 注文履歴 means "order history".
Accepted Payment Methods
Credit cards (VISA、MASTER) are accepted. JCB、AMEX, 、DINERS are accepted for tangible goods, not downloadable content. Per my conversation with a rep from Paidy on July 21, 2023, Paidy is unavailable for overseas customers.