
DXL活用例 -動的な印刷画面- その4

今回がこのシリーズの最終回です。前回確認したDXLを元に、置換用のDXLを生成するプログラムを解説していきます。
※前回の記事と連動していますので、もし読まれてない場合は、先に以下の記事をご確認ください。
DXLの解説
まずは、前回取得したリッチテキストのDXLを見てみましょう。
※下記は、見やすいようにスペースや改行を入れています。
<item name='Body'><richtext>
<pardef id='1'/>
<par def='1'/>
<table widthtype='fixedleft' refwidth='6.5in'>
  <tablecolumn width='2in'/>
  <tablecolumn width='3in'/>
  <tablecolumn width='1.5in'/>

  <tablerow>
    <tablecell bgcolor='#d2d2d2'>
      <pardef id='3' align='center' keepwithnext='true' keeptogether='true'/>
      <par def='3'>件名</par>
    </tablecell>
    <tablecell bgcolor='#d2d2d2'>
      <pardef id='4' align='center' keepwithnext='true' keeptogether='true'/>
      <par def='4'>コメント</par>
    </tablecell>
    <tablecell bgcolor='#d2d2d2'>
      <pardef id='5' align='center' keepwithnext='true' keeptogether='true'/>
      <par def='5'>作成日</par>
    </tablecell>
  </tablerow>

  <tablerow>
    <tablecell>
      <pardef id='6' keepwithnext='true' keeptogether='true'/>
      <par def='6'>文書1の件名です</par>
    </tablecell>
    <tablecell>
      <pardef id='7' keepwithnext='true' keeptogether='true'/>
      <par def='7'>文書1のコメント1</par>
      <par def='7'>文書1のコメント2</par>
    </tablecell>
    <tablecell>
      <pardef id='8' keepwithnext='true' keeptogether='true'/>
      <par def='8'>2024/01/01 10:00:00</par>
    </tablecell>
  </tablerow>

  <tablerow>
    <tablecell>
      <par def='6'>文書2の件名です</par>
    </tablecell>
    <tablecell>
      <par def='7'>文書2のコメントです</par>
    </tablecell>
    <tablecell>
      <par def='8'>2024/01/02 12:00:00</par>
    </tablecell>
  </tablerow>
</table>
<par def='1'/>
</richtext></item>
■各タグの説明
<item>タグ
フィールドを表します。
<richtext>タグ
フィールドがリッチテキストであることを表します。
<pardef>タグ
段落スタイルを表します。
これにはid 属性があり、<par>タグと関連があります。
<par>タグ
段落を表します。実際に表示されるテキスト情報はこちらに含まれます。
def 属性の値は、<pardef>タグのidと紐づいています。
<table>タグ
表を表します。
<tablecolumn>タグ
列の幅などを表します。
これは<table>タグ内の一番最初に登場します。
<tablerow>タグ
行を表します。
上記の例では、1つ目がヘッダー行、2つ目以降がデータ行となります。
<tablecell>タグ
セルを表します。
この中には、段落を示す<par>タグが含まれます。
また同じ列の場合、そのdef 属性には、基本的に同じ値が設定されます。
リッチテキストのDXLをプログラムで作成する
LotusScriptには、NotesDOMParserなどDXLを解析したり修正を扱う為の様々なクラスやメソッドが準備されていますが、より簡単にDXLを生成する為、今回はテキストベースでDXLを生成していきます。
この処理は、特に難しいことはなく、基本的には事前に確認したDXLのテキストを、そのまま生成するようにします。ただし、<tablecell>タグに含まれる<pardef>タグを、下記のように先頭に移動してください。
Function GetBodyAF(ndCur As NotesDocument) As String
	Dim strBody		As String

	strBody = |<item name='Body'><richtext>| &_
	|<pardef id='1'/>| &_
	|<pardef id='3' align='center' keepwithnext='true' keeptogether='true'/>| &_
	|<pardef id='4' align='center' keepwithnext='true' keeptogether='true'/>| &_
	|<pardef id='5' align='center' keepwithnext='true' keeptogether='true'/>| &_
	|<pardef id='6' keepwithnext='true' keeptogether='true'/>| &_
	|<pardef id='7' keepwithnext='true' keeptogether='true'/>| &_
	|<pardef id='8' keepwithnext='true' keeptogether='true'/>| &_
	|<par def='1'/>| &_
	|<table widthtype='fixedleft' refwidth='6.5in'>| &_
	|<tablecolumn width='2in'/>| &_
	|<tablecolumn width='3in'/>| &_
	|<tablecolumn width='1.5in'/>|

	'ヘッダー行
	strBody = strBody & |<tablerow>| &_
	|<tablecell bgcolor='#d2d2d2'><par def='3'>件名</par></tablecell>| &_
	|<tablecell bgcolor='#d2d2d2'><par def='4'>コメント</par></tablecell>| &_
	|<tablecell bgcolor='#d2d2d2'><par def='5'>作成日</par></tablecell>| &_
	|</tablerow>|

	'データ行(実行元文書の子文書を基にデータ行を生成する
	Dim ndc			As NotesDocumentCollection
	Dim ndR			As NotesDocument
	Set ndc = ndCur.Responses
	Set ndR = ndc.GetFirstDocument
	While Not(ndR Is Nothing)
		strBody = strBody & GetRowData(ndR)
		Set ndR = ndc.GetNextDocument(ndR)
	Wend

	strBody = strBody & |</table><par def='1'/></richtext></item>|

	GetBodyAF = strBody
End Function
データ行を生成する
各行のセルに文書のフィールドの値を設定していきます。
ここでのポイントは、改行や複数値、日付や選択肢などの値を単純な文字列にコンバートするということです。
Function GetRowData(ndR As NotesDocument) As String
	Dim subject				As String
	Dim comment				As String
	Dim creDate				As String
	Dim strBody				As String

	subject = ndR.GetItemValue("Subject")(0)
	comment = ConvValue(ndR, "Comment")
	creDate = ConvValue(ndR, "CreDate")

	strBody = |<tablerow>| &_
	|<tablecell><par def='6'>| & subject & |</par></tablecell>| &_
	|<tablecell><par def='7'>| & comment & |</par></tablecell>| &_
	|<tablecell><par def='8'>| & creDate & |</par></tablecell>| &_
	|</tablerow>|

	GetRowData = strBody
End Function
データコンバート
選択肢などは、別名を表示名に変換、日付であれば和暦や日付のみ表示するなど、必要に応じてデータコンバートします。
また、改行については、そのままでは、改行表示されません。その為、<break/>タグに置換します。
Function ConvValue(ndR As NotesDocument, fldId As String) As String
	Dim value		As String
	Dim nxLine		As String

	nxLine = Chr(13) & Chr(10)
	Select Case fldId
		Case "CreDate":
			value = ndR.Created
			ConvValue = Format(value, "yyyy年MM月dd日")

		Case "Comment":
			value = ndR.GetItemValue(fldId)(0)
			ConvValue = Replace(value, nxLine, "<break/>")

		Case Else:
			ConvValue = ndR.GetItemValue(fldId)(0)
	End Select
End Function
完成
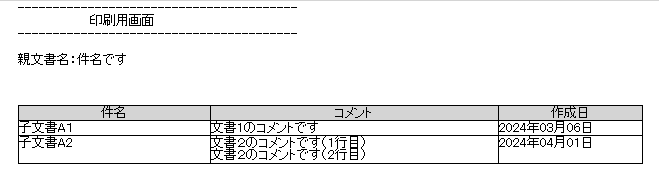
以上で、印刷用画面を生成するエージェントが完成です。
メイン文書から「印刷画面」ボタンをクリックすると、以下のような画面が表示されます。
※今回は説明の都合上、極力シンプルな表を作成していますが、セルの余白や文字の装飾なども設定可能ですので、いろいろ挑戦してみてください。
この記事が気に入ったらサポートをしてみませんか?