
【Flux.1】Flux.1時代のローカルAI画像生成③【SD1.5】

下記事のつづきです。
はじめに
Flux.1の最大の弱点は遅い・重いなので、今回もSD1.5を利用した工夫を紹介したいと思います。
Flux.1でもControlNet環境が整いつつありますが、現実問題としてミドルスペックPCでのローカル生成はまだ実用的ではありません。そこで、SD1.5のControlNetを利用した後にFlux.1をimg2img利用します。
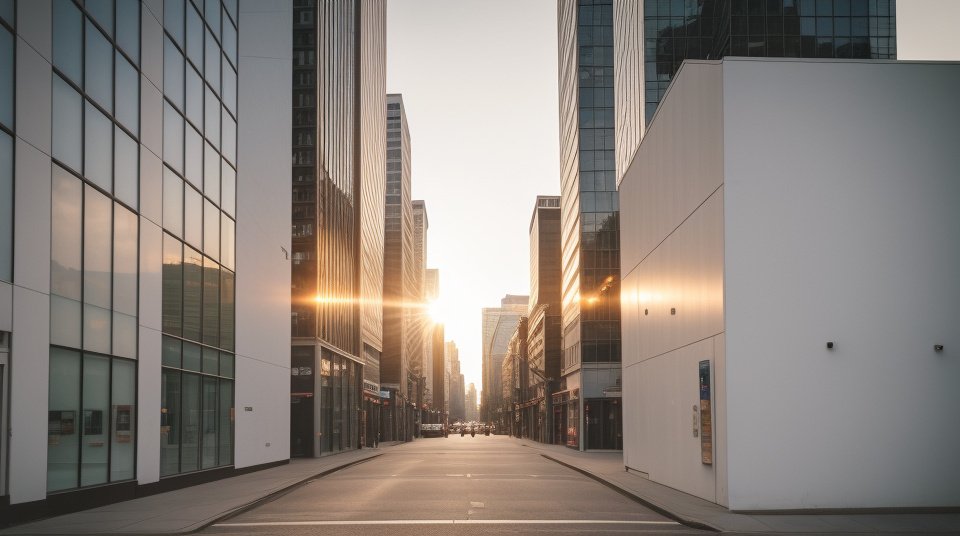
高層ビルの画像を生成
Blenderで構図を作る


この「陰影ラフ画」の光情報と、「深度マップ」を利用してAI画像を生成します。
SD1.5のControlNetを利用して画像を生成
今回はwebUI forgeを利用します。
プロンプトはLLMで生成します。最終的にFlux.1で利用するので、長く詳細なプロンプトをAIに考えてもらいます。
A vibrant city street bathed in the warm hues of sunset. The buildings, tall and imposing, line both sides of the street, their many windows reflecting the setting sun's glow. The tallest among them pierces the sky with its blue glass facade, standing out against the orange backdrop.
The street itself is a hive of activity. Cars are scattered along it, some parked while others navigate through the traffic under the watchful eyes of pedestrians on the sidewalks. The road is lined with trees, their leaves rustling in the evening breeze as they provide shade to those walking below.
The sky stretches out in a beautiful canvas of orange and yellow. It's a breathtaking sight that adds an extra layer of depth to the scene unfolding on the ground. The sun appears low on the horizon, casting long shadows and painting everything with its warm glow.
This is not just any ordinary city street; it's a snapshot of urban life at its most dynamic and colorful.
SD1.5用に短いバージョンも作成してもらいます。※ SD1.5では長いプロンプトを上手く処理できません
The scene depicts a bustling city street at sunset. Tall buildings with reflective windows cast long shadows as the sun sets, bathing the street in warm hues. Cars and pedestrians navigate the lively atmosphere, shaded by rustling trees.
webUI forgeのimg2imgタブを利用します。


この画像を元にFlux.1でimg2imgします。
Flux.1で生成する(img2img)
SD1.5で生成した画像を元にしてFlux.1で精細化します。


FullHD解像度なので、生成には時間がかかると思います。RTX 3060で4分程度です。

SD1.5では苦手な直線的建築物や路面がFlux.1では正しく生成されます。
最終工程にFlux.1を利用すると時間がかかってしまう事はデメリットですが、ControlNetを含めてすべてFlux.1で生成する場合に比べると必要な生成時間が大幅に縮小されます(せめてSDXL程度の扱いやすさになればいいのですが..)
ComfyUIで自動化
ノード工程紹介
上記の一連の流れをComfyUIで自動化します。


生成作品


付録
有料欄にて上記ComfyUIのjsonファイルとサンプルの画像(Blenderで出力した陰影と深度マップ)がダウンロードできます。参考程度にご利用ください。記事支援いただける場合はぜひよろしくお願いします。
【注意点】
足りないノードがある場合は、ComfyUI ManagerのInstall Missing Custom Nodesから導入できます。
以下のモデルを利用しています。(個別にhuggingface等からの手動ダウンロードが必要です)
realisticVisionV51_v51VAE.safetensors
flux1-dev-fp8.safetensors
t5xxl_fp8_e4m3fn.safetensors
clip_l.safetensors
ae.safetensors(vae)
ローカルLLMを利用するため、Windows版Ollamaの導入とモデルも必要です。
※ 公式GithubサイトからOllamaSetup.exeを実行してインストール後、ollama pull llama3.1コマンドを実行すると、llama3.1モデルがダウンロードできます。ComfyUIで利用するだけなら、これで十分です。
LLMをローカルでガッツリ利用したい方はこちらも参照ください。
ここから先は
この記事が気に入ったらサポートをしてみませんか?