
YOLOv8の転移学習で漫画画像の人物検出をしてみる

概要
機械学習に興味があった&私的な理由で漫画画像の人を検出する必要があったので、機械学習を使って漫画画像内の人物検出を作ってみました。
作ったアプリはこちら↓
※対応画像ファイルはjpg,png,gif
開発環境
Python3
Macbook M1 MAX
Render
事前調査
画像内の人物検出をするにあたり、YOLOを使うといいよという事をアドバイスいただいたのでこれを使うことに。
YOLO(You Only Look Once)は物体検出と画像分割モデルで、今回はYOLOv8を使って転移学習を行います。
YOLO
作成手順
学習データセットの用意
漫画画像の用意
学習に使う漫画データセットは東京大学の相澤・山肩・松井研究室さんが作ってくれたManga109-sを使います。実際の漫画109冊分の画像とアノテーションファイルが含まれていて、非営利機関での学術利用であれば、使うことができます。
Manga109-s
追加の学習データセット
もう一つ、YOLOを使ったアニメの人物検出モデルに使われた学習データもあったため、これも学習データとしてダウンロードします。
anime_person_detection Dataset
上記の学習データにもいくつか漫画画像がありましたが、漫画画像だと検出精度が落ちるようでした。
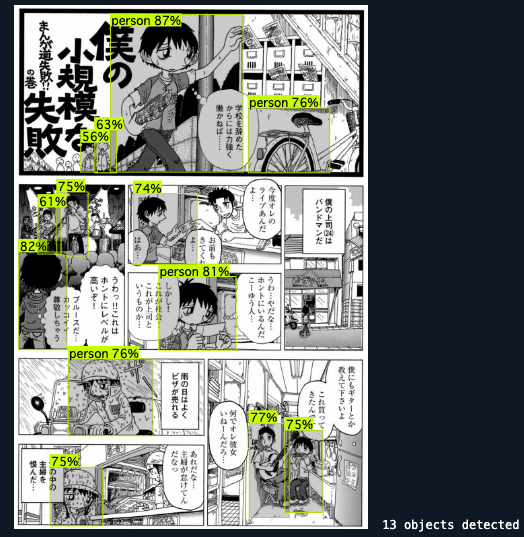
例えば下の画像はanime_person_detection モデルでの検出結果ですが、画像右上の自転車が人物として検出されていたり、真ん中のお兄さんが検出されていません。
Manga109-sのデータクレンジング
用意した上記2つのデータセットのうち、Manga109-sのデータを確認するとYOLOで学習させるにあたって、以下調整が必要でした。
犬や宇宙人などの非人間に人物タグがついているため、これを除く
アノテーションファイルをYOLOフォーマットに直す
使用する画像をランダムで抽出&フォルダ分け
画像内のメインキャラクター以外の人物に人物タグ(アノテーションデータ)を追加する
YOLO用にファイルを分ける
画像の水増しをする
それぞれ上記作業をローカルでやっていきます。
犬や宇宙人などの非人間に人物タグがついているため、これを除く
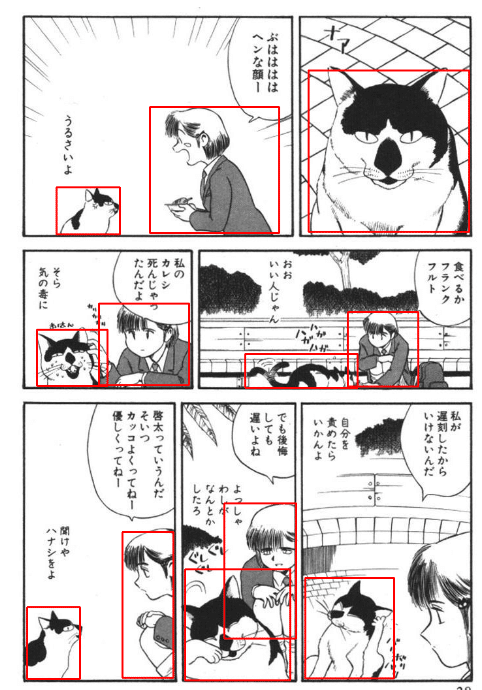
Manga109-sのアノテーションファイルはメインキャラクターorセリフのあるキャラクターにタグを付けているようで、そのため非人間にもタグが付いている場合があります。
例えば下画像のバウンディングボックス(赤枠部分)が、設定されているタグ領域なのですが、猫にも付いています。
今回は人物検出なので、非人間にタグがついている漫画を巻ごとデータセットから除外していきます。(人力)
アノテーションファイルをYOLOフォーマットに直す
アノテーションファイルがYOLOで学習できるものではなかったため、これをYOLOフォーマットに変換します。 変換に使ったコードは以下。
import os
import xml.etree.ElementTree as ET

def convert_to_yolo_format(xmin, ymin, xmax, ymax, image_width, image_height):
    x_center = (xmin + xmax) / 2.0 / image_width
    y_center = (ymin + ymax) / 2.0 / image_height
    width = (xmax - xmin) / image_width
    height = (ymax - ymin) / image_height
    return x_center, y_center, width, height

def process_annotation_file(xml_file_path, output_dir):
    tree = ET.parse(xml_file_path)
    root = tree.getroot()
    file_name = os.path.splitext(os.path.basename(xml_file_path))[0]

    for page in root.findall('.//page'):
        page_index = int(page.get('index'))
        page_width = int(page.get('width'))
        page_height = int(page.get('height'))

        yolo_annotations = []
        for body in page.findall('.//body'):
            xmin = int(body.get('xmin'))
            ymin = int(body.get('ymin'))
            xmax = int(body.get('xmax'))
            ymax = int(body.get('ymax'))

            x_center, y_center, width, height = convert_to_yolo_format(xmin, ymin, xmax, ymax, page_width, page_height)

            class_id = 0  # 任意のクラスID
            yolo_annotations.append(f"{class_id} {x_center} {y_center} {width} {height}")

        output_file_name = f"{file_name}_{page_index:03}.txt"
        output_file_path = os.path.join(output_dir, output_file_name)
        with open(output_file_path, 'w') as f:
            for annotation in yolo_annotations:
                f.write(annotation + '\n')

    print(f"{file_name}のYOLO形式のアノテーションファイル保存完了")

def process_all_xml_files(input_dir, output_dir):
    if not os.path.exists(output_dir):
        os.makedirs(output_dir)

    for xml_file in os.listdir(input_dir):
        if xml_file.endswith('.xml'):
            xml_file_path = os.path.join(input_dir, xml_file)
            process_annotation_file(xml_file_path, output_dir)

# 入力XMLファイルのディレクトリのパス
input_dir = './image/comic_dataset_origin/labels'
# 出力ディレクトリのパス
output_dir = './image/comic_dataset/labels'

process_all_xml_files(input_dir, output_dir)
使用する画像をランダムで抽出&フォルダ分け
Manga109-sは全部で数千枚の画像ファイルがあるので、今回学習に使用する画像・アノテーションファイルをランダムで抽出&コピーします。 ついでにYOLOで学習させる際に必要なディレクトリにも分けます。今回は500ファイルを抽出します。 抽出に使用したコードは以下。
import os
import shutil
import random

# 抽出するデータセットがあるディレクトリパスを指定 ここに後述のディレクトリ名で新しく作成される
dataset_dir = './comic_dataset'
images_dir = os.path.join(dataset_dir, 'images')
labels_dir = os.path.join(dataset_dir, 'labels')
new_dataset_dir = os.path.join(dataset_dir, 'new_500datasets') # 抽出後のデータセットを格納するディレクトリ名を指定

train_dir = os.path.join(new_dataset_dir, 'train')
valid_dir = os.path.join(new_dataset_dir, 'valid')
test_dir = os.path.join(new_dataset_dir, 'test')

for split in [train_dir, valid_dir, test_dir]:
    os.makedirs(os.path.join(split, 'images'), exist_ok=True)
    os.makedirs(os.path.join(split, 'labels'), exist_ok=True)

image_files = [f for f in os.listdir(images_dir) if f.endswith('.jpg')]

# ランダムに500ファイルを抽出
selected_files = random.sample(image_files, 500)

train_split = int(0.6 * len(selected_files)) # 抽出した500ファイルのうち60%をtrainディレクトリに格納
valid_split = int(0.1 * len(selected_files)) # 抽出した500ファイルのうち10%をvalidディレクトリに格納
test_split = len(selected_files) - train_split - valid_split #残りをtestディレクトリに格納

train_files = selected_files[:train_split]
valid_files = selected_files[train_split:train_split + valid_split]
test_files = selected_files[train_split + valid_split:]

def copy_files(files, split_dir):
    for file in files:
        image_src = os.path.join(images_dir, file)
        label_src = os.path.join(labels_dir, file.replace('.jpg', '.txt'))
        image_dst = os.path.join(split_dir, 'images', file)
        label_dst = os.path.join(split_dir, 'labels', file.replace('.jpg', '.txt'))

        shutil.copy(image_src, image_dst)
        shutil.copy(label_src, label_dst)

copy_files(train_files, train_dir)
copy_files(valid_files, valid_dir)
copy_files(test_files, test_dir)

print("データセットの分割が完了しました。")
上記コードを実行すると以下のようにnew_500datasetsディレクトリが作られます。
root/
├ comic_dataset/
├ images/
├ labels/
├ new_500datasets/
├ train/
│ └ images/
│ └ labels/
├ valid/
│ └ images/
│ └ labels/
├ test/
│ └ images/
│ └ labels/
画像内のメインキャラクター以外の人物に人物タグ(アノテーションデータ)を追加する
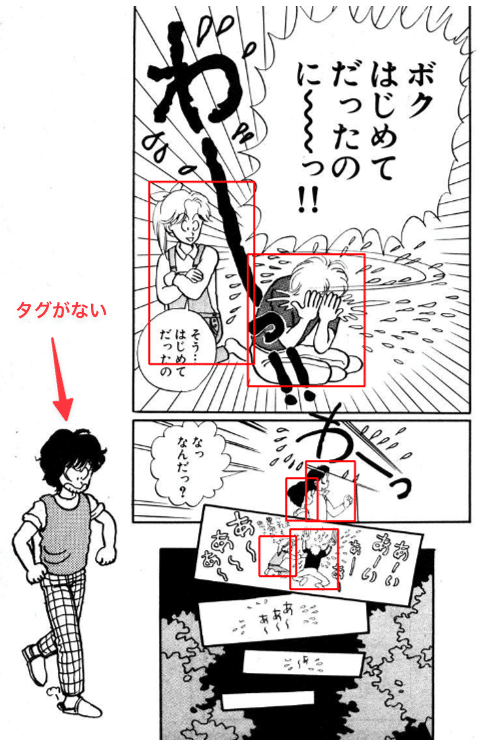
Manga109-sは基本的にすべての人間にタグが付いているのですが、扉絵だったりコマ外?のキャラにはタグがありません。そのため抽出した500ファイルをバーっと見て、タグを追加します。
追加タグを付けていくにあたり良さそうなツールを見つけられなかったので、手作業でチクチク追加していきます。
以下コードを実行すると指定したディレクトリ内の画像を順次表示し、タグを追加できる画面が表示されます。
【操作方法】
・Escキーで次の画像を表示
・画像内をマウスでドラッグアンドドロップするとタグを追加(赤色矩形で表示されます)
・Command+Zで追加したタグを取り消し
・Command+Sで追加したタグを保存
import cv2
import os

# グローバル変数
drawing = False
ix, iy = -1, -1
current_image = None
current_image_path = None
annotations = []
current_annotations = []
undo_stack = []

# マウスコールバック関数
def draw_rectangle(event, x, y, flags, param):
    global ix, iy, drawing, current_image

    if event == cv2.EVENT_LBUTTONDOWN:
        drawing = True
        ix, iy = x, y
    elif event == cv2.EVENT_MOUSEMOVE:
        if drawing:
            img_copy = current_image.copy()
            cv2.rectangle(img_copy, (ix, iy), (x, y), (0, 255, 0), 2)
            cv2.imshow('image', img_copy)
    elif event == cv2.EVENT_LBUTTONUP:
        drawing = False
        cv2.rectangle(current_image, (ix, iy), (x, y), (0, 255, 0), 2)
        cv2.imshow('image', current_image)
        # アノテーションを保存 (YOLO形式)
        x_center = (ix + x) / 2.0 / current_image.shape[1]
        y_center = (iy + y) / 2.0 / current_image.shape[0]
        width = abs(x - ix) / current_image.shape[1]
        height = abs(y - iy) / current_image.shape[0]
        annotation = f"0 {x_center} {y_center} {width} {height}\n"
        annotations.append(annotation)
        undo_stack.append(annotation)

# フォルダ内の画像を順次読み込み 下記ではvalidディレクトリが指定されている。作業したいディレクトリを都度指定する。
images_folder = './comic_dataset/new_500datasets/valid/images'
labels_folder = './comic_dataset/new_500datasets/valid/labels'
image_files = [f for f in os.listdir(images_folder) if f.endswith('.jpg')]

for image_file in image_files:
    img_path = os.path.join(images_folder, image_file)
    label_path = os.path.join(labels_folder, image_file.replace('.jpg', '.txt'))

    # 画像の読み込み
    current_image = cv2.imread(img_path)
    current_image_path = img_path

    # アノテーションの読み込み
    annotations = []
    undo_stack = []
    if os.path.exists(label_path):
        with open(label_path, 'r') as f:
            current_annotations = f.readlines()
        for annotation in current_annotations:
            parts = annotation.strip().split()
            class_id = int(parts[0])
            x_center = float(parts[1]) * current_image.shape[1]
            y_center = float(parts[2]) * current_image.shape[0]
            width = float(parts[3]) * current_image.shape[1]
            height = float(parts[4]) * current_image.shape[0]

            x_min = int(x_center - width / 2)
            y_min = int(y_center - height / 2)
            x_max = int(x_center + width / 2)
            y_max = int(y_center + height / 2)

            cv2.rectangle(current_image, (x_min, y_min), (x_max, y_max), (255, 0, 0), 2)  # 既存のタグは青色矩形で表示する

    cv2.namedWindow('image')
    cv2.setMouseCallback('image', draw_rectangle)

    while True:
        cv2.imshow('image', current_image)
        key = cv2.waitKey(1) & 0xFF
        if key == 27:  # 'ESC'キーで終了
            break
        elif key == ord('s') and (cv2.getWindowProperty('image', cv2.WND_PROP_VISIBLE) >= 1):
            # 'Command+S'キーでアノテーションを保存
            with open(label_path, 'w') as f:
                f.writelines(current_annotations + annotations)
            print(f"Annotations saved to {label_path}")
        elif key == ord('z') and (cv2.getWindowProperty('image', cv2.WND_PROP_VISIBLE) >= 1):
            # 'Command+Z'キーで最後のアノテーションを取り消す
            if annotations:
                last_annotation = annotations.pop()
                undo_stack.pop()
                # 画像を再描画して矩形を消す
                current_image = cv2.imread(img_path)
                for annotation in current_annotations + annotations:
                    parts = annotation.strip().split()
                    class_id = int(parts[0])
                    x_center = float(parts[1]) * current_image.shape[1]
                    y_center = float(parts[2]) * current_image.shape[0]
                    width = float(parts[3]) * current_image.shape[1]
                    height = float(parts[4]) * current_image.shape[0]

                    x_min = int(x_center - width / 2)
                    y_min = int(y_center - height / 2)
                    x_max = int(x_center + width / 2)
                    y_max = int(y_center + height / 2)

                    cv2.rectangle(current_image, (x_min, y_min), (x_max, y_max), (255, 0, 0), 2)  # 既存の矩形を青色で表示
                cv2.imshow('image', current_image)
                print("Last annotation undone")

    cv2.destroyAllWindows()

print("アノテーションの作成と更新が完了しました。")
500ファイルありましたが、タグのない画像は稀なので1時間強で作業完了しました。
YOLOによる転移学習
データクレンジングしたManga109-sのデータと、anime_person_detection Datasetのデータをガッチャンコして、学習ファイルの出来上がりです。 これをYOLOv8にて転移学習させます。今回はGoogle Colaboratoryで実行。
データセットとdata.yamlをGoogleDriveにアップロード
以下のようなディレクトリ構造でアップロード。
├ manga_detection/
├ datasets/
├ train/
│ └ images/
│ └ labels/
├ valid/
│ └ images/
│ └ labels/
├ test/
│ └ images/
│ └ labels/
data.yamlはデータセットの設定ファイルで、datasetsディレクトリの直下に置きます。ファイル内容は以下。
train: ../train/images
val: ../valid/images
test: ../test/images

nc: 1
names: ['person']
Google Colaboratoryで以下コードを実行
GoogleDriveに必要なものをアップロードしたら、Google Colaboratoryで学習をしていきます。
YOLOとPythonのインストール
!pip install ultralytics opencv-pythonGoogledriveのマウント
from google.colab import drive
drive.mount('/content/drive')
学習の実行
Google Colaboratoryのランタイム接続が切れるなどする場合、途中まで学習したモデルを使って再開するにはmodel指定部分を変更します。(以下コードのコメントアウト部分)
from ultralytics import YOLO
import os


# data.yamlのある場所を指定
data_yaml_path = '/content/drive/MyDrive/manga_detection/datasets/data.yaml'

# ベースとするモデル
model = YOLO('yolov8n.pt')
# 学習途中のmodelを使って学習再開する場合のパス
# model = YOLO('./runs/detect/train12/weights/last.pt')


# M1 macのGPUを使ってモデルを学習
results = model.train(
    data=data_yaml_path,
    epochs=100, # エポック数はとりあえず100に
    patience=50,#「学習精度が上がらなくなったらこのエポック数で止める」というオプションですが今回は100エポックまで行きました
    imgsz=640,
    device='0',  #ColabではGPUを使うのでdeviceを'0'に設定
    resume=True, #途中まで学習したモデルを使って学習再開するオプション
    batch=-1
)

print("Training completed successfully.")
画像から人物検出してみる
学習が完了するとruns/detect/train〇〇/weights/というディレクトリにモデルが作成されます。best.ptが最もパフォーマンスが良かったモデルで、last.ptが最新の学習モデルです。 これを使って漫画画像の人物検出してみます。
from ultralytics import YOLO
import cv2
from matplotlib import pyplot as plt

# モデルの読み込み
model = YOLO('runs/detect/train〇〇/weights/best.pt')

# 予測を実行 画像ファイルはルートディレクトリに設置
# conf:検出の最小信頼度しきい値。以下だとスコア0.25以下のものは検出しない。必要に応じて調整
# iou:値が低いほど、重複するボックスが排除されます。バウンディングボックスの重複が多い時に、必要に応じて調整
results = model.predict('syokibo.png', save=False, conf=0.25, iou=0.45)

# 予測結果の画像を取得
image = results[0].plot()  # 結果を描画した画像を取得

# 画像を表示
plt.figure(figsize=(12, 8))
plt.imshow(cv2.cvtColor(image, cv2.COLOR_BGR2RGB))
plt.axis('off')
plt.show()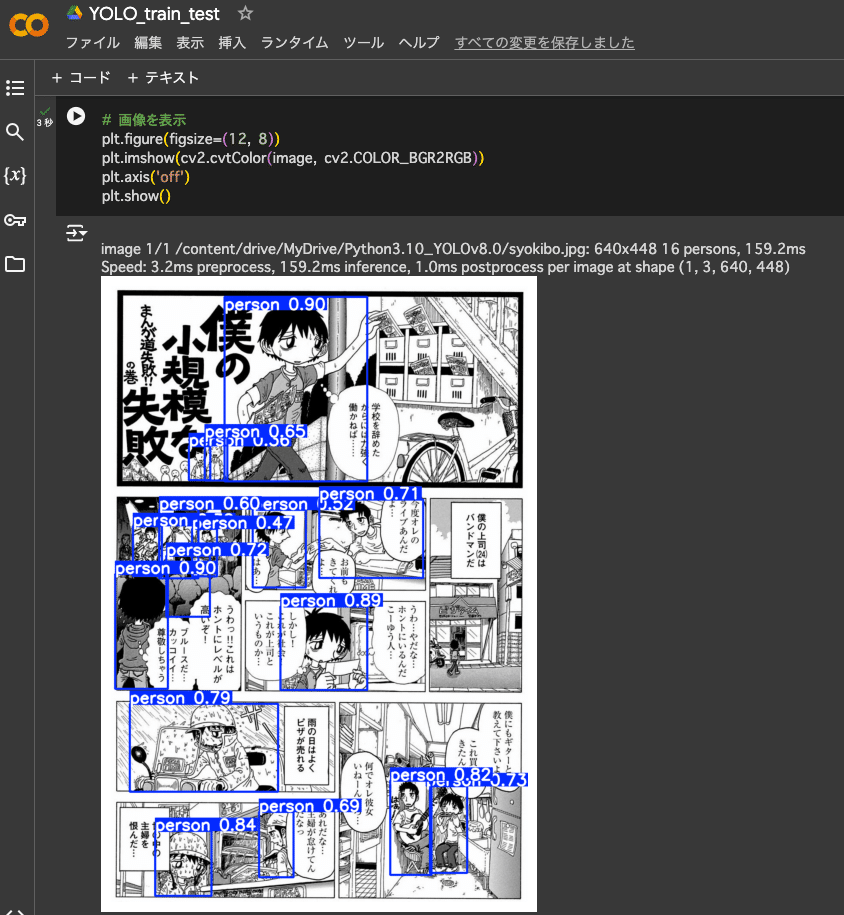
無事検出できました。anime_person_detection モデルで起こっていた誤検出や検出漏れもありません。
Renderへのデプロイ
検出モデルができたのでWebアプリとしてRenderで公開します。
■実行ファイル
アップロードされた画像に対して、best.ptで人物検出をし、表示します。ここでpng,gifの画像にも対応しています。
import os
from flask import Flask, render_template, request, redirect, url_for, session
from ultralytics import YOLO
import cv2
from PIL import Image
import numpy as np
import base64

app = Flask(__name__)
app.secret_key = 'your-secret-key'

# モデルの読み込み
model = YOLO('best.pt')

@app.route('/', methods=['GET', 'POST'])
def upload_and_predict():
    img_data = None  # 初期値としてNoneを設定
    if request.method == 'POST':
        # 画像ファイルがアップロードされた場合
        if 'file' not in request.files:
            return redirect(request.url)
        file = request.files['file']
        if file.filename == '':
            return redirect(request.url)
        if file:
            # 画像を一時的に保存するために一時ファイルを作成
            filepath = os.path.join("/tmp", file.filename)
            file.save(filepath)

            # 画像を読み込んでOpenCV形式に変換
            img = Image.open(filepath)
            if file.filename.endswith('gif'):
                img = img.convert('RGB')  # GIFはRGBに変換
            img = cv2.cvtColor(np.array(img), cv2.COLOR_RGB2BGR)

            # 予測を実行
            results = model.predict(img, save=False, conf=0.35, iou=0.45, show_labels=False)

            # 予測結果の画像を保存
            new_image_path = os.path.join("/tmp", file.filename.rsplit('.', 1)[0] + '.jpg')
            cv2.imwrite(new_image_path, results[0].plot())  # YOLOの予測結果を画像として保存

            # 画像を読み込んで表示用にエンコード
            with open(new_image_path, "rb") as img_file:
                img_data = base64.b64encode(img_file.read()).decode('utf-8')

    return render_template('index.html', img_data=img_data)

if __name__ == "__main__":
    port = int(os.environ.get('PORT', 8080))
    app.run(host ='0.0.0.0',port = port)
■requirement.txt
実行に必要なパッケージをインストールする設定ファイル
blinker==1.8.2
certifi==2024.2.2
charset-normalizer==3.3.2
click==8.1.7
Flask==3.0.3
idna==3.6
itsdangerous==2.2.0
Jinja2==3.1.4
MarkupSafe==2.1.5
requests==2.31.0
urllib3==2.2.1
Werkzeug==3.0.3
ultralytics==8.1.34
opencv-python
pillow==9.5.0
matplotlib==3.7.1
numpy==1.23.5
あとはWeb上で操作できるようにHTMLファイルとCSSファイルをアップロード。
出来上がったWebアプリ
https://anime-manga-person-detection.onrender.com/
上記URLが今回作成したWebアプリです。画像を選択して「アップロードして予測検出する」を押すとちょっと時間がかかりますが、検出後の画像が表示されます。
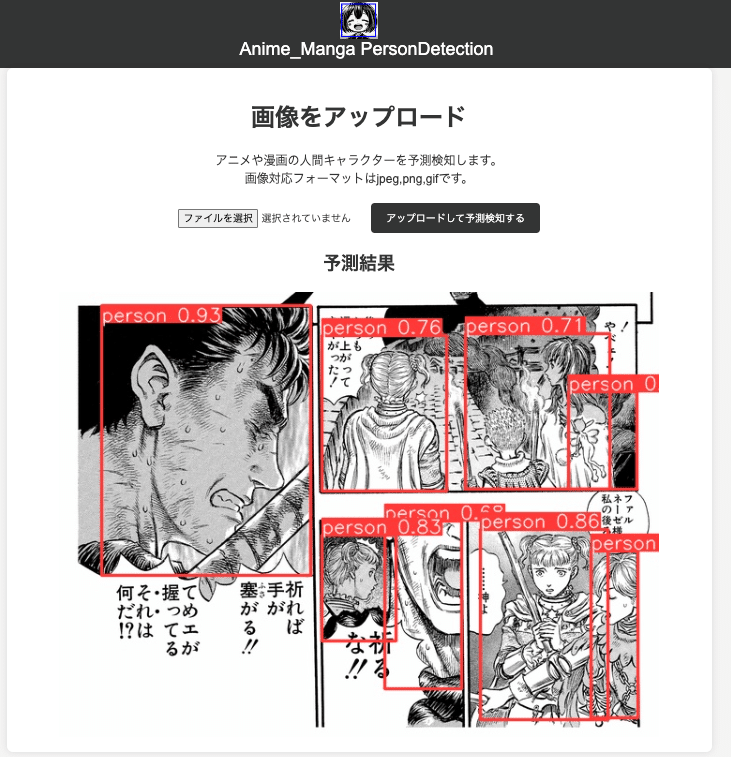
大好きなベルセルクの画像でもみんな検出できました。やったね。
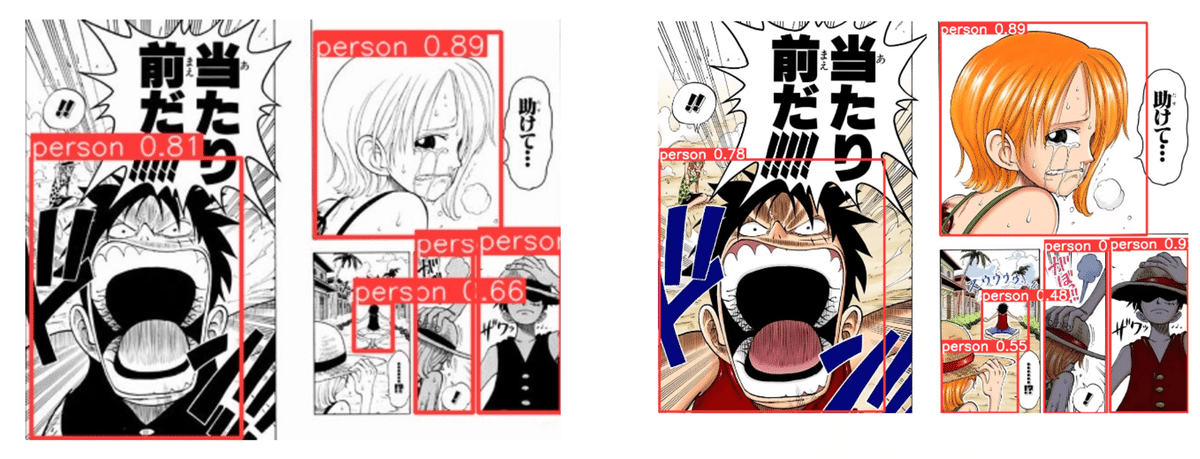
anime_person_detectionのdatasetも学習に使ったからか、カラー版も一応検出できました。
まとめ
現在のモデルだと画像の解像度が低いと検出精度が落ちるため、データセットに解像度の低いものも混ぜて学習すると良いのかもしれません。 また、今回は学習のepoch数を100にしていましたがまだ精度向上の余地がありそうなので、もう少し増やしてもいいかもです。
この記事が気に入ったらサポートをしてみませんか?