Python Tkinter.ttk ~Label~

Tkinterとはなにか
GUIを構築・操作するために用いるPythonに標準搭載されているライブラリである
TkinterはTcl/TkというOSSのクロスプラットフォームのツールキットをPythonから扱えるようにしたものであり、Pythonの標準ライブラリに含まれている
またTkinterには Tk8.5から導入された Tk のテーマ付きモジュールTkinter.ttkがあり、プラットフォームをまたいでより良い見た目のウィジェットを作成できる機能がある
しかし!!!
Tkinter.ttkのドキュメントがあまりにも見つかりにくい・わかりにくい!!!
ということで自分の備忘録のためにもメモを残すことにするの巻 その1
ベースプログラム
※Python3、Windows環境での動作を想定しています
# -*- coding: utf-8 -*-
import tkinter as tk
import tkinter.ttk as ttk


class SampleApp(ttk.Frame):
   def __init__(self, master):
       super().__init__(master)
       self.master = master
       # 環境設定をする関数
       self.set_env()
       # ウィジェットを作る関数
       self.create_widgets()

   def set_env(self):
       """
       ###############################
       # 画面サイズやタイトルを設定している #
       # __init__()内で直接設定しても可  #
       ###############################
       """
       env = {
           "geometry": {
               "width": 400,
               "height": 400
           },
           "title": "らべる君"
       }
       self.master.geometry("{width}x{height}".format(
           width=env["geometry"]["width"], height=env["geometry"]["height"]))
       self.master.title("{title}".format(title=env["title"]))
       self.pack()

   def create_widgets(self):
       """
       #################################
       # ここにラベルウィジェットを作っていく #
       #################################
       """
       pass


def main():
   root = tk.Tk()
   app = SampleApp(master=root)
   app.mainloop()


if __name__ == "__main__":
   main()
ウィジェットオプション
・anchor
テキストの配置を決めるオプション
【"n","ne","e","se","s","sw","sw","w","nw","center"】の何れかを指定できる
 def create_widgets(self):
     # 上寄せ
     label_anchor_n = ttk.Label(self, text="anchor : n", width=20,
                              padding=10, relief="solid", anchor="n", font=("メイリオ", 12))
     label_anchor_n.pack(pady=5, ipady=10)
     # 右寄せ
     label_anchor_e = ttk.Label(self, text="anchor : e", width=20,
                              padding=10, relief="solid", anchor="e", font=("メイリオ", 12))
     label_anchor_e.pack(pady=5, ipady=10)
     # 下寄せ
     label_anchor_s = ttk.Label(self, text="anchor : s", width=20,
                              padding=10, relief="solid", anchor="s", font=("メイリオ", 12))
     label_anchor_s.pack(pady=5, ipady=10)
     # 左寄せ
     label_anchor_w = ttk.Label(self, text="anchor : w", width=20,
                              padding=10, relief="solid", anchor="w", font=("メイリオ", 12))
     label_anchor_w.pack(pady=5, ipady=10)
     # 中央寄せ
     label_anchor_center = ttk.Label(self, text="anchor : center", width=20,
                              padding=10, relief="solid", anchor="center", font=("メイリオ", 12))
     label_anchor_center.pack(pady=5, ipady=10)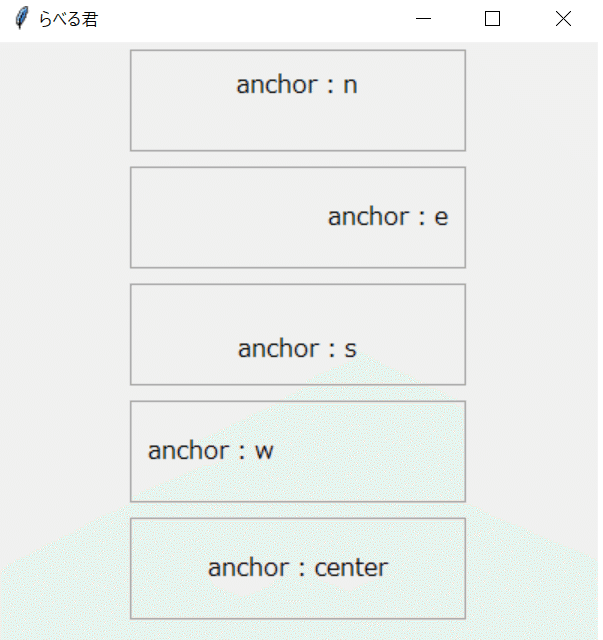
・background
テキストの背景色を設定するオプション
【"#xxx","#xxxxxx","色名"】の何れかを指定できる
def create_widgets(self):
    # カラーコード3桁
    label_background_code_3 = ttk.Label(self, text="background : #456", width=20,
                                        background="#456", anchor="center", padding=10, relief="solid", font=("メイリオ", 12))
    label_background_code_3.pack(pady=5, ipady=10)
    # カラーコード6桁
    label_background_code_6 = ttk.Label(self, text="background : #789ABC", width=20,
                                        background="#789ABC", anchor="center", padding=10, relief="solid", font=("メイリオ", 12))
    label_background_code_6.pack(pady=5, ipady=10)
    # カラーネーム
    label_background_name = ttk.Label(self, text="background : yellow", width=20,
                                      background="yellow", anchor="center", padding=10, relief="solid", font=("メイリオ", 12))
    label_background_name.pack(pady=5, ipady=10)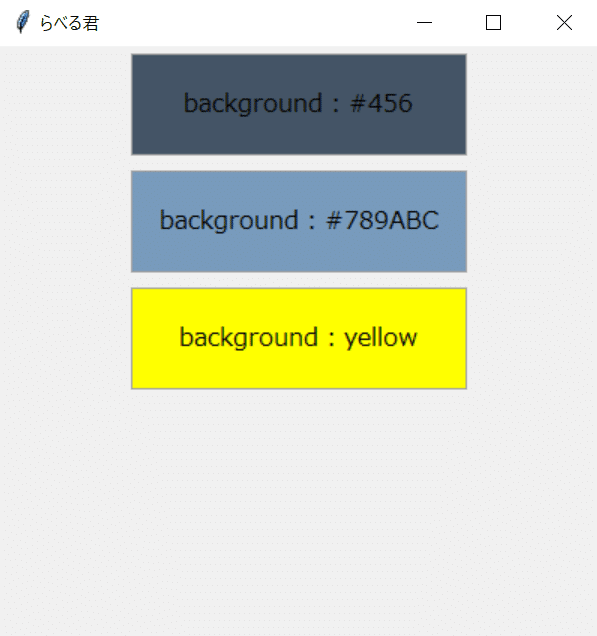
・borderwidth
ラベルの枠線の太さを設定するオプション
※1. 適用テーマがalt、default、classicの場合に有効
※2. reliefをflat以外にしている場合に有効
def create_widgets(self):
    # 使用テーマ変更 borderwidthが効くのはalt、default、classicのみ
    style = ttk.Style()
    style.theme_use("default")
    # borderwidth 1, relief flat -> flatなので枠線なし
    label_borderwidth_1 = ttk.Label(self, text="borderwidth : 1", width=20, background="white",
                                       relief="flat", borderwidth=1, anchor="center", padding=10, font=("メイリオ", 12))
    label_borderwidth_1.pack(pady=5, ipady=10)
    # borderwidth 3
    label_borderwidth_3 = ttk.Label(self, text="borderwidth : 3", width=20, background="white",
                                        relief="solid", borderwidth=3, anchor="center", padding=10, font=("メイリオ", 12))
    label_borderwidth_3.pack(pady=5, ipady=10)
    # borderwidth 5
    label_borderwidth_5 = ttk.Label(self, text="borderwidth : 5", width=20, background="white",
                                        relief="solid", borderwidth=5, anchor="center", padding=10, font=("メイリオ", 12))
    label_borderwidth_5.pack(pady=5, ipady=10)
・compound
画像とテキストの表示位置を設定するオプション
【"none","top","right","bottom","left","image","text"】の何れかを指定できる
def create_widgets(self):
    # 関数が終了したときに画像インスタンスを保持しないと画像が表示されない
    self.img = tk.PhotoImage(file="./cat.png")
    # compound none -> imageが設定されていれば画像を、なければテキストを表示する
    label_compound_none = ttk.Label(self, text="compound : none", image=self.img, compound="none",
                                    width=20, relief="solid", anchor="center", padding=10, font=("メイリオ", 12))
    label_compound_none.grid(
        row=0, column=0, sticky="nesw", padx=5, pady=5, ipady=10)
    # compound top -> 画像を上に、テキストを下に表示する
    label_compound_top = ttk.Label(self, text="compound : top", image=self.img, compound="top",
                                   width=20, relief="solid", anchor="center", padding=10, font=("メイリオ", 12))
    label_compound_top.grid(
        row=0, column=1, sticky="nesw", padx=5, pady=5, ipady=10)
    # compound right -> 画像を右に、テキストを左に表示する
    label_compound_right = ttk.Label(self, text="compound : right", image=self.img, compound="right",
                                     width=20, relief="solid", anchor="center", padding=10, font=("メイリオ", 12))
    label_compound_right.grid(
        row=0, column=2, sticky="nesw", padx=5, pady=5, ipady=10)
    # compound bottom -> 画像を下に、テキストを上に表示する
    label_compound_bottom = ttk.Label(self, text="compound : bottom", image=self.img, compound="bottom",
                                      width=20, relief="solid", anchor="center", padding=10, font=("メイリオ", 12))
    label_compound_bottom.grid(
        row=0, column=3, sticky="nesw", padx=5, pady=5, ipady=10)
    # compound left -> 画像を左に、テキストを右に表示する
    label_compound_left = ttk.Label(self, text="compound : left", image=self.img, compound="left",
                                    width=20, relief="solid", anchor="center", padding=10, font=("メイリオ", 12))
    label_compound_left.grid(
        row=1, column=0, sticky="nesw", padx=5, pady=5, ipady=10)
    # compound image -> 画像のみを表示する
    label_compound_image = ttk.Label(self, text="compound : image", image=self.img, compound="image",
                                     width=20, relief="solid", anchor="center", padding=10, font=("メイリオ", 12))
    label_compound_image.grid(
        row=1, column=1, sticky="nesw", padx=5, pady=5, ipady=10)
    # compound text -> テキストのみを表示する
    label_compound_text = ttk.Label(self, text="compound : text", image=self.img, compound="text",
                                    width=20, relief="solid", anchor="center", padding=10, font=("メイリオ", 12))
    label_compound_text.grid(
        row=1, column=2, sticky="nesw", padx=5, pady=5, ipady=10)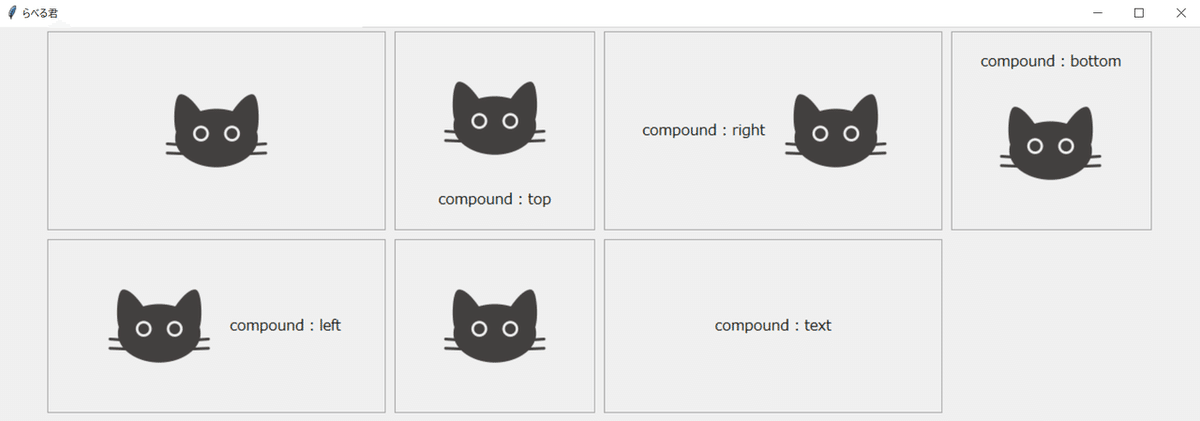
※引用画像
・cursor
ラベルホバー時のマウスカーソルを設定するオプション
※1. 設定可能なカーソル一覧
def create_widgets(self):
    label_cursor_arrow = ttk.Label(self, text="cursor : arrow", cursor="arrow",
                                   width=20, relief="solid", anchor="center", padding=10, font=("メイリオ", 12))
    label_cursor_arrow.pack(pady=5, ipady=10)

    label_cursor_boat = ttk.Label(self, text="cursor : boat", cursor="boat",
                                  width=20, relief="solid", anchor="center", padding=10, font=("メイリオ", 12))
    label_cursor_boat.pack(pady=5, ipady=10)

    label_cursor_circle = ttk.Label(self, text="cursor : circle", cursor="circle",
                                    width=20, relief="solid", anchor="center", padding=10, font=("メイリオ", 12))
    label_cursor_circle.pack(pady=5, ipady=10)

    label_cursor_exchange = ttk.Label(self, text="cursor : exchange", cursor="exchange",
                                      width=20, relief="solid", anchor="center", padding=10, font=("メイリオ", 12))
    label_cursor_exchange.pack(pady=5, ipady=10)

    label_cursor_spider = ttk.Label(self, text="cursor : spider", cursor="spider",
                                    width=20, relief="solid", anchor="center", padding=10, font=("メイリオ", 12))
    label_cursor_spider.pack(pady=5, ipady=10)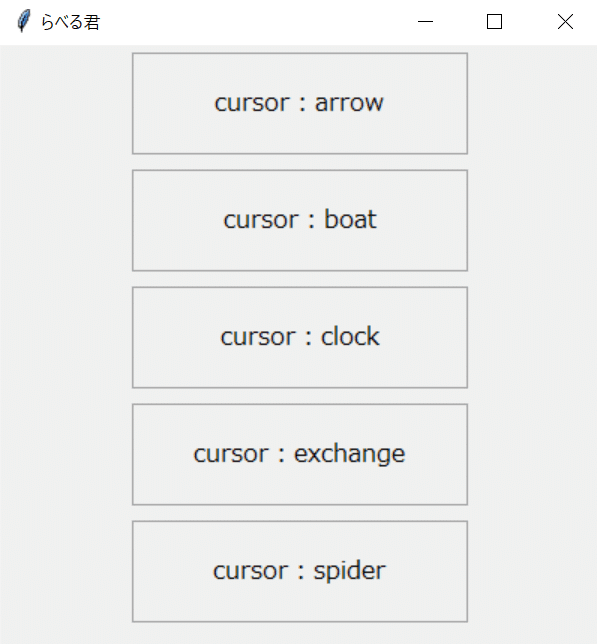
※各ラベルの範囲内にカーソルを移動させると対応したマウスカーソルが表示される
・font
テキストフォントを設定するオプション
【("family", "size", "weight", "slant", "underline", "overstrike")】をタプルまたはリストで指定できる
※1. 不要な引数は省略可能
def create_widgets(self):
    # 扱えるフォント一覧
    import tkinter.font as font
    print("\n".join([f for f in font.families()]))

    # family
    label_font_1 = ttk.Label(self, text="font family : MSゴシック", width=30,
                             relief="solid", anchor="center", padding=10, font=("MS ゴシック",))
    label_font_1.pack(pady=5, ipady=10, fill="x")
    # family、size
    label_font_2 = ttk.Label(self, text="font family : Arial", width=30,
                             relief="solid", anchor="center", padding=10, font=("Arial", 6))
    label_font_2.pack(pady=5, ipady=10, fill="x")
    # family、size、weight
    # weightに指定できるのは"normal"または"bold"
    label_font_3 = ttk.Label(self, text="font family : HG行書体", width=30,
                             relief="solid", anchor="center", padding=10, font=("HG行書体", 8, "bold"))
    label_font_3.pack(pady=5, ipady=10, fill="x")
    # family、size、weight、slant
    # slantに指定できるのは"roman"または"italic"
    label_font_4 = ttk.Label(self, text="font family : Orange LET", width=30, relief="solid",
                             anchor="center", padding=10, font=("Orange LET", 11, "normal", "italic"))
    label_font_4.pack(pady=5, ipady=10, fill="x")
    # family、size、weight、slant、underline
    # underlineに指定できるのは"normal"または"underline"
    label_font_5 = ttk.Label(self, text="font family : Mystery Quest", width=20, relief="solid",
                             anchor="center", padding=10, font=("Mystery Quest", 14, "bold", "roman", "underline"))
    label_font_5.pack(pady=5, ipady=10, fill="x")
    # family、size、weight、slant、underline、overstrike
    # overstrikeに指定できるのは"normal"または"overstrike"
    label_font_6 = ttk.Label(self, text="font family : HGS明朝E", width=20, relief="solid",
                             anchor="center", padding=10, font=("HGS明朝E", 17, "bold", "italic", "normal", "overstrike"))
    label_font_6.pack(pady=5, ipady=10, fill="x")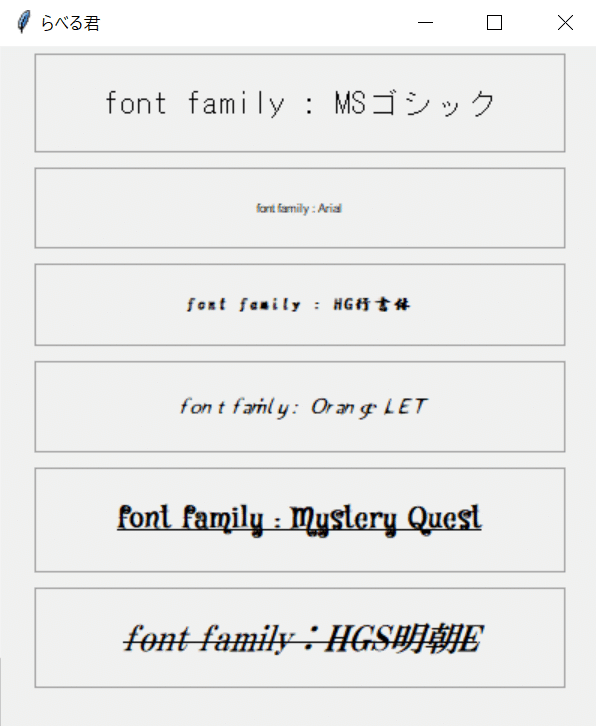
・foreground
テキストの文字色を設定するオプション
【"#xxx","#xxxxxx","色名"】の何れかを指定できる
def create_widgets(self):
    # カラーコード3桁
    label_foreground_code_3 = ttk.Label(self, text="foreground : #093", width=20,
                                        foreground="#093", anchor="center", padding=10, relief="solid", font=("メイリオ", 12))
    label_foreground_code_3.pack(pady=5, ipady=10)
    # カラーコード6桁
    label_foreground_code_6 = ttk.Label(self, text="foreground : #DC143C", width=20,
                                        foreground="#DC143C", anchor="center", padding=10, relief="solid", font=("メイリオ", 12))
    label_foreground_code_6.pack(pady=5, ipady=10)
    # カラーネーム
    label_foreground_name = ttk.Label(self, text="foreground : blue", width=20,
                                      foreground="blue", anchor="center", padding=10, relief="solid", font=("メイリオ", 12))
    label_foreground_name.pack(pady=5, ipady=10)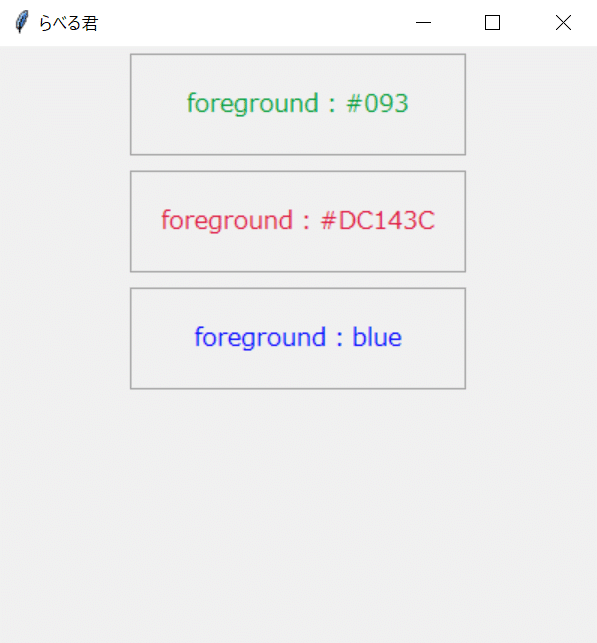
・image
ラベルに設置する画像を設定するオプション
※1. 設定する変数はtkinter.PhotoImageクラスでないといけない
※2. 関数、クラスの処理終了時に画像インスタンスを保持していないと画像が表示されない
def create_widgets(self):
    # 関数が終了したときに画像インスタンスを保持しないと画像が表示されない
    img = tk.PhotoImage(file="./cat.png")
    self.img = tk.PhotoImage(file="./cat.png")
    # 画像インスタンス未保持 -> 画像が表示されない
    label_image_no_instance = ttk.Label(self, text="image : img", image=img, compound="bottom",
                                        width=20, relief="solid", anchor="center", padding=10, font=("メイリオ", 12))
    label_image_no_instance.pack(pady=5, ipady=10)
    # 画像インスタンス保持 -> 画像が表示される
    label_image_instance = ttk.Label(self, text="image : self.img", image=self.img, compound="bottom",
                                     width=20, relief="solid", anchor="center", padding=10, font=("メイリオ", 12))
    label_image_instance.pack(pady=5, ipady=10)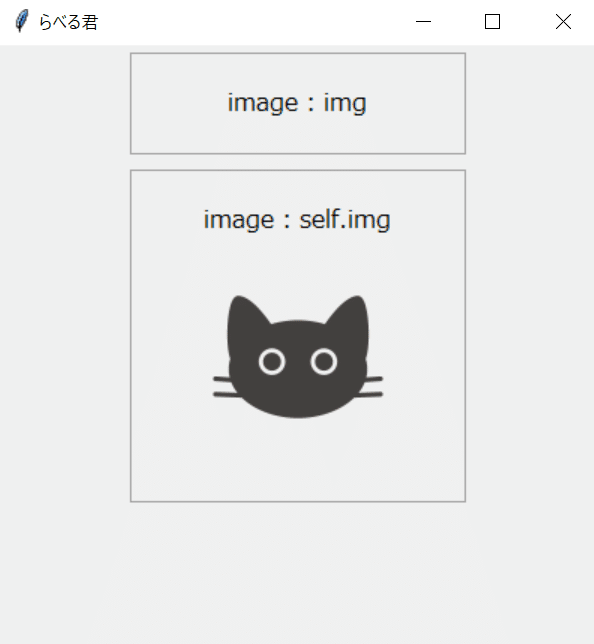
※引用画像
・justify
改行が含まれているテキストの位置揃えを設定するオプション
【"center","right","left"】の何れかを指定できる
def create_widgets(self):
    # justify center
    label_justify_center = ttk.Label(self, text="justify : center\njustify : centercenter\njustify : centercentercenter",
                                     justify="center", width=30, relief="solid", anchor="center", padding=10, font=("メイリオ", 12))
    label_justify_center.pack(pady=5, ipady=10)
    # justify right
    label_justify_right = ttk.Label(self, text="justify : right\njustify : rightright\njustify : rightrightright",
                                    justify="right", width=30, relief="solid", anchor="center", padding=10, font=("メイリオ", 12))
    label_justify_right.pack(pady=5, ipady=10)
    # justify left
    label_justify_left = ttk.Label(self, text="justify : left\njustify : leftleft\njustify : leftleftleft",
                                   justify="left", width=30, relief="solid", anchor="center", padding=10, font=("メイリオ", 12))
    label_justify_left.pack(pady=5, ipady=10)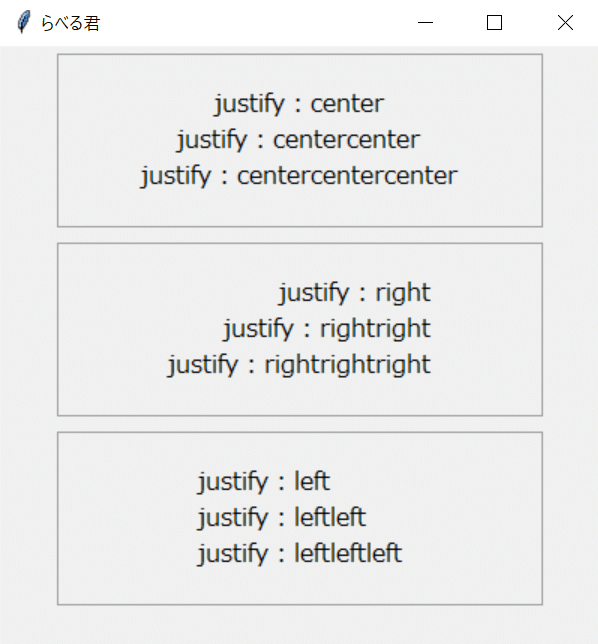
・padding
テキスト上下左右のパディングを設定するオプション
※1. paddingには数値またはタプル(x,y)を指定できるが、ここでは数値のみを指定している
def create_widgets(self):
    # padding 5
    label_padding_5 = ttk.Label(self, text="padding : 5", width=20,
                                relief="solid", anchor="center", padding=5, font=("メイリオ", 12))
    label_padding_5.pack(pady=5, ipady=10)
    # padding 20
    label_padding_20 = ttk.Label(self, text="padding : 20", width=20,
                                 relief="solid", anchor="center", padding=20, font=("メイリオ", 12))
    label_padding_20.pack(pady=5, ipady=10)
    # padding 30
    label_padding_30 = ttk.Label(self, text="padding : 30", width=20,
                                 relief="solid", anchor="center", padding=30, font=("メイリオ", 12))
    label_padding_30.pack(pady=5, ipady=10)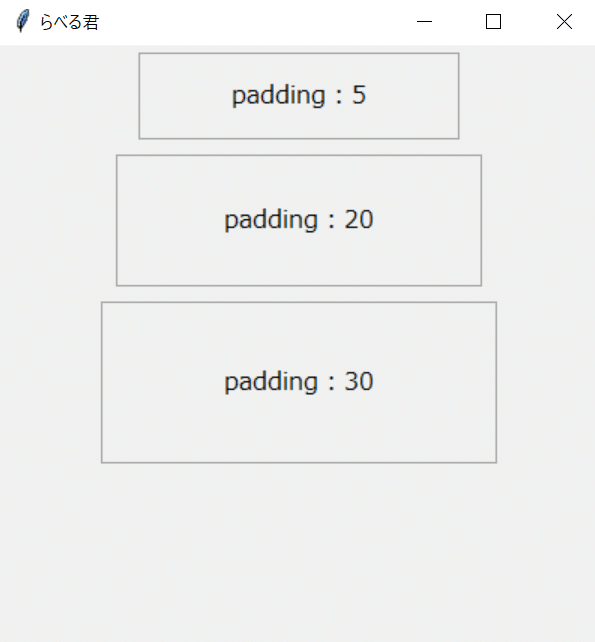
・relief
テキストの境界線を設定するオプション
【"flat","groove","raised","ridge","solid","sunken"】の何れかを指定できる
def create_widgets(self):
    # relief flat
    label_relief_flat = ttk.Label(self, text="relief : flat", width=20,
                                  relief="flat", anchor="center", padding=10, font=("メイリオ", 12))
    label_relief_flat.grid(row=0, column=0, padx=5,
                           pady=5, ipady=30, sticky="nesw")
    # relief groove
    label_relief_flat = ttk.Label(self, text="relief : groove", width=20,
                                  relief="groove", anchor="center", padding=10, font=("メイリオ", 12))
    label_relief_flat.grid(row=0, column=1, padx=5,
                           pady=5, ipady=30, sticky="nesw")
    # relief raised
    label_relief_flat = ttk.Label(self, text="relief : raised", width=20,
                                  relief="raised", anchor="center", padding=10, font=("メイリオ", 12))
    label_relief_flat.grid(row=0, column=2, padx=5,
                           pady=5, ipady=30, sticky="nesw")
    # relief ridge
    label_relief_flat = ttk.Label(self, text="relief : ridge", width=20,
                                  relief="ridge", anchor="center", padding=10, font=("メイリオ", 12))
    label_relief_flat.grid(row=1, column=0, padx=5,
                           pady=5, ipady=30, sticky="nesw")
    # relief solid
    label_relief_flat = ttk.Label(self, text="relief : solid", width=20,
                                  relief="solid", anchor="center", padding=10, font=("メイリオ", 12))
    label_relief_flat.grid(row=1, column=1, padx=5,
                           pady=5, ipady=30, sticky="nesw")
    # relief sunken
    label_relief_flat = ttk.Label(self, text="relief : sunken", width=20,
                                  relief="sunken", anchor="center", padding=10, font=("メイリオ", 12))
    label_relief_flat.grid(row=1, column=2, padx=5,
                           pady=5, ipady=30, sticky="nesw")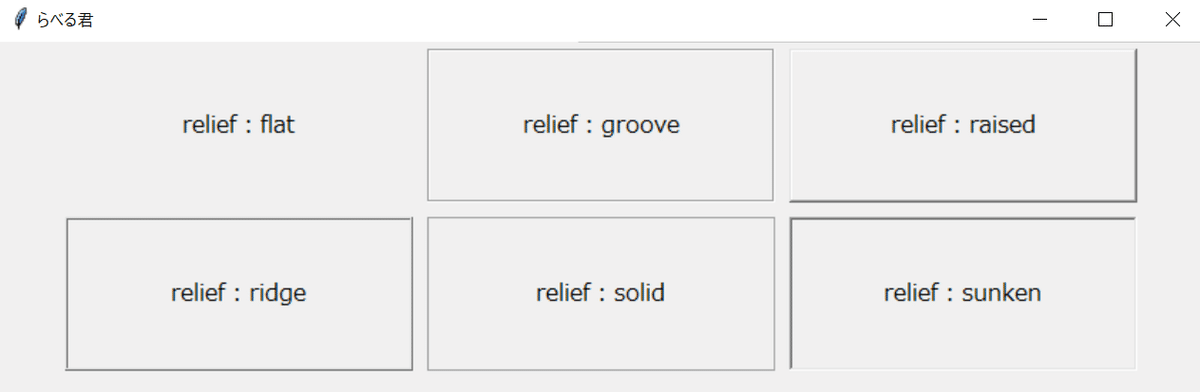
・takefocus
ウィジェット範囲内でのフォーカス処理を設定するオプション
【"", True, False】を指定できる
※1. そもそもLabelにはfocusがなくtakefocusをTrueにしても変化はない
・text
ラベルに表示するテキストを指定するオプション
def create_widgets(self):
    label = ttk.Label(self, text="text : sample_label", width=20,
                      relief="solid", anchor="center", padding=10, font=("メイリオ", 12))
    label.pack(pady=5, ipady=10)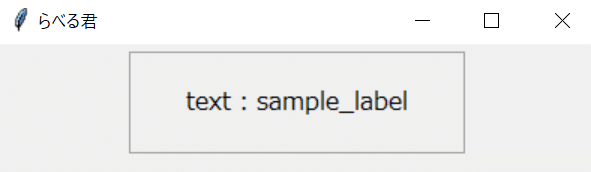
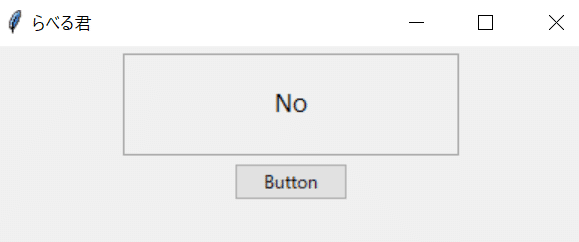
・textvariable
ラベルに設定できるウィジェット変数を設定するオプション
ボタン押下時にラベルのテキストを変更したりする場合に用いる
※1. 通常Labelにはtk.StringVar()を設定する
def create_widgets(self):
    # 初めに表示するテキストをStringVarにセットする
    s = tk.StringVar()
    s.set("Yes")
    # textを設定していてもtextvariableを指定すると無視される
    label_textvariable = ttk.Label(self, text="stringvar", textvariable=s,
                                   width=20, relief="solid", anchor="center", padding=10, font=("メイリオ", 12))
    label_textvariable.pack(pady=5, ipady=10)
    # ボタン押下時に表示されるテキストをNoにする
    button = ttk.Button(self, text="Button",
                        takefocus=False, command=lambda: s.set("No"))
    button.pack()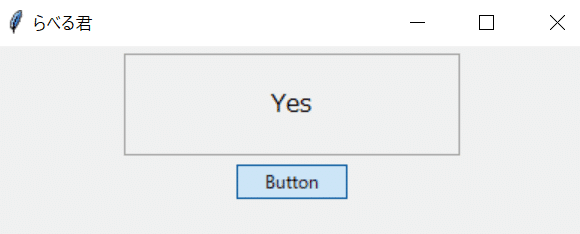
・underline
指定した位置にある文字の下に下線を設定するオプション
※1. 下線を引くことができる文字は1文字のみ
def create_widgets(self):
    label_underline_0 = ttk.Label(self, text="underline : 0", underline=0,
                                  width=20, relief="solid", anchor="center", padding=10, font=("メイリオ", 12))
    label_underline_0.pack(pady=5, ipady=10)

    label_underline_3 = ttk.Label(self, text="underline : 3", underline=3, width=20,
                                  relief="solid", anchor="center", padding=10, font=("メイリオ", 12, "underline"))
    label_underline_3.pack(pady=5, ipady=10)

    label_underline_7 = ttk.Label(self, text="underline : 7", underline=7,
                                  width=20, relief="solid", anchor="center", padding=10, font=("メイリオ", 12))
    label_underline_7.pack(pady=5, ipady=10)
    # 文字列の長さ以上を設定すると無視される
    label_underline_100 = ttk.Label(self, text="underline : 100", underline=100,
                                    width=20, relief="solid", anchor="center", padding=10, font=("メイリオ", 12))
    label_underline_100.pack(pady=5, ipady=10)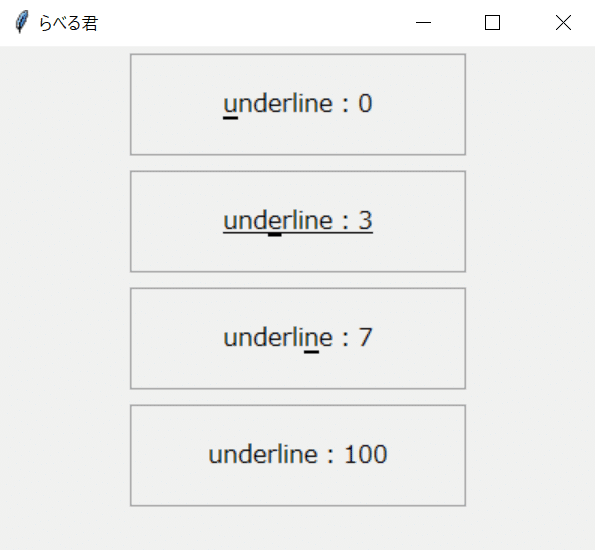
・wraplength
テキストを折り返す位置を設定するオプション
【数値(ピクセル), "数値+c(センチ)/i(インチ)/m(ミリ)/p(ポイント)】の何れかを設定できる
def create_widgets(self):
    # wraplength 70 -> 整数を指定するとpixel計算になる、70ピクセルで折り返す
    label_wraplength_pixel = ttk.Label(self, text="wraplength : 70pixel", wraplength=70,
                                       width=20, relief="solid", anchor="center", padding=10, font=("メイリオ", 12))
    label_wraplength_pixel.pack(pady=5, ipady=10)
    # wraplength 2c -> 2センチメートルで折り返す
    label_wraplength_c = ttk.Label(self, text="wraplength : 2c", wraplength="2c",
                                   width=20, relief="solid", anchor="center", padding=10, font=("メイリオ", 12))
    label_wraplength_c.pack(pady=5, ipady=10)
    # wraplength 1i -> 1インチで折り返す
    label_wraplength_i = ttk.Label(self, text="wraplength : 1i", wraplength="1i",
                                   width=20, relief="solid", anchor="center", padding=10, font=("メイリオ", 12))
    label_wraplength_i.pack(pady=5, ipady=10)
    # wraplength 15m -> 15ミリで折り返す
    label_wraplength_m = ttk.Label(self, text="wraplength : 15m", wraplength="15m",
                                   width=20, relief="solid", anchor="center", padding=10, font=("メイリオ", 12))
    label_wraplength_m.pack(pady=5, ipady=10)
    # wraplength 50p -> 50ポイントで折り返す
    label_wraplength_pt = ttk.Label(self, text="wraplength : 50pt", wraplength="50p",
                                    width=20, relief="solid", anchor="center", padding=10, font=("メイリオ", 12))
    label_wraplength_pt.pack(pady=5, ipady=10)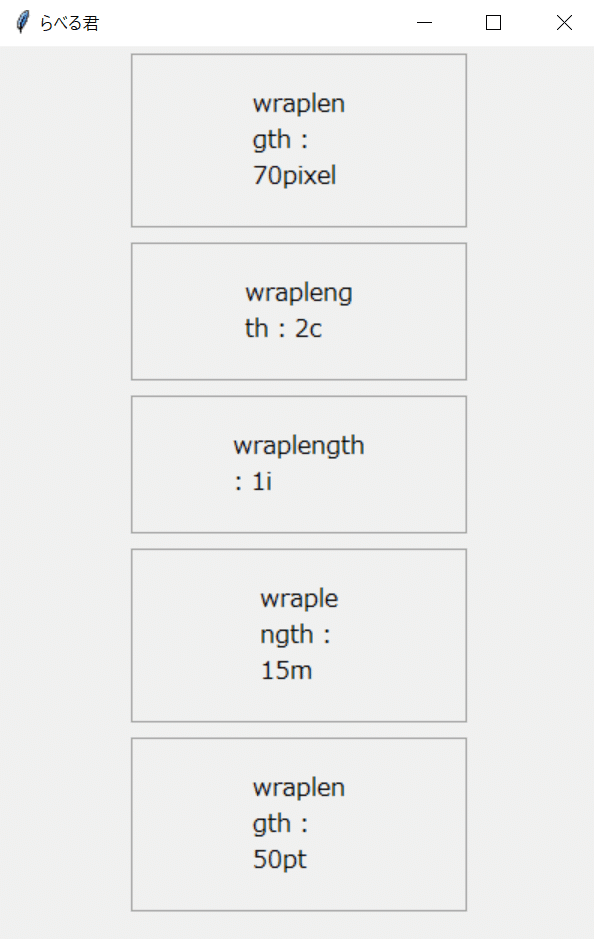
・width
表示するテキストの幅を設定するオプション
※1. 表示する最小幅を設定する場合は-(マイナス)を付ける
def create_widgets(self):
    # width指定なし -> ウィジェットサイズはテキストの長さに自動で調整される
    label_width_none = ttk.Label(
        self, text="width : none", padding=10, relief="solid", anchor="center", font=("メイリオ", 12))
    label_width_none.pack(pady=5, ipady=10)
    # width 3 -> 指定したwidthを超えたテキストは非表示
    label_width_3 = ttk.Label(self, text="width : 3", width=3,
                              padding=10, relief="solid", anchor="center", font=("メイリオ", 12))
    label_width_3.pack(pady=5, ipady=10)
    # width 10 -> 指定したwidthを超えたテキストは非表示
    label_width_10 = ttk.Label(self, text="width : 10", width=10,
                               padding=10, relief="solid", anchor="center", font=("メイリオ", 12))
    label_width_10.pack(pady=5, ipady=10)
    # width -20 -> 指定したwidthの領域は確保される、widthを超えたテキストの場合はテキストの長さに自動で調整される
    label_width_m20 = ttk.Label(self, text="width : -20", width=-20,
                                padding=10, relief="solid", anchor="center", font=("メイリオ", 12))
    label_width_m20.pack(pady=5, ipady=10)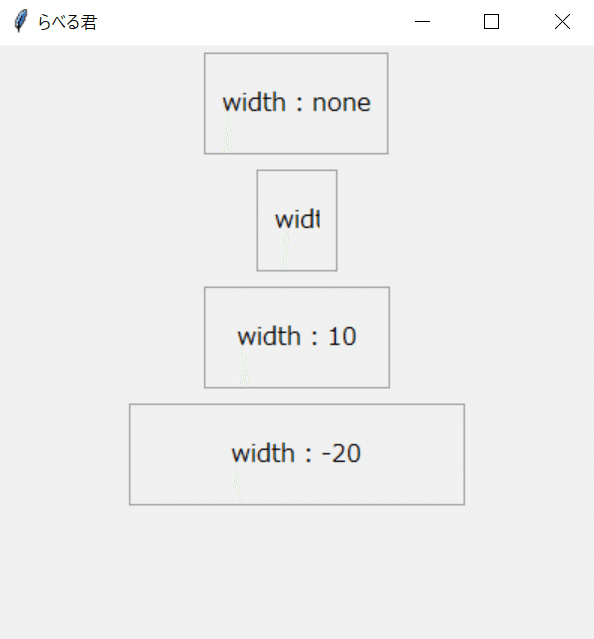
この記事が気に入ったらサポートをしてみませんか?