
Seeed XIAO で楽しむアクアポニックス制御システム(v0.4.0)

アクアポニックス農場EDENで稼働しているアクアポニックス制御システムを、個人向けに楽しめるようアレンジしました。
自宅のアクアポニックスでテストを重ね、とりあえず動くレベルに達したと考えたのでサンプルコードを公開します。コードは公式Seeed Studioサイトのhttps://wiki.seeedstudio.com/Getting_Started/を参考にしています。
開発環境によって作動しないことがありますので、
設定については要望があれば記事にしていきたいと思います。
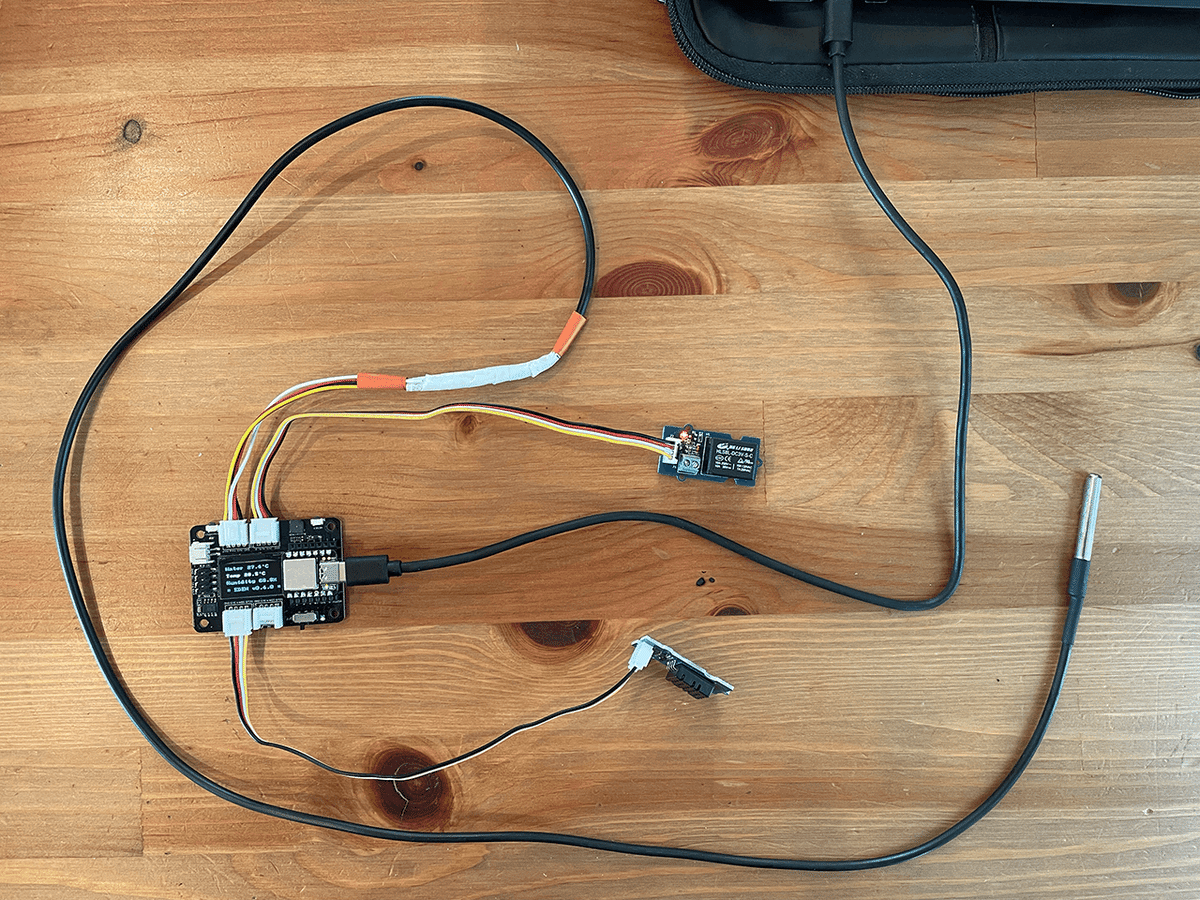
このシステムに使用している(写真の)キットは以下になります。
・Seeed Studio XIAO SAMD21(XIAO本体)
・Seeed Studio Expansion Board(XIAO 拡張ボード)
・Grove - Relay (リレー制御)
・One Wire Temperature Sensor DS18B20(水温測定器)
・Grove - Temperature & Humidity Sensor V2.0 (DHT20)(室温と湿度測定)
あとUSB type cケーブルが環境によって必要です。
私の開発環境はMacBookAir(M2 2022)なので
相互がUSB type c の物を使っています。
/////////////////////////////
// XIAO Aquaponics system  //
//          EDEN           //
//        2023.7.1         //
/////////////////////////////
#define VERSION "0.4.0"

#include <Arduino.h>
#include <DallasTemperature.h>
#include <Wire.h>
#include <DHT20.h>
#include <U8x8lib.h>

U8X8_SSD1306_128X64_NONAME_HW_I2C u8x8(/* clock=*/ PIN_WIRE_SCL, /* data=*/ PIN_WIRE_SDA, /* reset=*/ U8X8_PIN_NONE);   // OLEDs without Reset of the Display

// Data wire is plugged into port 7 on the Arduino
#define ONE_WIRE_BUS 7

DHT20 DHT(&Wire);

// Setup a oneWire instance to communicate with any OneWire devices (not just Maxim/Dallas temperature ICs)
OneWire oneWire(ONE_WIRE_BUS);

// Pass our oneWire reference to Dallas Temperature.
DallasTemperature sensors(&oneWire);

unsigned long TIMER1 = 0,TIMER2 = 0;

//////////////////
// init setting //
//////////////////
void setup()
{
  //////////
  // OLED //
  //////////
  u8x8.begin();
  u8x8.setFlipMode(1);   // set number from 1 to 3, the screen word will rotary 180
  //default view
  u8x8.setFont(u8x8_font_amstrad_cpc_extended_r);
  u8x8.setCursor(1,6);
  u8x8.print("= EDEN v");
  u8x8.print(VERSION);
  u8x8.print(" =");

  ///////////
  // relay //
  ///////////
  pinMode(0, OUTPUT);
  digitalWrite(0,HIGH);

  //////////////////////////
  // one wire temperature //
  //////////////////////////
  // start serial port
  Serial.begin(115200);

  /////////////////
  // temp & Fumi //
  /////////////////
  DHT.begin();
  Serial.print("DHT TEST");
  Wire.begin();

  // Start up the library
  sensors.begin();
}

void loop()
{
  //////////////////////////
  // one wire temperature //
  //////////////////////////
  // call sensors.requestTemperatures() to issue a global temperature
  // request to all devices on the bus
  Serial.print("Requesting one wire temperatures...");
  sensors.requestTemperatures(); // Send the command to get temperatures
  Serial.println("DONE");
  // After we got the temperatures, we can print them here.
  // We use the function ByIndex, and as an example get the temperature from the first sensor only.
  float temp_one = sensors.getTempCByIndex(0);

  // Check if reading was successful
  if(temp_one != DEVICE_DISCONNECTED_C) {
    Serial.print("Temperature for the device 1 (index 0) is: ");
    Serial.print(temp_one);
    Serial.println(" C");
  } else {
    Serial.println("Error: Could not read temperature data");
  }

  /////////////////
  // Temp & Humi //
  /////////////////
  DHT.readData();
  DHT.convert();
  float dht20Humidity = DHT.getHumidity();
  float dht20Temperature = DHT.getTemperature();
  if(dht20Temperature == -50){
    dht20Temperature = 0;
  }
  DHT.requestData();

  //////////////////////////
  //     timer loop       //
  //////////////////////////
  unsigned long now = millis();
  ///////////////////////////
  //       OLED draw       //
  //                       //
  // use temp_one(onewire) //
  // use dht20Humidity.    //
  // use dht20Temperature  //
  ///////////////////////////
  if((now - TIMER1) > 3000) {
    // water temperature
    u8x8.setFont(u8x8_font_amstrad_cpc_extended_r); //2x2 bigfont
    u8x8.setCursor(1,0);
    u8x8.print("Water ");
    u8x8.print(String(temp_one,1));
    u8x8.print("'C ");
    // temperature
    u8x8.setCursor(1,2);
    u8x8.print("Temp ");
    u8x8.print(String(dht20Temperature,1));
    u8x8.print("'C ");
    // humidity
    u8x8.setCursor(1,4);
    u8x8.print("Humidity ");
    u8x8.print(String(dht20Humidity,1));
    u8x8.print("% ");
    // turbidity
    //u8x8.setCursor(1,6);
    //u8x8.print("Turbidity ");
    //u8x8.print("none"); //clear nomal dark

    TIMER1 = now;
  }
  ///////////////////////
  // relay timer event //
  ///////////////////////
  if((now - TIMER2) > 100000 && digitalRead(0) == LOW){ //約1.66分
    digitalWrite(0,HIGH);
    TIMER2 = now;
  } else if((now - TIMER2) > 300000 && digitalRead(0) == HIGH){ //5分
    digitalWrite(0,LOW);
    TIMER2 = now;
  }
}
自分で設計できて家庭用アクアポニックスが制御できます。
下の写真は実際に私の自宅で動いているシステムの一例となります。

アクアポニックスキットの詳細につきましては別記事で紹介していきます。
この記事が気に入ったらサポートをしてみませんか?