How to Disable Permanently Windows Defender Antivirus on Windows 10?

We have never doubted the software program that was developed by Microsoft, and their house Antivirus, aka Window Defender, is one of them.However, several users haven't disabled the services of Windows Defender.If you are also one of those users who are facing virus related issues on your device and would like to sneak out them, then follow the below-written methods to attain the knowledge about disabling of Window Defender.So, here are the steps to permanently turn off Windows Defender Antivirus.
Through Group Policy
To launch the Run dialog box by pressing Win + R keys together on your keyboard.After
that, enter 'gpedit.msc.' Select the OK tab to launch 'Local Group Policy Editor.'
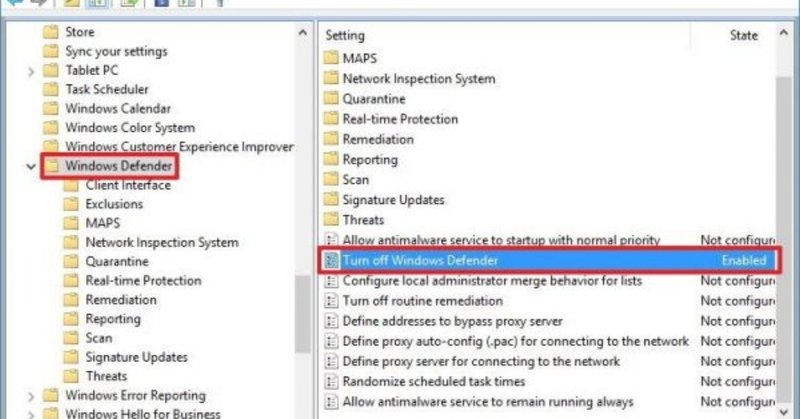
You should search the pursuing path: Computer Configuration> Administrative Templates> Windows Components> Windows Defender Antivirus.Go
to 'Turn off Windows Defender Antivirus and twice click on it on the right-hand side panel.Choose
the option Enabled, and then click on the Apply button then pick the OK tab.Search
: Computer Configuration> Administrative Templates> Windows Components> Windows Defender Antivirus> Real-time Protection.
Reach the policy 'Turn on behavior monitoring.'
Choose the option Disabled and select the Apply tab.
Click on the OK
tab.Navigate to policy 'Monitor file and program activity on your computer.'
Choose Disabled and choose the Apply option then pick the OK tab.Select
the policy 'Turn on process scanning whenever real-time protection is enabled' and twice click on
it.Reach the Disabled tab and choose the Apply option then select the OK
tab.Navigate to 'Turn on behavior monitoring and twice click on it.
Later, choose the Disabled tab and select the Apply option then pick the OK tab.
Now, reboot the
system.Thru the Registry
Press Win + R keys together on your keyboard to launch the Run dialog box.
Then enter 'regedit' then select the OK to launch the Registry.
You should search the pursuing: HKEY_LOCAL_MACHINE \ SOFTWARE \ policies \ Microsoft \ Windows Defender.Navigate
to Windows Defender folder, and right-click on it then choose the New and select the 'DWORD (32-bit)
Value.Input the key name' DisableAntiSpyware. 'Then press the Enter
key.Go to the key that was freshly created and twice click on it and adjust its value to 1 from 0.Click
on the OK
tab.Navigate to the folder of' Windows Defender ', then select the 'New' button and press the
key.Input the key name 'Real-Time Protection' and hit the Enter button.After
that, go to the folder of 'Real-Time Protection' and choose the 'New' then click on the value of DWORD (32-bit).
Rename the key named 'DisableBehaviorMonitoring.' Then hit the Enter
button.Twice click on the freshly made key and adjust the value from 0 to 1.Press
the OK button.Reach
folder of 'Real-Time Protection' and right-click on it .
Choose The New Option And Press The 'DWORD (32-Bit) Value'.
Give A New Name To The Key Named 'DiaisableScanOnRealtimeEnable.' Then Hit The Enter Button.
Twice Click On The Freshly Make Key And Adjust Value To 1 From 0 .
Finally, Hit On The OK Key.
Through The Security Center
Launch 'Windows Defender Security Center' On The Windows 10.
After That, Click On The Option 'Virus And Threat Protection.'
You Should Select 'Virus And Threat Protection Settings.'
Now, disable 'Real-time protection' switch toggle.
Richard Branson is a technology enthusiast who loves writing about new advancements and IT threats on a regular basis.Her work focuses on the latest advancements in the realm of technology, social media, and cyber security at
norton.com/setup
Source- https://nortonnorton.uk/how-to-disable-permanently-windows-defender-antivirus-on-windows-10/