
Metaverse Programming! How to "Hello World" on Vket Cloud

Introduction
Vket Cloud allows programming using the engine's own script called HeliScript.
The structure itself is similar to Unity's standard C#, but using HeliScript you can implement complex gimmicks and behaviors in the world you are creating with VketCloudSDK.
For example, using HeliScript, you can implement the following gimmicks.
-Status screen that displays the number of items acquired
-A gimmick that allows you to acquire items and change your walking/running speed.
-Bomb that explodes if not released within 3 minutes
etc...
HeliScript is also used when using ChatGPT within Vket Cloud.
In this article, as the first step in HeliScript programming, we will explain how to output the string "Hello, World!" to the debug log in the world.
As you may know if you have used other programming languages, the method of outputting "Hello World" is an essential part of learning the basics of writing programs.
Let's start learning HeliScript's "Hello World"!

World setup
In this article, we will implement HeliScript after completing the basic setup of the world.
If you haven't set up your world yet, please refer to the article below to do so!
HeliScript setup
Add HeliScript files to Assets
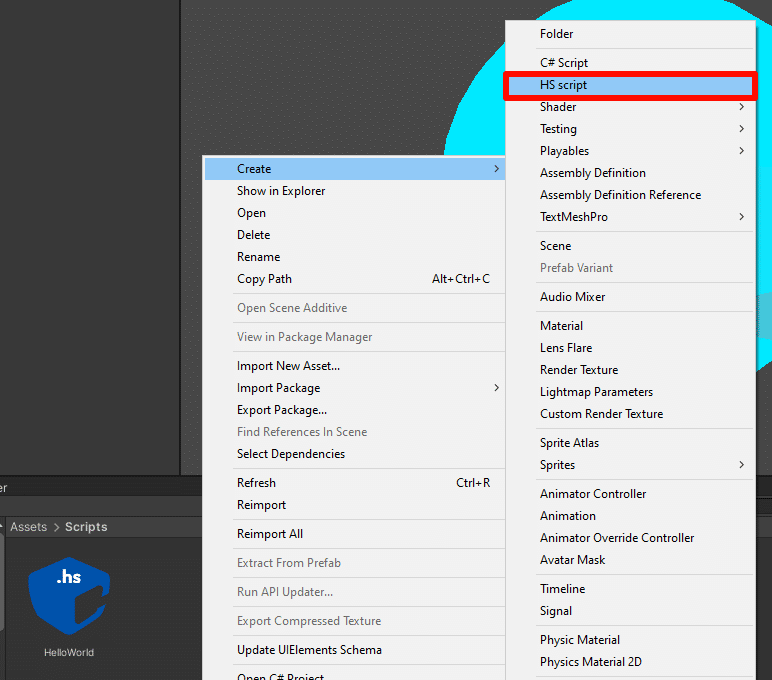
First, create a new HeliScript file in Assets.
After installing VketCloudSDK, an item called "HS script" will be added when you right-click > Create in the Asset window. Select this and add HeliScript to any folder.
As an example, here we add a Scripts folder to the Assets folder and generate a new HeliScript with the name HelloWorld.

Add HEOScript to the scene
After adding the HeliScript file, next configure HeliScript in the scene.
HeliScript appears in the scene using components.
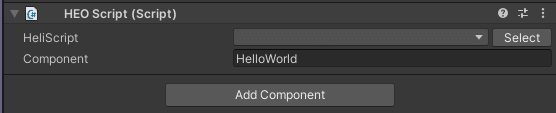
Select Add Component > HEOScript on the inspector screen to attach the component.
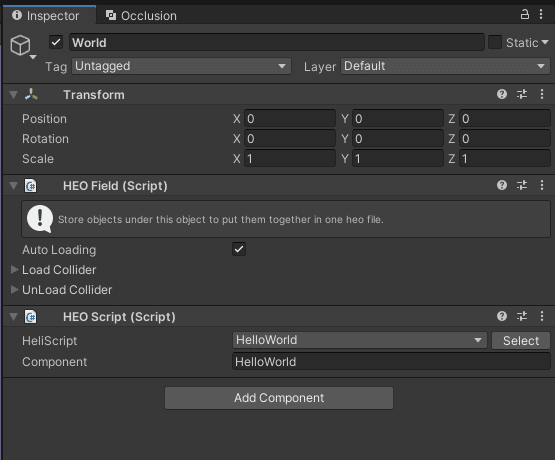
In the HEOScript component, select the HeliScript file you want to run. When you select "Select" on the right, a list of HeliScripts will appear, so select the HeliScript you want to use.
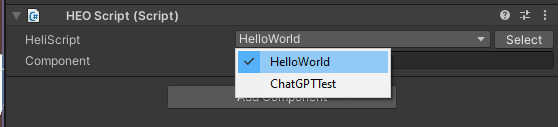
*The images below are as of SDK Ver5.4. The appearance may change significantly with future updates, so please check the relevant page of the SDK manual.

Depending on the operation, "Component" described later may be blank as shown in the image below , so in that case , select HeliScript from the "HeliScript" pull-down.

Enable debug mode in HEOWorldSetting
In the HelloWorld that we will implement this time, it is necessary to set the world build to debug mode in order to output characters in the debug log . Enable Debug Mode in the HEOWorldSetting component to use debug mode.
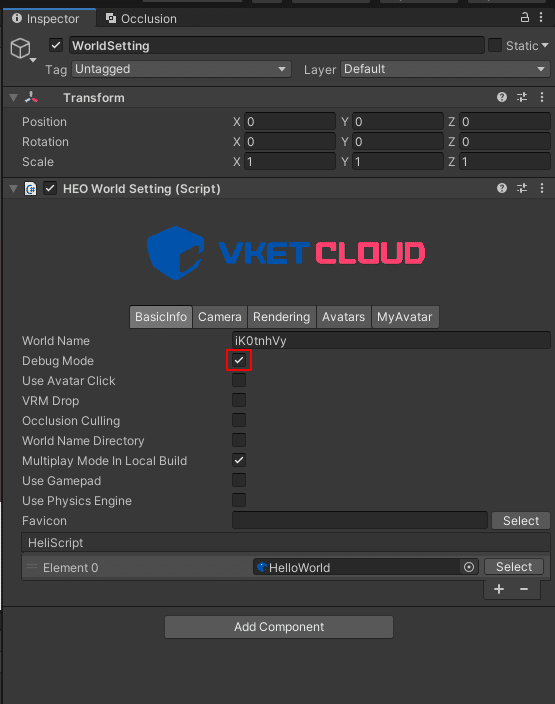
HEOWorldSetting displays a list of HeliScripts added to the scene.
Please note that if you delete a script from this list, it will also disappear from HEOScript, which may cause unintended behavior depending on the timing.
Let's write some code
Edit HeliScript
Once the settings in the scene are complete, it's time to write the HeliScript.
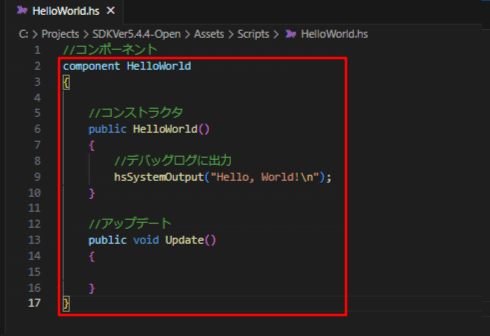
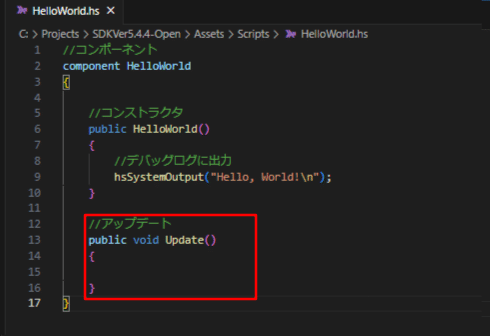
This time, for convenience, we will show the code that can output "Hello, World!" and then explain each element.
If you just want to try it out, copy and paste the code below into a file and run it in the same way as "Test with Build & Run" below.
//component
component HelloWorld
{

     //constructor
     public HelloWorld()
     {
     //Output to debug log
     hsSystemOutput("Hello, World!\n");
     }

     //update
     public void Update()
     {

     }
}
Explanation of each HeliScript element
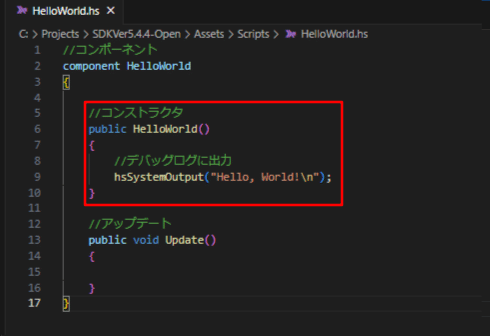
component HelloWorld is a HeliScript component class.
In this article, we will not explain the class for the time being, but as a general understanding, it is "the main part that includes the minimum number of variables and functions necessary for HeliScript execution."
In addition to being able to define your own functions within the component, you can also define the behavior of callback functions that respond to player operations, such as OnEnterAreaCollider and OnClickedButton.
public HelloWorld() is a constructor function that is executed only once when a class object is created .
Normally, it only runs once when entering the world.
hsSystemOutput() is a function to output a string to the debug log.
Here, "Hello, World!\n" (\n is the line feed code) is output.
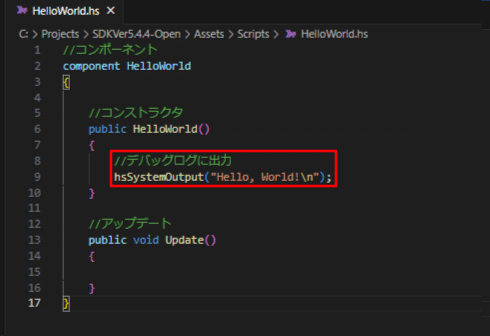
Note that if you use hsSystemWriteLine() instead of hsSystemOutput() , you can omit the trailing line feed code "\n".
public void Update() is a function that is executed every frame. An implementation example will be shown in Outputting numbers every frame
below.
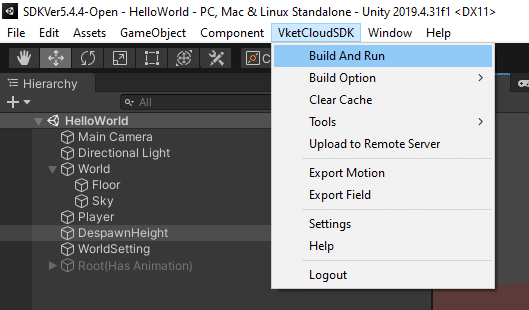
Test with Build and Run
After completing the code implementation and executing Build And Run, "Hello, World!" will be output to the debug log on the screen.

Try adding variables
Now that we can output "Hello, World!", the next step is to change the string that is output. VketCloud provides four basic variable types
to represent data such as 42, 3.14, "Hello World!" . To change a string, define a string type variable, then assign the initial value and change the string in the constructor as shown below.
component HelloWorld
{
     //define variable
     string m_helloWorld;

     //constructor
     public HelloWorld()
     {
         //Substitute initial value
         m_helloWorld = "Hello, World";
         //modify string
         m_helloWorld = "Hello, World from Vket Cloud!\n";

         hsSystemOutput(m_helloWorld);
     }

     public void Update()
     {

     }
}
At this time, you can also add to the end of the string using the += operator as shown below.
component HelloWorld
{
     //define variable
     string m_helloWorld;

     //constructor
     public HelloWorld()
     {
         //Substitute initial value
         m_helloWorld = "Hello, World";
         //modify string
         m_helloWorld += "from Vket Cloud!\n";

         hsSystemOutput(m_helloWorld);
     }

     public void Update()
     {

     }
}
The result when executed is as follows.

It is important to note that variables must be initialized in the constructor and not within the class.
Please note that if you enter an initial value within the class, a build error will occur.
component HelloWorld
{
    //Build Error
    string m_helloWorld = "Hello, World";
Try outputting numbers every frame
HeliScript allows you to execute code in Update() in addition to the constructor.
As an example, write a code in Update that adds 1 to the int type variable defined as m_frameCount for each frame and outputs it as shown below.
component HelloWorld
{
     //define variable
     string m_helloWorld;
     int m_frameCount;

     //constructor
     public HelloWorld()
     {
         //Substitute initial value
         m_frameCount = 0;
         m_helloWorld = "Hello, World";

         // add string
         m_helloWorld += " from Vket Cloud!\n";

         hsSystemOutput(m_helloWorld);
     }

     public void Update()
     {
         // Add 1 to m_frameCount every frame
         m_frameCount++;
         // Convert int type to string by using % operator and output
         hsSystemOutput("Frame Count: " + "%d" % m_frameCount + "\n");
     }
}
When executed, the output will be as shown below.

In conclusion
Read the SDK manual
That's all for explaining the basic elements of HeliScript!
The SDK manual contains more detailed information about HeliScript, so we recommend reading it if you are interested.
We also plan to continue writing articles about how to use HeliScript and how to implement gimmicks. stay tuned!
If you have any problems, please visit the community Discord
When we have trouble implementing it, or which component/HeliScript should we use to create this...? If so, please come to VketCloud's Discord server!

On this server, in addition to a channel that accepts questions about the SDK, we regularly hold study sessions about the SDK's functions.
Please take advantage of it and create an amazing world using Vket Cloud!
(Negi Trotsky)


この記事が気に入ったらサポートをしてみませんか?