
Let's Challenge!! Auth0とAngularとNestJSでフルスタックなアプリケーションを作る

何かを開発する場合、フルスクラッチならAugularとNestJSの組み合わせを採用することが多いです。
理由は、TypeScriptで統一できることと、AugularとNestJSのアプローチが似ているので、頭を切り替える必要がないからです(これが原因ではまることもありますが)
今回は、Auth0とAngularとNestJSを使ってフルスタックなアプリケーションを作ってみます。
作るもの
下図のようなアプリケーションを作ります。
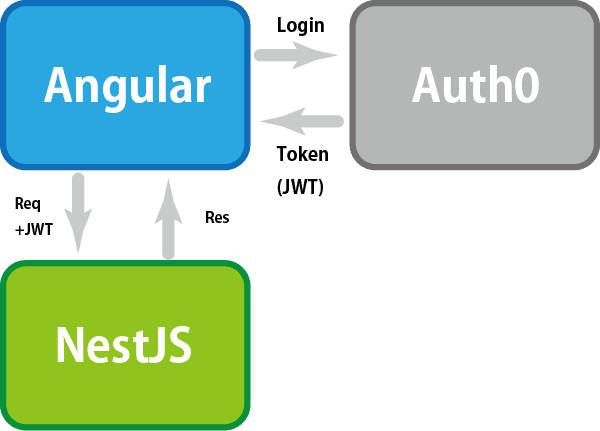
ログイン
AngularアプリケーションからAuth0に依頼してログインします。
トークン取得
Auth0でログインが成功したら、トークン(JWT)を取得します。
APIリクエスト
NestJSのAPIにアクセスします。アクセスするときには、Authorizationヘッダーにトークンを設定します。
APIレスポンス
NestJSでトークンを検証しOKだったら、要求されたデータを返します。
Auth0の準備
AngularアプリケーションでAuth0にログインするためにアプリケーションが必要です。
さらに、AngularアプリケーションからNestJS APIにJWTを渡し検証するために、APIが必要になります。
仕組みとしては、AngularアプリケーションがNestJS APIに要求するときにAuth0からどのAPIに対するトークンなのかを明示してJWTを取得します。
こうして作成されたJWTでないと、NestJS APIは不正だと要求を拒否するようになっています。
アプリケーションの作成
AngularアプリケーションからAuth0にログインを依頼するために必要なアプリケーションを作成します。
Auth0のApplicationsから+CREATE APPLICATIONを実行します。
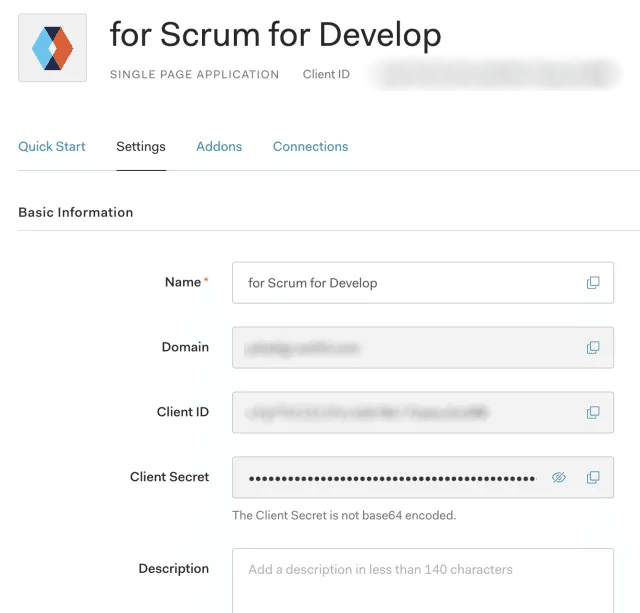
設定のポイントは以下の通りです。
Application Type
Angularを使いますので、Single Page Applicationを選択します。
Allowed Callback URLs
Auth0にログインを依頼するときに指定するredirect_urlを指定します。
ローカルで開発するときは、http://localhost:4200でOKです。
Allowed Logout URLs
Auth0にログアウトを依頼するときに指定するreturnToを指定します。
ローカルで開発するときは、http://localhost:4200でOKです。
Allowed Web Origins
アクセスする元のURLを指定します。
ローカルで開発するときは、http://localhost:4200でOKです。
APIの準備
Angularアプリケーションと連携するAPIサーバー(NestJS)の設定を行います。
APIsで+CREATE APIで作成します。
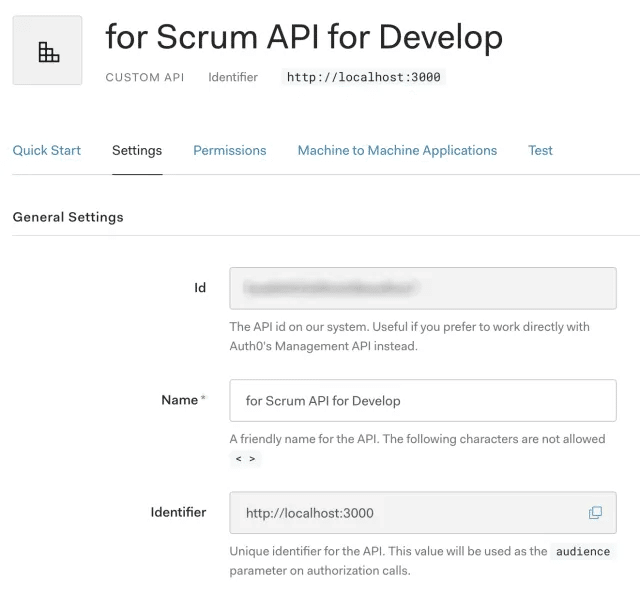
ポイントは以下の通りです。
Identifier
Angularアプリケーションでログイン後、トークン(JWT)を取得するときに指定するaudienceを指定します。
NestJS APIのアドレスになります。
ローカルで開発するときには、http://localhost:3000でOKです。
※Allow Skipping User ConsentがEnabledの場合、AngularアプリケーションがAPIアクセスのトークンを取得するときにユーザから許可を得ることをスキップできます。
ですが、localhostの場合は、Enabledでも許可が必要だというエラー(consent required)が返ってきます。
このQ&Aにもあるように、localhostからのアクセスは安全ではないためエラーを返すようです。
/etc/hostsで127.0.0.1に適用なホスト名を付け、これを使うようにすればいいようです。
Angularアプリケーションの実装
@auth0/auth0-spa-jsのインストール
AngularアプリケーションでAuth0と連携してログインするために、@auth0/auth0-spa-jsというパッケージが準備されていますので、インストールします。
npm install @auth0/auth0-spa-js --save環境変数の実装
Auth0にログインを依頼するために以下のものが必要になります。
・Auth0のドメイン名 ・・・ テナントごとに割り振られるドメイン名
・RedirectURL ・・・ ログインしたあとに表示するページのURL
・LogoutURL ・・・ ログアウトしたあとの表示するページのURL
・AudienceURL ・・・ NestJSアプリケーションのURL(APIのURL)
設定は、environmentsフォルダのenvironment.tsを以下のようにします。
export const environment = {
 // Production Mode
 production: false,
 // Auth0
 // Domain
 auth0Domain: '*****.auth0.com',
 // Client ID
 auth0CClientId: '<< Auth0のアプリケーションのClient ID',
 // Redirect URL
 auth0RedirectUrl: 'http://localhost:4200',
 // Audience URL
 auth0AudienceUrl: 'http://localhost:3000',
 // Logout URL
 auth0LogoutUrl: 'http://localhost:4200',
};
認証サービスの実装
ng g service authでサービスクラスを作成し、以下のように実装します。
import { Injectable } from '@angular/core';
import createAuth0Client from '@auth0/auth0-spa-js';
import Auth0Client from '@auth0/auth0-spa-js/dist/typings/Auth0Client';
import { from, of, Observable, BehaviorSubject, combineLatest, throwError } from 'rxjs';
import { tap, catchError, concatMap, shareReplay } from 'rxjs/operators';
import { Router } from '@angular/router';

import { environment } from '../../environments/environment';

@Injectable({
 providedIn: 'root'
})
export class AuthService {
 // Domain
 static readonly AUTH0_DOMAIN: string = environment.auth0Domain;
 // Client ID
 static readonly AUTH0_CLIENT_ID: string = environment.auth0CClientId;
 // Redirect URL
 static readonly AUTH0_REDIRECT_URL: string = environment.auth0RedirectUrl;
 // Audience URL
 static readonly AUTH0_AUDIENCE_URL: string = environment.auth0AudienceUrl;
 // Logout URL
 static readonly AUTH0_LOGOUT_URL: string = environment.auth0LogoutUrl;

 // Create an observable of Auth0 instance of client
 auth0Client$ = (from(
   createAuth0Client({
     domain: AuthService.AUTH0_DOMAIN,
     client_id: AuthService.AUTH0_CLIENT_ID,
     redirect_uri: AuthService.AUTH0_REDIRECT_URL,
   })
 ) as Observable<Auth0Client>).pipe(
   shareReplay(1), // Every subscription receives the same shared value
   catchError(err => throwError(err))
 );

 // Define observables for SDK methods that return promises by default
 // For each Auth0 SDK method, first ensure the client instance is ready
 // concatMap: Using the client instance, call SDK method; SDK returns a promise
 // from: Convert that resulting promise into an observable
 isAuthenticated$ = this.auth0Client$.pipe(
   concatMap((client: Auth0Client) => from(client.isAuthenticated())),
   tap(res => this.loggedIn = res)
 );

 /**
  * JWTを取得する
  * optionのaudienceがlocalhostならポップアップ表示で取得する(localhostの場合、ポップアップ表示でないとconsent requiredになるため)
  * audienceがlocalhost以外ならサイレントで取得する(optionが未設定、audienceが未設定の場合はこっち)
  * @param options トークン取得オプション
  */
 getToken$(options?): Observable<any> {
   let op = options;
   if (!op) {
       // Auth0からトークン(JWT)を取得し、Authorizationヘッダに付ける
       op = {
         audience: environment.auth0AudienceUrl,
         responseType: 'token id_token',
     };
   }

   let bPopup = true;

   if (op && op.audience) {
     const url = new URL(op.audience);
     if (url.hostname !== 'localhost') {
       bPopup = false;
     }
   }
   return this.auth0Client$.pipe(
     concatMap((client: Auth0Client) => from(client.getTokenSilently(op)))
   );
 }

 /**
  * JWTを取得する
  * @param options
  */
 getTokenSilently$(options?): Observable<any> {
     return this.auth0Client$.pipe(
       concatMap((client: Auth0Client) => from(client.getTokenSilently(options)))
     );
 }

 /**
  * JWTを取得する
  * @param options
  */
 getTokenWithPopup$(options?): Observable<any> {
   return this.auth0Client$.pipe(
     concatMap((client: Auth0Client) => from(client.getTokenWithPopup(options)))
   );
 }

 handleRedirectCallback$ = this.auth0Client$.pipe(
   concatMap((client: Auth0Client) => from(client.handleRedirectCallback()))
 );

 // Create subject and public observable of user profile data
 private userProfileSubject$ = new BehaviorSubject<any>(null);
 userProfile$ = this.userProfileSubject$.asObservable();
 // Create a local property for login status
 loggedIn: boolean = null;

 constructor(private router: Router) {
   // On initial load, check authentication state with authorization server
   // Set up local auth streams if user is already authenticated
   this.localAuthSetup();
   // Handle redirect from Auth0 login
   this.handleAuthCallback();
 }

 // When calling, options can be passed if desired
 // https://auth0.github.io/auth0-spa-js/classes/auth0client.html#getuser
 getUser$(options?): Observable<any> {
   return this.auth0Client$.pipe(
     concatMap((client: Auth0Client) => from(client.getUser(options))),
     tap(user => this.userProfileSubject$.next(user))
   );
 }

 private localAuthSetup() {
   // This should only be called on app initialization
   // Set up local authentication streams
   const checkAuth$ = this.isAuthenticated$.pipe(
     concatMap((loggedIn: boolean) => {
       if (loggedIn) {
         // If authenticated, get user and set in app
         // NOTE: you could pass options here if needed
         return this.getUser$();
       }
       // If not authenticated, return stream that emits 'false'
       return of(loggedIn);
     })
   );
   checkAuth$.subscribe();
 }

 login(redirectPath: string = '/') {
   // A desired redirect path can be passed to login method
   // (e.g., from a route guard)
   // Ensure Auth0 client instance exists
   this.auth0Client$.subscribe((client: Auth0Client) => {
     // Call method to log in
     client.loginWithRedirect({
       redirect_uri: `${window.location.origin}`,
       appState: { target: redirectPath }
     });
   });
 }

 private handleAuthCallback() {
   // Call when app reloads after user logs in with Auth0
   const params = window.location.search;
   if (params.includes('code=') && params.includes('state=')) {
     let targetRoute: string; // Path to redirect to after login processsed
     const authComplete$ = this.handleRedirectCallback$.pipe(
       // Have client, now call method to handle auth callback redirect
       tap(cbRes => {
         // Get and set target redirect route from callback results
         targetRoute = cbRes.appState && cbRes.appState.target ? cbRes.appState.target : '/';
       }),
       concatMap(() => {
         // Redirect callback complete; get user and login status
         return combineLatest([
           this.getUser$(),
           this.isAuthenticated$,
         ]);
       })
     );
     // Subscribe to authentication completion observable
     // Response will be an array of user and login status
     authComplete$.subscribe(([user, loggedIn]) => {
       // Redirect to target route after callback processing
       this.router.navigate([targetRoute]);
     });
   }
 }

 logout() {
   // Ensure Auth0 client instance exists
   this.auth0Client$.subscribe((client: Auth0Client) => {
     // Call method to log out
     client.logout({
       client_id: AuthService.AUTH0_CLIENT_ID,
       returnTo: AuthService.AUTH0_LOGOUT_URL,
     });
   });
 }
}
Guardの実装
ログインしていないときに、アクセスできるページ(ルート)を制限するために、Guardを実装します。
ng g guard auth/Authでauth.guard.tsを作成し、以下のように実装します。
import { Injectable } from '@angular/core';
import { ActivatedRouteSnapshot, RouterStateSnapshot, UrlTree, CanActivate } from '@angular/router';
import { Observable } from 'rxjs';
import { AuthService } from './auth.service';
import { tap } from 'rxjs/operators';

@Injectable({
 providedIn: 'root'
})
export class AuthGuard implements CanActivate {

 constructor(private auth: AuthService) {}

 canActivate(
   next: ActivatedRouteSnapshot,
   state: RouterStateSnapshot
 ): Observable<boolean> | Promise<boolean|UrlTree> | boolean {
   return this.auth.isAuthenticated$.pipe(
     tap(loggedIn => {
       if (!loggedIn) {
         this.auth.login(state.url);
       }
     })
   );
 }
}
これで、AuthGuardというGuardが完成しました。
ルーティング(app-routing.module.ts)で使うには、以下のようにします。
これで、memberというパスにアクセスするためには、ログインが必要になります。
{ path: 'member', component: MemberComponent, canActivate: [AuthGuard], },
インターセプタクラスの実装
NestJS APIにアクセスするときに、AuthorizationヘッダーにBearer <JWT>を付けるようにします。
Angularアプリケーションでリクエストのたびに、 Authorizationヘッダーを付加するには、インターセプタを使います。
ng g interceptor auth/AuthInterceptorでauth-interceptor.tsを作成して以下のように実装します。
import { Injectable } from '@angular/core';
import { HttpEvent, HttpInterceptor, HttpHandler, HttpRequest } from '@angular/common/http';
import { Observable, throwError } from 'rxjs';
import { mergeMap, catchError } from 'rxjs/operators';

import { AuthService } from './auth.service';

@Injectable()
export class AuthInterceptor implements HttpInterceptor {
   constructor(
       private readonly authService: AuthService
   ) {}

   intercept(req: HttpRequest<any>, next: HttpHandler): Observable<HttpEvent<any>> {
       // ログインしていなければ何もしない
       if (!this.authService.loggedIn) {
           return next.handle(req)
       }

       return this.authService.getToken$().pipe(
           mergeMap(token => {
               const tokenReq = req.clone({
                   setHeaders: { Authorization: `Bearer ${token}` }
               });
               return next.handle(tokenReq);
           }),
           catchError(err => throwError(err))
       );
   }
}
ルーティングの実装
app-routing.module.tsにルーティングの実装を行います。
ルートの定義に、canActiveでAuthGuardを設定します。
これでログインしていないとパスにアクセスできなくなります。
さらに、NestJSのAPIにアクセスするときにインターセプタでAuthorizationヘッダを付けるために、providersを定義します。
以下の実装だと、home以外はログインが必要です。
import { NgModule } from '@angular/core';
import { Routes, RouterModule } from '@angular/router';
import { HTTP_INTERCEPTORS } from '@angular/common/http';

import { AuthInterceptor } from './auth/auth-interceptor';
import { HomeComponent } from './home/home.component';
import { ProfileComponent } from './profile/profile.component';
import { MemberComponent } from './member/member.component';
import { AuthGuard } from './auth/auth.guard';

const routes: Routes = [
 { path: 'home', component: HomeComponent, },
 { path: 'member', component: MemberComponent, canActivate: [AuthGuard] },
 { path: 'profile', component: ProfileComponent, canActivate: [AuthGuard] },
 { path: '**', redirectTo: 'home' },
];

@NgModule({
 imports: [RouterModule.forRoot(routes)],
 exports: [RouterModule],
 providers: [
   {
     provide: HTTP_INTERCEPTORS,
     useClass: AuthInterceptor,
     multi: true,
   },
 ],
})
export class AppRoutingModule { }
NestJS APIの実装
GraphQLのAPIを実装します。
REST APIの場合もあまり大きく変わりません(全く同じではダメですが)
Passportパッケージのインストール
JWTの検証には、Passportパッケージを使います。
npm install @nestjs/passport jwks-rsa passport passport-jwt --save環境変数の準備
.envファイルにJWTの検証で使う環境変数を準備します。
AUTH0_DOMAIN=https://****.auth0.com/
AUTH0_AUDIENCE=http://localhost:3000
JWTを検証するプログラムを実装
jwt.strategy.tsにJWTをPassportを使って検証するプログラムを準備します。
import { Injectable } from '@nestjs/common';
import { PassportStrategy } from '@nestjs/passport';
import { ExtractJwt, Strategy } from 'passport-jwt';
import { passportJwtSecret } from 'jwks-rsa';

@Injectable()
export class JwtStrategy extends PassportStrategy(Strategy) {
 constructor() {
   super({
     secretOrKeyProvider: passportJwtSecret({
       cache: true,
       rateLimit: true,
       jwksRequestsPerMinute: 5,
       jwksUri: `${process.env.AUTH0_DOMAIN}.well-known/jwks.json`,
     }),

     jwtFromRequest: ExtractJwt.fromAuthHeaderAsBearerToken(),
     audience: process.env.AUTH0_AUDIENCE,
     issuer: process.env.AUTH0_DOMAIN,
     algorithms: ['RS256'],
   });
 }

 validate(payload: any) {
   return payload;
 }
}
次にJWT認証を行うモジュールを作成します。
nest g module Authzで、authz.module.tsを作成し、以下のようにします。
import { Module } from '@nestjs/common';
import { PassportModule } from '@nestjs/passport';
import { JwtStrategy } from './jwt.strategy';

@Module({
   imports: [
       PassportModule.register({
           defaultStrategy: 'jwt',
       }),
   ],
   providers: [
       JwtStrategy,
   ],
   exports: [
       PassportModule,
   ],
})
export class AuthzModule {}
作成したAuthzModuleは、app.module.tsでインポートしてください。
GraphQL APIをガードするGuardを実装
GraphQL APIにアクセスするときに、JWTを検証するために、Guardを実装します。
import { ExecutionContext, Injectable } from '@nestjs/common';
import { AuthGuard } from '@nestjs/passport';
import { GqlExecutionContext } from '@nestjs/graphql';


@Injectable()
export class GraphqlAuthGuard extends AuthGuard('jwt') {
 getRequest(context: ExecutionContext) {
   const ctx = GqlExecutionContext.create(context);
   return ctx.getContext().req;
 }
}
Resolverクラスで、このGuardを使うには以下のようにします。
これで、createMemberというmutationにはJWTがないとアクセスできません。
@UseGuards(GraphqlAuthGuard)
@Mutation(returns => MemberResult)
async createMember(@Args({name: 'memberInput', type: () => MemberInput}) memberInput: MemberInput): Promise<MemberResult> {
前回は、AngularアプリケーションでAuth0を使う場合の方法をご紹介しました。
今回は、Angularアプリケション+NestJS APIとフルスタックで使う場合にはどうしたらいいかについてご紹介しました。
Angularアプリケーション、NestJS APIともにちょっとしたコードを実装するだけで、セキュアなフルスタックアプリケーションを作ることができます。
Auth0、オススメです。