How to convert avatars for VRChat to VRM so they can be used with cluster

Hello, this is Kohada.
Recently, I’ve been hearing a lot of talk about cluster users wanting to try out VRChat and VRChat users wanting to visit cluster.
One of the biggest hurdles is transferring their usual avatars between platforms. I’ve seen several acquaintances struggle with this, so I’ve decided to explain how to convert a VRChat avatar to the VRM format for use in cluster.
While this guide focuses on using the avatar in cluster, VRM format is widely adopted by various applications, so converting to VRM expands the versatility of your avatar.
Check Avatar Restrictions and Terms of Use
Some avatars have restrictions on modifications and usage. Additionally, follow any specific SDK or Unity version requirements for VRChat. Since we are modifying a VRChat avatar, avoid contacting the creator about unexpected uses like VRM conversion.
Using the "Lucifer" Avatar by Nafunado
For this guide, I'll use the "Lucifer" avatar by Nafunado, which utilizes the common "Marubody" base, making it easier to create new outfits and swap costumes in the future.
Overview of Steps
Avatars compatible with cluster are in VRM 0.x format. Since VRChat avatars are in .fbx format, the steps are as follows:
Convert the avatar to VRM format in Unity and input metadata.
Adjust jiggle physics.
Change shaders.
Set up expressions for emotes.
For detailed restrictions on avatars in cluster, refer to the following link.
Create a Unity Project
Start by creating a new Unity project using Unity Hub. Since there are no specific version requirements for the model, I used the recommended version for cluster. Name your project accordingly and choose "3D Core".

The following screenshots are based on Unity version 2021.3.4f1. Interfaces might differ slightly depending on your Unity version.
Install the VRM Conversion Tool
Once the project is created, install the tool for converting to VRM.
Download the "VRM Converter for VRChat" from the link above. This package includes the necessary UniVRM, so it's sufficient for our needs.
Extract the downloaded Zip file and drag the "VRM Converter for VRChat Installer.unitypackage" into the Unity Asset area.

Click the "Import" button in the dialog that appears.

Upon nearing completion of the import, click "Close".

and then click "Use recommended Linear" to change the project's Color Space. Cluster uses Linear Color Space.

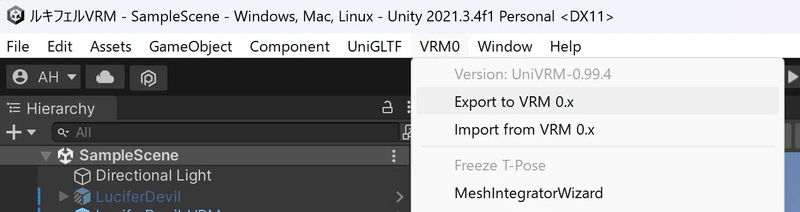
If installed correctly, the Unity menu will have new "UniGLTF" and "VRM0" items.

Supplementary Note
Currently, "VRChat Creator Companion" (commonly known as VCC) is used for managing project files of VRChat avatars. If you're using VCC, adding the project as a community repository may simplify installation and make version management easier!
For more details, please refer to the application introduction page on Booth mentioned above.
Install the Original Shader
Next, install the shader recommended for the avatar to check its original colors before switching to MToon for VRM compatibility.
The shader used for this model is as follows.
Download and import the shader similarly as before.
Import Avatar Data
Now, import the avatar data you obtained earlier into Unity. Typically, avatars are provided in .unitypackage format. Import it as done previously.
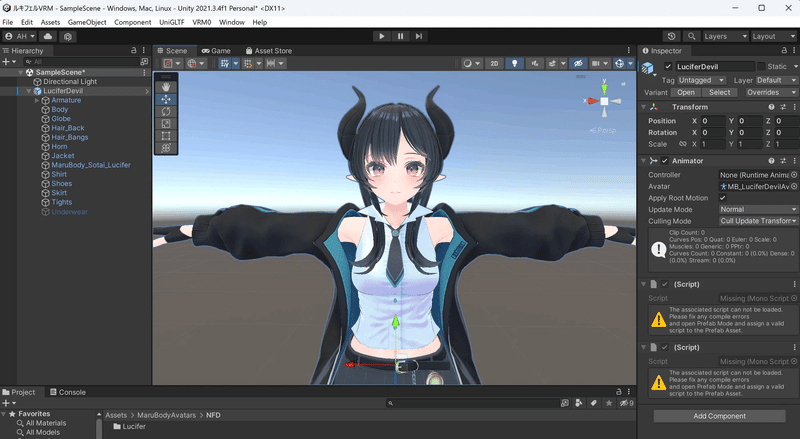
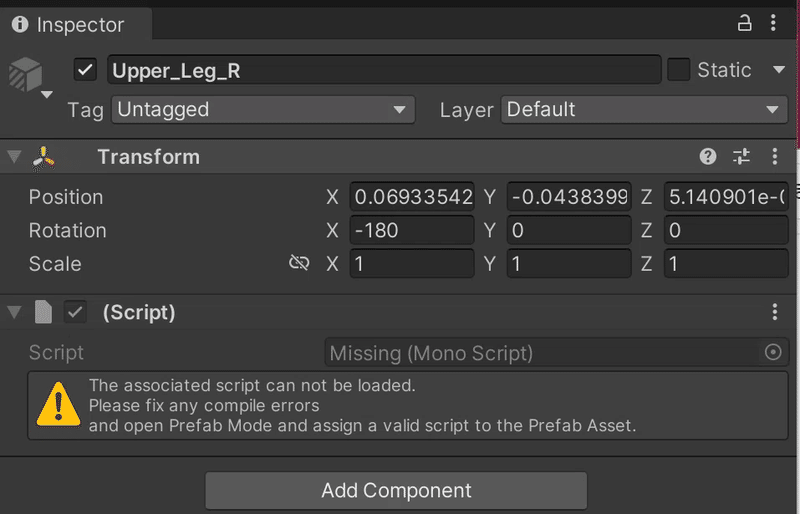
Remove VRChat Scripts
The avatar data includes VRChat-specific scripts. Remove these before converting to VRM. However, keep a copy of the original Prefab in the same scene for reference, especially for Phys Bone and Phys Bone Collider objects.

Convert Avatar to VRM Format
Now, let's convert the avatar to VRM format. Instead of using "Export VRM file from VRChat avatar," directly execute "Export to VRM 0.x." This avoids issues with Spring Bone settings that sometimes occur.
This is because there have been numerous cases where the Spring Bone settings were completely messed up during the export process. Therefore, I will take a slightly more roundabout approach with more manual steps to ensure proper migration.

Drag and drop the avatar Prefab from the Hierarchy panel into the "ExportRoot" at the top left. This will bring up a dialog for metadata (data about the data), where three errors will be displayed.

You can scroll down in this dialog. Enter the "Title" (avatar's name), "Version," and "Author" (creator) for the VRM data of this avatar. These three fields must be filled in; otherwise, the data cannot be exported. "Contact Information" and "Reference" (original work) can be left blank. Select the "Permission Scope for the Avatar's Personality" based on the avatar's terms of use.
Once you've finished entering the information, click "Export" at the bottom right. Set an appropriate location to save the file and click "Save." (I create a folder named "Model" under the Asset folder of the same Unity project, and within that, a folder named after the avatar, where I store the files.)
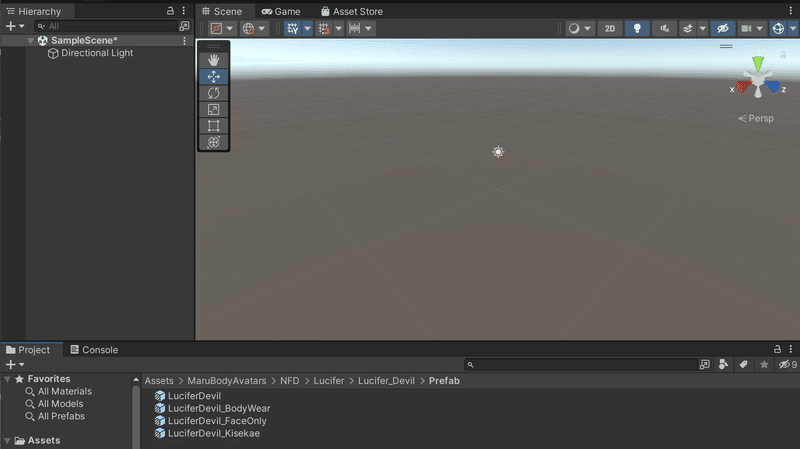
Load the VRM Avatar
Disable the original avatar Prefab by unchecking the box next to its name in the Inspector. Drag and drop the newly exported VRM avatar into the Hierarchy. Name it appropriately to distinguish it.

Now, the real work begins. From here on, we will:
Adjust jiggle physics
Change shaders
Register expressions
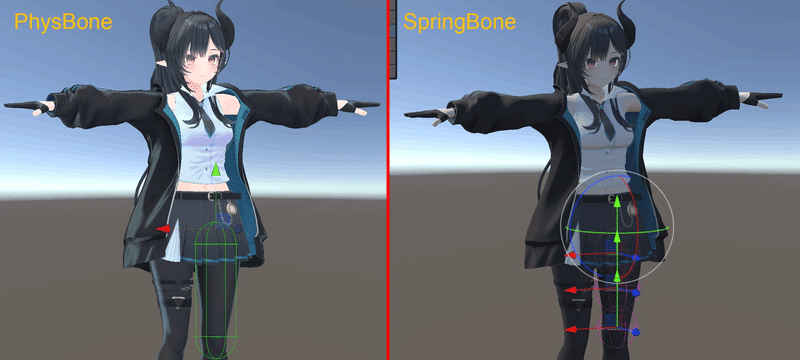
Adjust Jiggle Physics
Now, this is where it gets tricky. VRChat avatars use "Dynamic Bone" and "Phys Bone" systems to make hair, skirts, etc., flutter, but these are not supported in the VRM format.
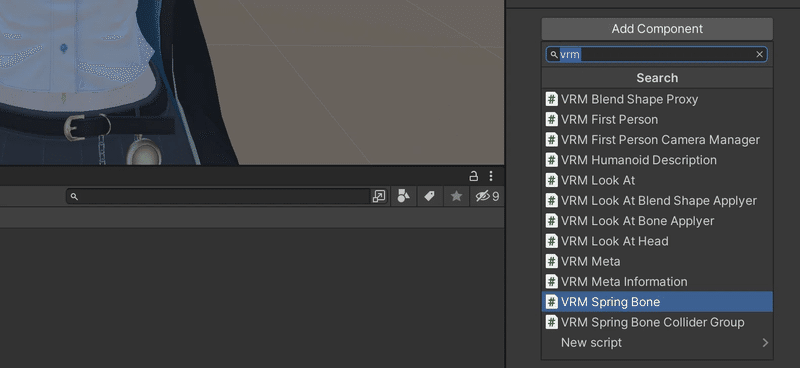
Therefore, we will use the "Spring Bone" component, which is compatible with the VRM format, to recreate this effect. This Spring Bone component is found within the "secondary" section of the VRM avatar object.

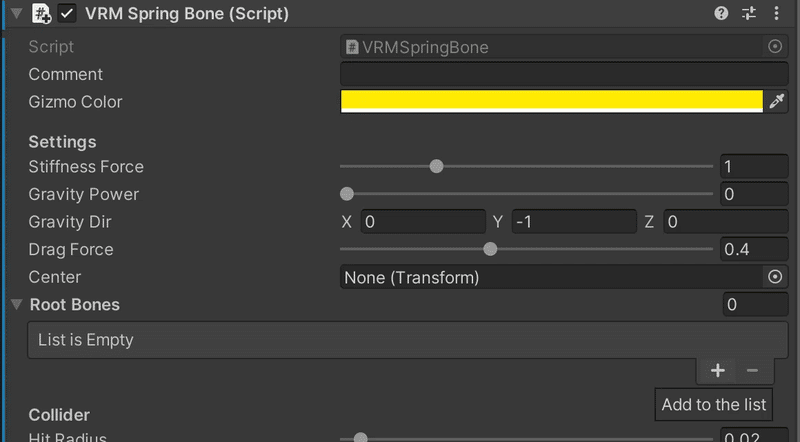
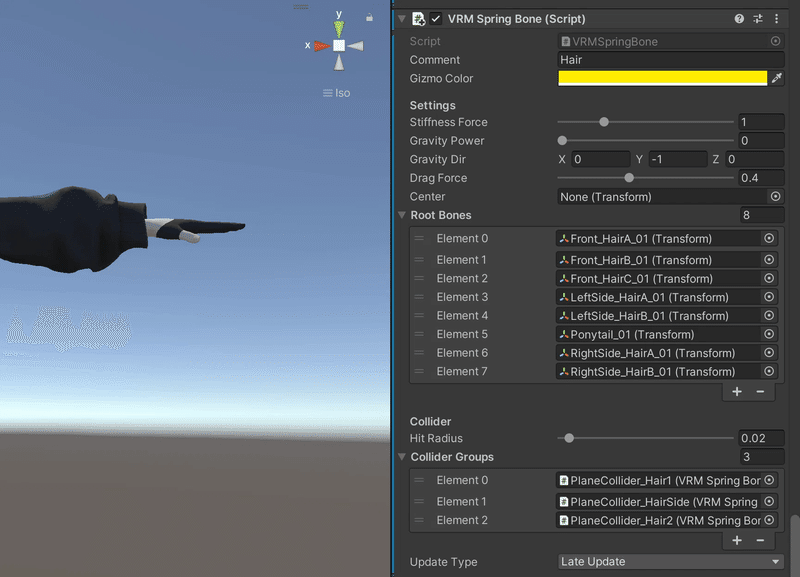
Click on the "secondary" object and, in the Inspector on the right, add the "VRM Spring Bone" component by clicking "Add Component."
Within this component, you will:
Specify the root of the bones to be affected (Root).
Set the strength of the spring (Stiffness Force), the strength of gravity (Gravity Power), the direction of gravity (Gravity Dir), and the resistance (Drag Force).
Set the colliders that the jiggle physics will interact with.
Note: You don't need to add a "VRM Spring Bone" component for each root bone. Group bones with the same body part, jiggle behavior, and colliders together under one component.
Finding the Root Bones
There are several methods to find the root bones:
1) In a project with the VRC SDK3 Avatar installed, open the Armature of the avatar and look for objects with Phys Bone attached. Note: Since the VRC SDK cannot be downloaded standalone anymore, you need to create a project and import the avatar using the "VRChat Creator Companion."
If the above method is cumbersome, try:
2) Look for bones in the Armature with names that are not defined in the Humanoid format (e.g., Hair, Skirt, Chain—names that suggest they might jiggle).
3) Look for objects typically set up for jiggle physics (e.g., Breast).
4) Look for objects named with xxxx_Root or similar.
These methods might not cover everything! You'll need to process and test the movements, and adjust as needed if something feels off. Alternatively, executing "Export VRM file from VRChat avatar" from the VRM0 menu can bring in all jiggle objects, which can also be used as a reference.
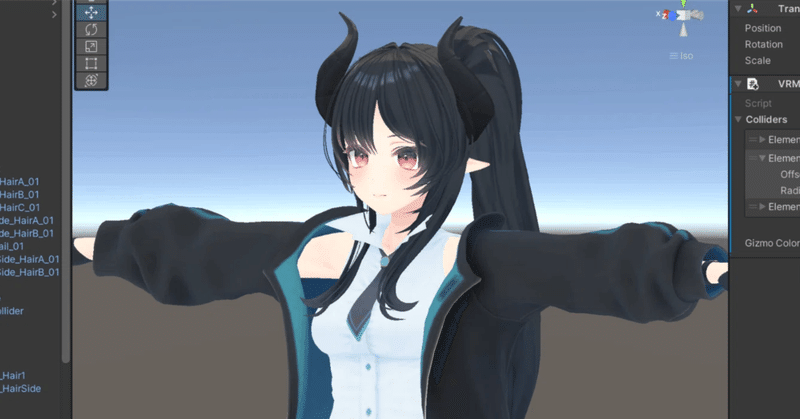
Expand the Armature and add all suspicious bones in groups to the Spring Bone component elements. For this guide, I added the following bones from the Lucifer model to the Root Bone elements of the Spring Bone:
Belt_01
Chain_01
Skirt_Root
Breast_L
Breast_R
Front_Hair*_01 (3 in total)
LeftSide_Hair*_01 (2 in total)
Ponytail_01
RightSide_Hair*_01 (2 in total)
Tie_01
For example, for hair, the component would look like this (we will adjust the jiggle parameters later!).


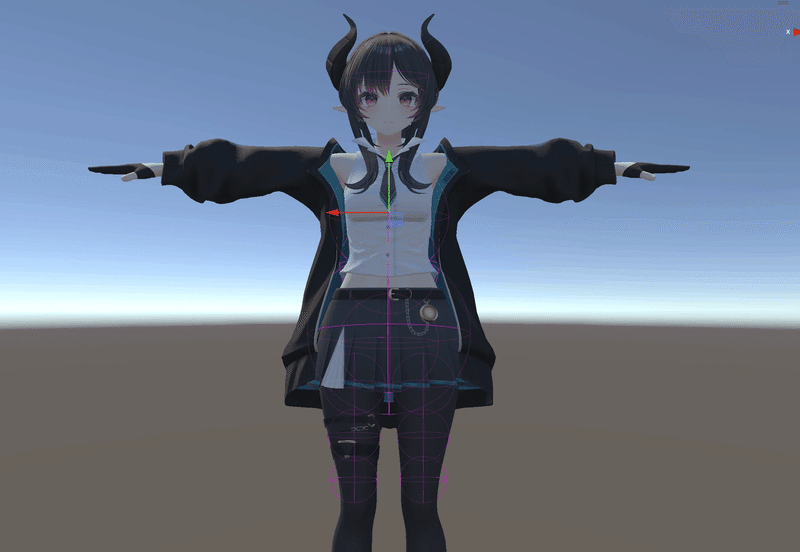
Setting Up Colliders
Next, we will set up the colliders that the jiggle elements will collide with.
To find the colliders, expand the Armature and look for objects named something like "xxxxCollider" directly under the Humanoid bones. Additionally, inspect each object within the Armature of the pre-VRM conversion avatar to see if it has VRChat-specific scripts (like VRC Phys Bone Collider) attached. These will be the targets for collider settings.
Select the object to which you want to add a collider. In the Inspector, click "Add Component" and add "VRM Spring Bone Collider Group."

For the Lucifer model, I will set the colliders as follows:
Head_Collider: Prevents front hair from clipping into the head
PlaneCollider_Hair1: Prevents ponytail from clipping into the back
PlaneCollider_HairSide: Prevents side hair from clipping into the chest
PlaneCollider_Hair2: Prevents the end of the ponytail from clipping into the waist
Belt_Collider: Prevents the end of the belt from clipping into the waist
Hips: Prevents the skirt from clipping into the navel
Upper_Leg_L: Prevents the skirt from clipping into the left thigh
Upper_Leg_R: Prevents the skirt from clipping into the right thigh
One issue to note is that VRChat's Phys Bone Colliders offer three shapes: Sphere, Capsule, and Plane. In contrast, Spring Bone only supports spherical colliders.
Since you cannot create identical shapes, you will need to approximate by placing similar colliders.
It's recommended to add new colliders in addition to the original ones. If there are gaps between spherical colliders, clipping may occur, so add colliders as needed.
Reopen "secondary" and set up the collider groups for each Spring Bone component.
Belt_01: Belt_Collider
Skirt_Root: Hips, Upper_Leg_L, Upper_Leg_R
Hair elements: PlaneCollider_Hair1, PlaneCollider_HairSide, PlaneCollider_Hair2
Once this is done, press the play button in Unity to enter play mode. Switch to the "Scene" tab, and move or rotate the Armature objects in the Hierarchy to check for any "floating" or "clipping" issues, and make adjustments accordingly.
For example:

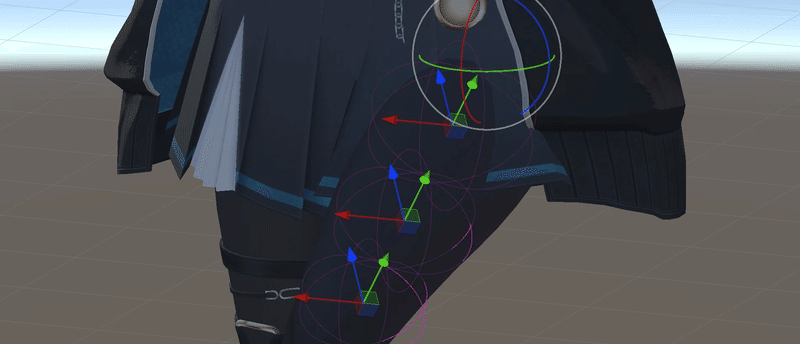
Addressing "Floating" Issues:
Make the collider smaller
Increase the distance between the collider and the jiggle object
Decrease the "Hit Radius" value in the Spring Bone component
Addressing "Clipping" Issues:
Make the collider larger
Increase the number of colliders to fill gaps
Reduce the distance between the collider and the jiggle object
Increase the "Hit Radius" value in the Spring Bone component
When making adjustments, it's best to change values in play mode to test them, and then transfer the optimal values.

Adjusting Jiggle Parameters
Based on the original avatar's jiggle behavior, I set the parameters for the jiggle elements as follows. The movements are slightly more rigid than the original to ensure the colliders function properly. The chest has a slightly soft jiggle to maintain a gentle effect. Parameters not listed use the default values when the component is added.
Hair
Stiffness Force: 2
Gravity Power: 0.04
Drag Force: 0.6
Skirt
Stiffness Force: 2
Gravity Power: 0.03
Drag Force: 0.6
Hit Radius: 0.02
Chest
Stiffness Force: 1
Gravity Power: 0
Drag Force: 0.14
Additional Note: Using Tools for Setup
For those who find it difficult to set up Spring Bones and colliders individually, there are tools available that can perform these conversions in bulk.
I will report more details after using the tool myself!
Changing Shaders and Adjusting Colors
With this, we've completed about half of the work. Let's keep going for the remaining half!
Next, we'll change the shaders. VRChat avatars often use the lilToon or poiyomi shader, but unfortunately, it is not supported in the VRM format.
Therefore, we need to change it to the MToon shader, which is compatible with VRM. Since the color rendering is different, we need to adjust the parameters to match the original as closely as possible.
First, change the shaders from the material components specified for objects other than the avatar's Armature.

After making the changes, you'll notice that the colors are different from when using lilToon. The overall appearance is whiter and more pinkish.
This is due to the default settings of MToon, where the shadow color is light pink.
We will need to adjust these.

For the Lucifer model, I made the following adjustments:
Skin Shade Color: FFFFFF
Clothes Shade Color: DAE9FF
Hair Shade Color: 8FA2BE
Jacket Rim Color: R3:G6:B10
Clothes and Tights Rim Color: R0:G3:B14
As a result, it looks like this (the one on the far right shows the adjusted MToon shader colors).

Setting Up Expressions
Yes, just a little more to go. Let's keep it up!
The avatar has been converted to VRM, but the expressions are not yet configured. Currently, pressing the emotes provided by cluster will result in a motionless expression.
So, let's set up the expressions.
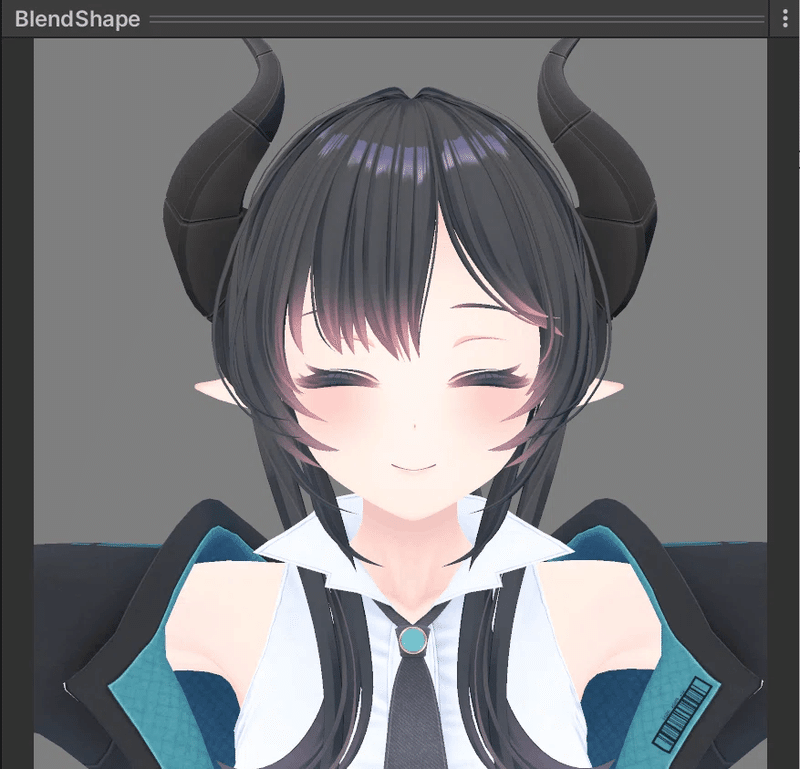
In the VRM-converted avatar assets, there's a folder named "(Avatar Name).BlendShapes."

By selecting "BlendShape" in that folder, you can configure the settings in the Inspector.

Cluster supports the following expressions:
Neutral
Joy
Angry
Sorrow
Fun
Surprised
The "Surprised" expression is missing from the initial settings, so we need to add it manually. Click "Create BlendShapeClip" at the top of the screen to create a new expression.
Save it as "Surprised.asset."

Then, assign expressions to all the displayed expressions in this screen. In addition to the above, there are also the following (details :Japaniese):
A, I, U, E, O: Correspond to the lip-syncing sounds of "a, i, u, e, o."
Blink: Blinking action.
Blink_L, Blink_R: Action of blinking one eye.
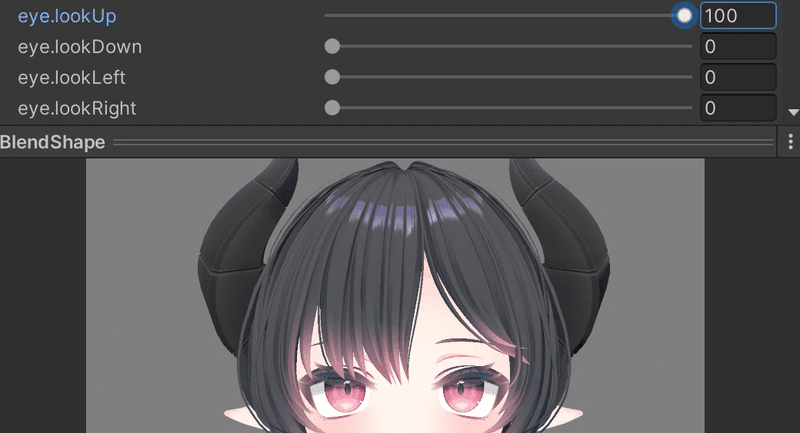
LookUp, LookDown, LookLeft, LookRight: Used for models with eye movement controlled by morphs.
Setting Up BlendShapes
Let's go through this step by step.
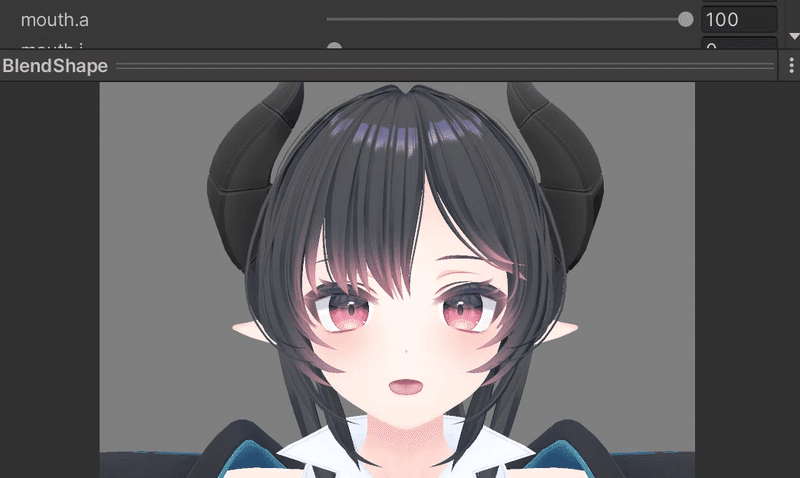
First, we'll set up A, I, U, E, O. This involves configuring the shape of the mouth.
In the Inspector, under the "BlendShape" tab, click the triangle next to "Body" to expand it. Look for the blendshape names related to the mouth, likely corresponding to the "A" sound. (The names may vary depending on the model.)

Move the slider of the relevant item all the way to the right (100%). There's a hidden preview section below, so drag the window divider up to enlarge it and verify the expression. Repeat this process for I, U, E, and O.
Next, let's set up Blink. Blink only involves the shape of the eyes.
In the "BlendShape" tab, click the triangle next to "Body" to expand it and find the blendshape names related to Blink. (The names may vary depending on the model.)

Just like before, move the slider of the relevant item to 100%. Do the same for Blink_L and Blink_R.
Next, we'll set up LookUp, LookDown, LookLeft, and LookRight, using the same method as before.
Now, onto the expressions. Expressions are composed of multiple parts: eyes, mouth, eyebrows, and others. Some blendshape names clearly indicate their function, like eye_joy and mouth_joy, while others may not match the expression names exactly.
You can double-click the parameter file set in the Expression section of the avatar Prefab's Inspector to expand it, and then click each expression icon under the Facial category to confirm its function.
However, feel free to be creative and register any expressions you like!


Example Expression Parameters
I set up the expressions based on the original model as follows.
・Joy
- eye.smile … 100
- mouth.smile4 … 100
- brow.b_tare … 35

・Sorrow
- eye.open … 100
- eye.highlight_big … 100
- eye.cry … 100
- mouth.triangle … 100
- brow.b_sad … 100
- other.tears1 … 100

・Fun
- eye.smile_right … 100
- eye.open_left … 100
- eye.shiitake … 100
- mouth.smile3 … 100
- mouth.upperteeth_up … 100
- brow.fun … 100

・Angry
- eye.angry … 100
- eye.highlight_x1 … 100
- eye.eye_small … 25
- mouth.anger1 … 60
- brow.b_anger … 100

・Surprised (← Be sure to register the Blend Shape Name exactly as this spelling!)
- eye.eyelashes_up … 100
- eye.lowereyelashes_down … 100
- eye.open … 100
- eye.eyes_small … 40
- mouth.surprise … 100
- brow.trouble … 100
- brow.b_tare … 100
For more details, please refer to this(Japanese) as well.
Optimizing Avatar File Size
VRChat avatars are designed with high-resolution textures for potential modifications. When I exported the current VRM data, it was 124MB.
Large data sizes can cause upload failures to cluster, so we need to reduce the file size as much as possible. Additionally, cluster automatically applies low-quality adjustments if the file size exceeds a certain limit.
おそらく現状の最高設定で圧縮かからない最大のアバターテクスチャ
— W@(㍗)⏸ (@what_wat_) January 5, 2022
2048*2048 2枚
1024*1024 2枚
512*512 10枚
(ノーマルマップ含む) #clusterhttps://t.co/9vhjYGNz2m pic.twitter.com/vHWagRlLQC
Keep this in mind while adjusting.
Open the model's textures from the Assets.

The default settings are as follows.

Currently, there are seven textures. We will resize all of them to 512x512 pixels and apply compression.
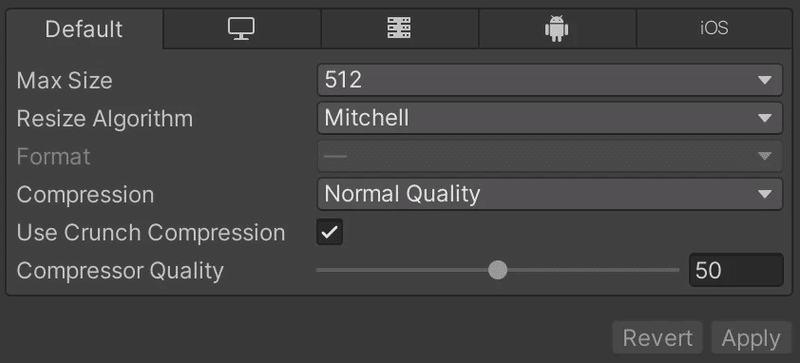
Select all the textures, change their settings as shown above, and click the "Apply" button.
This reduces the size to 58MB. It's still not lightweight, so further optimization may be necessary, but that will be covered in another article.
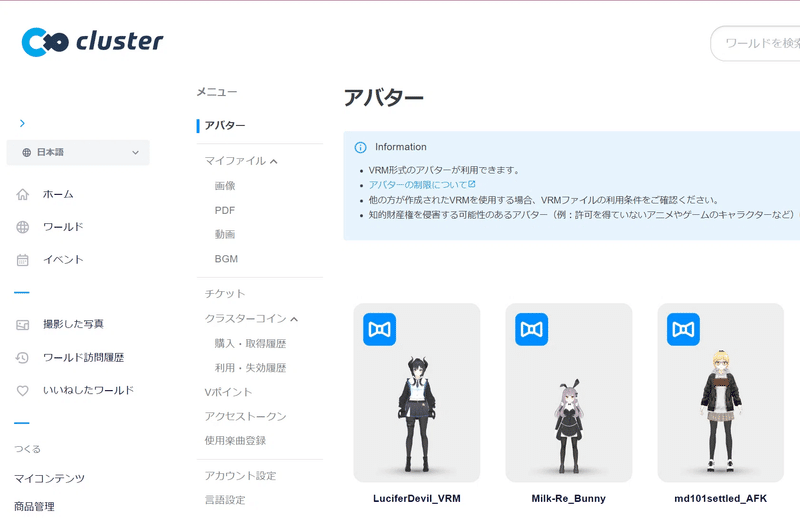
Exporting and Testing the Avatar
Once you've completed the steps so far, upload the avatar to cluster, run it, and check the behavior of the jiggle physics, colors, and expressions to ensure everything is correctly set.
When you actually use it, you'll notice various things. Adjusting the jiggle physics and colliders requires patience and repeated tweaking.

In the future, I plan to write another article on "Optimizing Avatar File Size" that will also cover fixing the issues mentioned above.
That's it for tips on converting a VRChat avatar to VRM and making it usable in cluster! Thank you for sticking with me through this long explanation.
もしサポートをいただけましたら、制作活動を行う際のソフトウェア、アセットの購入資金に充てたいと思います!