【Java入門】JavaFXを使って物体を動かす【FXML&CSS】

今回はJavaFXを使って物体を動かし、おまけでランダムで色を表示するプログラムを作成した。その作成方法を、今回紹介する。
前準備編
今回はJavaFXの導入等は終わらせている前提で進めていくため、要望があれば別途作成することにする所存である。
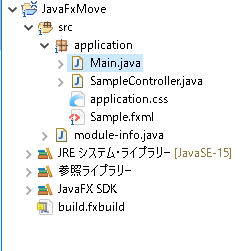
さて、まずはファイル構成を公開させて頂こう。今回はJavaファイルのほかに、FXMLとCSSのファイルも作成する。
また、実行の構成を開き、
Javaアプリケーション->Main->引数
を開き、VM引数の欄に以下を記載する。
--module-path="C:\Program Files\java\javafx-sdk-11.0.2\lib"

--add-modules=javafx.controls,javafx.fxml
これで前準備は完了した為、次の段階に移らせていただく。
実装編
以下が今回実装したファイルの内容である。
Main.java
package application;

import javafx.application.Application;
import javafx.fxml.FXMLLoader;
import javafx.scene.Scene;
import javafx.scene.layout.AnchorPane;
import javafx.stage.Stage;


public class Main extends Application {
	@Override
	public void start(Stage primaryStage) {
		try {
			primaryStage.setTitle("JavaFxで物体を動かす");
			AnchorPane root = (AnchorPane)FXMLLoader.load(getClass().getResource("Sample.fxml"));
			Scene scene = new Scene(root,600,600);
			scene.getStylesheets().add(getClass().getResource("application.css").toExternalForm());
			primaryStage.setScene(scene);
			primaryStage.show();
		} catch(Exception e) {
			e.printStackTrace();
		}

	}

	public static void main(String[] args) {
		launch(args);
	}
}
SampleController.java
package application;

import java.util.Random;

import javafx.event.ActionEvent;
import javafx.fxml.FXML;
import javafx.scene.control.Button;
import javafx.scene.paint.Paint;
import javafx.scene.shape.Rectangle;

public class SampleController {

   @FXML
   private Button startButton;

   @FXML
   private Rectangle enemyRect;

   @FXML
   private Button stopButton;

   @FXML
   private Button changeButton;

	int i=0;
   boolean cont;

   @FXML
   void start(ActionEvent e) {
   	System.out.println("startが呼ばれた");
   	cont= true;
   	Runnable r = new Runnable(){
   		public void run(){
   			while(cont == true){
   				try{Thread.sleep(300);}catch( Exception e ){}
   				enemyRect.setX(enemyRect.getX()+15);
   			}
   		}
   	};
   	new Thread(r).start();
   }

   @FXML
   void stop(ActionEvent e) {
   	System.out.println("stopが呼ばれた");
   	cont = false;
   }

   @FXML
   void change(ActionEvent e) {
   	String[] c = { "red","blue","green","yellow","black","white"};
   	Random r = new Random();
   	String color = c[r.nextInt(c.length+1)];
       enemyRect.setFill(Paint.valueOf(color));
   }
}
application.css
.root{
-fx-background-color: pink;
} #startButton {
-fx-text-fill: red;
-fx-font-size: 17;
} #stopButton {
-fx-text-fill: blue;
-fx-font-size: 17;
} #changeButton {
-fx-font-size: 17;
} #enemyRect {
-fx-fill: cyan;
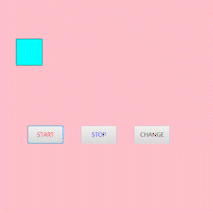
}Sample.fxml
<?xml version="1.0" encoding="UTF-8"?>

<?import javafx.scene.control.Button?>
<?import javafx.scene.layout.AnchorPane?>
<?import javafx.scene.layout.Pane?>
<?import javafx.scene.shape.Rectangle?>

<AnchorPane xmlns:fx="http://javafx.com/fxml/1" xmlns="http://javafx.com/javafx/17" fx:controller="application.SampleController">
  <children>
     <Pane layoutX="-22.0" layoutY="-7.0" prefHeight="553.0" prefWidth="584.0">
        <children>
           <Rectangle fx:id="enemyRect" arcHeight="5.0" arcWidth="5.0" fill="#bf1111" height="76.0" layoutX="67.0" layoutY="116.0" stroke="BLACK" strokeType="INSIDE" width="75.0" />
           <Button fx:id="startButton" layoutX="100.0" layoutY="361.0" mnemonicParsing="false" onAction="#start" prefHeight="50.0" prefWidth="100.0" text="START" />
           <Button fx:id="stopButton" layoutX="250.0" layoutY="361.0" mnemonicParsing="false" onAction="#stop" prefHeight="50.0" prefWidth="100.0" text="STOP" />
           <Button fx:id="changeButton" layoutX="400.0" layoutY="361.0" mnemonicParsing="false" onAction="#change" prefHeight="50.0" prefWidth="100.0" text="CHANGE" />
        </children>
     </Pane>
  </children>
</AnchorPane>
Buttonについて少し捕捉をすると、
layoutXを変更することでボタンの横軸の位置調整ができるため、ボタンを増やす際は変更を推奨する。また、二段などにしたい場合は、layoutYを変更することで二段構成の画面を作ることが可能になる。大きさの変更はprefHeight,prefWidthで行えるため活用するといいだろう。
.cssの中身については希望があればまた別の記事に書かせていただく。
では、また次回の記事で会おう。
この記事が気に入ったらサポートをしてみませんか?