
AWSでの負荷試験を自動化するツールを作った

AWSのECS(Fargate)とgatlingを使った負荷試験を自動化できるツールを作りました。gatlingのコンテナとレポート集計なども自動的に行います。また、負荷試験を実行する以前に、負荷を掛ける側のクラスタやコンテナの準備なども簡単に構築できるようになっています。
システム構成は以下のとおり。
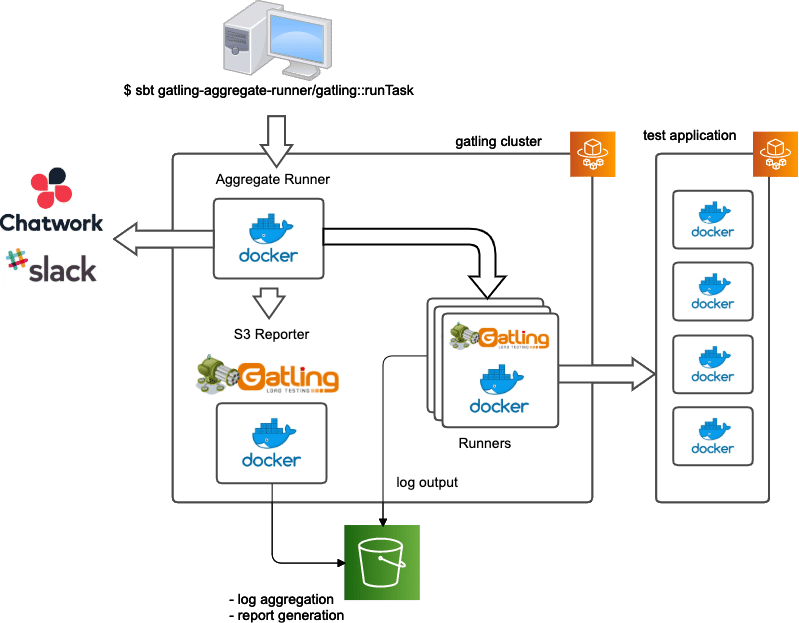
テストアプリケーションはgatlingが接続できるならなんでもOK。負荷を掛けるのはgatling-runner(以下、runner)です。ECS(Fargate)上に起動したコンテナがgatlingのシナリオを実行しS3のバケットにログを出力します。runnerコンテナはgatling-aggregate-runner(以下、aggregate-runner)が制御するので、設定でコンテナ数を指定できます。すべてのrunnerが完了したら、aggregate-runnerがgatling-s3-reporter(以下、s3-reporter)を起動し、ログ集計しレポートを出力します。s3-reporterが終了したらaggregate-runnerがChatworkやSlackに通知します。
インストール手順
インストール手順はGithubに書いてありますが、日本語で詳しく補足したいと思います。
とりあえず以下のツールをインストールしてください。
$ brew install sbt awscli jq terraformDocker for MacなどのDocker環境も忘れずにインストールしてください。
負荷を掛ける側はECS(Fargate)を利用するので、IAM userが必要になります。マネジメントコンソールで作成して、~/.aws/credentails に設定してください。
[aws-gatling-tools]
aws_access_key_id = XXXXX
aws_secret_access_key = XXXXX
region = ap-northeast-1
次は負荷試験を掛ける側のVPCやECSクラスターなどをterraformを使って構築します。以下の手順に従ってください。
$ cd terraform
terraform $ cp terraform.tfvars.default terraform.tfvars
terrafrom $ vi terrafrom.tfvars # edit
terraform $ terraform init
terraform $ terraform plan
terraform $ terraform apply
以下のterrafrom.tfvarsは適宜修正してください。
# すべてのリソースのプレフィックス
prefix = "j5ik2o-aws-gatling-tools"
owner = "j5ik2o"

# AWSアカウントID
account_id = "XXXXXX"

# VPC名(なんでもOK)
vpc_name = "j5ik2o-vpc"

# AZ,サブネット。このままでたぶんOK
aws_az = ["ap-northeast-1a", "ap-northeast-1c", "ap-northeast-1d"]
aws_subnet_public = ["10.0.0.0/24", "10.0.1.0/24", "10.0.2.0/24"]

# テスト用のアプリケーションのECSクラスター名とECR名。すでに自前のアプリケーションをお持ちなら無視してOK
api_server_ecs_cluster_name = "j5ik2o-api-server-ecs"
api_server_ecr_name = "j5ik2o-aws-gatling-tools/api-server"

# Gatlingを実行するECSクラスタ名
gatling_ecs_cluster_name = "j5ik2o-aws-gatling-tools-ecs"
# ECR名
gatling_runner_ecr_name = "j5ik2o-aws-gatling-tools/gatling-runner"
gatling_s3_reporter_ecr_name = "j5ik2o-aws-gatling-tools/gatling-s3-reporter"
gatling_aggregate_runner_ecr_name = "j5ik2o-aws-gatling-tools/gatling-aggregate-runner"
# S3バケット名
gatling_s3_log_bucket_name = "j5ik2o-aws-gatling-tools-logs"
Githubリポジトリはテスト用アプリケーションが含まれていますが、すでにアプリケーションがあって不要なら、terraform/main.tfの以下の部分をコメントアウトしてください。
# module "ecr_api_server" {
#   source   = "./api-server"
#   prefix   = var.prefix
#   owner    = var.owner
#   vpc_id = module.vpc.vpc_id
#   subnet_ids = module.vpc.public_subnets
#   aws_subnet_public = var.aws_subnet_public
#   api_server_ecs_cluster_name = var.api_server_ecs_cluster_name
#   api_server_ecr_name = var.api_server_ecr_name
#   aws_account_id = var.account_id
# }
テスト用アプリケーションを利用したい場合は、上記はコメントアウトせずに、terraform構築後に以下のコマンドを実行し、DockerイメージをECRにプッシュします。
$ AWS_DEFAULT_PROFILE=aws-gatling-tools sbt api-server/ecr:push続いて、runner, s3-reporter, aggregate-runnerのDockerイメージをECRにプッシュします。
# gatling-runner docker build & push
$ AWS_DEFAULT_PROFILE=aws-gatling-tools sbt gatling-runner/ecr:push

# gatling-s3-reporter docker build & push
$ cd gatling-s3-reporter && make release && cd ..

# gatling-aggregate-runner build & push
$ AWS_DEFAULT_PROFILE=aws-gatling-tools sbt gatling-aggregate-runner/ecr:push
負荷試験の実行方法
以下のコマンドを実行するだけです。
$ cp run-stress-test.sh.default run-stress-test.sh
$ vi run-stress-test.sh # edit stress-test conditions
$ sh ./run-stress-test.sh
run-stress-test.shを適宜修正します。以下の例ではBasicSimulationクラスが実行されるようになっています。独自のシナリオを実行したい場合は適宜クラスを修正してください。
export AWS_REGION=ap-northeast-1
export AWS_PROFILE=aws-gatling-tools

# gatlingのECSクラスター名
export GATLING_ECS_CLUSTER=j5ik2o-aws-gatling-tools-ecs
# gatlingを実行するサブネットID(1個)
export GATLING_SUBNET_ID=subnet-xxxxxxxxx
# S3バケット名
export GATLING_BUCKET_NAME=j5ik2o-aws-gatling-tools-logs
# 通知用WebhookURL(Slack)
export GATLING_NOTICE_SLACK_INCOMING_WEBHOOK_URL=https://hooks.slack.com/services/xxxxx

# 起動するgatlingコンテナ数
export GATLING_COUNT=10
# 1コンテナのユーザ数
export GATLING_USERS=10
# pause時間
export GATLING_PAUSE_DURATION=3s
# ramp時間
export GATLING_RAMP_DURATION=200s
# hold時間
export GATLING_HOLD_DURATION=5m
# 実行するSimulationクラス名
export GATLING_SIMULATION_CLASS="com.github.j5ik2o.gatling.BasicSimulation"
# エンドポイントURL
export GATLING_TARGET_ENDPOINT_BASE_URL=http://xxxx.ap-northeast-1.elb.amazonaws.com

sbt gatling-aggregate-runner/gatling::runTask
負荷試験自体の制御は完全にECS上で行うのでコマンド発行後は手元の端末は閉じてOKです。負荷試験完了後にチャット上に以下のようにログが通知されます。最後にS3上に作成されたGatlingレポートのURLが通知されます。
Gatling Runner started:
task arns = [
https://ap-northeast-1.console.aws.amazon.com/ecs/home?region=ap-northeast-1#/clusters/j5ik2o-aws-gatling-tools-ecs/tasks/xxxxxxxxxx/details
...
https://ap-northeast-1.console.aws.amazon.com/ecs/home?region=ap-northeast-1#/clusters/j5ik2o-aws-gatling-tools-ecs/tasks/xxxxxxxxxx/details
]
runTaskCount = 10, runTaskEnvironments = Map(GATLING_S3_BUCKET_NAME -> j5ik2o-aws-gatling-tools-logs, GATLING_PAUSE_DURATION -> 3s, GATLING_TARGET_ENDPOINT_BASE_URL -> http://tf-xxxxxxxxxx-xxxxxxxx.ap-northeast-1.elb.amazonaws.com, GATLING_EXECUTION_ID -> api-server/xxxxxxxx-xxxxxxxxx, GATLING_SIMULATION_CLASS -> com.github.j5ik2o.gatling.BasicSimulation, GATLING_RAMP_DURATION -> 200s, GATLING_RESULT_DIR -> target/gatling, GATLING_HOLD_DURATION -> 5m, GATLING_USERS -> 10, AWS_REGION -> ap-northeast-1)
Gatling Runner finished: task arns = [
https://ap-northeast-1.console.aws.amazon.com/ecs/home?region=ap-northeast-1#/clusters/j5ik2o-aws-gatling-tools-ecs/tasks/xxxxxxxxxx/details
...
https://ap-northeast-1.console.aws.amazon.com/ecs/home?region=ap-northeast-1#/clusters/j5ik2o-aws-gatling-tools-ecs/tasks/xxxxxxxxxx/details
]
Gatling Reporter started: task arns = https://ap-northeast-1.console.aws.amazon.com/ecs/home?region=ap-northeast-1#/clusters/j5ik2o-aws-gatling-tools-ecs/tasks/xxxxx-xxxxx-xxxxx-xxxx-xxxxxxxxxxx/details
runTaskReporterEnvironments = Map(AWS_REGION -> ap-northeast-1, GATLING_BUCKET_NAME -> j5ik2o-aws-gatling-tools-logs, GATLING_RESULT_DIR_PATH -> api-server/xxxxxxxxxxx-xxxxxxxxxxxx)
Gatling Reporter finished: report url: https://j5ik2o-aws-gatling-tools-logs.s3.amazonaws.com/api-server/xxxxxxxxx-xxxxxxxxxxx/index.html
不明点などあればお問い合わせください。
この記事が気に入ったらサポートをしてみませんか?